Настойка IPsec VPN-туннеля между двумя сетевыми узлами (Site-to-Site) при помощи маршрутизаторов TP-Link
![]()
Дата последнего обновления: 04-26-2013 15:05:04 PM 369169
.jpg)
Для настройки IPsec VPN-туннеля между маршрутизаторами TP-Link вам необходимо совершить следующие действия:
1. Установить соединение между двумя устройствами
2. Уточнить настройки маршрутизаторов, необходимые для создания IPsec VPN-туннеля
3. Настроить параметры IPsec VPN-туннеля на yстройстве TL-ER6120 (Маршрутизатор «А»)
4. Настроить параметры IPsec VPN-туннеля на устройстве TL-R600VPN (Маршрутизатор «B»)
5. Проверить настройки IPsec SA
ПРИМЕЧАНИЕ: В данном примере мы используем устройства TL-ER6120 и TL-R600VPN. Способ настройки IPsec VPN-туннеля для устройства TL-WR842ND является таким же, как и для устройства TL-R600VPN.
Установка соединения между двумя устройствами:
Перед установкой VPN-туннеля, убедитесь, что два маршрутизатора подключены к сети интернет. После того как вы убедились, что для каждого маршрутизатора установлено активное интернет-соединение, вам необходимо проверить настройки VPN для данных устройств. Для этого следуйте инструкции ниже.
Проверьте настройки маршрутизатора, необходимые для установки IPsec VPN-туннеля
Для проверки настроек, необходимых для двух маршрутизаторов, перейдите на веб-страницу управления маршрутизатором «А».
Страница состояния маршрутизатора «А»:

Страница состояния маршрутизатора «B»:
.jpg)
Настройка параметров IPsec VPN-туннеля для устройства TL-ER6120
В пункте IKE Proposal по своему усмотрению введите наименование (Proposal Name), выберите параметры aутентификаци (Authentication), шифрования (Encryption) и DH Group. В данном примере мы вводим параметры MD5 , 3DES , DH2.
copy.jpg)
Шаг 3 : Нажмите IKE Policy , по своему усмотрению введите наименование (Policy Name), выберите режим обмена (Exchange Mode). В данном примере мы используем параметры » Основной» (Main), выбираем IP-адрес (IP Address) в качестве вида ID (ID type ).
.jpg)
Шаг 4 : В пункте IKE Proposal 1 в данном примере мы используем test 1. Введите Pre-shared Key и SA Lifetime, DPD должен быть отключен.
.jpg)
.jpg)
Шаг 6 : Нажмите IPsec в меню слева, затем нажмите IPsec Proposal. Выберите протокол защиты (Security Protocol), ESP аутентификацию (ESP Authentication) и ESP шифрование (ESP Encryption), которые вы хотите использовать для VPN-туннеля. В данном случае мы вводим параметры ESP, MD5 и 3DES.
copy.jpg)
Шаг 8 : Нажмите IPsec Policy, по вашему усмотрению введите наименование (Policy Name), режим (Mode) должен быть установлен LAN-to-LAN. Введите значение локальной подсети (Local Subnet) и удаленной подсети (Remote Subnet).
.jpg)
Шаг 9 : Выберите WAN, который вы используете, и введите удаленный шлюз (Remote Gateway). В данном примере в качестве удаленного шлюза (Remote Gateway) используется WAN IP-адрес 218.18.1.208.
Шаг 13 : В пункте PFS в данном примере мы выбираем NONE, в пункте SA Lifetime введите «28800» или значение по своему усмотрению.
copy.jpg)
.jpg)
.jpg)

Шаг 2: Введите наименование (Policy Name) по своему усмотрению, в данном примере мы используем test2. В пункте режим обмена (Exchange Mode) выберите «Основной» (Main).
.jpg)
Шаг 3 : Алгоритм аутентикации (Authentication Algorithm) и алгоритм шифрования (Encryption Algorithm) являются такими же, как и в настройках маршрутизатора «А», в данном примере мы используем MD5 и 3DES.
Шаг 5 : Введите Pre-share Key и срок SA Lifetime, убедитесь, что они совпадают с маршрутизатором «А».
Шаг 7 : Выберите IPsec в меню слева и нажмите «Добавить новый» (Add new).

Шаг 9 : Введите значения локальной подсети (Local Subnet) и удаленной подсети (Remote Subnet), затем введите значение удаленного шлюза (Remote Gateway), которым является WAN IP-адрес маршрутизатора «А» — 218.18.0.233.
copy.jpg)
Шаг 10 : В пункте режим обмена (Exchange mode) выберите IKE, в пункте протокол защиты (Security Protocol) выберите ESP.
Шаг 11 : Алгоритм аутентификации (Authentication Algorithm) и алгоритм шифрования (Encryption Algorithm) являются такими же, как и в настройках маршрутизатора «А», в данном примере мы используем MD5 и 3DES.
Шаг 13 : В пункте PFS мы выбираем NONE, в пункте Lifetime введите «28800» или значение по своему усмотрению.
[VPN] How to set up a VPN server on ASUS router –IPSec VPN
Product ASUS ZenWiFi AC (CT8), ASUS ZenWiFi AX (XT8), DSL-AX82U, GT-AC5300, GT-AX11000, GT-AX11000 Pro, GT-AXE11000, ROG Rapture GT6, ROG Rapture GT-AC2900, ROG Rapture GT-AX6000 EVA Edition, ROG Rapture GT-AXE16000, ROG STRIX GS-AX3000, ROG STRIX GS-AX5400, RT-AC3100, RT-AC5300, RT-AC86U, RT-AC88U, RT-AX53U, RT-AX55, RT-AX56U, RT-AX57, RT-AX58U, RT-AX58U V2, RT-AX59U, RT-AX68U, RT-AX82U, RT-AX82U V2, RT-AX86S, RT-AX86U, RT-AX86U Pro, RT-AX88U, RT-AX89X, RT-AX92U, RT-AXE7800, TUF-AX3000, TUF-AX3000 V2, TUF-AX4200, TUF-AX4200Q, TUF-AX5400, ZenWiFi AX Hybrid (XP4), ZenWiFi ET8, ZenWiFi Mini AX XD4, ZenWiFi Pro ET12, ZenWIFI Pro XT12, ZenWiFi XD4S, ZenWiFi XD5, ZenWiFi XD6, ZenWiFi XD6S, ZenWiFi XT9
[VPN] How to set up a VPN server on ASUS router –IPSec VPN What is a VPN? Virtual Private Network : V irtual private networks encrypt your network connection, ensuring the secure transmission of important information and preventing your information from being stolen. Allows remote consumers (VPN clients) to securely connect to VPN servers. VPN has a variety of connection methods, this article with Asus router support IPSec VPN servers to do the setup related to the introduction, and two other supported servers (PPTP VPN, OpenVPN ) settings can refer to the following related FAQ. Recommendations can be selected based on the type of VPN supported by your appliance. For PPTP VPN server settings, please refer to: [VPN] How to set up a VPN server on ASUS router – PPTP For OpenVPN server settings, please refer to: [VPN] How to set up a VPN server on ASUS router – OpenVPN The VPN servers supported by ASUS wireless routers vary by model, and it is recommended that you refer to the product user manual or the product specifications page to confirm that your router is supported. ASUS Download Center This FAQ introduces how to set up IPSec VPN Server on ASUS router 1. Some functions of VPN will be different due to firmware version. Support routers with firmware later than 3.0.0.4.388.xxxx (including), please refer to WEB GUI or ASUS Router App for the setting instructions. Support routers with firmware earlier than 3.0.0.4.388.xxxx, please refer to here for the setting instructions. 2. For information on how to upgrade the firmware, please refer to [Wireless Router] How to update the firmware of your router to the latest version via ASUS Router App 3. How to set up IPSec VPN client 4. FAQ
WebGUI – Please refer to the following steps to set up IPSec VPN Server (support routers with firmware later than 3.0.0.4.388.xxxx (including))
1. Connect your device (laptop or phone) to the router via wired or Wi-Fi connection and enter your router LAN IP or router URL http://www.asusrouter.com to the WEB GUI. 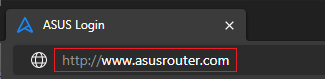 Note: Please refer to [Wireless Router] How to enter the router’s GUI to learn more. 2. Key in your router’s username and password to log in.
 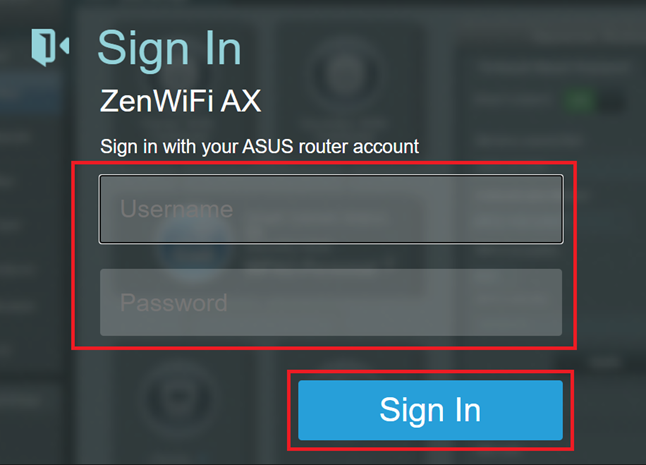 Note: If you forget the username and/or password, please restore the router to the factory default status and setup. Please refer to [Wireless Router] How to reset the router to factory default setting for how to restore the router to default status. 3. Click [VPN] > [VPN Server] > click IPSec VPN button
  to enable it (default is off) > enter customized [Pre-Shared Key]. This key is used to provide connection for IPSec VPN client.
 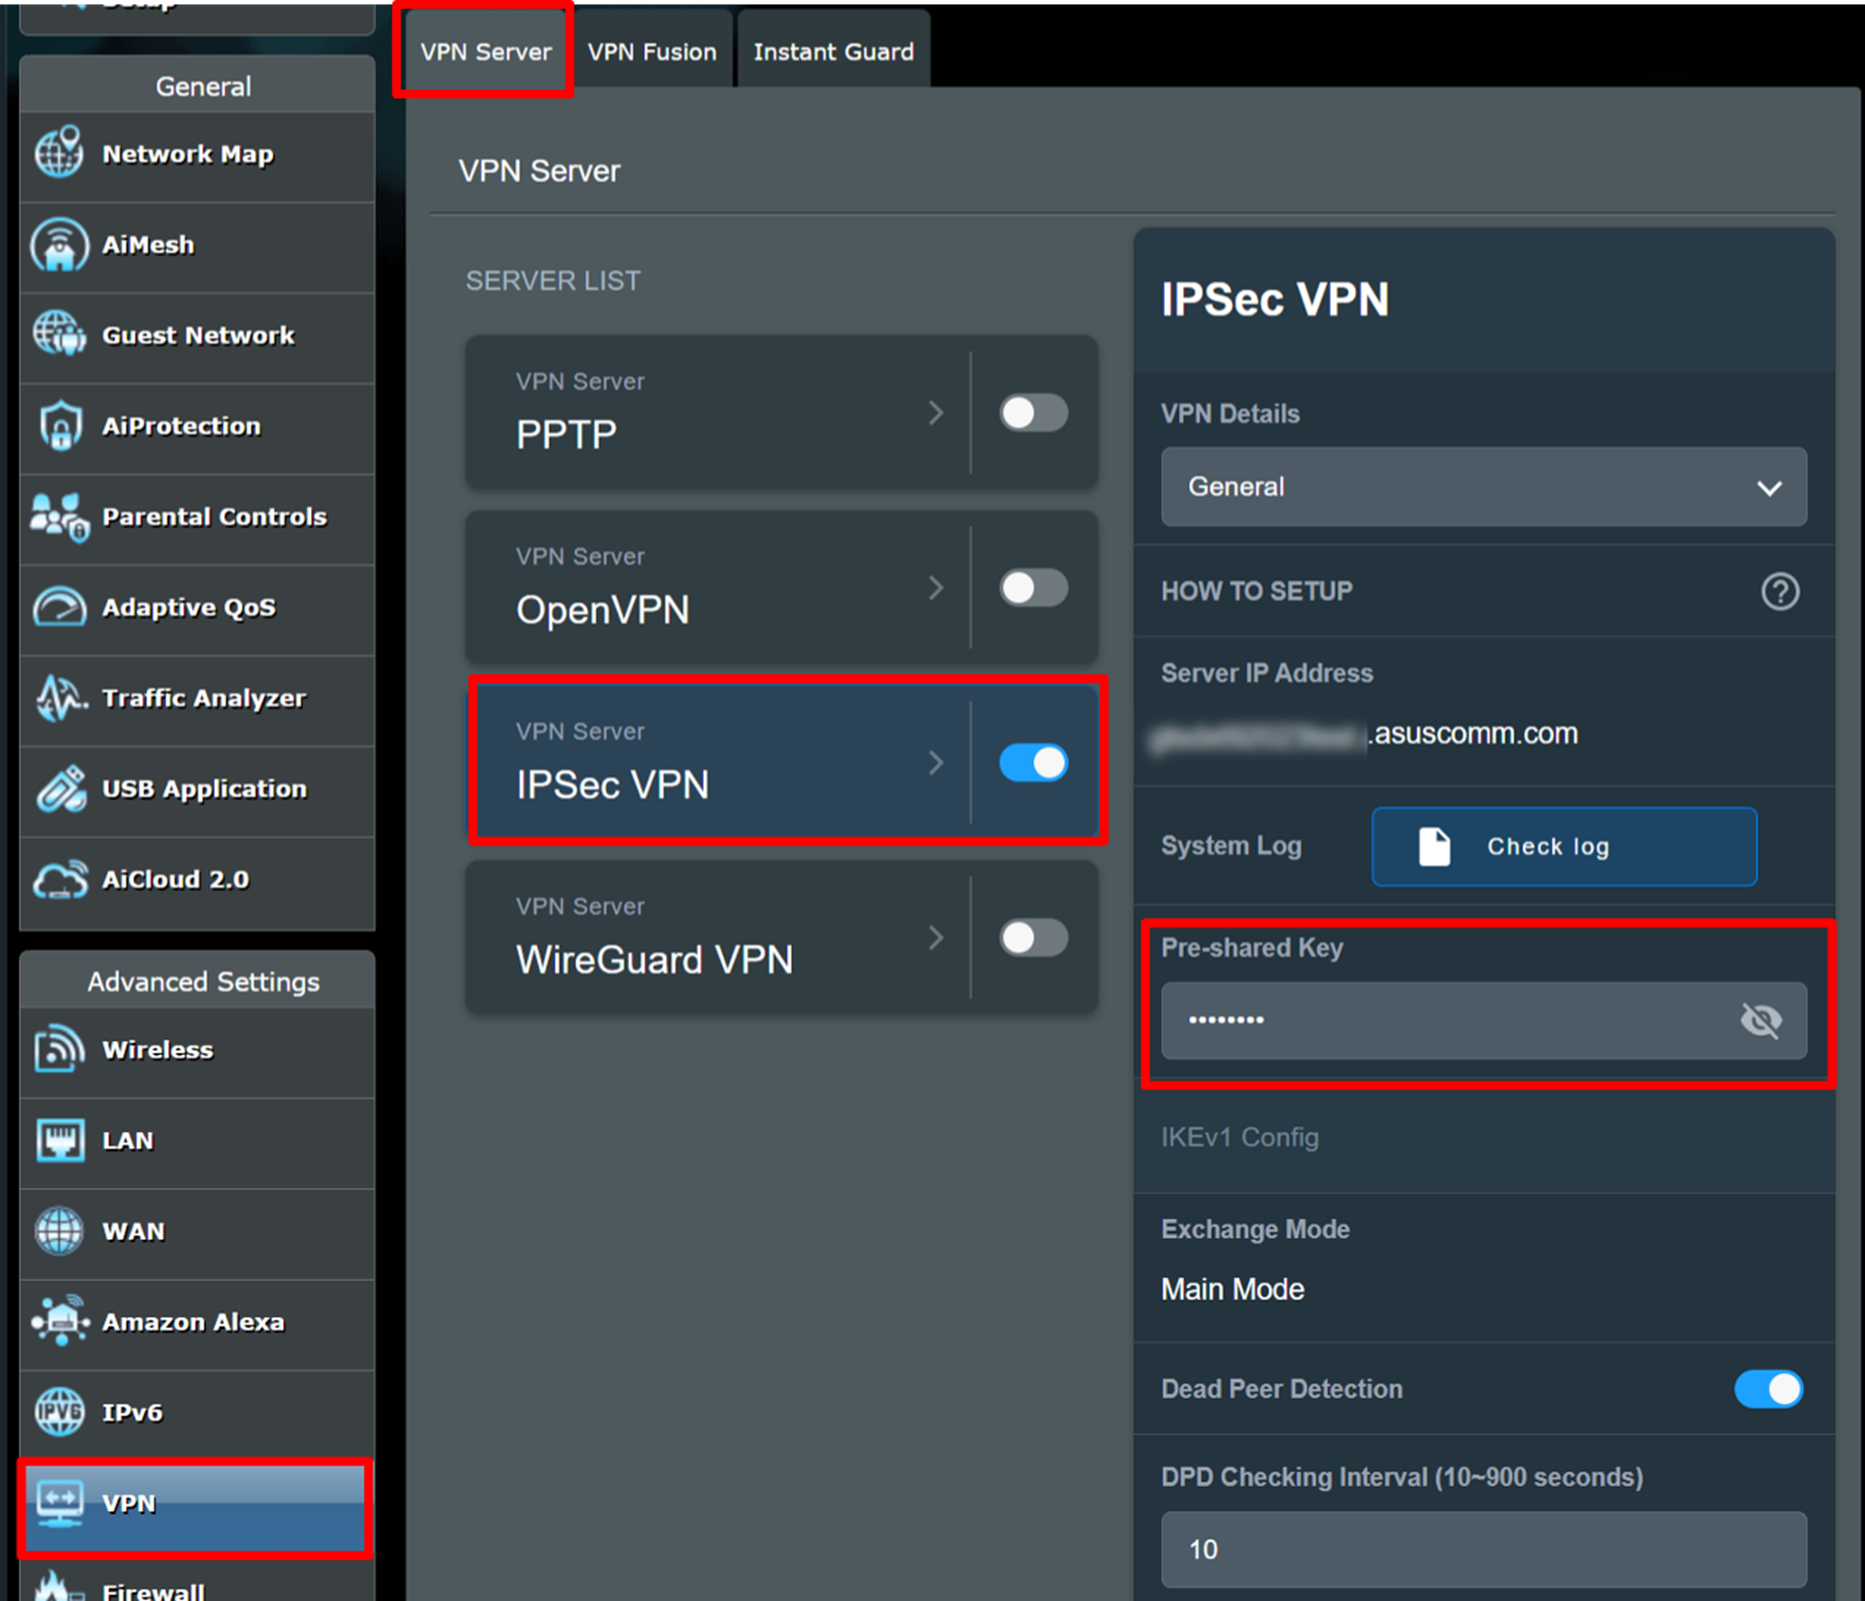 4. In the lower right corner, click『+』next to VPN Client (Max Limit: 8) to add a new account.
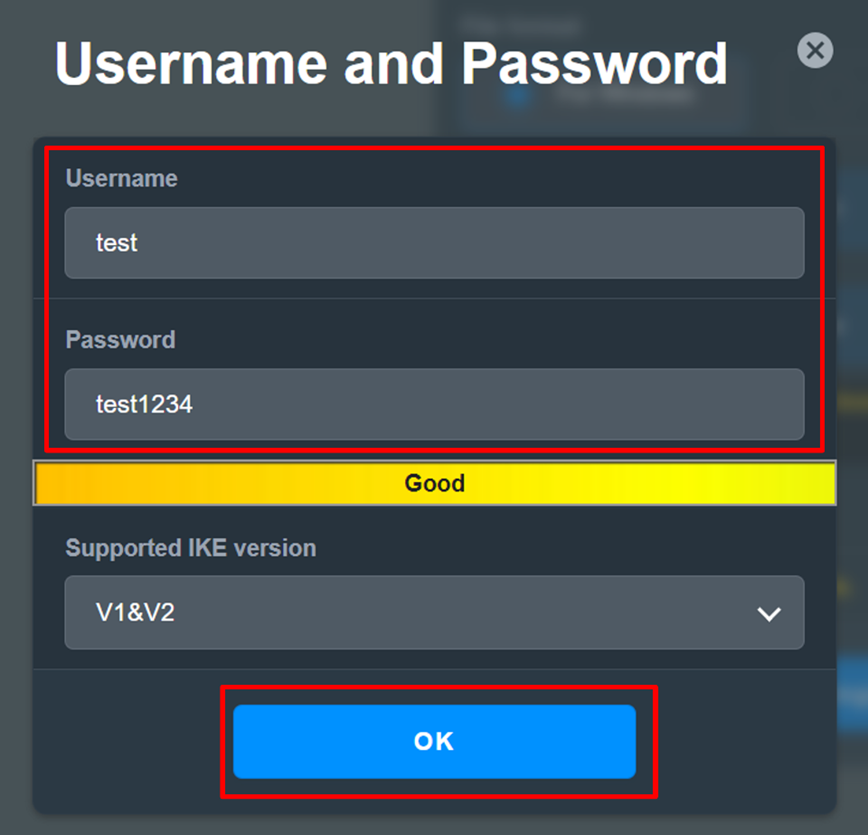
 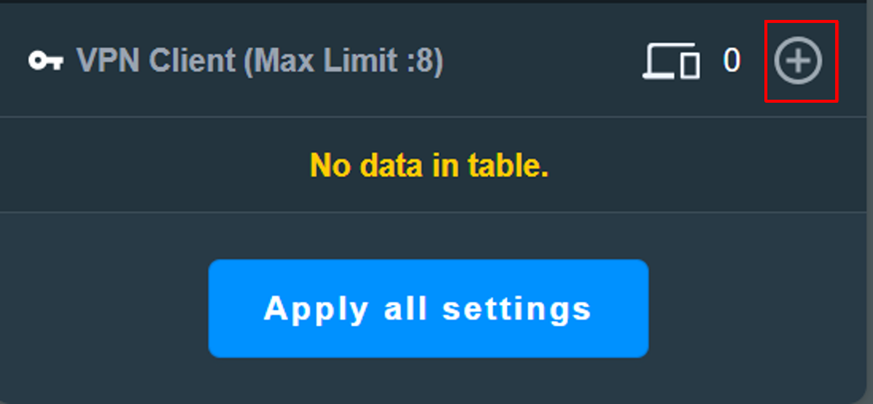 5. Enter customized [Username], [Password], and then click [OK].
Reminder: Once the [Username] and [Password] are set, they cannot be modified.
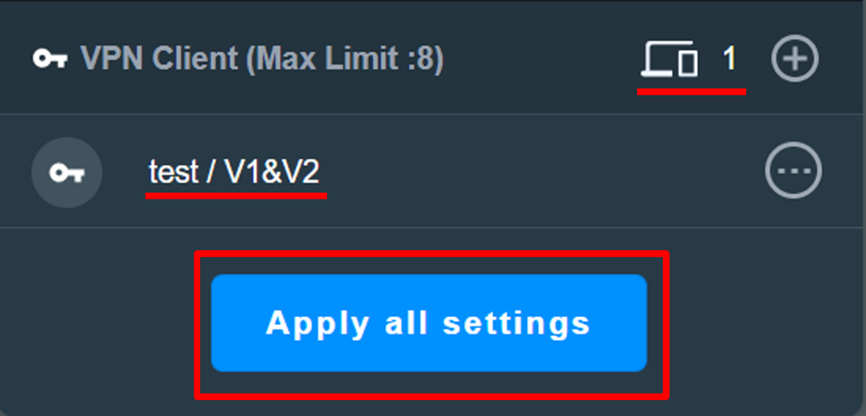
 6. In the lower right corner, the VPN client will display the number of newly added accounts, as shown in the figure below.
Last, click [Apply all settings] to finish settings.
ASUS Router APP- Please refer to the following steps to set up IPSec VPN server (support routers with firmware later than 3.0.0.4.388.xxxx (including))
1. Enter ASUS Router App and click [Settings] > [VPN] > [VPN Server] > enable [IPSec VPN] (default is off) 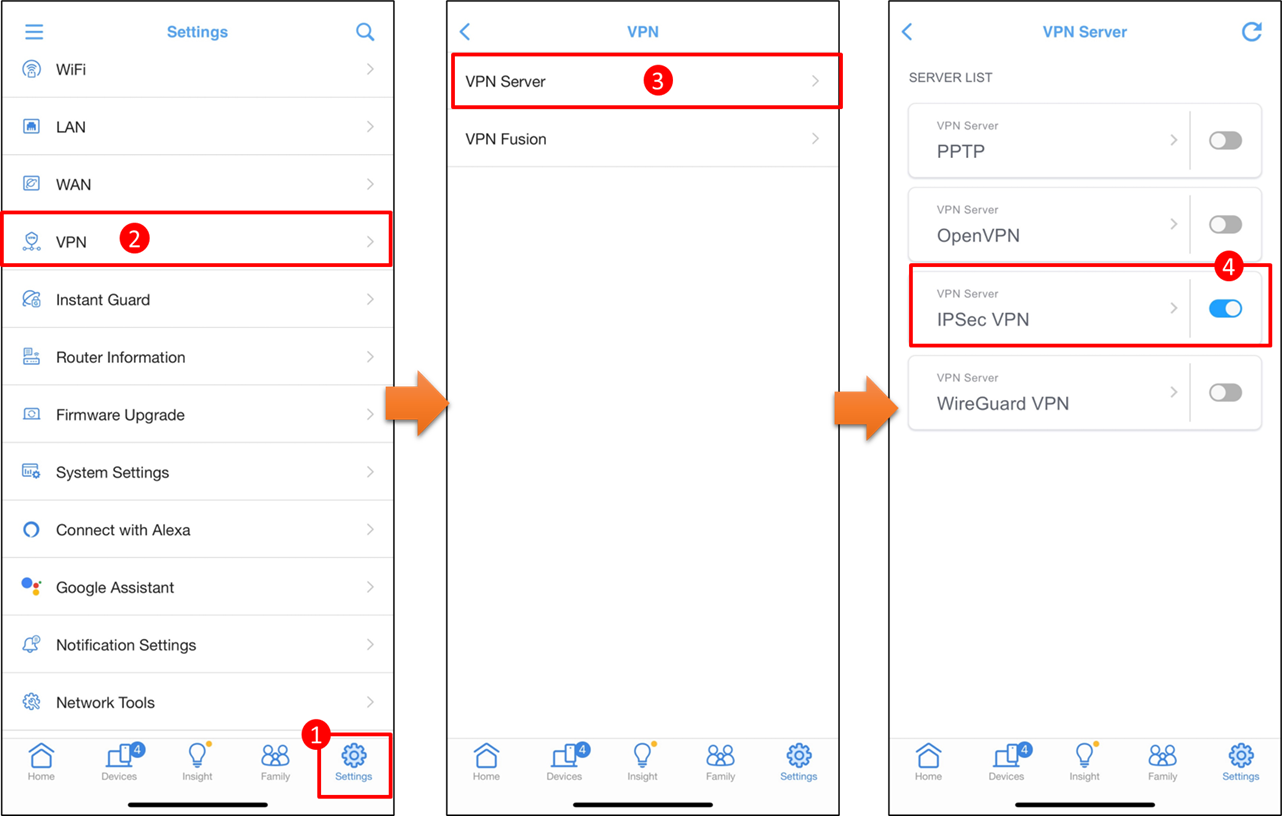 2. Enter customized [Pre-Shared Key], and this key is used to provide connection for IPSec VPN client. In the bottom, click『+』next to [VPN Client (Max Limit: 8) to add a new account. 3. Enter customized [Username], [Password], and then click [OK]. Reminder: Once the [Username] and [Password] are set, they cannot be modified. 4. The VPN client will display the number of newly added account and usernames. Last, click [Apply all settings] to finish settings.
 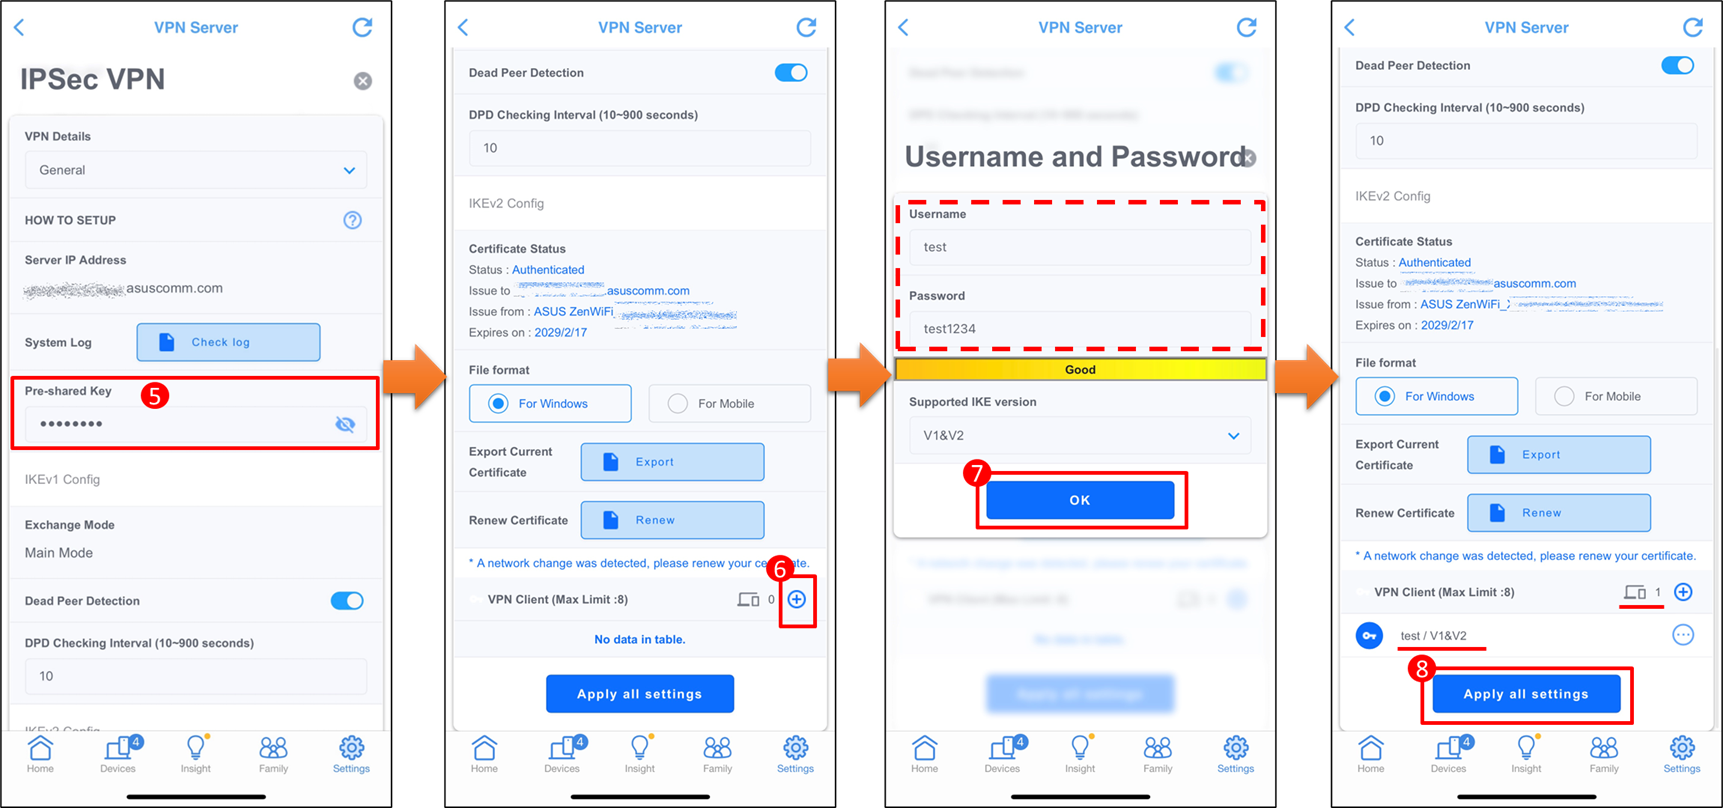 Note: If you don’t know how to enter ASUS Router App, please refer to the following FAQ: [Wireless Router] How to set up ASUS Wi-Fi router via ASUS Router App? (QIS, Quick Internet Setup) [Wireless Router]How to manage multiple ASUS routers by ASUS router app? Please refer to the following IPSec VPN Server (support routers with firmware earlier than 3.0.0.4.388.xxxx) 1. Connect your device (laptop or phone) to the router via wired or Wi-Fi connection and enter your router LAN IP or router URL http://www.asusrouter.com to the WEB GUI. Note: Please refer to [Wireless Router] How to enter the router’s GUI to learn more. 2. Key in your router’s username and password to log in. Note: If you forget the username and/or password, please restore the router to the factory default status and setup. Please refer to [Wireless Router] How to reset the router to factory default setting for how to restore the router to default status. 3. Go to [VPN] > [VPN server] tab, set Enable IPSec VPN Server as [ON]
 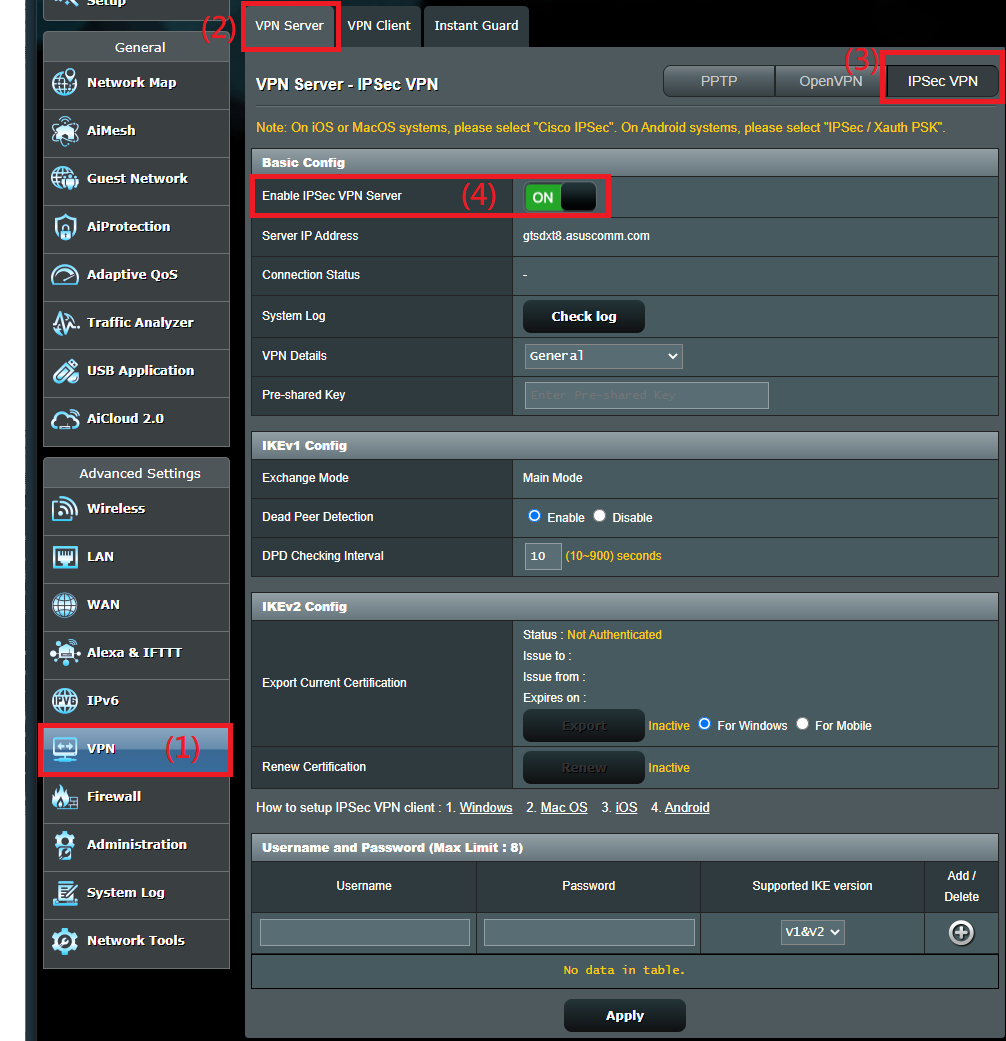 4. We suggest use default [General] settings and enter [Pre-shared Key] which can be more than 8 characters containing numbers and letters. This key is used to provide connection for IPSec VPN client to enhance security.
 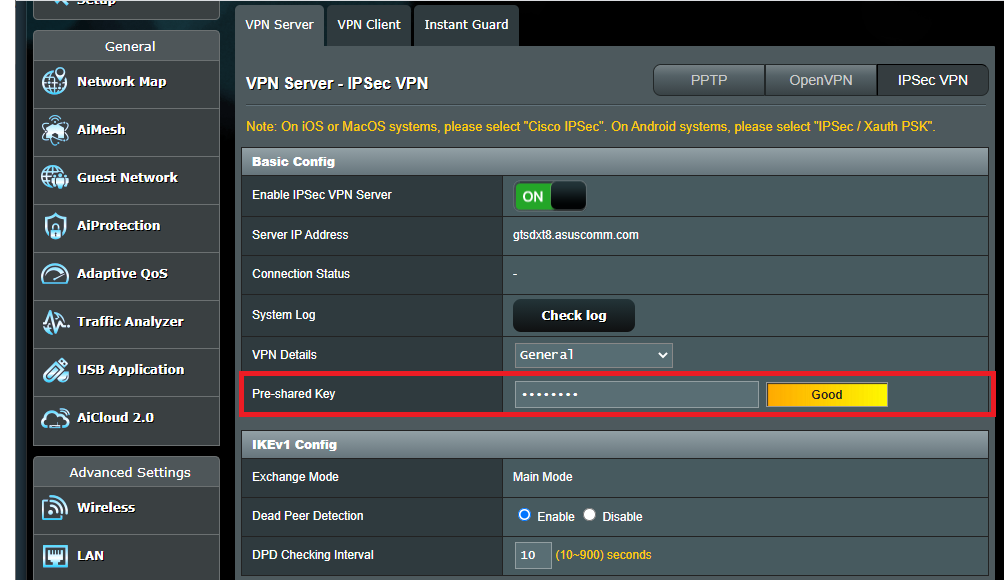 5. Enter [Username] and [Password] under [Username and Password]. You can set up 8 different usernames and passwords for your IPSec VPN clients.
 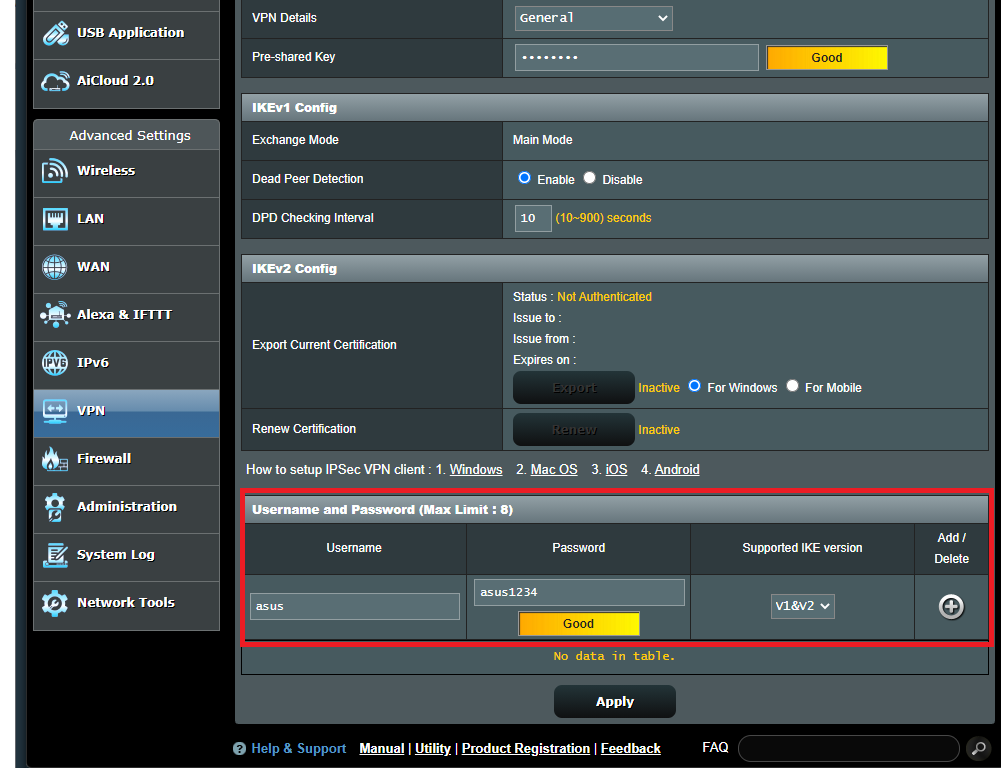 Note: Each account is only allowed for one VPN client connection. The latest connected client takes precedence, and the previously connected client will be disconnected. 6. After entering the username and password, please click
  to add the account. As the figure showed below, the password you just set up is automatically hidden. Next, click [Apply] to finish setting up IPSec VPN server.
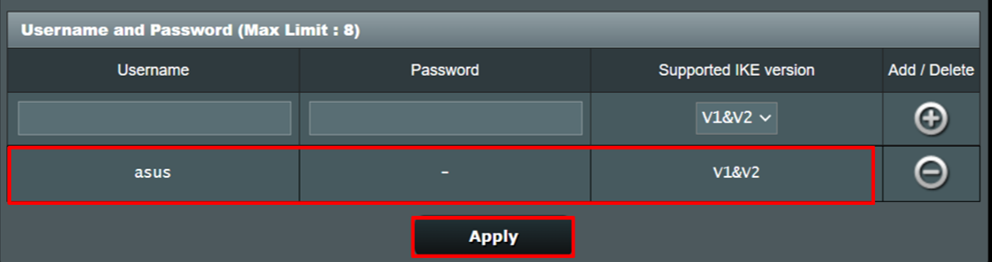
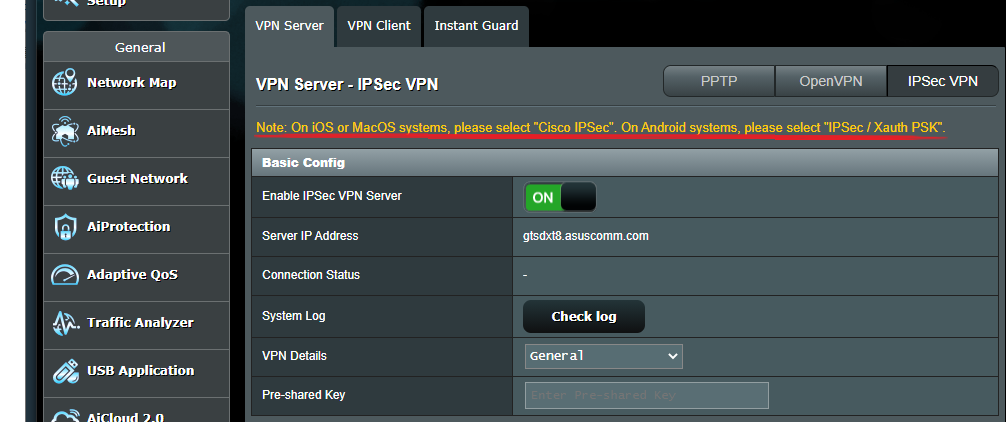
Note: If your VPN client is using iOS or MacOS systems, please select «Cisco IPSec» on your devices (such as iPhone or MacBook). If your VPN client is using Android, please select «IPSec / Xauth PSK» on your devices (such as mobile phone or tablet). 1. [VPN] How to setup IPsec VPN connection in Windows 10 (Firmware support is available for 3.0.0.4.386_4xxxx) 2. [VPN] IPSec VPN setup on Mac 3. [VPN] IPSec VPN setup on iOS 4. [VPN] IPSec VPN setup on Android
1. What should I do if VPN connection cannot be successfully established after setting up IPSec VPN server? (1) If you need to connect to IPSec VPN server from Internet (e.g. using mobile phone from company to connect to IPSec VPN server on ASUS router at home), please check if your router gets Public IP. If you are not sure if your IP is public, please check with Internet Service Provider (ISP). (2) Please check if pre-shared key, username, and password are entered correctly on your IPSec VPN client. (3) Please check if your router is updated to the latest firmware version. Please refer to [Wireless] How to update the firmware of your router to the latest versionto learn more. 2. After setting up IPSec VPN server, how many VPN clients can connect to it at the same time? In VPN Server – IPSec VPN page, you can set up 8 different usernames and passwords for your IPSec VPN clients. Each account is only allowed for one VPN client connection (when a new VPN client is connected, the previously connected client will be disconnected). For example, you originally use your mobile phone to connect to IPSec VPN server by username [test] and password [1234]. When another computer is using the same username and password to build VPN connection, VPN connection on your mobile phone will be disconnected. 3. After a few seconds or minutes of inactivity, VPN connection on devices (Windows/iOS/Android) are disconnected. When your device is idle or inactive, VPN connection may disconnect due to inactivity on the device. Currently, this setting cannot be adjusted on router. Please set it up on your devices. How to get the (Utility / Firmware)? You can download the latest drivers, software, firmware and user manuals in the ASUS Download Center. If you need more information about the ASUS Download Center, please refer to this link.