- 3 Ways to Extract and Copy Files from ISO Image in Linux
- Mount or Extract ISO File in Linux
- Extract ISO Content Using 7zip Command
- Extract ISO Content Using isoinfo Command
- How to Create an ISO File in Ubuntu 18.04 LTS
- Using Mkisofs utility
- Using dd command in Terminal to build an ISO file
- Using Brasero utility to make an ISO file
- How To Create ISO Files In Linux
- Via Archive Manager
- Via Command Line
- Conclusion
- How to Extract ISO Files With Linux
- What Is an ISO File?
- Why Create an ISO?
- Opening an ISO File
- Extracting an ISO Using GNOME Archive Manager
3 Ways to Extract and Copy Files from ISO Image in Linux
Let’s say you have a large ISO file on your Linux server and you wanted to access, extract or copy one single file from it. How do you do it? Well in Linux there are couple ways do it.
For example, you can use standard mount command to mount an ISO image in read-only mode using the loop device and then copy the files to another directory.
Mount or Extract ISO File in Linux
To do so, you must have an ISO file (I used ubuntu-16.10-server-amd64.iso ISO image) and mount point directory to mount or extract ISO files.
First create an mount point directory, where you will going to mount the image as shown:
Once directory has been created, you can easily mount ubuntu-16.10-server-amd64.iso file and verify its content by running following command.
$ sudo mount -o loop ubuntu-16.10-server-amd64.iso /mnt/iso $ ls /mnt/iso/
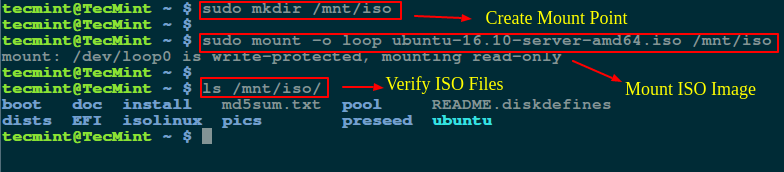
Now you can go inside the mounted directory (/mnt/iso) and access the files or copy the files to /tmp directory using cp command.
$ cd /mnt/iso $ sudo cp md5sum.txt /tmp/ $ sudo cp -r ubuntu /tmp/
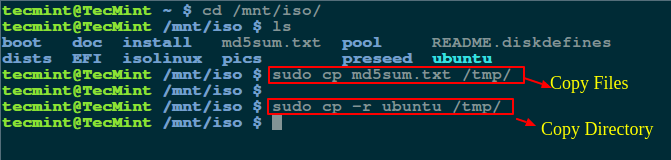
Note: The -r option used to copy directories recursively, if you want you can also monitor progress of copy command.
Extract ISO Content Using 7zip Command
If you don’t want to mount ISO file, you can simply install 7zip, is an open source archive program used to pack or unpack different number of formats including TAR, XZ, GZIP, ZIP, BZIP2, etc..
$ sudo apt-get install p7zip-full p7zip-rar [On Debian/Ubuntu systems] $ sudo yum install p7zip p7zip-plugins [On CentOS/RHEL systems]
Once 7zip program has been installed, you can use 7z command to extract ISO file contents.
$ 7z x ubuntu-16.10-server-amd64.iso

Note: As compared to Linux mount command, 7zip seems much faster and smart enough to pack or unpack any archive formats.
Extract ISO Content Using isoinfo Command
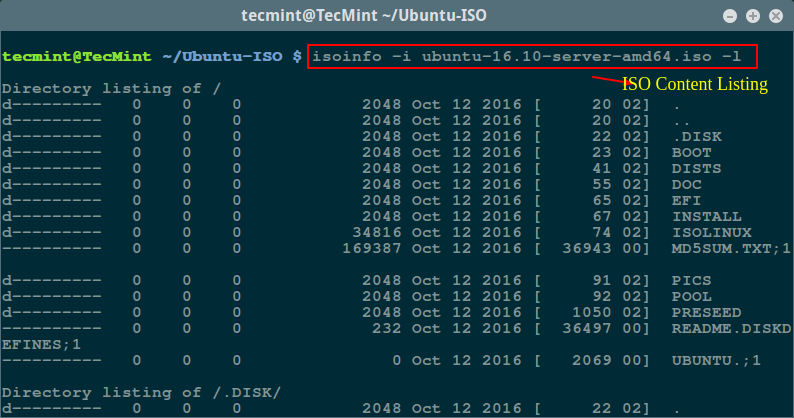
The isoinfo command is used for directory listings of iso9660 images, but you can also use this program to extract files.
As I said isoinfo program perform directory listing, so first list the content of ISO file.
$ isoinfo -i ubuntu-16.10-server-amd64.iso -l
Now you can extract a single file from an ISO image like so:
$ isoinfo -i ubuntu-16.10-server-amd64.iso -x MD5SUM.TXT > MD5SUM.TXT
Note: The redirection is needed as -x option extracts to stdout.

Well, there are many ways to do, if you know any useful command or program to extract or copy files from ISO file do share us via comment section.
How to Create an ISO File in Ubuntu 18.04 LTS

Most operating system and programs especially large one comes in an ISO format containing all required installation files. An ISO file or an ISO image is a perfect representation of all file and folders contained in a CD /DVD. Alternatively, you can say that it is a package all installation files and folder in one single file in an ISO format.
You can easily back up or archive the files and folders into an ISO file. You can make that ISO file to act it as an external drive, make bootable USBs or CD/DVD to later use for installation, save as a backup or distributing it over to someone.
- Create an installation disc by Burning to USB or CD/DVD.
- Mount as a virtual drive.
- Use for installation of OS or software programs.
In this article, I will describe some ways to create an ISO file in Ubuntu 18.04 LTS.
Using Mkisofs utility
Under Linux, you can create an ISO image from a folder using a command line argument with the Mkisofs utility. You can use Mkisofs to automatically backup the data with the option to exclude some individual files if necessary. It supports wildcards as well.
The basic syntax of the command is:
$ mkisofs -o [filename.iso] [ directory_path]
-o defines the file name of the ISO you want to create followed by the directory you want to backup or store an ISO file.
For instance, I want to create an ISO file from the directory /home/tin/Documents/backup and save it as backup.iso file:
$ mkisofs –o backup.iso /home/tin/Documents/backup

It will create the backup.iso file and save it in the current directory.
Using dd command in Terminal to build an ISO file
Basically using dd command, we can create copies of data whether they are file or folders, partitions, or CD/DVDs. We can also make use of dd command to create ISO files.
The basic syntax of dd command is:
If= Tells command from where to input the source data.
Of= Tells command where to define the output.
For instance, I will type the following command to copy and save the contents of the drive as an ISO file named diskimage.iso:
$ sudo dd if= /dev/sdb of= diskimage.iso

The ISO image named diskimage.iso will be created in the current directory.
Using Brasero utility to make an ISO file
You can use Linux disk burning utility Brasero to create an ISO file. Older versions of Ubuntu include built-in Brasero utility. However, in 16.04 and the newer version, you have to manually install this utility.
To install Brasero, press Ctrl+Alt+T to launch Terminal.
Enter the following command in Terminal:
$ sudo apt-get install brasero

Once you have done with the installation, open the application.
To open the Brasero application, Press windows key or click on dash icon in the bottom left corner of the desktop to open Dash menu.

Then search for Brasero application by typing its name in the search bar. When the application appears, click on it to open it.

In the Brasero application window, click on the Data project option.

Then click on the + icon to start adding files to the new project.

From the window that appears, select the individual files or directories then click on Add.

You will notice that files are added in the application. Click on Burn.

Choose the location to save the ISO file. Specify the name for the ISO file with .iso extension and click on Create Image.

Once finished, you will be notified that the image has been successfully created.

Hence all above were the different ways using which you can create ISO files. Once you have ISO file, you can save it as a backup, use it as virtual CD/DVD, burn it on USB or CD/DVD and share it with someone.
How To Create ISO Files In Linux

You probably know that an ISO file can be burned onto a CD/DVD or USB drive, but did you know that you can easily back up or archive your files and folders into an ISO file as well? With this ISO file you can then burn it onto a CD/DVD as a backup or simply mount it like an external drive and access the files from within.
If you want to back up the content of a disc or if you have a bunch of files and folders that you want to back up and archive, here is how you can create ISO files in Linux.
Via Archive Manager
If you are using Ubuntu (or Gnome desktop), the Archive Manager application (file-roller) allows you to easily create an ISO file.
1. Open the file manager. Select the files and folders that you want to back up. Right-click on them and select “Compress.”

2. Select “.iso” option, and click “Create.” This will compress all the selected files and folders into an ISO file.

Via Command Line
dd is a useful command that you can use to create ISO file. All you need to do is specify the source and destination, and it will do the necessary work of creating an ISO file.
The basic usage is as follow:
dd if=source of=destination
For example, if your CD-ROM drive is mounted at “/dev/hdc,” and you want to back up the content of your disc to a “my-cd-backup.iso” file, you can use the following command:
dd if=/dev/hdc of=/home/username/my-cd-backup.iso
The “source” doesn’t have to be a CD-ROM drive. It can be a hard drive partition, an external drive or a file path, though it won’t work on a folder.
Note: there is much more to dd than described above, but we won’t go into the details here.
Alternatively, you can also use the mkisofs command to create an ISO file. The advantage of mkisofs is that it gives you more options to customize how you want the ISO file to be created.
The basic usage is as follow:
mkisofs -o destination-filename source
For example, use the following command to backup your Home folder:
mkisofs -o myHomeBackup.iso /home/username
You can tell mkisofs to enable Rockridge extension by setting the -R option.
mkisofs -R -o myHomeBackup.iso /home/username
The Joliet extension is enabled by the -J flag.
mkisofs -J -o myHomeBackup.iso /home/username
You can also set a volume name (-V option) for the ISO file. (If you burn your ISO file to a CD, the volume name will be used as the CD’s name.)
mkisofs -V "Home Folder Backup" -o myHomeBackup.iso /home/username
You can also exclude certain files to add to the ISO file with the “-m” option. It supports wildcard (*), so you can use it for something like the following
mkisofs -m ".*" -o destination source
to exclude all hidden files (filename with a “.” in front) from adding to the ISO file.
Check out all the options of mkisofs with the following command:
Conclusion
While it may not be the best backup option, an ISO file can be rather useful in some instances. With the above instructions, you can now create ISO files with ease.
Damien Oh started writing tech articles since 2007 and has over 10 years of experience in the tech industry. He is proficient in Windows, Linux, Mac, Android and iOS, and worked as a part time WordPress Developer. He is currently the owner and Editor-in-Chief of Make Tech Easier.
Our latest tutorials delivered straight to your inbox
How to Extract ISO Files With Linux
How do you view an ISO disk image in Linux? Can you unpack ISOs in the terminal? Here’s everything you need to know.

Readers like you help support MUO. When you make a purchase using links on our site, we may earn an affiliate commission. Read More.
You’ve probably downloaded an image file before, and there’s a good chance it used the popular ISO file extension. These (usually quite large) files are essentially digital versions of optical media discs. All files contained on that disc are inside the ISO archive.
Like Apple macOS and newer versions of Microsoft Windows, Linux has built-in support for mounting image files. This means you don’t necessarily need third party software in order to access ISO archives and the files within.
There are in fact a couple of ways of going about this, so you can choose a method which suits you.
What Is an ISO File?

The image file format has been a popular way of distributing software online since broadband speeds allowed us to do so. If you’ve already installed a Linux distribution, chances are you did so using an ISO file. If you haven’t installed a version of Linux, looking for an ISO file to download will likely be your first step.
The ISO file format is a digital archive of the contents of an optical media disc. You can make an ISO image from any optical media format, such as CD, DVD, and Blu-ray.
There is one notable exception. You cannot use the ISO file format to create an image of an audio CD as these do not use a computer file system. In these cases, consider the BIN/CUE image combinations instead.
ISO files use the ISO 9660 file system. It is also possible for these images to use the UDF (Universal Disc Format) file system in some cases. The data within the archive is uncompressed.
Why Create an ISO?
ISO images enable you to burn your own Linux installation disc to use on your own computer or give to someone else. With Linux being free and open source software, no one’s threatening to sue you for spreading the software around.
These days, many ISO images are too large for a CD. While you can opt for a DVD, oftentimes instructions recommend a USB flash drive instead. Plus there are plenty of uses for a live CD or USB stick aside from installing Linux.
ISO files are not used exclusively for Linux. The format is a good way to create exact backups of optical discs or to distribute other types of large programs.
Opening an ISO File
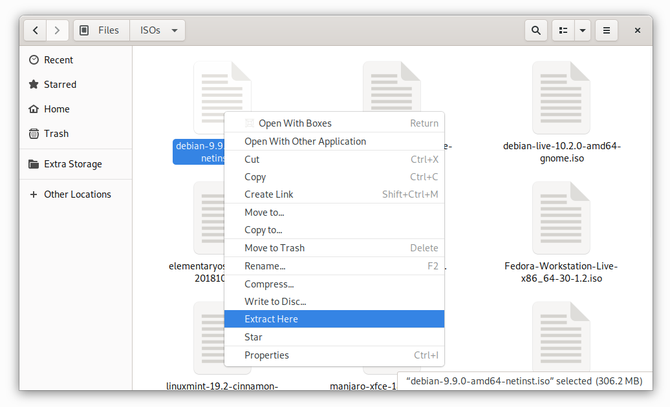
Quite frankly, this job may be a lot simpler than you think. Many distributions come with the ability to extract ISO images via the right-click menu. Find your ISO image in the file manager, right click, and look for the Extract Here option. You might just be pleasantly surprised!
If that isn’t the case, there are ISO-reading apps available either pre-installed or in your distro’s chosen app store.
Extracting an ISO Using GNOME Archive Manager

If you don’t want to extract all of the files at once, you don’t have to. Instead, open whichever program your Linux distro uses to manage compressed archives such as those in the ZIP and TAR formats. GNOME Archive Manager (also known as File Roller) is the default in many distros, including Ubuntu and Fedora, so we’ll use that as our example.
First, select Menu > Open and navigate to the ISO you wish to open (the button with three horizontal lines is the Menu button). The files and folders contained within should now appear, just like if you were opening a ZIP archive. You can now proceed to select which bits you wish to extract and where on your computer you want these files to go.