- Burn an ISO File
- Burning to CD/DVD in Linux
- Burning to a CD/DVD in Windows
- Writing to a USB Stick in Linux
- Using the Terminal
- How you can check ISO
- How create isohybrid
- Using a Burning Application
- ImageWriter
- Writing to a USB Stick in Windows
- Using Rufus
- Writing to a USB Stick on a Macintosh
- Iso образ linux manjaro
- Cборка от русскоязычного сообщества Manjaro Linux
- Сборки от международного сообщества Manjaro Linux
- Download Manjaro
Burn an ISO File
As outlined in the Download Manjaro page, an ISO is not simply a ‘drag and drop’ or ‘copy and paste’ duplication of Manjaro’s installation files. It is in fact a copy of the raw computer code that makes up the files themselves. This is why it is necessary to use a software burning application to ‘burn’ an ISO file, that is, convert its raw code into the files onto a physical medium such as a DVD or USB flashdrive / datastick in order to use it. Once burned / converted, the files on that medium can then be used to run Manjaro directly without having to install it to your system (referred to as Live-CD or Live-USB mode), and/or install Manjaro on your system. Again however, it will not be necessary to to burn an ISO if you intend on running Manjaro in a virtual machine environment using Oracle’s Virtualbox. This is because Virtualbox is able to read ISO files directly as virtual disks.
note Manjaro will not have full functionality when run in Live-CD mode. For example, you will not be able to save any changes to the system, or install updates or new applications.
Burning to CD/DVD in Linux
tip It is strongly recommended to select the slowest speed available when burning to disc in order minimise the possibility of corruption during the burning process.
Several different software burning applications — if not already installed — should be available for installation from your distribution’s Software Center / Software Manager / Package Manager / repositories. Popular burners include XFBurn, K3b, and Brasero. Which one you may choose is entirely down to personal choice. However, a guide to burning your downloaded Manjaro ISO using Brasero has been provided below:
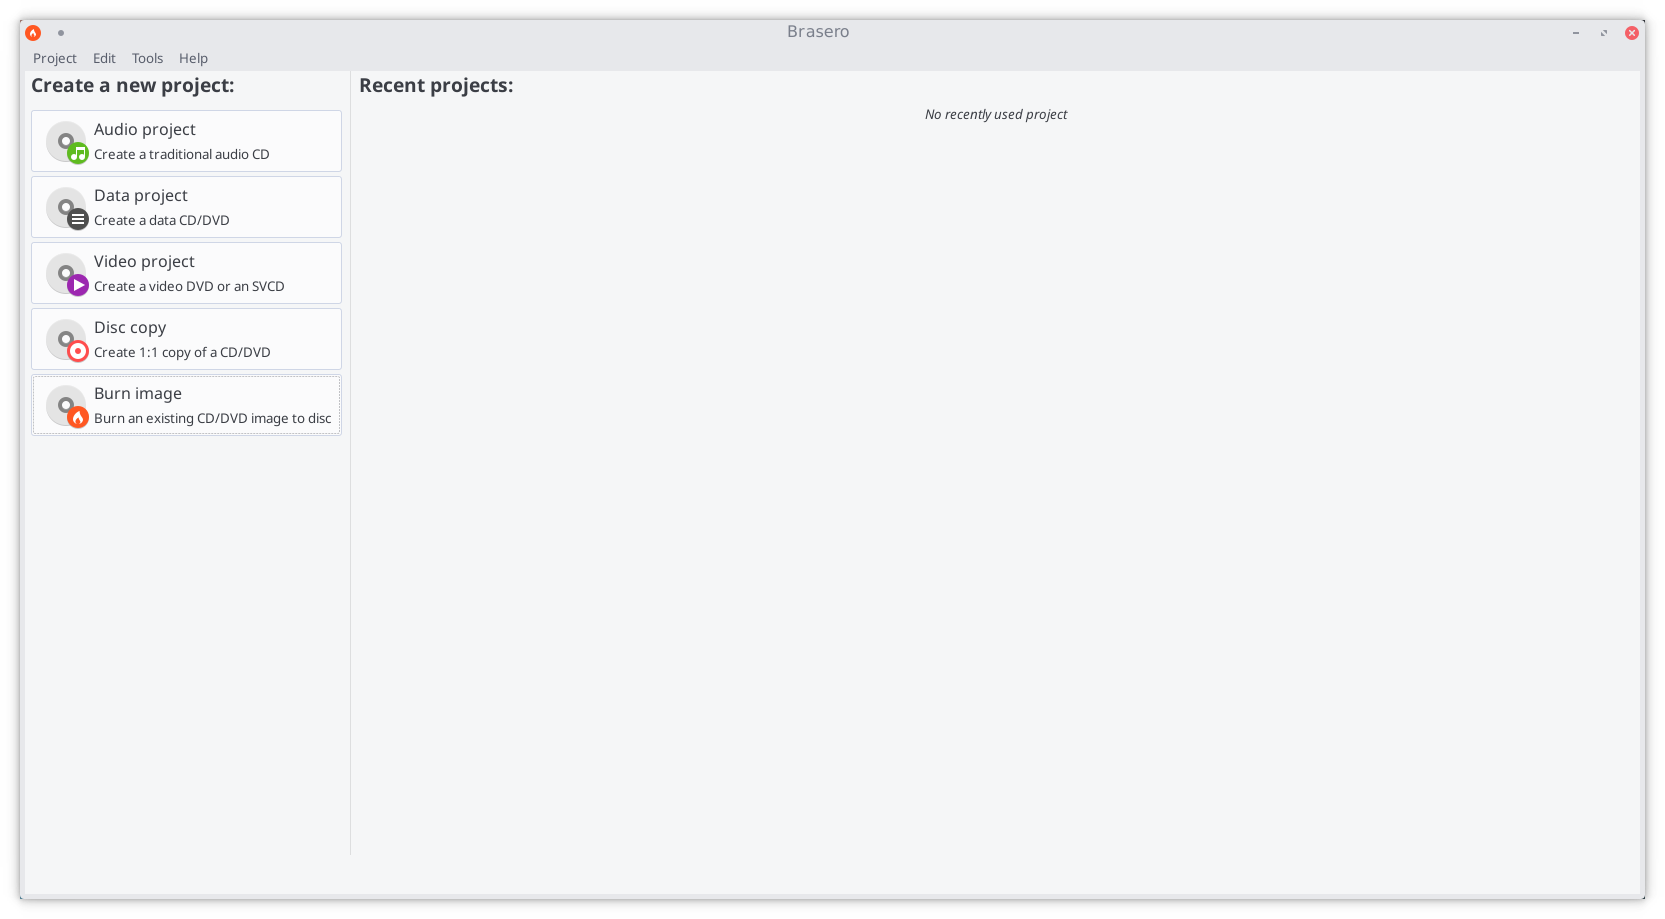
1. Insert a Blank CD/DVD (use a DVD if burning an ISO for anything other than the NET Edition)
2. Start the Brasero software burner
3. Click the Burn Image — Burn an existing CD/DVD image to disc button to open the Image Burning Setup window.
4. Click the button beneath the title Select a disc image to write to open up your file manager. Locate and double-click the downloaded ISO file to load it. Upon automatically returning to the Image Burning Setup window, note that the ISO file is now listed as the disc image to write.
5. Underneath the title Select a disc to write to the blank CD/DVD inserted should already have been automatically listed. Otherwise, click the button to select it manually.
6. Click the properties button to open the properties window, and then click the button beneath the title Burning Speed. Again, it is strongly recommended to select the slowest speed available. Once selected, click the Close button.
7. Click the Burn button to start the burning process. If necessary, follow any on-screen instructions provided.
Burning to a CD/DVD in Windows
In Windows 7 and later, support for burning an ISO to DVD is built-in. Simply right click on the on .iso file and select «Burn disk image». This will bring up a series of dialogues to walk you through the process.
For Windows Vista or older versions of Windows you will need to download 3rd party software. Several free software burner applications are available for Windows. One such tool is DeepBurner. The portable version can be downloaded from here.
Writing to a USB Stick in Linux
This section describes how to write a Linux ISO file to USB.
Windows ISO files are notoriously difficult and requires special attention.
Using the Terminal
To burn the iso on an usb stick, enter the following command in a terminal :
user $ sudo dd bs=4M if=/path/to/manjaro.iso of=/dev/sd[drive letter] status=progress oflag=sync COPY TO CLIPBOARD
Where [drive letter] is the letter of your removable device. Please note that it is the device (e.g. /dev/sdb), and not the partition number (e.g. /dev/sdb1).
To find which drive letter it might be write:
Warning Not all ISO are isohybrid ! However you can create isohybrid ISO. If you use very old hardware and rare, may not support isohybrid. Isohybrid created for UEFI should work with «Legacy mode», without support UEFI not will work on UEFI. Before use USB stick check Bios/UEFI settings, USB should start first. If isohybrid not working for you with uefi, try create isohybrid for own use without this option.
How you can check ISO
Disk manjaro-mate-15.12-x86_64.iso: 7,5 GiB, 8006074368 bytes, 15636864 sectors Units: sectors of 1 * 512 = 512 bytes Sector size (logical/physical): 512 bytes / 512 bytes I/O size (minimum/optimal): 512 bytes / 512 bytes Disklabel type: dos
Disk identifier: 0x00000000 COPY TO CLIPBOARD
Disk manjaro-xfce-16.08-x86_64.iso: 1,5 GiB, 1561657344 bytes, 3050112 sectors Units: sectors of 1 * 512 = 512 bytes Sector size (logical/physical): 512 bytes / 512 bytes I/O size (minimum/optimal): 512 bytes / 512 bytes Disklabel type: dos Disk identifier: 0x06c2dccb . Device Boot Start End Sectors Size Id Type manjaro-xfce-16.08-x86_64.iso1 * 0 3050111 3050112 1,5G 0 Empty
manjaro-xfce-16.08-x86_64.iso2 224 63711 63488 31M ef EFI (FAT-12/16/32) COPY TO CLIPBOARD
Isohybrid have 2 partitions, you can check also with gparted after burn the iso on an usb stick.
How create isohybrid
Using a Burning Application
ImageWriter
ImageWriter should be available for installation from your distribution’s Software Center / Software Manager / Package Manager / repositories. Once Imagewriter has been downloaded and installed, ensure that your USB stick is plugged in before starting it.
A brief guide to writing the Manjaro .ISO image has been provided:
1. Click on the centre icon
2. Navigate to where the ISO image has been saved and select it
3. Ensure that your USB device has been selected from the drop-down menu
4. Click on the Write button
5. After the Write process has finished, reboot your system
Writing to a USB Stick in Windows
Using Rufus
Rufus Rufus is a utility that helps format and create bootable USB flash drives, such as USB keys/pendrives, memory sticks, etc.
When you use Rufus to write a Manjaro Live ISO to USB you must select DD mode when prompted to use standard or DD mode.
See its website for more details: [1]
Writing to a USB Stick on a Macintosh
As a Unix variant, macOS uses a similar approach to Linux. All commands below should be run in the Terminal application. Commands using sudo may prompt for your password; this is expected.
After you’ve inserted your USB drive, identify it using diskutil:
/dev/disk0 (internal, physical): #: TYPE NAME SIZE IDENTIFIER 0: GUID_partition_scheme *1.0 TB disk0 1: EFI EFI 209.7 MB disk0s1 2: Apple_APFS Container disk1 1000.0 GB disk0s2 /dev/disk3 (external, physical): #: TYPE NAME SIZE IDENTIFIER 0: FDisk_partition_scheme *7.8 GB disk3 1: Windows_NTFS MYUSBDRIVE 7.8 GB disk3s1
Note the identifier disk3s1 in this example.
Unmount the drive with the command:
Volume MYUSBDRIVE on disk3s1 unmounted
Now you can use dd to write to the raw device:
user $ sudo dd bs=4M if=Desktop/manjaro-i3-21.2.3-220205-linux515.iso of=/dev/disk3 COPY TO CLIPBOARD
787+1 records in 787+1 records out 3303161856 bytes transferred in 2470.782563 secs (1336889 bytes/sec)
The USB drive can now be removed from the computer and used to boot Manjaro.
Cookie-файлы помогают нам предоставлять наши услуги. Используя наши сервисы, вы соглашаетесь с использованием cookie-файлов.
Iso образ linux manjaro
Сборка построена с использованием рабочего окружения Xfce (произносится как экс-эф-си-и), свободной легковесной среды рабочего стола для UNIX-подобных операционных систем. Призвана быть быстрой и не требовательной к ресурсам компьютера системой, но при этом понятной и визуально привлекательной для пользователя. Конфигурация данной среды полностью управляется мышью, конфигурационные файлы скрыты от пользователя. Используются кроссплатформенная библиотека элементов интерфейса GTK+ и собственный менеджер окон Xfwm. Xfce воплощает в себе традиционную философию UNIX, а именно концепции модульности и возможности многократного использования. Функциональные компоненты вынесены в отдельные приложения, и пользователь имеет возможность конфигурировать систему оптимальным образом.
MANJARO KDE LYSIA 20.0.1
Сборка построена с использованием рабочего окружения KDE. Это свободная среда рабочего стола и набор программ. Построена на основе кросс-платформенного инструментария разработки пользовательского интерфейса Qt. KDE является многофункциональным и универсальным окружением рабочего стола, в котором присутствует несколько различных стилей меню для доступа к приложениям. Имеется встроенный интерфейс для легкого доступа к имеющимся и установки новых тем, наборов значков, стилей оформления окон, виджетов и т.д. Вместе с тем KDE достаточно ресурсоемкий и медленный на слабом оборудовании в сравнении с XFCE. 64-битная версия Manjaro KDE требует порядка 550MB оперативной памяти.
MANJARO GNOME LYSIA 20.0.1
Начиная с версии 17.0 рабочее окружение GNOME включено в официальную версию редакции Manjaro Linux. Редакция Manjaro Gnome содержит ванильный рабочий стол GNOME, но при этом система настроена так, чтобы все плюсы использования Manjaro в качестве рабочей системы, такие как утилита автоматического обнаружения оборудования Manjaro-Hardware-Detection (MHD), утилита настройки системы Manjaro-Settings-Manager (MSM), пакетный менеджер Pamac и приветственное окно Manjaro-Hello, были доступны из коробки.
MANJARO ARCHITECT ILLYRIA 18.1.3
Это сетевой инсталлятор с интерфейсом командной строки. Ему не нужен, и он не предоставляет, (настоящий) графический интерфейс, и все пакеты для целевой системы будут загружаться из Интернета во время установки, а не извлекаться из сжатого образа ISO. Установить сборку вам поможет данное руководство. Это не так сложно, как может показаться.
wget https://github.com/manjaro/packages-core/raw/master/manjaro-keyring/manjaro.gpg gpg —import manjaro.gpg gpg —verify manjaro-xfce-17.0.6-stable-x86_64.iso.sig
Cборка от русскоязычного сообщества Manjaro Linux
KDE RU MINIMAL STABLE
Сборки от международного сообщества Manjaro Linux
COMMUNITY EDITIONS
Сборки Manjaro Linux от членов команды разработчиков являются дополнительным бонусом к сборкам, официально разрабатываемым и поддерживаемым командой Manjaro. Основное отличие между ними в используемых окружениях рабочего стола, менеджерах экрана и предустановленном программном обеспечении. Неважно, что за фрукт будет выбран вами. Лежать он будет все в том же крепко сколоченном Manjaro Linux. Имейте в виду, что данные сборки могут немного отставать от официального дистрибутива по актуальности версий включенного программного обеспечения. Кроме того, их разработка может быть прекращена без дополнительных уведомлений со стороны мейнтейнеров.
Download Manjaro
Manjaro installation images are available for download as ISO files. An ISO file is itself a literal copy of a disc image, although not in the same sense as a copy and paste duplication, rather it is a copy of the raw machine code that makes up the files and folders of that disc. This is why just copying an ISO file to a disc (or USB flashdrive) to begin installing it won’t work; you’ll need to use a disc burning application to translate that raw data into the files and folders. Instructions to do so for both Linux and Windows operating systems are provided below.
note There is an exception to this rule. If you intend on installing Manjaro in a virtual machine environment using Oracle’s Virtualbox, then there will be no need to burn the image as Virtualbox will be able to read from the ISO file directly as a virtual disc.
There are currently three Official Manjaro Editions: Gnome, KDE and Xfce. You can view a brief introduction at the Manjaro Official Webpage
On the OSDN download server, each Manjaro Edition has its own particular folder, which will contain a folder for each new ISO release. Each folder will also contain a torrent file for the ISO image, a list of the included packages, the build log file and the relevant checksum files, which can be used to check the integrity of your downloaded ISO file, to ensure that it has not been corrupted during download. A link to the guide on doing this has been provided below.
Stable Releases of Manjaro are intended to be used by the general public. As such, they will be the appropriate choice for the majority of users.
Test Builds of Manjaro are intended to be used by developers and testers, in order to identify any bugs or issues to be addressed as their development continues towards the next stable release. These are not suitable nor intended for use by the general public as a main operating system; however, should you wish to try out a test build (preferably in a virtual machine) each current release have a look at the Forum Announcements.
There are also several Community releases for the most famous, or hardly known Display Environments, like Cinnamon, MATE, i3, Awesome, Deepin, Budgie, LxQt and Openbox.
You may find them in the Manjaro website: