Как изменить настройки DNS-серверов
В статье мы расскажем, как изменить настройки DNS-серверов на популярных ОС: Ubuntu, Debian, Centos и Windows Server.
Самые распространённые причины смены DNS-серверов:
- увеличение скорости загрузки сайта в браузере,
- настройка родительского контроля (чтобы дети не просматривали нежелательный контент),
- защита от фишинга и другие.
Ubuntu 18.04
Изменить DNS-серверы поможет служба netplan. С её помощью нужно отредактировать её конфигурационный файл 01-netcfg.yaml.
sudo nano /etc/netplan/01-netcfg.yamlnetwork: ethernets: eth0: addresses: - 123.123.123.123/24 - 2002:7b7b:7b7b:0:0:0:0:0/64 gateway4: 123.123.123.123 gateway6: 2002:7b7b:7b7b:0:0:0:0:0 nameservers: addresses: - 1.1.1.1 - 1.0.0.1 renderer: networkd version: 2nameservers: addresses: - 8.8.8.8 - 8.8.4.4systemd-resolve --status | grep 'DNS Servers' -A2Ubuntu 20.04/Debian
sudo nano /etc/systemd/resolved.confsudo systemctl restart systemd-resolvedsystemd-resolve --status | grep 'DNS Servers' -A2CentOS
1: lo: mtu 65536 qdisc noqueue state UNKNOWN group default qlen 1000 link/loopback 00:00:00:00:00:00 brd 00:00:00:00:00:00 inet 127.0.0.1/8 scope host lo valid_lft forever preferred_lft forever inet6 ::1/128 scope host valid_lft forever preferred_lft forever 2: eth0: mtu 1500 qdisc pfifo_fast state UP group default qlen 1000 link/ether 2002:7b7b:7b7b:0:0:0:0:0 inet 123.123.123.123/24 brd 123.123.123.255 scope global eth0 valid_lft forever preferred_lft forever inet6 2002:7b7b:7b7b:0:0:0:0:0/64 scope global valid_lft forever preferred_lft forever inet6 2002:7b7b:7b7b:0:0:0:0:0/64 scope link valid_lft forever preferred_lft forever 3: eth1: mtu 1500 qdisc noop state DOWN group default qlen 1000 link/ether 52:54:00:e4:b4:cc brd ff:ff:ff:ff:ff:ff Слева от значения
sudo nano /etc/sysconfig/network-scripts/ifcfg-eth0Вместо eth0 укажите название вашего конфигурационного файла. На экране отобразится содержимое файла:
NAME="eno1" ONBOOT=yes BOOTPROTO=static HWADDR="2002:7b7b:7b7b:0:0:0:0:0" IPADDR="123.123.123.123" NETMASK="255.255.255.0" GATEWAY="123.123.123.123" TYPE=Ethernet DEVICE=eth0 BOOTPROTO=none ONBOOT=yes IPADDR=123.123.123.123 PREFIX=24 GATEWAY=123.123.123.123 DNS1=1.1.1.1 DNS2=1.0.0.1 IPV6INIT=yes IPV6ADDR=2002:7b7b:7b7b:0:0:0:0:0::3f9d/64 IPV6_DEFAULTGW=2002:7b7b:7b7b:0:0:0:0:0Вместо 8.8.8.8 и 8.8.4.4 будут указаны ваши IP-адреса. Если вам нужно добавить дополнительные DNS-серверы, добавьте их на следующих строках как DNS3 и DNS4.
systemctl restart networkHow to set DNS Nameserver on Ubuntu 20.04
The Domain Name System (DNS) translates text-based domain names to numeric IP addresses. By default, most networks are configured to work with DNS servers supplied by the internet service provider. However, users are free to change the DNS nameservers.
This tutorial will show you how to change DNS nameservers on your Ubuntu machine using GUI or the command line.
- Ubuntu 20.04 (both methods also work on Ubuntu 18.04 and later)
- Access to the terminal
- Sudo privileges
Change DNS Nameserver via GUI
Use Ubuntu Settings to complete all the steps to change DNS addresses via the graphical user interface.
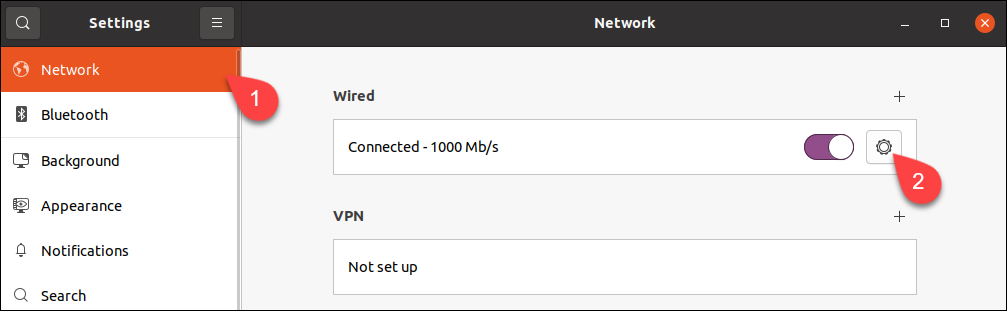
1. Launch Settings and click the Network tab in the menu on the left.
2. Click the cogwheel next to the connection you wish to set up.
Note: To change the settings for a wireless connection, select the Wi-Fi tab, choose a wireless network and proceed with the steps below.
3. Go to the IPv4 tab.
4. Disable automatic DNS configuration by turning off the switch next to the DNS field.
5. Type new DNS addresses in the field. The example shows Google’s public DNS nameservers.
6. Click Apply.
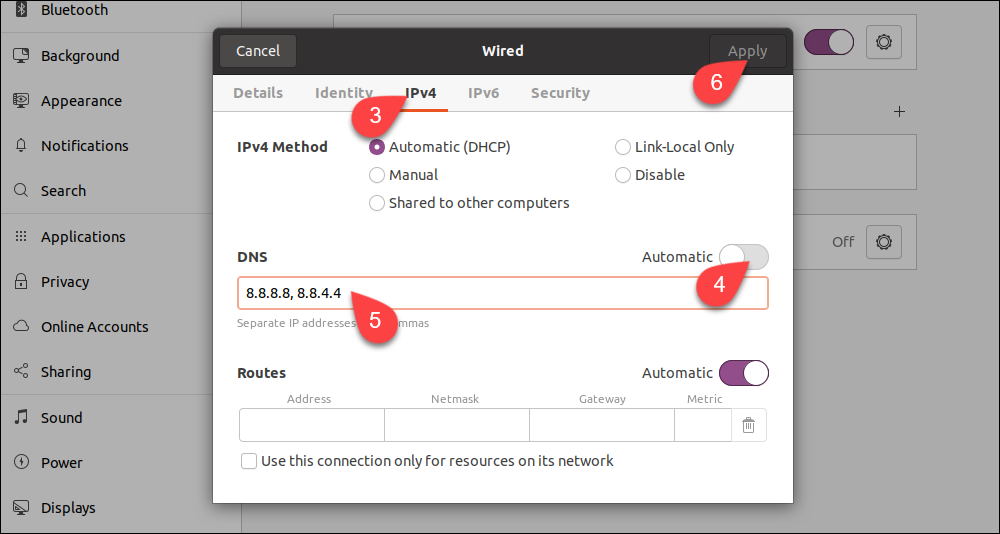
The system is now configured to work with the new DNS servers.
Note: If you wish to set up IPv6 nameservers, go to the IPv6 tab and enter them there. The IPv6 address format is different from IPv4. For example, Google’s IPv6 DNS servers are: 2001:4860:4860::8888 and 2001:4860:4860::8844 .
Change DNS Nameserver via Config File
If you do not use a GUI, change DNS settings with the command line Netplan tool.
1. Go to the Netplan directory:
2. List the directory contents with ls to see the name of the yaml file containing network configuration.

Open the file in a text editor. Your file may have a different name.
sudo nano 01-network-manager.yamlEthernet connections are listed in the ethernets section of the file. If there are any wireless connections, you can find them in the wifis section. Netplan stores the current DNS configuration parameters in nameservers subsections of each section.
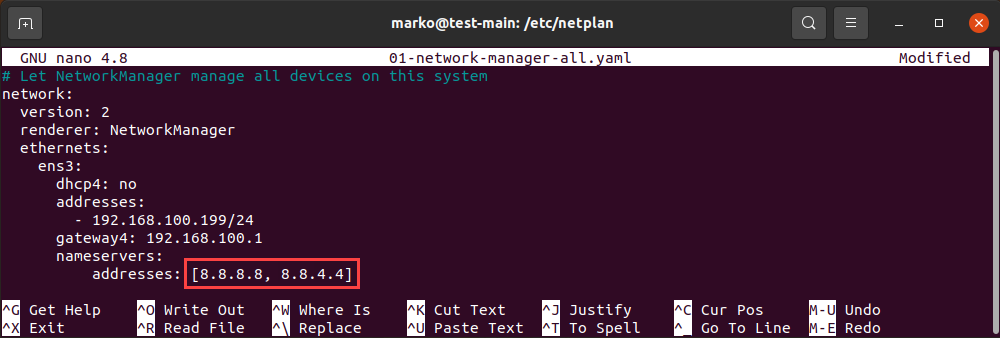
Replace the addresses located in the file with the DNS addresses you want to use. You can enter more than two addresses. Save the changes and exit.
Note: The file on your system may lack the entire ethernets or wifis section. In that case, add the lines that are missing, making sure you respect the indentation provided in the example.
3. Apply the changes you made in the config file:
If the operation is successful, there is no output. To check if the system successfully applied the changes, type:
resolvectl status | grep "DNS Server" -A2The output lists your current DNS servers:

Why Change DNS Nameserver on Ubuntu?
In most cases, your default DNS settings offer optimal performance. However, there are scenarios in which you should consider switching to a third-party DNS provider:
- Large companies with better infrastructure are usually more capable of providing uninterrupted DNS service. If your ISP is unreliable and you experience frequent downtimes, switching the DNS provider may be the solution.
- Third-party DNS servers can be faster than those provided to you by your ISP.
Note: Since latency is the primary consideration for DNS, a fast third-party server located far away may provide inferior service to a slower one that is closer to you.
- Some DNS providers offer filters that prevent phishing sites from reaching your computer. The same mechanism is also used to block sensitive content on the internet. Businesses often employ this DNS feature.
- Internet Service Providers sometimes block content on the DNS level, so switching to another DNS nameserver may help you access some geo-restricted websites.
Note: Learn how to install PowerDNS on Ubuntu, a flexible and robust DNS solution.
This tutorial showed you how to set your DNS nameservers on Ubuntu, either using a GUI or CLI.
How do I configure my DNS settings in Ubuntu server?
According to this page it appears to be simple. However, /etc/bind does not exist on the default installation of Ubuntu 12.04.3 LTS server. So, without installing any further software, how can configure DNS and remove dnsmasq on ubuntu server? I am quite familiar with sudo & nano .
Also take a look at help.ubuntu.com/community/Dnsmasq. bind IS a nameserver. If you need nameserver functionality on your server, you must install a nameserver. It would help if you could describe what it is you are trying to achieve.
You were reading a manual to configure a DNS Server, not how to configure the DNS entries in the server. The manual you should have read are this
I don’t have the rep to post a comment on another answer, but in reply to Nullet’s answer on September 17th 2013, this worked for me. I was thinking that there was a problem with my router (a cheap, ISP provided one). I also think it worth mentioning that on the dns-nameservers line, you should use the IP of the public DNS. Don’t use the local address of the DNS, which is most likely on your router. I was connecting to the DNS on my router, which for some unknown reason wasn’t working with my server. Instead, I found out where the DNS on my router was getting its information from, and set dn
I think there is a better answer here unix.stackexchange.com/a/154538/82018 — basically you can override your dhcp settings to «prepend» a server in front of the ones you currently use. This is nice as you don’t have to rely solely on the new server, you just give it precedence for lookups.