- Assign Device Host Name on 300 Series Managed Switches Using Command Line Interface
- Objectives
- Applicable Devices
- Step-by-Step Procedure
- Assign device host name
- How to Change Cisco Router Name in GNS3
- How to Use the Hostname Command in Router
- How to Change Cisco Router Hostname ⇒ Video
- Final Word
- Related Articles
- Configuring Hostname on a Cisco Router
- configuration
- commands explained
- Changing the host name of a router in Cisco Packet Tracer
Assign Device Host Name on 300 Series Managed Switches Using Command Line Interface
The documentation set for this product strives to use bias-free language. For the purposes of this documentation set, bias-free is defined as language that does not imply discrimination based on age, disability, gender, racial identity, ethnic identity, sexual orientation, socioeconomic status, and intersectionality. Exceptions may be present in the documentation due to language that is hardcoded in the user interfaces of the product software, language used based on RFP documentation, or language that is used by a referenced third-party product. Learn more about how Cisco is using Inclusive Language.
Objectives
A host name is a label that is given to a device to distinguish it from other devices. The default device name for a Series 300 Switch is «switch» combined with the last 6 characters of the MAC address for the device. The device host name shows up in the command prompt after every command, and it might be more meaningful to assign a different name to distinguish this device from other devices while using the command line interface.
This document explains how to assign the device host name to a 300 Series Switch using the Command Line Interface.
Applicable Devices
Step-by-Step Procedure
Note: Changing the device host name requires user privilege level 15.
Assign device host name

Step 1. Using the command prompt, enter telnet 192.168.1.254 to access the command line interface for this device on the default IP address.

Step 2. Enter the User Name and Password.
Note: The default User Name is cisco and the default Password is cisco.

Step 3. Enter config to enter Global Configuration mode.

Step 4. To modify the device host name, there are two options:
• Enter hostname [name] to assign a new hostname to the device.
Note: The name must start with a letter, end with a letter or digit, and can only contain letters, numbers, and hyphens.
• Enter no hostname to restore the host name back to the default.

Step 5. Enter exit to exit Global Configuration mode.
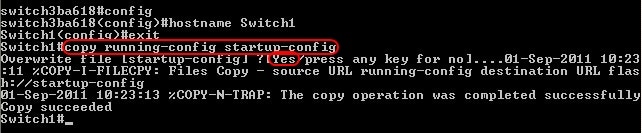
Step 6. (Optional) Any settings changed will be lost if the switch loses power. To make the changes permanent enter copy running-config startup-config and enter Yes to copy the current configuration file to the startup configuration file.
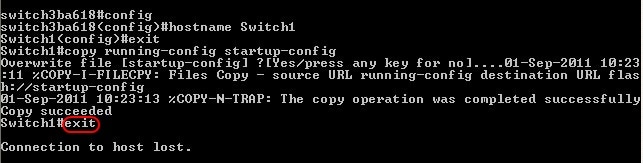
Step 7. Enter exit again to end the session.
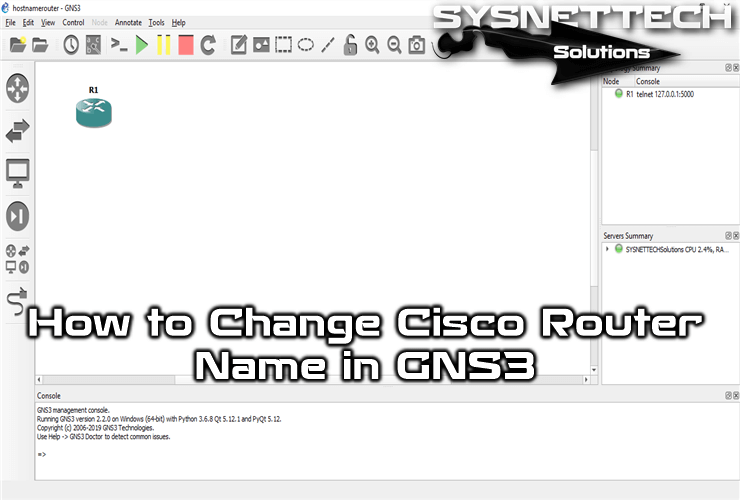
How to Change Cisco Router Name in GNS3
![]()

Last Updated: January 15, 2020 | GNS3 | Tolga Bagci
By changing the device names of your Router or Switch in your network topology, you can avoid complexity and have a more detailed network design.
How to Use the Hostname Command in Router
In a growing network, configuring the names of devices according to their location prevents both complexity and faster resolution of network errors that may occur.
For example, suppose your headquarters is named A, and you have branches in 2 different cities. When you define these cities as B and C, you can have a more organized structure by changing the name of the Router in center A to ARouter.
Now, to change the label of a Router on the network, open your GNS3 simulator, and create a new project and then add a Router to the workspace.
After running your router in GNS3, double-click on it to open the CLI prompt.
At the CLI prompt, the router’s title will default to R1#. When you add one or more devices to the working environment, the device’s name will be named R2, R3, R4.
At the CLI prompt, execute the Configure Terminal command to switch to Global Configuration Mode, and then use the hostname + (name) command to rename the Router.
R1# configure terminal R1(config)# hostname ? R1(config)# hostname ARouter 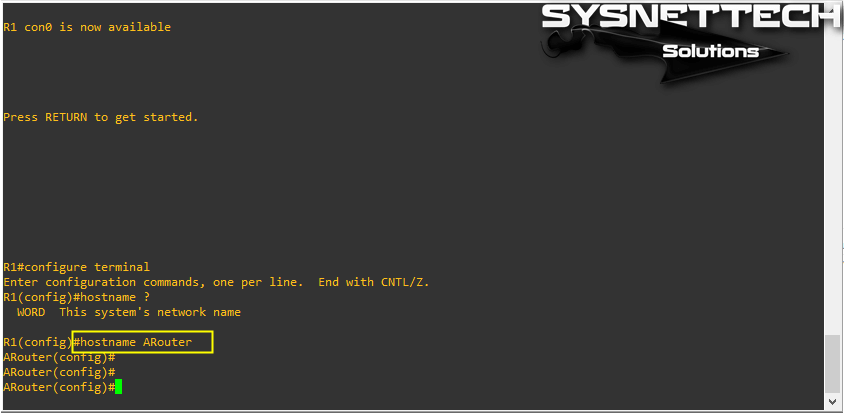
To learn how to use the hostname command in the CLI, use the ” ? ” character. Note that this command only works in config mode!
How to Change Cisco Router Hostname ⇒ Video
To rename a Router or Switch on GNS3, you can watch the video below and also subscribe to our YouTube channel to support us!
Final Word
In this article, we have examined how to use the hostname command, which is the easiest setting to configure on a network device, but which causes trouble in a growing network. Thanks for following us!
Related Articles

TolgaBagci
Hello, I’m Tolga! I am a computer specialist who has been specializing in computer technologies for about 20 years. I provide solutions to problems encountered in many areas such as hardware, system, network, virtualization, server systems, and operating systems, and create relevant content on my website by explaining how to solve these problems. My goal is to be a reliable source of expert, quality, and trustworthy solutions for your computer problems. By following innovations and using the latest technologies, I aim to be successful in my job and provide you with the best service. Don’t hesitate to contact me for any questions or curiosity about technology. Have a nice day, stay up to date 🙂
Configuring Hostname on a Cisco Router
One of the first things you want to configure on a router or a switch is the hostname. Although it is mainly important to us administrators (so we can identify our devices easier), the hostname can be used to authenticate one router to another as well, but I’ll talk about that in another post.
configuration
The default name for routers is Router and the default name for switches is … Yes, you guessed right, it is Switch! Now lets rename our router to R1. The command we need is hosname folowed by the desired hostname (in this case R1):
Router>enable Router#conf terminal Enter configuration commands, one per line. End with CNTL/Z. Router(config)#hostname R1 R1(config)#exit R1# *Mar 1 00:07:14: %SYS-5-CONFIG_I: Configured from console by console R1#copy running-config startup-config Destination filename [startup-config]? Building configuration. [OK] R1#
The official documentation states that a hostname cannot be longer than 63 characters, must start with a letter and end with a letter or digit. Hyphen is accepted as internal character only. In reality you could start and finish the hostname with either a letter, a digit, a hyphen or an underscore. It’s up to you, but the best practice is to keep it short and simple.
commands explained
Commands used with a brief explanation.
enable : Moves the user from User mode to Privileged mode
conf terminal : Moves the user into Global Configuration mode. This is where you can make changes to the configuration
hostname R1 : Sets the hostname to R1
exit : Moves you back one level. In this case back to Privileged mode
copy running-config startup-config : Saves the running configuration into the startup configuration
Destination filename [startup-config]? : Verifies the destination file name. Just press ENTER!
Changing the host name of a router in Cisco Packet Tracer
I have planned to write Cisco labs which will help those preparing for CCNA exam and will be a quick guide for Cisco users. This is our first simple lab and will move on to the complex one’s following in this series of labs. This lab simply demonstrates how to use and configure a router’s host name using Cisco Packet Tracer. Before moving further make sure you have Cisco Packet Tracer downloaded and installed. Step 1: Open Packet Tracer.
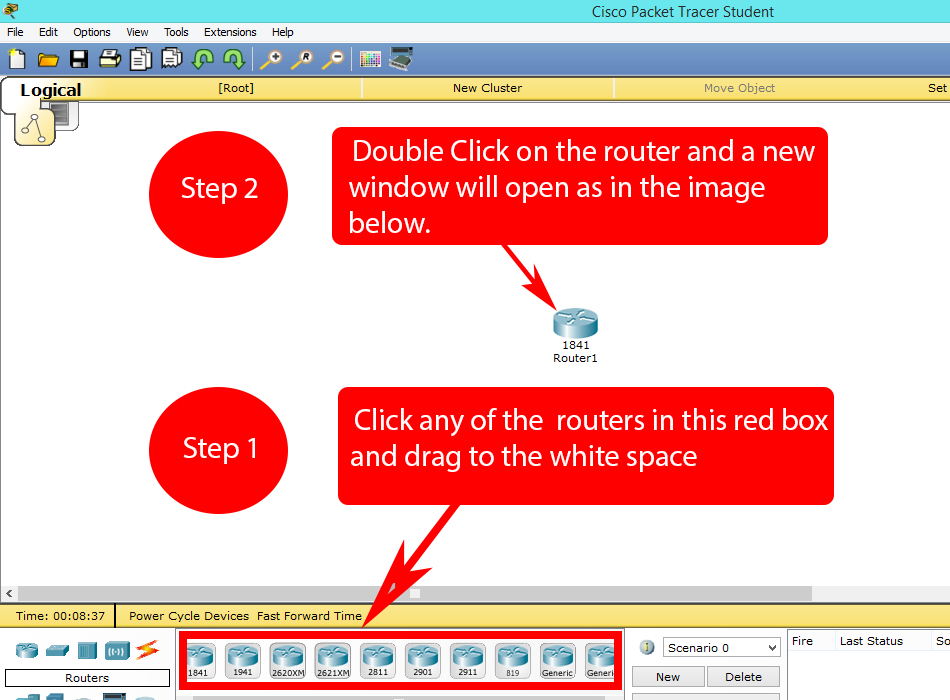
 Step 2: Now click the router icon in the left bottom corner, all the routers will be displayed in the bottom middle section.

After completing the steps mentioned in the above image a new window will appear. Step 3: Set your router host name and router display name. Router host name is the name which you will see in the command line interface for all of your routers in a network, while Router Display name is used for visually identifications of your routers.
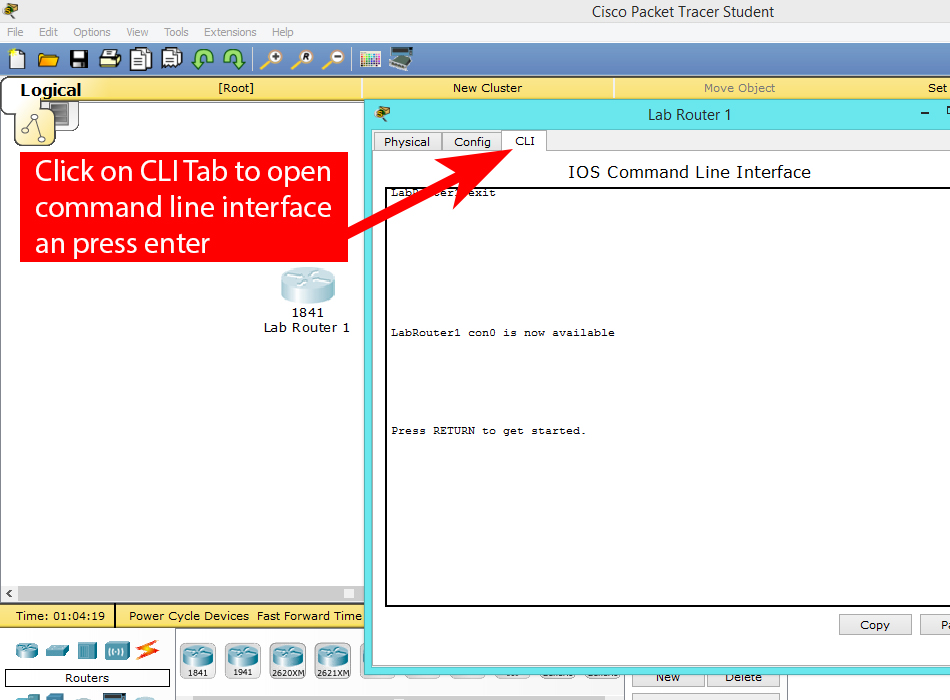
Step 4: For CCNA using command line interface is recommended, click on the CLI tab for opening command line interface. Step 5:
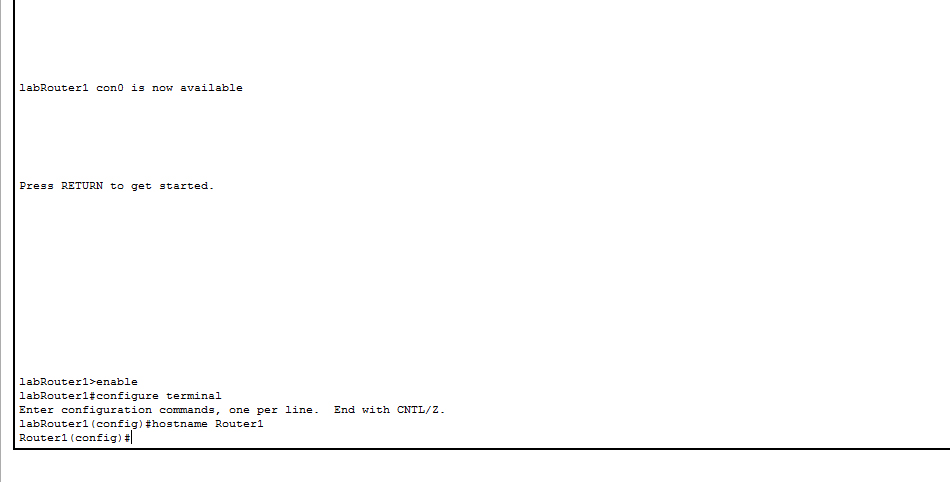
For renaming / setting router host name you should be in Global Configuration Mode (for more about Cisco Router Modes visit Cisco Router Modes) , hostname yourDesiredName is the command you enter for changing host name. Our host name was labRouter1 and our prompt was labRouter1(config)# before executing this command ( labRouter1(config)# hostname Router1 ), notice that our prompt changes to Router1(config)#, confirming the change of our router host name.