- How to Configure The Grub Boot Menu in Linux
- Configure Grub manually via Editing config file
- 1. GRUB_DEFAULT
- 2. GRUB_TIMEOUT
- 3. GRUB_DISTRIBUTOR
- 4. GRUB_CMDLINE_LINUX
- 5. GRUB_TERMINAL
- 6. GRUB_DISABLE_SUBMENU
- 7. GRUB_THEME
- Apply Changes
- Configure boot menu via graphical Grub-Customizer
- Как настроить порядок загрузки ОС в Ubuntu (grub)
- Как задать операционную систему для загрузки в терминале
- Как задать операционную систему для загрузки в графическом интерфейса
- Добавить комментарий
How to Configure The Grub Boot Menu in Linux
GNU Grub, stands for GNU GRand Unified Bootloader, is the default boot-loader from the most Linux operating systems. It’s the most common way to handle the boot menu when dual or multi-boot other OSes with Linux.
Including Ubuntu, Debian, Fedora, Arch, openSUSE, CentOS, Linux Mint, and others, you can configure Grub to do the jobs below:
- Change the default system to boot.
- Set boot menu timeout before automatically booting the default.
- Add Linux Kernel parameters.
- Hide the recovery menu entry.
- Set boot screen resolution.
- Change boot screen text font, background, and themes.
- And more.
And things can be done either via a graphical tool Grub-Customizer or by manually editing the configuration file.
Configure Grub manually via Editing config file
The main configuration file normally locates at /boot/grub/grub.cfg . It however varies on different Linux Distros, such as Fedora generates the file at /boot/efi/EFI/fedora/grub.cfg for UEFI and /boot/grub2/grub.cfg for BIOS-boot.
It is an automatic generated file that is being loaded by Grub on each boot. We don’t recommend to edit the file directly because it changes automatically after applying system updates.
Users can edit the /etc/default/grub as well as files under /etc/grub.d/ to control how to generate the main configuration file.
Firstly, open terminal and run command to edit /etc/default/grub .
Here I use the universal nano command line text editor. To save changes, press Ctrl+X, type y, and hit Enter. For choice, replace nano with your favorite text editor, such as gedit for Ubuntu/Fedora, xed for Linux Mint.

As you see in the picture above, lines started with # at the beginning are comments. They do nothing but descriptions. You can comment / un-comment a line by adding / removing # at the beginning.
1. GRUB_DEFAULT
The GRUB_DEFAULT line sets which OS to boot by default. The value can be either a number or full-name of a boot menu entry.
The number value counts from 0. It can be 0, 1, 2, 3, 4, …
- To boot the first entry, set GRUB_DEFAULT = 0.
- For the second entry, use GRUB_DEFAULT = 1.
- And GRUB_DEFAULT = 2 will set the third entry as default.
You can also set the full-text of a menu entry as the value. For example:

Also it can set to GRUB_DEFAULT = saved. With it, you NEED one more rule to set default OS:
- Boot the last booted entry with one more line: GRUB_SAVEDEFAULT = true
- Set default entry anytime via grub-set-default command, without editing config file:
- sudo grub-set-default 1 set the second entry as default.
- sudo grub-set-default 3 set the fourth entry as default.
2. GRUB_TIMEOUT
The GRUB_TIMEOUT value controls how long the boot menu will display in seconds, before it boots the default automatically. Press any key during the time will interrupt the timeout.
The timeout may not work if you set to 0 in recent Ubuntu releases, e.g., Ubuntu 20.04 & higher. It's overwritten by /etc/grub.d/30_os-prober file. As a workaround, add
GRUB_DISABLE_OS_PROBER=trueto disable 30_os-prober.You can control how the timeout count down via GRUB_TIMEOUT_STYLE. Though the value is also overwritten to always ‘menu’ in Ubuntu if more than one menu entries available.
- GRUB_TIMEOUT_STYLE = ‘menu’ will display boot menu and wait for timeout.
- Set GRUB_TIMEOUT_STYLE = ‘countdown’ will NOT display the menu, but countdown before timeout.
- And GRUB_TIMEOUT_STYLE = ‘hidden’ will also hide the boot menu, but wait until timeout silently.
There’s also GRUB_RECORDFAIL_TIMEOUT. If the last boot failed, it will stuck at boot menu until you choose an entry and hit Enter. In the case, use GRUB_RECORDFAIL_TIMEOUT to set a timeout to boot the default.
3. GRUB_DISTRIBUTOR
The value of the key is usually your Linux Distribution name, exported via a simple command. It is useful for a certain script in /etc/grub.d/ directory to take effect. Leave it unchanged unless you know what you’re doing.
4. GRUB_CMDLINE_LINUX
The GRUB_CMDLINE_LINUX value adds kernel parameters to the menu entry.
The GRUB_CMDLINE_LINUX_DEFAULT will also add kernel parameters. But they are added after those listed in ‘GRUB_CMDLINE_LINUX‘. As well, it generates ‘recovery mode‘ for each kernel entry (without parameter).
To disable the recovery mode, use GRUB_DISABLE_RECOVERY = true.
5. GRUB_TERMINAL
The GRUB_TERMINAL value specifies the input and output device. You can use ‘GRUB_TERMINAL_INPUT’ and/or ‘GRUB_TERMINAL_OUTPUT’ respectively, or use ‘GRUB_TERMINAL’ to overwrite both to the same.
- “console” – native platform console.
- “serial” – serial terminal
- “serial_ “ – serial terminal with explicit port selection.
- “at_keyboard” – PC AT keyboard input device.
- “usb_keyboard” – USB keyboard using the HID Boot Protocol.
- “gfxterm” – graphics-mode output.
- “vga_text” – VGA text output.
- “mda_text” – MDA text output.
- “morse” – Morse-coding using system beeper
- “spkmodem” – simple data protocol using system speaker.
6. GRUB_DISABLE_SUBMENU
The key will toggle on / off the sub-menu (e.g. “Advanced options for …”). By setting GRUB_DISABLE_SUBMENU = true, it brings out the sub-menu items into top-level menu.
7. GRUB_THEME
Grub boot-loader supports themes! You can find a theme either in gnome-look.org or Github.
By installing theme folders into “/boot/grub/themes” directory, you can add GRUB_THEME=”/boot/grub/themes/THEME_NAME/theme.txt” to apply one.
And you can specify the boot screen resolution via “GRUB_GFXMODE”. For example:
It will try to use 32-bit color 1280×1024 resolution. If failed, fallback to 1024×768. The default will in use via ‘auto‘ if all the previous not available.
Apply Changes
After editing the config file, or running grub-set-default command, you need to update the main config file to apply change.
Normally, run this command will do the job:

The command vary on some Linux, such as Fedora you need to run for UEFI boot:
grub2-mkconfig -o /boot/efi/EFI/fedora/grub.cfg
For legacy bios boot in Fedora, run:
grub2-mkconfig -o /boot/grub2/grub.cfg
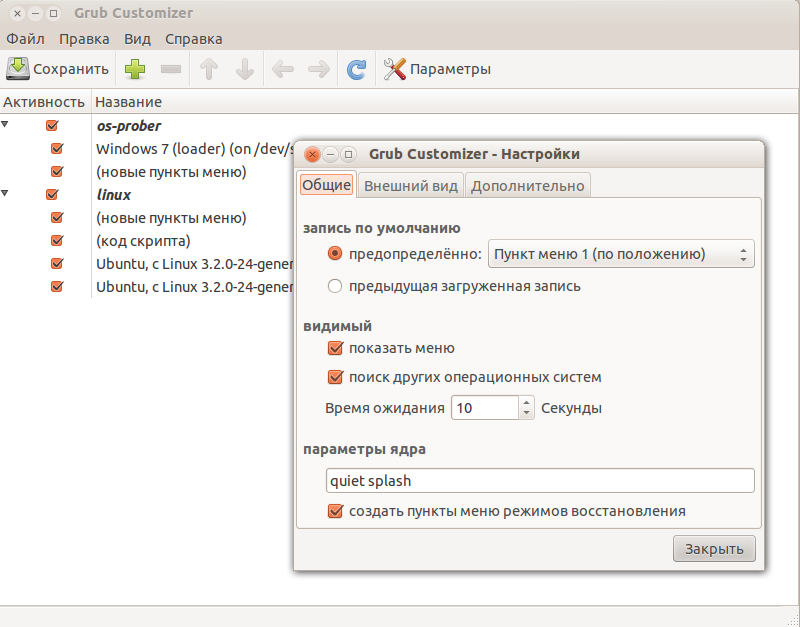
Configure boot menu via graphical Grub-Customizer
Grub-Customizer is a free open-source tool to edit the Grub boot menu. It can do the most previous settings as easy as a few clicks. Including add, remove, edit, and rearrange the menu entries.
The software is available in the most Linux repositories. Except for Manjaro (due to package conflict), you can either install it in your system’s package manager, app store, or by running a command below:
- For Debian, Ubuntu, Linux Mint based system, run command to install the tool:
sudo apt install grub-customizer
sudo dnf install grub-customizer
sudo pacman -S grub-customizer
Once installed, open it from system app launcher and enjoy!
Как настроить порядок загрузки ОС в Ubuntu (grub)

Если на вашем компьютере установлено одновременно две операционные системы, например, Ubuntu и Windows, скорее всего, одна из этих систем является основной, которую вы загружаете чаще всего. Часто возникает вопрос — как изменить систему, которая выбирается при включении компьютера и загружается по умолчанию. Сегодня я расскажу, как изменить настройки grub и выбрать нужную ОС.
Как задать операционную систему для загрузки в терминале
Задачу настройки выбора пункта меню загрузки grub, который будет выбираться по умолчанию, можно решить в терминале без установки дополнительных утилит. Для этого откройте в текстовом редакторе файл /etc/default/grub . Например, можно использовать графический gedit
$ sudo gedit /etc/default/grub
или nano, который работает в терминале
Измените в строке GRUB_DEFAULT=0 0 на порядковый номер операционной системы, которая должна запускаться по умолчанию (отсчёт, как вы понимаете, начинается с 0).
Также в строке GRUB_TIMEOUT=10 можно изменить время, в течение которого меню будет показываться на экране. Например, можно заменить 10 на 3, тогда оно будет показываться 3 секунды — достаточно для того, чтобы успеть выбрать систему, но это позволит ускорить загрузку системы на 7 секунд.
Сохраните файл, закройте редактор. Выполните в терминале следующую команду для применения изменений в конфигурации grub:
Если после обновления Windows обновился загрузочный раздел диска и grub не загружается, читайте эту статью.
Как задать операционную систему для загрузки в графическом интерфейса
Если вы не фанат работы в командной строке, вы можете воспользоваться графической утилитой Grub Customizer. Для её установки выполните в терминале следующие команды:
$ sudo add-apt-repository ppa:danielrichter2007/grub-customizer $ sudo apt update $ sudo apt install grub-customizer
Эта программа также позволит:
- Добавлять и удалять пункты в меню загрузки
- Задать задержку перед началом загрузки
- Изменить разрешение экрана
- Настроить внешний вид меню

Добавить комментарий
Этот сайт использует Akismet для борьбы со спамом. Узнайте, как обрабатываются ваши данные комментариев.