- Как изменить разрешение экрана в Linux Mint 20.1 MATE
- Как поменять разрешение Linux Mint 20.1
- How to Set A Custom Screen Resolution in Ubuntu Desktop
- Changing the Resolution or Orientation of the Screen Using Displays
- Changing the Resolution or Orientation of the Screen Using Xrandr
- Set Screen Resolution in Ubuntu
- How to Add Missing or Set Custom Display Resolution Using xrandr
Как изменить разрешение экрана в Linux Mint 20.1 MATE
После установки операционной системы она должна сама установить оптимальное разрешение экрана. Но иногда этого не происходит и пользователю приходиться самостоятельно изменять его. Если взять Windows то там все просто а вот с системами Linux могут возникнуть трудности. Изменить разрешения в них можно двумя способами, используя терминал но с этим справятся только опытные пользователи или используя графический интерфейс. Но даже используя графическую оболочку не опытному пользователю все равно будет сложно это сделать. Так как найти данные настройки будет не просто. Сегодня хочу рассказать и показать как это делается в операционной системе Linux Mint 20.1 MATE. Рассмотрим оба варианта.
Прежде чем продолжить дальше хочу вам порекомендовать ранее написанные мною статьи на тему настройки ОС Linux Mint 20.1.
Как поменять разрешение Linux Mint 20.1
Найти настройки экрана можно в «Центре управления» который в свою очередь находиться в пуске.

В открывшемся окне переходим в раздел «Оборудование» и выбираем пункт «Экраны».
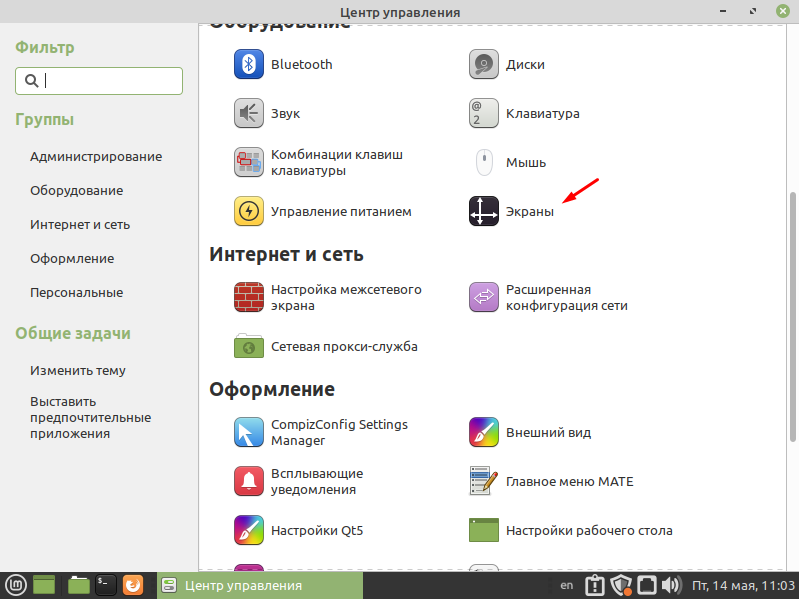
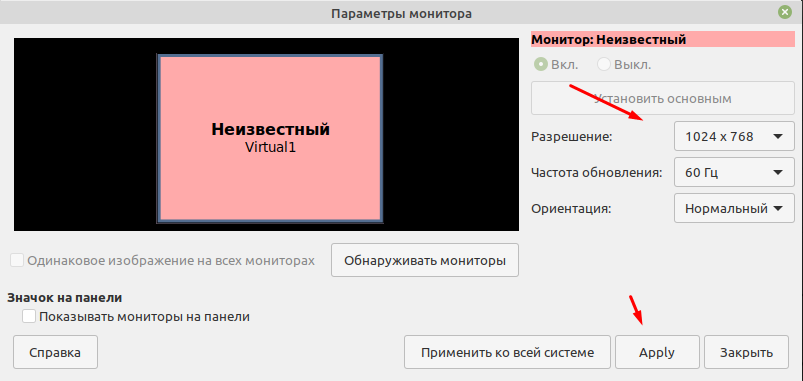
Вот тут и можно изменить разрешение экрана, указать частоту обновления Гц и ориентацию.
Теперь рассмотрим второй вариант изменения разрешения экрана через терминал. Первое что нужно сделать это узнать все доступные разрешения введя команду
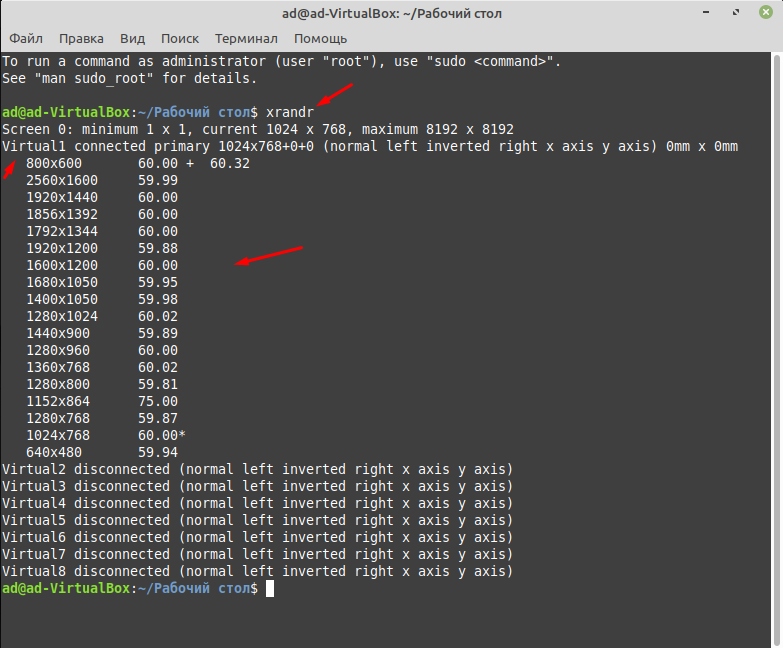
После этого вы должны увидеть количество подключенных мониторов и доступных для разрешений экрана. Так как у меня Linux Mint 20.1 установлена на виртуальную машину, монитор называется Virtual1 и ниже отображен список, из которого я могу выбрать.
Для того чтобы изменить разрешение нужно ввести команду.
xrandr —output Virtual1 —mode 1280×768
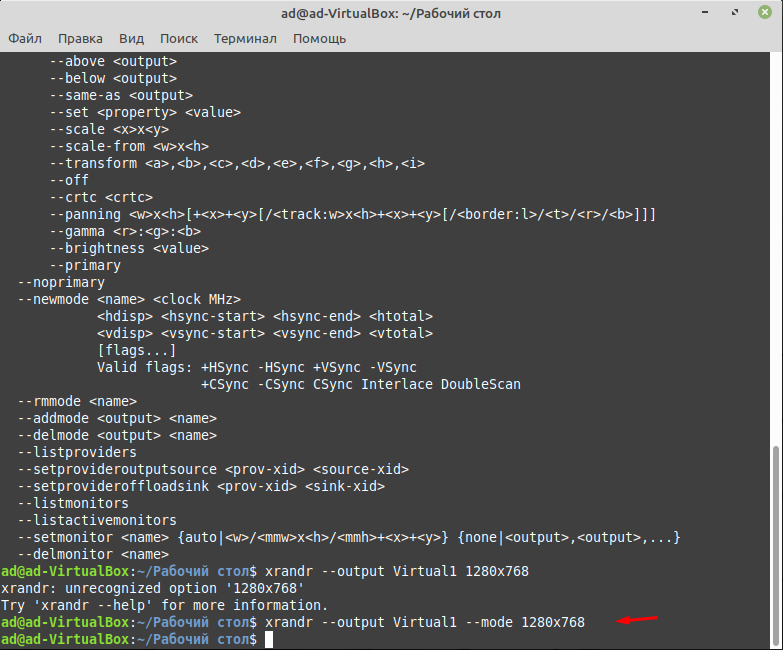
Кстати таким образом можно изменить разрешения экрана практически в любой операционной систем Linux. Так же кода будет вводить команду не ставьте лишних пробелов. Например, если вы напишите так.
xrandr —output Virtual1 — mode 1280×768
Команда не сработает, если кто не заметил то я постав пробел вот тут —_mode.
В общем все достаточно просто, главное нужно быть внимательней.
How to Set A Custom Screen Resolution in Ubuntu Desktop
Is your screen (or external monitor) resolution is low? thus making the items on your screen look larger and less clear? Or do you want to simply increase the current maximum resolution or add a custom resolution?
In this article, we will show how to add missing or set custom display resolution in Ubuntu and its derivatives such as Linux Mint. By the end of this article, you will be able to set to a higher resolution, making content on your screen appear sharper and clearer.
Changing the Resolution or Orientation of the Screen Using Displays
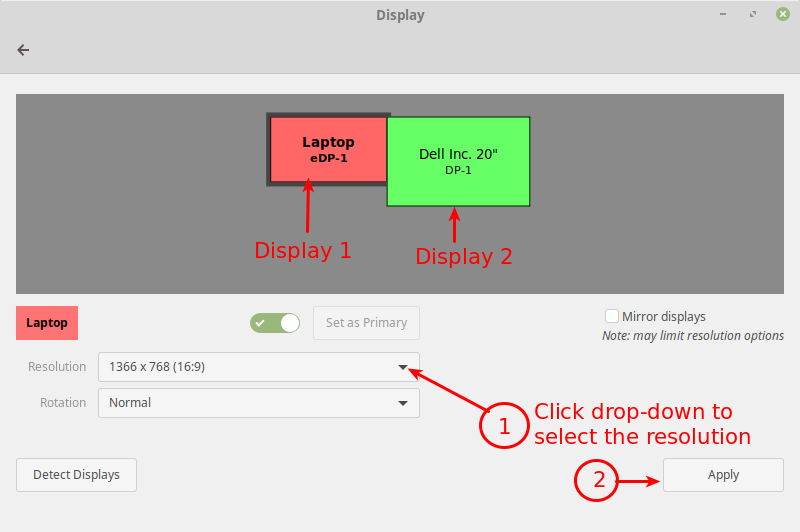
Normally, to change the resolution or orientation of the screen, you can use the Displays graphical user interface tool (open the Activities overview and type Displays, click to open it or System Menu then type Displays and open it).
Note: In case you have multiple displays connected to your computer (as shown in the following image), if they are not mirrored, you can have different settings on each display. To change the settings for a display device, select it in the preview area.
Next, select the resolution or scale you want to use, and choose the orientation then click Apply. Then select Keep This Configuration.
Changing the Resolution or Orientation of the Screen Using Xrandr
Alternatively, you can also use the powerful xrandr tool (a command-line interface to RandR (Resize and Rotate) X Window System extension) which is used to set the size, orientation and/or reflection of the outputs for a screen.
You can also use it to set the screen size or list all active monitors as shown.
$ xrandr --listactivemonitors

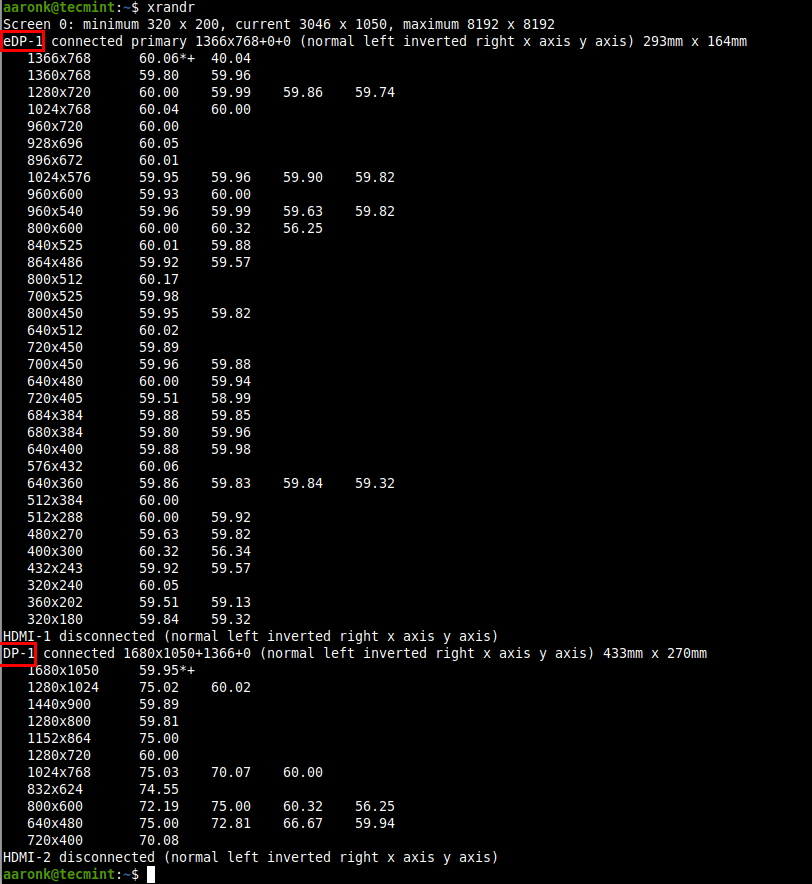
To show the names of different outputs available on your system and resolutions available on each, run xrandr without any arguments.
Set Screen Resolution in Ubuntu
To set the resolution for a screen for an external monitor named DP-1 to 1680×1050, use the —mode flag as shown.
$ xrandr --output DP-1 --mode 1680x1050
You can also set the refresh rate using the —rate flag as shown.
$ xrandr --output DP-1 --mode 1680x1050 --rate 75
You can also use the —left-of , —right-of , —above , —below , and —same-as options to arrange your screens either relatively to each other.
For example, I want my external monitor (DP-1) to be positioned left of the Laptop screen (eDP-1) in correspondence to the actual physical positioning:
$ xrandr --output DP-1 --left-of eDP-1
Keep in mind that any changes made using xrandr will only last until you log out or restart the system. To make xrandr changes persistently, use the xorg.conf configuration files for Xorg X server (run man xorg.conf for details on how to create a xorg.conf file) – this is the most effective method.
You can also use the ~/.xprofile file (add xrandr commands in it), however, there are some disadvantages of using this method, one is that this script is read fairly late in the startup process, thus it will not alter the resolution of the display manager (if you use one e.g lightdm).
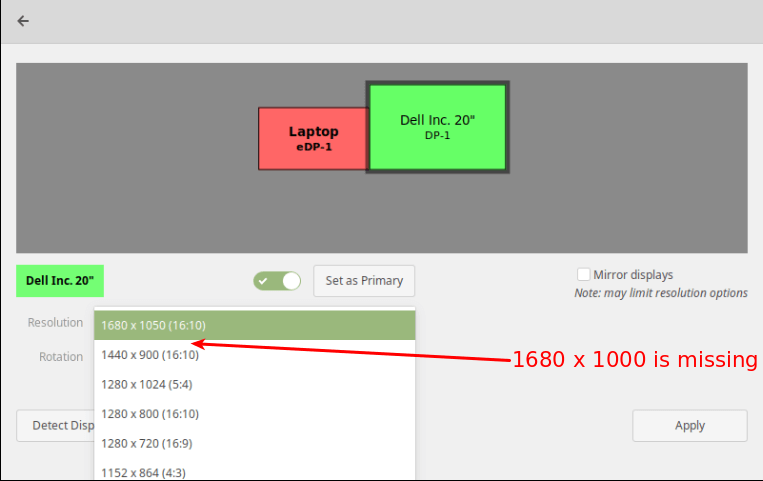
How to Add Missing or Set Custom Display Resolution Using xrandr
It is possible to add a missing or custom display resolution e.g 1680 x 1000 to Displays panel, for a specific display device (DP-1), as explained below.
To add a missing or custom display resolution, you need to calculate the VESA Coordinated Video Timing (CVT) modes for it. You can do this using the cvt utility as follows.
For example, if you need a horizontal and vertical resolution of 1680 x 1000, run the following command.
Next, copy the Modeline (“1680x1000_60.00″ 139.25 1680 1784 1960 2240 1000 1003 1013 1038 -hsync +vsync) from the output of the cvt command and use it to create a new mode using the xrandr as shown.
$ xrandr --newmode "1680x1000_60.00" 139.25 1680 1784 1960 2240 1000 1003 1013 1038 -hsync +vsync
Then add the new mode to the display.
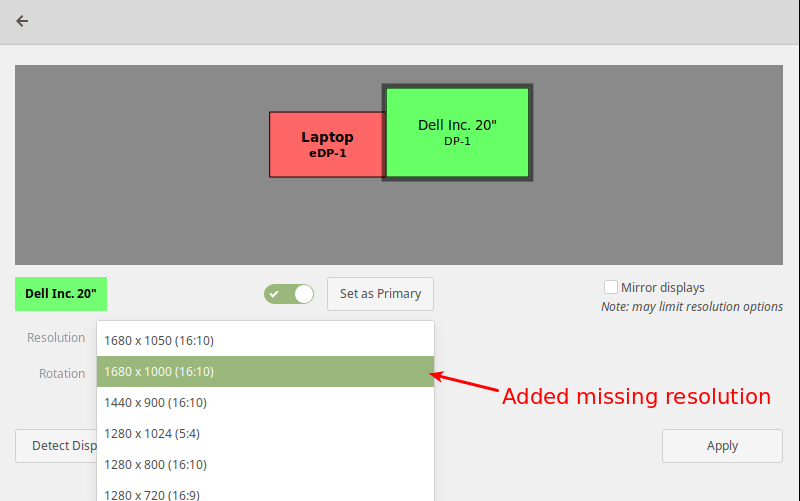
$ xrandr --addmode DP-1 "1680x1000_60.00"

Now open the Displays and check if the new resolution has been added.
The above changes are only temporary and work for the current session (they last until you log out or restart the system).
To add the resolution permanently, create a script called external_monitor_resolution.sh in the directory /etc/profile.d/.
$ sudo vim /etc/profile.d/external_monitor_resol.sh
Then add the following lines in the file:
xrandr --newmode "1680x1000_60.00" 139.25 1680 1784 1960 2240 1000 1003 1013 1038 -hsync +vsync xrandr --addmode DP-1 "1680x1000_60.00"
Save the changes and exit the file.
For more information on how xrandr works and how to use it, read its man page:
That brings us to the end of this article. If you have any thoughts to share or queries, reach us via the feedback form below.