- Ubuntu on VirtualBox can only show resolution of 800×600 — how do I change it?
- 8 Answers 8
- Update 2023
- VirtualBox. Как изменить разрешение экрана гостевой системы.
- Решение
- Ставим на Windows
- Ставим на Linux
- Итог
- P.S.
- How to Change Resolution of a Linux VM in VirtualBox
- Method 1: Change Display Settings
- Installation of VirtualBox Guest Addition Image
- Insert Guest Addition CD Image Manually
- Conclusion
- About the author
- Shehroz Azam
Ubuntu on VirtualBox can only show resolution of 800×600 — how do I change it?
My monitor is 1920 x 1200 and the computer is running Windows 7. Using VirtualBox and Ubuntu 10.04, the screen of the Ubuntu can only be 800 x 600 or 640 x 480. Is there a way to change that. I resized the VirtualBox window and Ubuntu still thinks the max is 800 x 600.
8 Answers 8
Try installing the guest additions.
Inside the window holding your virtual machine you can go to one of the menu options and select to install guest additions. It will mount a CD in the virtual machine where you will be able to run the installation scripts from.
The article below describes the complete installation process in more detail:
- Note that one of the first steps is to install the dkms package. This is also suggested in the section Guest Additions for Linux in the VirtualBox User Manual.
To solve this issue, open a terminal and run the following command:
sudo apt install virtualbox-guest-dkms I had this problem, and it was because my physical screen resolution is 1024×768.
Uncheck: View > Auto-resize Guest Display
Excellent! Having got it working once and then somehow breaking it without realising how, this fixed it. Thanks!
- Search for Terminal
- Open Terminal
- Type : Sudo apt-get install virtualbox-guest-dkms
- Wait Until It dones (if anything press enter,Y,OK
- if it done. type : Exit
- Restart your Ubuntu by clicking Shutdown then click Restart!
- If you have black screen wait for 5 minute or above .
- Insert Guest additions in your virtualbox.
- If it said Force Unmount or Unmount .. PRess Cancel!
- You i’ll see its finished now! Press CTRL(right) + F
What. So you mean to tell me that you don’t even have to run virtualboxLinux.run file in the guest addition iso file. I just did what you listed here and it worked.
I had the same problem yesterday. Installing the Guest Additions in Ubuntu resolved the issue. This is the article I found on VirtualBox’s official forum that describes how to install the Guest Additions in any Linux distros.
Once the installation was done and Ubuntu was restarted, Ubuntu was able to detect my host OS’ (Windows 7) screen resolution and adjust automatically.
My answer is related to console mode Linux only. So, please be aware of that.
If you are using Linux with no X-Window installed (like usually servers do) than you’ll need to edit /etc/default/grub file adding following lines:
GRUB_GFXMODE=1980x1200x32 GRUB_GFXPAYLOAD_LINUX=1980x1200x32 and reboot your VirtualBox instance.
If, like me, you have found this post and already have Guest Additions installed and are still having this problem even in Scaled mode, what worked for me is.
- Hit Host+C (for me Right-CTL + C)
- In the VBox header menu, go to: View > Virtual Screen
- Select the «Scale to [some percent] (autoscaled output)» option
(It should then scale to whatever size you’ve stretched the window to w/in a few seconds (if it takes more than 3 it’s not working))
Update 2023
virtualbox-guest-dkms is no longer required.
I noticed a lot of the answers here are from 2010 and haven’t been updated.
As @Julian Wagner pointed out:
If you run sudo apt install virtualbox-guest-dkms , you will get the error
Unable to locate package virtualbox-guest-dkms.
The correct solution for this is to ensure scaled mode is disabled on VirtualBox ( View > Scaled Mode ).
Then, after installation is completed, it’s as simple as right-clicking on the desktop, going into Display Settings and selecting your preferred resolution.
VirtualBox. Как изменить разрешение экрана гостевой системы.

Когда начал изучать программирование на Hexlet, сразу же переехал на Linux, без возможности возврата. Снёс Windows, поставил Ubuntu.
Само собой сразу возникло много вопросов, как всё это работает и куда тыкать. Точно помню, что в курсе «Основы командной строки. Операционные системы», было знакомство с Linux и дополнительные материалы по установке Ubuntu и операционным системам.
Курс мотивировал изучать и исследовать Linux дальше.
В общем и целом мне очень понравилась операционная система — она плавная и аккуратная. И в последствии конечно же захотелось попробовать как можно больше, найти свой дистрибутив и окружение рабочего стола. Чтобы испытать разные дистрибутивы с понравившимся мне DE, плюс для работы на удалёнке, мне нужен был Windows, поэтому я решил использовать VirtualBox.
Так вот, когда меняю разрешение экрана в настройках гостевой системы, нажимаю «Принять», но разрешение не меняется. А иногда необходимых параметров просто нет. Как-будто не установлены драйвера.
Решение
В общем вычитал, что необходимо поставить VBoxGuestAdditions — Гостевые дополнения. Это образ, который необходимо установить в привод виртуальной машины и запустить в гостевой системе. Данное дополнение предоставляет следующие возможности:
- Интеграция указателя мыши (полезно, единый курсор для хоста и гостя)
- Общие папки
- Лучшая поддержка видео (как следствие произвольное изменение сторон экрана)
- Бесшовные окна
- Общие каналы связи основная/гостевая ОС
- Синхронизация времени
- Общий буфер обмена
- Автоматические логины
Всю информацию взял с офф.сайта, где и расположена документация. Если интересны подробности по каждому пункту, ссылку оставлю тут.
Меня интересует конкретно ресайз окна. Сам образ VBoxGuestAdditions можно найти и скачать в сети, но, к сожалению, все источники не официальны. Но этого как оказалось и не требуется, опять же обратимся к докам, тут всё чётко сказано, что при установке лицензионного софта Oracle VirtualBox, VBoxGuestAdditions поставляется с установочным файлом.
Образ можно найти в основной системе:
- Для Windows
- C:\Program files\Oracle\VirtualBox.
- Для Mac OS X
- Файл находится в пакете приложений Oracle VM VirtualBox в папке Contents/MacOS.
- Для Linux
- Обычно /opt/VirtualBox/
В моём случае образ находился по адресу /usr/share/virtualbox/VBoxGuestAdditions.iso
Чтобы проще было его использовать в будущем и каждый раз не вспоминать, где он находится, скопировал образ в домашний каталог.
Далее дело за малым, запускаем гостевую систему, монтируем диск VBoxGuestAdditions.iso в виртуальный привод или наоборот сначала монтируем, потом запускаем.
Ставим на Windows
- При монтировании CD система автозапуска предложит выбрать действие для обнаруженного диска
- Выбираем «Запустить»
- Если не предложит, нужно будет зайти в Проводник/Мой компьютер, открыть папку и запустить файл VBoxWindowsAdditions.exe
- Согласиться с установкой, подружить с антивирусом (Поставить галочку «Доверять»).
- Перезагрузить
Ставим на Linux
- Запустили ОС
- Монтируем диск
- Открываем эмулятор терминала (можно в файловом менеджере открыть папку с образом, правым кликом «Открыть в терминале»)
- sh ./VBoxLinuxAdditions.run
- Перезагрузить
Итог
Указателем мыши меняем размер окна или разворачиваем его на весь экран, рабочий стол гостевой системы меняет параметры разрешения автоматически под текущие размеры.
P.S.
Из опробованных дистров, почему-то не сработало на Ubuntu 18.04 LXQT и Debian или OPENSuse XFCE, точно уже не помню.
How to Change Resolution of a Linux VM in VirtualBox
![]()
When we create a new machine in the VirtualBox and install an operating system, the VirtualBox sets a default screen resolution of 800×600(4:3). However, while working in a Virtual Machine, we often need to have a screen resolution of our own choice. Therefore, there are two ways to change the resolution of any Virtual Machine in VirtualBox.
- By changing the display settings of the Linux operating system
- By installing VirtualBox Guest Addition Image
We will be using the Ubuntu 20.10 operating system installed in VirtualBox and try both of the above-provided methods to change the screen resolution.
Method 1: Change Display Settings
The simplest and quickest way to have a screen resolution of your choice is to change the screen resolution from the display settings of the Linux operating system.
First, go to the settings of the operating system.
In Ubuntu or any other Linux-based operating system, open the application menu.
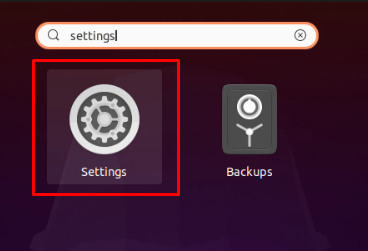
Search for “settings” and open the settings by clicking on the Settings icon from the appeared search results.
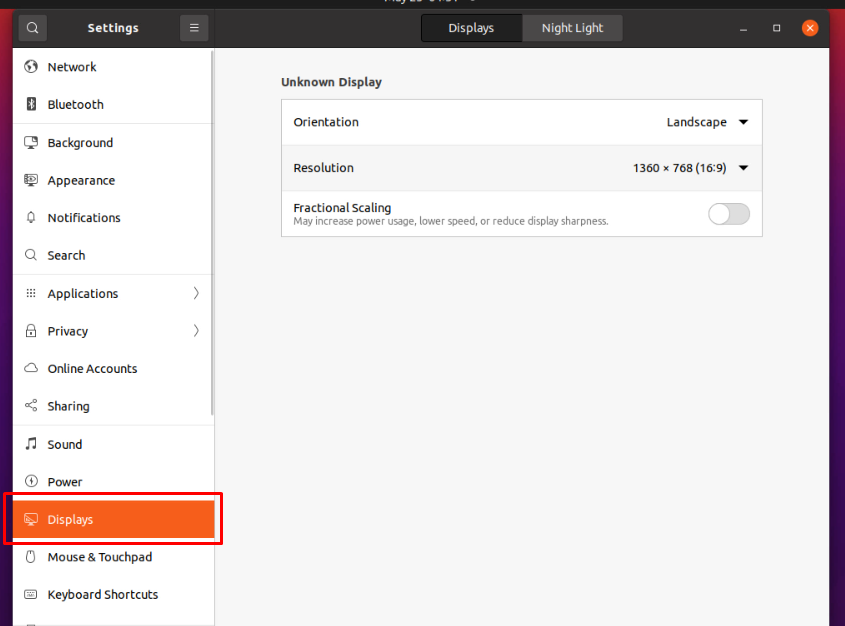
Scroll down through the left menu bar and click on the Display settings.
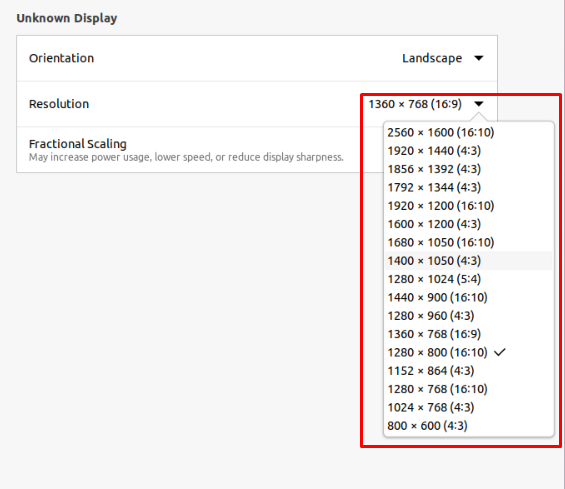
In the display settings section, click on the resolution drop-down menu.
From the drop-down menu, simply choose the resolution of your choice.
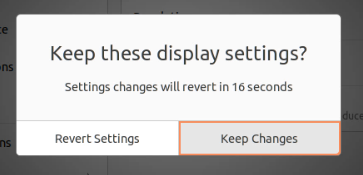
After choosing the suitable resolution of your choice, a green-colored “Apply” button will appear on the top right corner of the window.
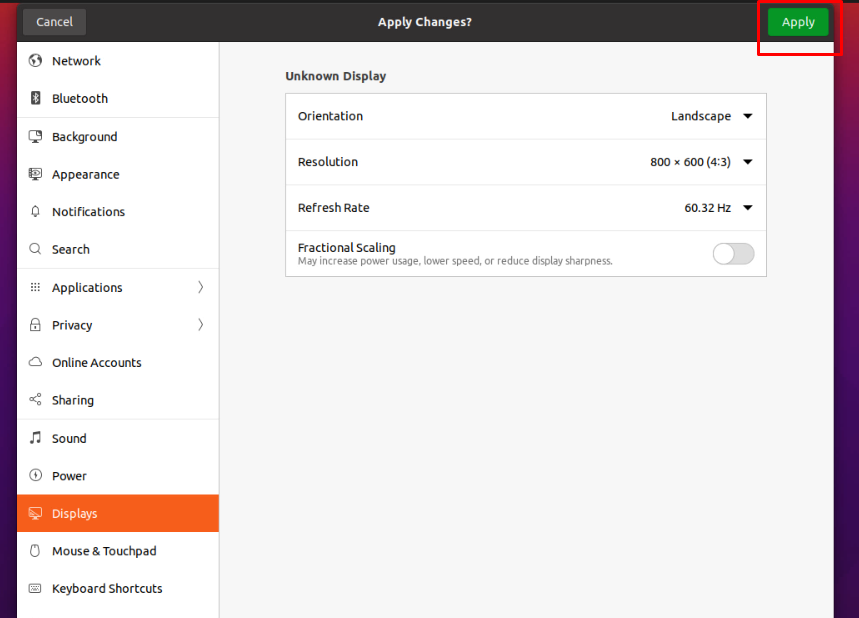
Click on the Apply button and confirm the changed resolution by clicking on the “Keep changes” button that appeared in the pop-up box.
This is it. You have changed the screen resolution of your own choice by changing the display settings of the Linux Operating system.
The limitation of this method is that we have a limited number of options available for changing the screen resolution.
For example, you want to have the screen resolution precisely equal to the screen size of your laptop, but that resolution is not available. In such a scenario, installing VirtualBox Guest Addition comes in handy.
Installation of VirtualBox Guest Addition Image
To install guest additional image in your Virtual Machine, follow the procedure given below:
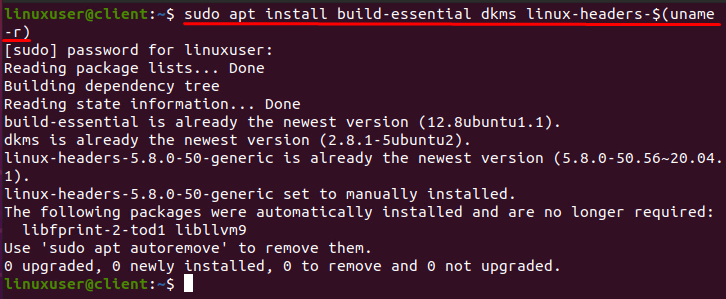
Step 1: Open the terminal of the operating system and execute the command provided below to install some necessary packages for installing Guest Addition Image:
For Ubuntu or Debian-based operating systems:
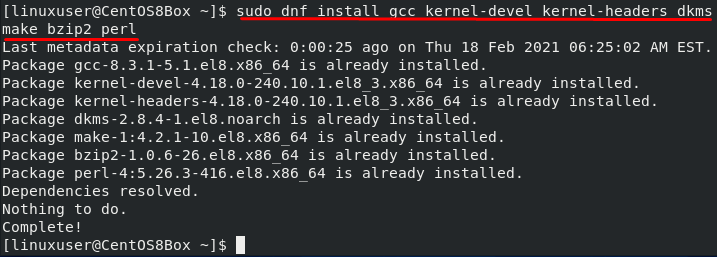
For CentOS or RHEL-based operating systems:
$ sudo dnf install epel-release
$ sudo dnf install gcc perl dkms make kernel-devel kernel-headers bzip2
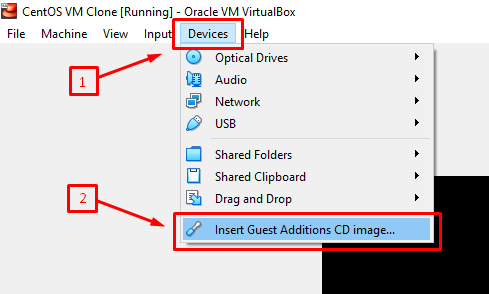
After installing the required packages, insert the Guest Addition CD image.
Step 2: Click on the “Devices” in the menu bar of the Virtual machine and select “Insert Guest Addition CD image” from the “Devices” menu:
The installation will complete in a while.
Once it gets completed, it will ask to reboot the system.
Step 3: Restart the machine, and if it gets successfully inserted and installed, the screen size will automatically be resized according to the size of the window.
But if it is not working for you, then it means that the guest Addition Image is not inserted successfully. You have to insert it manually.
Insert Guest Addition CD Image Manually
First, create a new /mnt/cdrom directory:

After creating, mount the image to the /mnt/cdrom:

Change directory to the /mnt/cdrom and execute the “VBoxLinuxAddition.run” script:

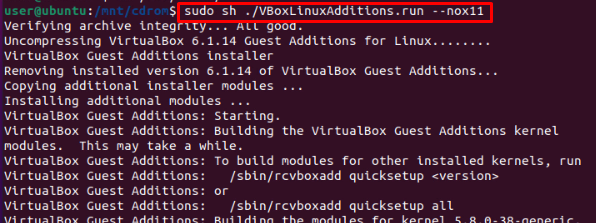
Once the script has finished the execution, reboot the system using the command mentioned below:

After rebooting the machine, the screen size will adjust accordingly. However, it will work perfectly fine now.
You can now easily switch to the full-screen and work with ease on your Linux Virtual Machine.
Conclusion
This post has covered all the basic to pro-level concepts and methods to install the Guest Addition CD Image to change the resolution on any Linux operating system in the virtual machine using the simple way and manually from the terminal. In addition, we have learned to resize the screen resolution by changing the display settings of the operating system.
About the author
Shehroz Azam
A Javascript Developer & Linux enthusiast with 4 years of industrial experience and proven know-how to combine creative and usability viewpoints resulting in world-class web applications. I have experience working with Vue, React & Node.js & currently working on article writing and video creation.