- Команды Linux для тестирования подключения и скорости передачи данных
- Ping
- Traceroute
- Предварительно установите пакет traceroute
- Netcat
- Предварительно установите пакет netcat
- Speedtest
- Предварительно установите пакет speedtest-cli
- nethogs
- How to Test Network Speed in Linux via CLI
- Test Network Speed on Linux Via Command Line
- Using speedtest-cli to Test Internet Speed
- Using fast-cli to Test Internet Speed
- Using CMB to Show Network Speed
- Using iperf to Measure Network Speed Between Two Devices
- Using nload to View Incoming and Outgoing Network Traffic
- Using tcptrack to Test Network Activity
- Using iftop to Test Speed on a Network Interface
- Using wget to Test Download Speed
- Using youtube-dl to Test Internet Speed
Команды Linux для тестирования подключения и скорости передачи данных
![]()
Вот несколько команд Linux, которые могут проверять скорость соединения, анализировать задержки и проверять, доступны ли другие системы.
Существует довольно много инструментов, которые могут помочь проверить ваше подключение в командной строке Linux. В этой статье мы рассмотрим ряд команд, которые могут помочь оценить скорость вашего соединения, проверить, можете ли вы связаться с другими системами, проанализировать задержки соединения и определить, доступны ли определенные службы.
Ping
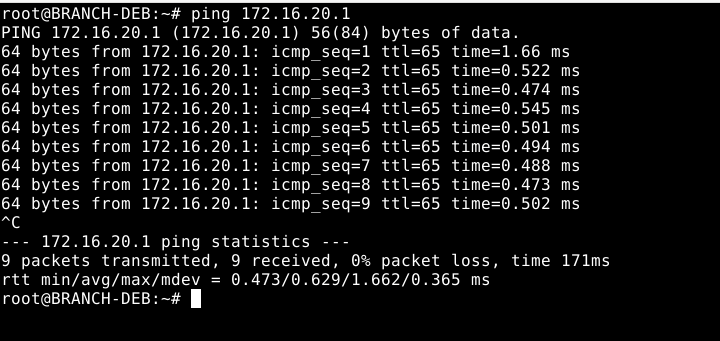
Команда ping-это самая простая и наиболее часто используемая команда для выполнения базового тестирования подключения. Он посылает пакеты, называемые эхо-запросами, и это пакеты, которые запрашивают ответ. Команда ищет ответы и отображает их вместе с тем, сколько времени занял каждый ответ, а затем сообщает, какой процент запросов был получен.
Время отклика будет в значительной степени зависеть от того, сколько маршрутизаторов должны пересечь запросы и перегружена ли ваша сеть. Пингинг локальной системы может выглядеть так. Обратите внимание на небольшое количество миллисекунд, необходимых для каждого ответа, и потерю пакетов в 0%.

В системах Linux эхо-запросы будут продолжаться, пока вы не наберете ^c (CTRL+C), чтобы их остановить. Некоторые системы, включая Windows, выдают четыре эхо-запроса, а затем останавливаются самостоятельно. Удаленная система будет реагировать значительно дольше. Отсутствие потери пакетов — это всегда хороший знак, и даже когда вы проверяете связь с удаленной системой, вы, как правило, ожидаете получить ответ от нее, если только не возникнет проблема.
Команда ping обеспечивает простой способ проверки сетевого подключения для домашней сети. Отправляйте запросы в общедоступную систему, и вы должны ожидать 0% потери пакетов. Если у вас возникли проблемы, команда ping, скорее всего, покажет значительную потерю пакетов.
Traceroute
Предварительно установите пакет traceroute
Traceroute-это гораздо более сложная команда, поскольку она выполняет серию проверок, чтобы увидеть, сколько времени занимает каждый переход между маршрутизаторами, и сообщает об этом обратно. Если общая проверка занимает много времени, это может означать, что один или два прыжка перегружены. Если сообщенные результаты сводятся к последовательности звездочек, то последний достигнутый маршрутизатор не может ответить на используемый тип пакета (UDP по умолчанию в системах Linux).
Команда traceroute использует хитроумную технику для определения времени каждого прыжка. Он использует параметр времени жизни (TTL), который уменьшается с каждым прыжком, чтобы гарантировать, что каждый маршрутизатор на маршруте в какой-то момент отправит обратно сообщение об ошибке. Это позволяет traceroute сообщать о продолжительности времени между каждым переходом.
Вот пример использования traceroute для доступа к локальной системе (один переход и быстрый ответ):

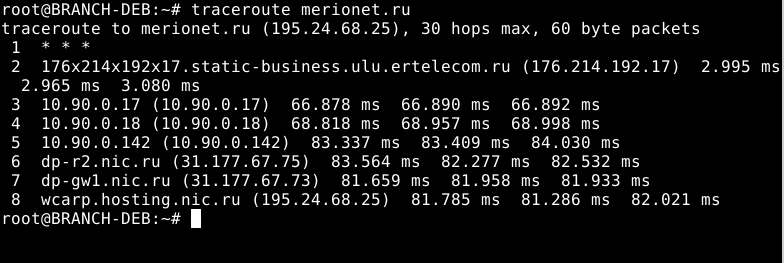
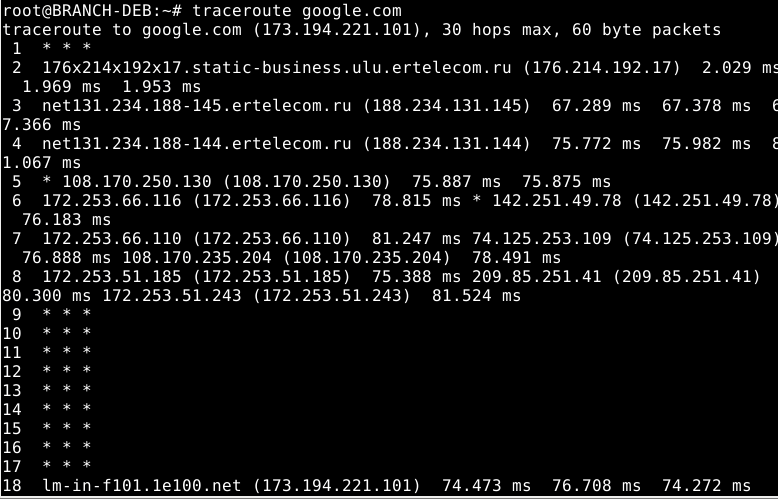
В следующем примере, команда traceroute пытается связаться с удаленной системой, но не может сообщить о каждом прыжке (те, которые показывают звездочки), потому что маршрутизаторы на некоторых прыжках не отвечают на тип используемого пакета. В этом нет ничего необычного.
По умолчанию максимальное количество переходов для traceroute составляет 30. Обратите внимание, что этот параметр отображается в первой строке вывода. Его можно изменить с помощью аргумента -m (например, traceroute -m 50 merionet.ru).

Netcat
Предварительно установите пакет netcat
Команда netcat-это многофункциональная сетевая утилита для записи данных по сети из командной строки, но в форме, показанной ниже, позволяет просто определить, можно ли подключиться к определенной службе. Первоначально он был написан для nmap (the network mapper).
Отправляя нулевые байты (параметр -z) на конкретный порт в удаленной системе, мы можем определить, доступна ли соответствующая служба, не прибегая к фактическому использованию соединения.
Как вы, наверное, заметили, команду netcat можно вызвать с помощью nc или ncat.
Speedtest
Предварительно установите пакет speedtest-cli
Инструмент speedtest проверяет скорость вашего соединения с вашим интернет-провайдером. Обратите внимание, что скорость загрузки нередко бывает значительно ниже скорости выгрузки (отдачи). Интернет-провайдеры понимают, что большинство людей загружают значительно больше данных, чем отправляют. Инструмент speedtest выделит любые различия. В приведенном ниже тесте скорость загрузки не намного превышает скорость загрузки.
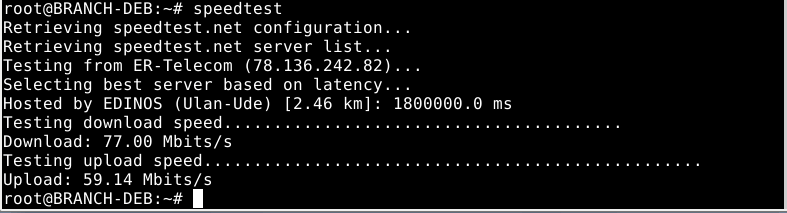
Результаты команд будут несколько отличаться от теста к тесту.
Вы также можете использовать утилиту speedtest через браузер, зайдя на сайт speedtest.net.
nethogs
Команда methods использует совершенно иной подход, чем команды, описанные выше. Он группирует использование полосы пропускания по процессам, чтобы помочь вам точно определить конкретные процессы, которые могут вызвать замедление сетевого трафика. Другими словами, он помогает вам точно определить «net hogs«.
How to Test Network Speed in Linux via CLI
With the increase in people staying at home and spending more time on the Internet, ISPs have seen traffic loads higher than ever. If you noticed your network speed was slower at times, this global overload is the reason.
There are many online tools to test internet speed. However, Linux users can do this from the command prompt window. Some of the utilities for testing both local and internet speed we will cover are:
- Speedtest
- Fast
- Color Bandwidth Meter (CBM)
- iPerf
- nload
- Tcptrack
- Iftop
- Wget
- youtube-dl
Follow the instructions in this article to learn how to test network connection speed on Linux using the terminal. The steps work in both normal and headless mode.

- A machine running Linux
- sudo / root permissions
- Access to a terminal / command-prompt window
Test Network Speed on Linux Via Command Line
The tools in this guide help you check the Internet and LAN speed on a Linux machine. The article uses Ubuntu 20.04 for instructions, but the utilities work for any Linux distribution.
Note: Use the appropriate package manager for your Linux distribution, for example, yum for RHEL / CentOS, to install the apps.
Using speedtest-cli to Test Internet Speed
One of the most famous online internet connection test apps is speedtest.net. To install Speedtest on Linux via the terminal, use a package manager for your distro.
sudo apt install speedtest-cli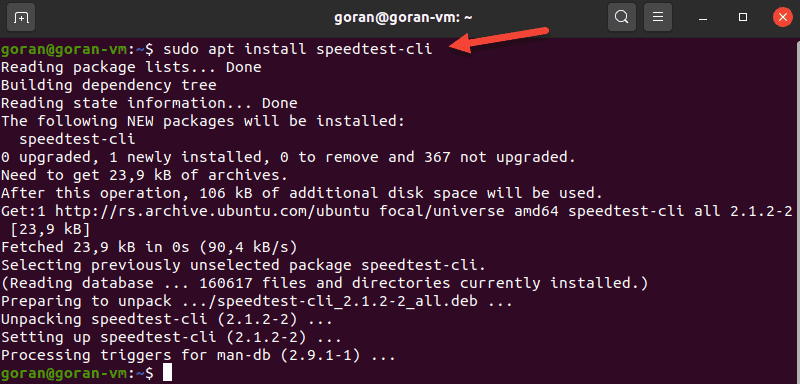
Optionally, use pip to install speedtest-cli in Python:
sudo pip install speedtest-cli
The standard speedtest-cli output shows all steps, including selecting a server. To display a shorter output, enter:
The test is simple to use and provides multiple options. To view all of them, pass the -h flag to display the speedtest-cli help file.
Using fast-cli to Test Internet Speed
Fast is a lightweight CLI utility based on the web speed test fast.com. The test uses Netflix servers to provide results.
Fast-cli is simple to use, but you need the node package manager (NPM) on your machine. The package comes with Nodejs.
For example, to install Node.js version 15, enter these commands:
curl -sL https://deb.nodesource.com/setup_15.x | sudo -E bash -Then, run the install command:
sudo apt install -y nodejsIf needed, run the npm init command and then install Fast:
npm install --global fast-cli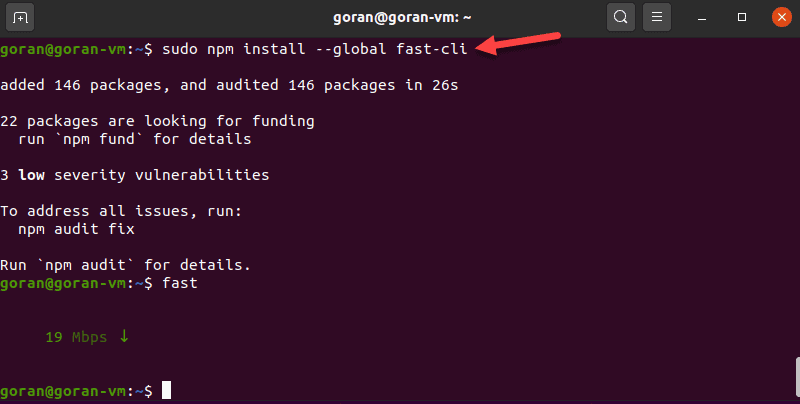
To test the download speed, enter:
To show both the download and upload speed, add the -u option:
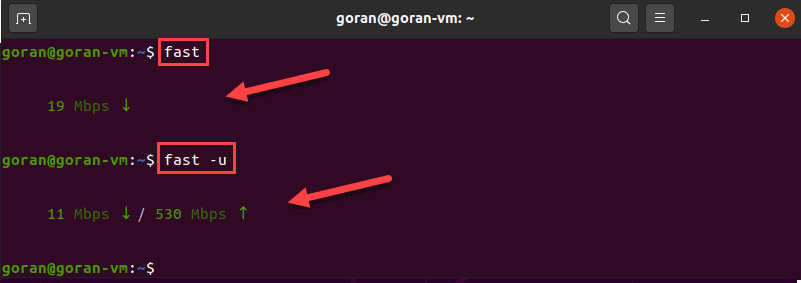
This internet speed test aims to provide only the information about your connection speed, without any bells and whistles.
Note: Since NPM is a requirement, it can be a hassle to install fast-cli. If you need more help with NPM installation, see our guides How To Install Node.Js And NPM On CentOS or How To Install Node.Js & NPM On Ubuntu.
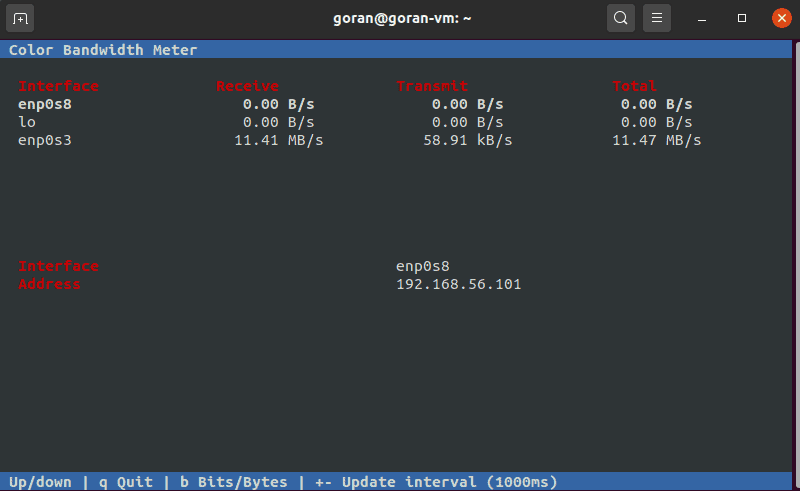
Using CMB to Show Network Speed
The Color Bandwidth Meter (CMB) is a Linux tool that displays activity on all network interfaces. After the installation, run the tool to see network speeds in color-coded columns.
To install CBM, run this command:
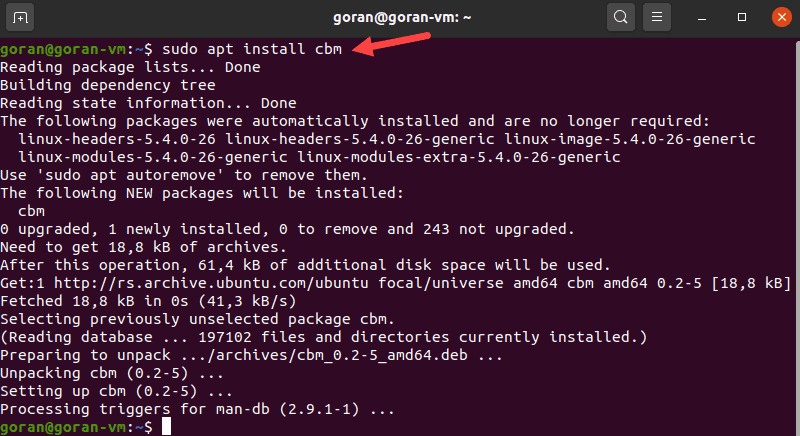
When the process finishes, run the tool:
The output displays the transmit, receive, and total speed. Use the arrows to switch between the interfaces.
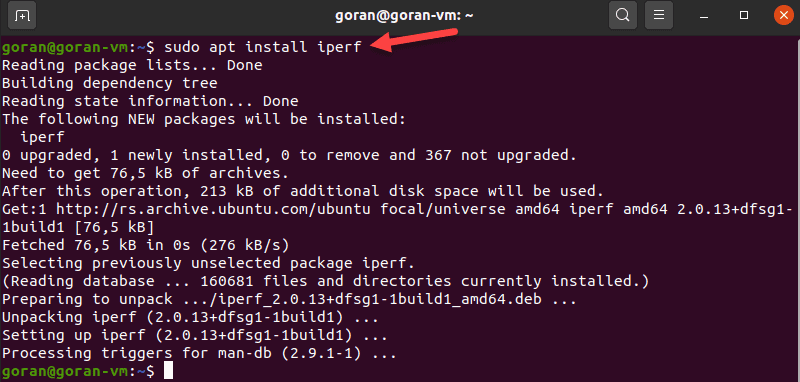
Using iperf to Measure Network Speed Between Two Devices
The iPerf tool provides many options for testing connection speed between a server and a client. Hence, to perform a test, you need to install the utility on both machines:
Make sure the client can reach the server. For quick confirmation, run a ping test.
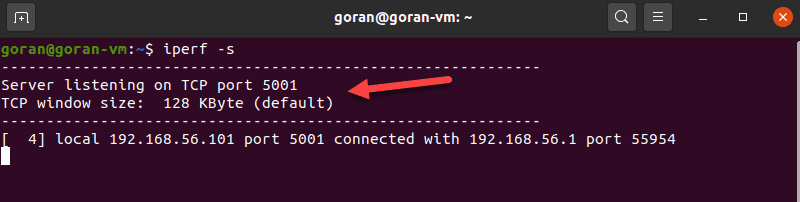
If port 5001 is open, the connection works. So, on the server machine, enter:
The device starts listening for a connection request.
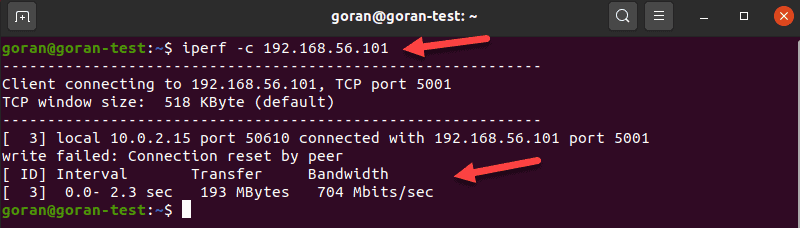
On the other machine, enter:
The output shows the transfer and bandwidth information:
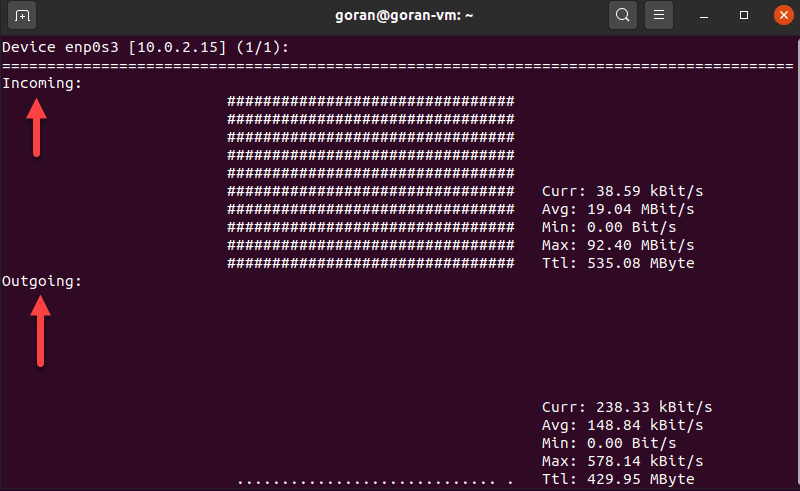
Using nload to View Incoming and Outgoing Network Traffic
Nload is a tool that monitors incoming and outgoing activity on a network interface you specify. The application splits the traffic into two sections for easier data analysis.
To install the tool, enter:
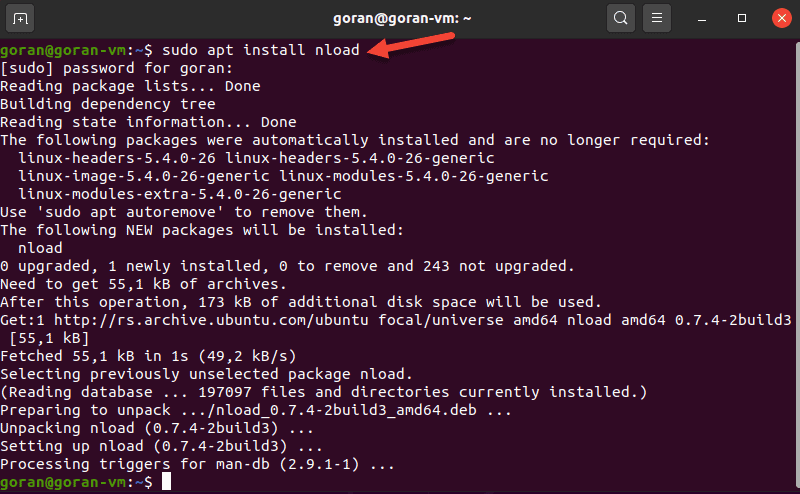
To run the application, specify the network interface:
If there is activity on the selected interface, nload displays network speed details.
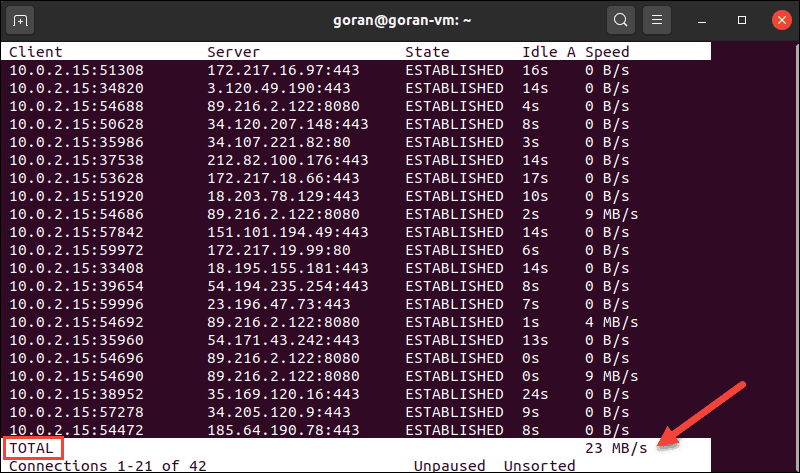
Using tcptrack to Test Network Activity
TCPtrack shows the connection status for a network interface. When your machine’s network is active, run this tool to view and monitor bandwidth speed and usage.
To install tcptrack on Linux Ubuntu, enter:
sudo apt install tcptrack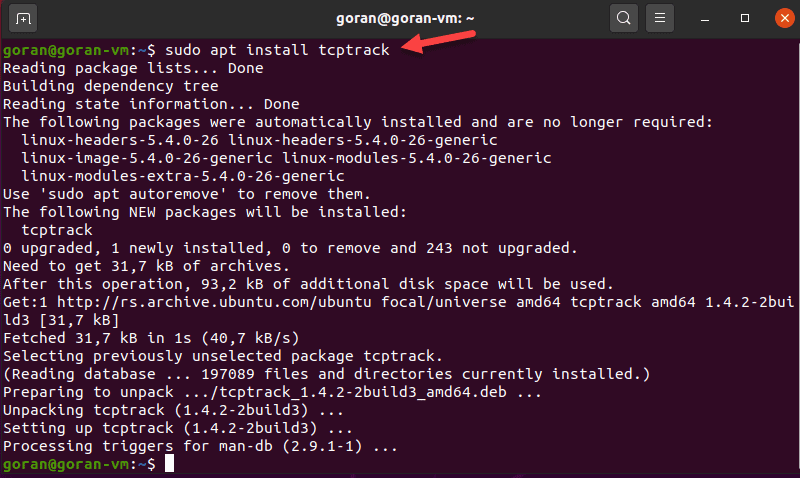
To view network activity with TCPtrack, specify the network interface. To find the device name, use the ifconfig tool.
In our case, it is enp0s3
The terminal displays the network activity on the selected interface. The total network speed is at the bottom of the terminal:
Note: Make sure you run tcptrack with sudo . Otherwise, this error pops up: pcap_open_live: enp0s3: You don’t have permission to capture on that device (socket: Operation not permitted)
TCPtrack is customizable and offers options to narrow down the test to specific ports, for example.
To do so, pass the port option and the port number:
sudo tcptrack -i enp0s3 port 443If there is no activity on the port, the output is blank.
Using iftop to Test Speed on a Network Interface
Iftop lets you view network speed for a defined interface. The tool shows a similar output to what tcptrack provides.
To install iftop, run this command:
To launch the utility, use the -i flag and specify your network interface.
In our case:
The output shows the activity for the device. The bottom of the screen provides a traffic summary.
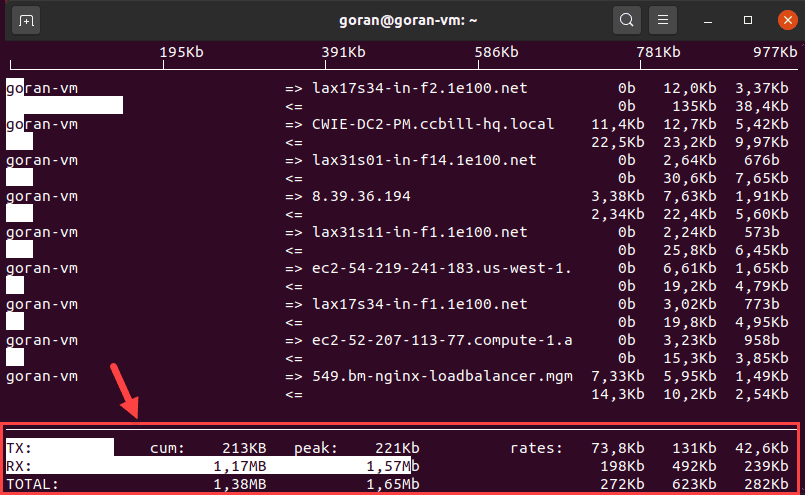
If you do not specify a network interface, iftop selects the first available. Make sure you run the command with sudo to avoid any errors.
Using wget to Test Download Speed
Wget is a CLI tool for downloading content from web servers. Since the tool does not upload files, you can only test the download speed.
If you do not have wget on your Ubuntu machine, enter this command to install it:
Now, choose a reliable server to download a file and test your internet speed. For example, use phoenixNAP’s 1GB test file from the list.
This example uses a server located in Phoenix:
wget -O /dev/null -q --show-progress http://174.138.175.114/PHX-1GB.test
Using youtube-dl to Test Internet Speed
An unconventional way to test your download speed is to use the youtube-dl CLI utility. The tool allows you to download YouTube videos and view the download speed.
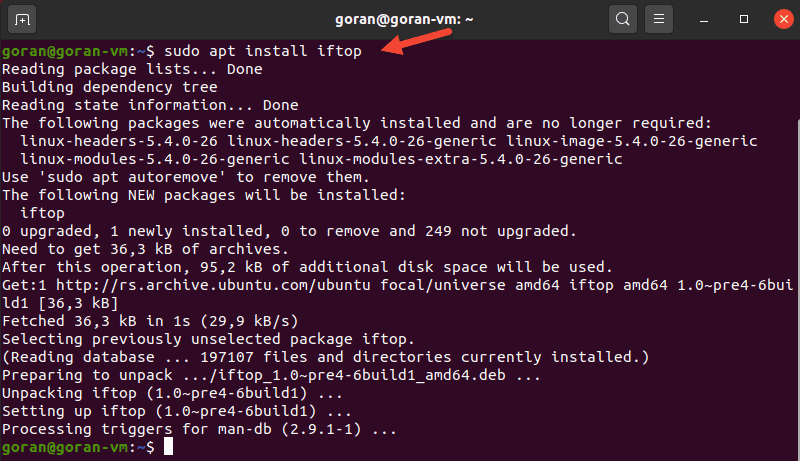
To install youtube-dl, enter:
sudo apt install youtube-dlThe application takes around 268MB of space. While the installation is in progress, choose a video you want to download and save the URL.
When the process finishes, use this command but replace the URL with the one you selected:
youtube-dl -f best --no-part --no-cache-dir -o /dev/null --newline https://www.youtube.com/watch?v=8TLsqgLDMN4The terminal shows the download progress, file size, download speed, and ETA.
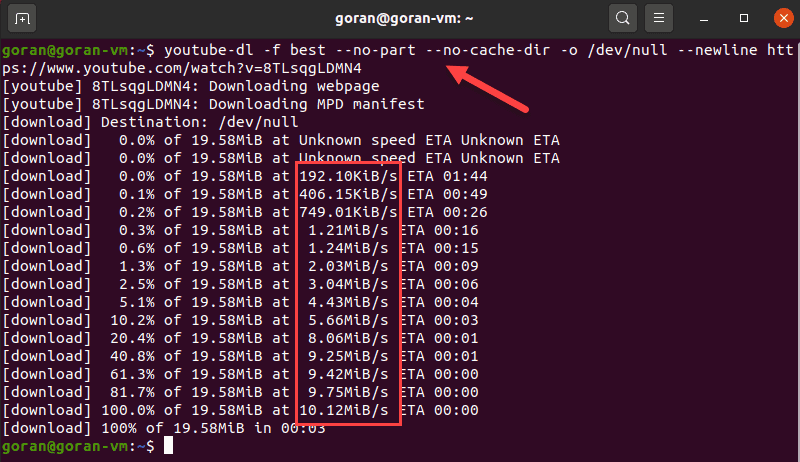
The command above does not save the file to any filesystem, hence the /dev/null part.
This example used a short phoenixNAP BMC demo video of around 19MB. Choose a longer video for more precise results.
The article showed you nine ways to test network speed in Linux via CLI. Choose the tool depending on whether you want to test local network speed, internet speed, etc.
The tools work for all Linux distributions, so make sure you use the right package manager.