- Disk Speed Test (Read/Write): HDD, SSD Performance in Linux
- dd: TEST Disk WRITE Speed
- dd: TEST Disk READ Speed
- dd: TEST Read/Write Speed of an External Drive
- hdparm: Test HDD, SSD, USB Flash Drive’s Performance
- 18 Replies to “Disk Speed Test (Read/Write): HDD, SSD Performance in Linux”
- Как измерить скорость жесткого диска
- Проверка скорости чтения диска
- Проверка скорости записи на диск
- Онлайн курс по Linux
- Скорость Диска (Чтения/Записи): Тест HDD, SSD в Linux
- dd: ТЕСТ Скорости ЧТЕНИЯ Диска
- dd: ТЕСТ Скорость Чтения/Записи Внешнего Накопителя
- hdparm: Проверка Производительности HDD, SSD, USB Флэш Накопителья
Disk Speed Test (Read/Write): HDD, SSD Performance in Linux
From this article you’ll learn how to measure an input/output performance of a file system on such devices as HDD, SSD, USB Flash Drive etc.
I’ll show how to test the read/write speed of a disk from the Linux command line using dd command.
I’ll also show how to install and use hdparm utility for measuring read speed of a disk on Linux Mint, Ubuntu, Debian, CentOS, RHEL.
To get the accurate read/write speed, you should repeat the below tests several times (usually 3-5) and take the average result.
Cool Tip: How to choose SSD with the best quality/price relation! Read more →
dd: TEST Disk WRITE Speed
Run the following command to test the WRITE speed of a disk:
$ sync; dd if=/dev/zero of=tempfile bs=1M count=1024; sync 1024+0 records in 1024+0 records out 1073741824 bytes (1.1 GB) copied, 3.28696 s, 327 MB/s
dd: TEST Disk READ Speed
The file tempfile , that has just been created by the previous command, was cached in a buffer and its read speed is much higher then the real read speed directly from the disk.
To get the real speed, we have to clear cache.
Run the following command to find out the READ speed from buffer:
$ dd if=tempfile of=/dev/null bs=1M count=1024 1024+0 records in 1024+0 records out 1073741824 bytes (1.1 GB) copied, 0.159273 s, 6.7 GB/s
Clear the cache and accurately measure the real READ speed directly from the disk:
$ sudo /sbin/sysctl -w vm.drop_caches=3 vm.drop_caches = 3 $ dd if=tempfile of=/dev/null bs=1M count=1024 1024+0 records in 1024+0 records out 1073741824 bytes (1.1 GB) copied, 2.27431 s, 472 MB/s
dd: TEST Read/Write Speed of an External Drive
Cool Tip: Have added a new drive to /etc/fstab ? No need to reboot! Mount it with one command! Read more →
To check the performance of some External HDD, SSD, USB Flash Drive or any other removable device or remote file-system, simply access the mount point and repeat the above commands.
Or you can replace tempfile with the path to your mount point e.g.:
$ sync; dd if=/dev/zero of=/media/user/MyUSB/tempfile bs=1M count=1024; sync
Reminder: All the above commands use the temporary file tempfile . Don’t forget to delete it when you complete the tests.
hdparm: Test HDD, SSD, USB Flash Drive’s Performance
hdparm is a Linux command line utility that allows to set and view hardware parameters of hard disk drives.
And it can also be used as a simple benchmarking tool that allows to quickly find out the READ speed of a disk.
hdparm is available from standard repositories on the most Linux distributions.
Install hdparm depending on your Linux distribution.
Cool Tip: Troubleshooting an issue with a hard drive performance? It will be a good idea also to test download/upload Internet speed. It can be easily done from the Linux command line! Read more →
On Linux Mint, Ubuntu, Debian:
$ sudo apt-get install hdparm
On CentOS, RHEL:
Run hdparm as follows, to measure the READ speed of a storage drive device /dev/sda :
$ sudo hdparm -Tt /dev/sda /dev/sda: Timing cached reads: 16924 MB in 2.00 seconds = 8469.95 MB/sec Timing buffered disk reads: 1386 MB in 3.00 seconds = 461.50 MB/sec
18 Replies to “Disk Speed Test (Read/Write): HDD, SSD Performance in Linux”
williamj@SilverK:~$ sync; dd if=/dev/zero of=tempfile bs=1M count=1024; sync 1024+0 records in 1024+0 records out 1073741824 bytes (1.1 GB, 1.0 GiB) copied, 0.313688 s, 3.4 GB/s williamj@SilverK:~$ dd if=tempfile of=/dev/null bs=1M count=1024 1024+0 records in 1024+0 records out 1073741824 bytes (1.1 GB, 1.0 GiB) copied, 0.093416 s, 11.5 GB/s williamj@SilverK:~$ sudo /sbin/sysctl -w vm.drop_caches=3 [sudo] password for williamj: vm.drop_caches = 3 williamj@SilverK:~$ dd if=tempfile of=/dev/null bs=1M count=1024 1024+0 records in 1024+0 records out 1073741824 bytes (1.1 GB, 1.0 GiB) copied, 0.7639 s, 1.4 GB/s
“Reminder: All the above commands use the temporary file tempfile. Don’t forget to delete it when you complete the tests.”
I can not find any place where you instruct as to how to delete the tempfile. How is this done safely?
go to directory where you executed the command, in terminal:
““rm tempfile““
or in a gui select the file and delete it.
I must have done something wrong. I tested first with bs=4k and count=256k.
It finished quickly.
Afterwards I decided myself to alter the parameters like so: bs=1M and count=256k
I didn’t know exactly what I was doing. I left it running not having slightest hunch if it’s wrong to interrupt it via Ctrl-C. It run approximately 1000 seconds having written almost 100GB of all 150GB free on the SSD. Only then I’ve read the man pages searching for clues but still didn’t found. So I have a couple of questions if kindly allowed. That ‘k’ at the end of count I am not sure of it’s meaning or even if it makes sense. I have to also ask what would have happened if the command filled the whole free space? Would it have stopped by itself with message/error? Was it dangereous for an ssd doing this. The fact I performed it from sysresccd on ssd with Windows installed has any effect on outcome?
I mean the if = is it from the RAM memory? I specified an of= on the ssd after mounting it like /mnt/windows/some.output.file. Is the way I did it significant for the results?
@JON > bs=4k and count=256k
k means what it always means: about 1,000, but in the case of computers (here), usually 1024. “bs” means block size, “count” means number of blocks. So this means write 4k x 256k bytes. 1k x 1k = 1 megabyte (about 1,000 x about 1,000 = about 1,000,000). How many megabytes? Since we already took care of the ‘k’s; 4x 256 = 1024 (aka about 1000, or 1k again.) What’s 1k x 1k x 1k? 1 gigabyte (about 1,000,000,000.) You wrote 1 gigabyte of zeros. Therefore, > bs=1M and count=256k 1M = (1k x 1k)
(1k x 1k) x 1k(the k from “count”) = 1 gigabyte
1 gigabyte x 256 = 256 gigabytes. You were writing 256 gigabytes of zeros. Your drive is only 150 gigabytes in size. It won’t hurt your drive, it will just delete everything on your drive. When it fills your drive, it will stop. The “if” is not from ram, it is a program (/dev/zero) in your system disguised as a file but whenever it is read is just endless zeros.
How to check sdb drive?
Should I use /dev/sdb instead of /dev/zero here:
sync; dd if=/dev/zero of=/media/user/MyUSB/tempfile bs=1M count=1024; sync
?
I think you missed the best software package for this kind of tests. It’s called fio:
https://github.com/axboe/fio/
It’s not accurate. The second sync does not influence the measurement (it’s being run after dd reports the results) and thus it’s influenced by caching. If you try the same test with 4096 or 8192 megs, you’ll have worse results (but closer to the reality). One way to correct for this is measuring the whole process with the time command and then doing the division manually. E.g.:
# time (sync; dd if=/dev/zero of=tempfile bs=1M count=8192; sync) You’ll see that dd will report a higher throughput, but you can then divide 8192 with whatever seconds time comes up with.
You need `conv=fdatasync` in your dd commands to include flush and sync time. Otherwise the results will be way too high, as others have mentioned.
/dev/sdb2:
Timing cached reads: 16830 MB in 1.99 seconds = 8454.99 MB/sec
Timing buffered disk reads: 434 MB in 3.01 seconds = 144.27 MB/sec
Hello, after doing some tests with different “GB” my storage on NVMe was filled with 7% (56GB), can I delete that storage or stay there permanently?
Как измерить скорость жесткого диска
Иногда хочется быстро прикинуть, как работает дисковая подсистема, либо сравнить 2 жестких диска. Очевидно, что измерить реальную скорость дисков практически невозможно, она зависит от слишком большого числа параметров. Но получить некое представление о скорости дисков можно.
Если у вас есть желание научиться профессионально строить и поддерживать высокодоступные виртуальные и кластерные среды, рекомендую познакомиться с онлайн-курсом Администратор Linux. Виртуализация и кластеризация в OTUS. Курс не для новичков, для поступления нужно пройти вступительный тест.
Проверка скорости чтения диска
Проще всего измерить скорость диска с помощью программы hdparm. Установить ее очень просто:
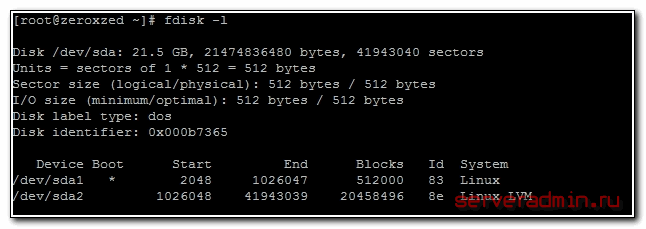
Теперь нужно вывести список дисков и разделов в системе:
Выбираем нужный раздел и проверяем скорость чтения:
Обращаю ваше внимание еще раз на то, что мы видим очень примерные цифры, которые имеют значение только в сравнении с другими цифрами, полученными в схожих условиях. hdparm выполняет последовательное чтение с диска. В реально работе скорость чтения диска будет другой.
Проверка скорости записи на диск
Для того, чтобы измерить скорость записи на диск, можно воспользоваться стандартной утилитой linux — dd. С ее помощью мы создадим на диске файл размером 1 Gb частями по 1Mb.
Измеряем скорость записи на диск:
# sync; dd if=/dev/zero of=tempfile bs=1M count=1024; sync
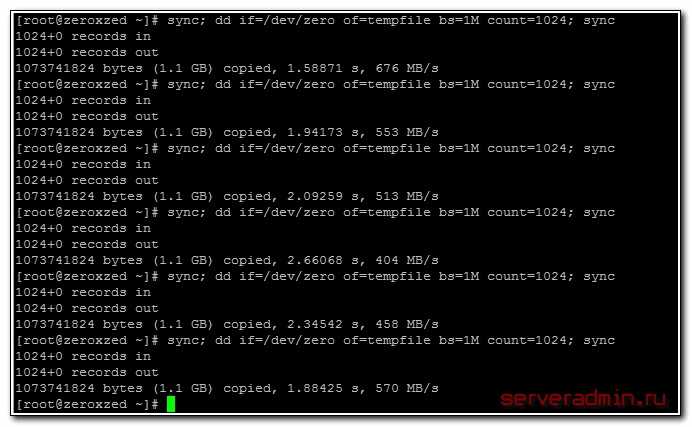
Я измерял скорость на виртуальной машине, диск которой был размещен на RAID5, собранным из 5-ти дисков SAS 10к. В принципе, неплохой результат. Можно изменить размер файла и блоков, из которого он записывается. Если сделать файл побольше, результат скорости диска может получиться более приближенный к реальности.
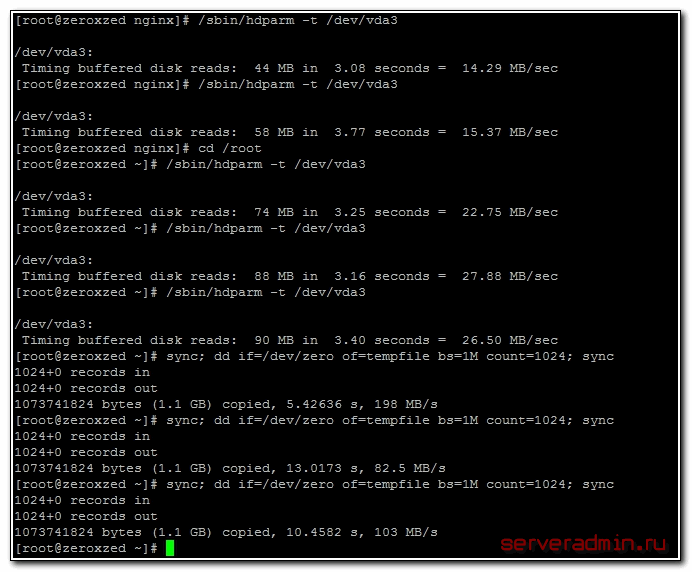
А вот скорость диска на VDS, который я арендую. Результат в разы хуже:
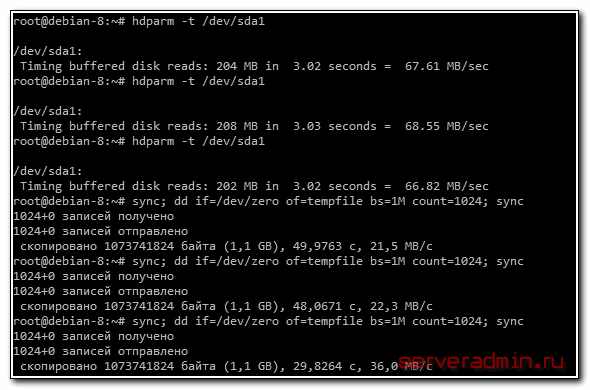
Скорость диска на виртуальной машине, расположенной на втором SATA диске моего рабочего ноутбука:
Результат не очень, надо разбираться в чем дело. Давно возникли подозрения, что с диском что-то не то, заметно подтормаживают виртуальные машины, хотя раньше это было не заметно. Жаль, результатов более ранних тестов не сохранилось.
Интересно было бы посмотреть на ваши результаты тестов. Если же вы хотите серьезно измерить скорость дисков, то вам сюда — Как правильно мерять производительность диска.
Онлайн курс по Linux
- Умение строить отказоустойчивые кластера виртуализации для запуска современных сервисов, рассчитанных под высокую нагрузку.
- Будете разбираться в современных технологиях кластеризации, оркестрации и виртуализации.
- Научитесь выбирать технологии для построения отказоустойчивых систем под высокую нагрузку.
- Практические навыки внедрения виртуализации KVM, oVirt, Xen.
- Кластеризация сервисов на базе pacemaker,k8s, nomad и построение дисковых кластеров на базе ceph, glaster, linstore.
Скорость Диска (Чтения/Записи): Тест HDD, SSD в Linux
Выполните следующую команду для определения скорости ЗАПИСИ на накопитель:
dd: ТЕСТ Скорости ЧТЕНИЯ Диска
Файл tempfile , сгенерированный предыдущей командой, был закэширован в буфер и скорость его чтения будет намного выше чем реальная скорость чтения непосредственно с жесткого диска.
Чтобы получить реальную скорость, необходимо предварительно очистить кэш.
Выполни следующую команду, чтобы узнать скорость ЧТЕНИЯ из буфера:
Очистите кэш и измерьте реальную СКОРОСТЬ чтения непосредственно с жесткого диска:
dd: ТЕСТ Скорость Чтения/Записи Внешнего Накопителя
Для проверки производительности какого-либо внешнего HDD, SSD, USB Флэшки либо другого съемного носителя или удаленной файловой системы, просто перейдите в точку монтирования и выполните приведенные выше команды.
Либо, вместо tempfile , можно непосредственно прописать путь к точке монтирования, например:
Напоминание: Все приведенные выше команды используют временный файл tempfile . Не забудьте удалить его по окончанию тестов.
hdparm: Проверка Производительности HDD, SSD, USB Флэш Накопителья
hdparm — это утилита для командной строки в Linux, которая позволяет просматривать и менять параметры жестких дисков.
Так же она может использоваться в качестве простой утилиты для сравнительного анализа, которая позволяет быстро узнать скорость ЧТЕНИЯ с диска.
hdparm доступен из стандартных репозиториев в большинстве Linux дистрибутивах.
Установите hdparm , в зависимости от вашего Linux дистрибутива.
В Linux Mint, Ubuntu, Debian:


