- how can I find JRE version of running application in Linux server
- 1 Answer 1
- How to Check Java Version Installed on Linux
- Method 1: Check the Java Version On Linux
- Method 2: Find Version by Checking Path Where Java is Installed
- Method 3: Search for Java in the Installed Packages List
- Install the Java Runtime Environment
- What you’ll learn
- What you’ll need
- 2. Installing OpenJDK JRE
- 3. Installing Oracle HotSpot JRE
- Downloading the Oracle HotSpot JRE binaries
- Installing
- Post-installation steps
- Need further assistance?
how can I find JRE version of running application in Linux server
No, there is no such thing as «JRE 1.42». The output means you’re using Java 7 update 45. Java is installed in such a way that it overrides what the alternatives mechanism provides, so the output of the alternatives command is not important. You also have the Eclipse Java compiler in your path instead of the Java compiler from the JDK.
Thanks for the reply, Actually I am getting «Unsupported major.minor version 51.0» error after uploading a external jar file to Informatica powercenter Java transformation. The class files in jar file have been compiled with 1.7 and tried with other versions too after getting this error while running session. I suspect my Informatica application is running in JRE 1.4 ? does it make sense or any other thoughts ?
That error means you have classes compiled with JDK 7 but you are running them on an older Java version, so somehow indeed something older than the Java 7 that you have installed is being picked up.
1 Answer 1
It would appear that you have two versions of Java installed:
- The Java on your PATH is Java 1.7.0. I think it is an Oracle build rather than a build from your Linux system’s package repository.
- The Java configured using alternatives looks like a GCJ Java that is compatible with Java 1.4.2. It was probably installed from your package repository. IMO, it is inadvisable to use this from a technical standpoint. In fact, I would recommend uninstalling it.
Actually I am getting «Unsupported major.minor version 51.0» error after uploading a external jar file to Informatica powercenter Java transformation.
That implies that Informatica is using the Java 1.4.2 installation.
Now, the version of Java that an application uses will depend on what version of Java the application’s launcher / launch script is using. That could depend on a number of things:
- If the launcher uses an absolute path for the java command, then that is what will use.
- If the launcher uses a simple name (e.g. java ) then the version used will depend on the launcher’s $PATH . This is probably what is happening . and the $PATH used is different from your shell’s $PATH .
- You could add the Oracle Java install to the alternatives system. See man alternatives or Google for instructions using «java oracle alternatives install»
- You could tweak the $PATH used by the application’s launcher.
- Depending on your Linux distro, you could install an OpenJDK 1.7.0 JDK or JRE from the package repos. That will (should) add the new installed Java to the alternatives database, so that you can select it instead of the old GCJ 1.4.2 installation.
How to Check Java Version Installed on Linux
How do I check my current Java version? There are several ways to check if Java is installed and which version is running on your system.
In this tutorial, learn how to check the Java version installed on Linux distros, including Ubuntu, CentOS, and Debian.
- A user account with sudo privileges
- Access to the command-line/terminal window
- A version of Java
Method 1: Check the Java Version On Linux
To check the Java version on Linux Ubuntu/Debian/CentOS:
2. Run the following command:
3. The output should display the version of the Java package installed on your system. In the example below, OpenJDK version 11 is installed.

Note: If the output indicates there is no such package on the system, you can install it with the help of one of our guides – How to install Java on Ubuntu or How to Install Java on CentOS.
You can also check the version of the primary Java compiler – javac (pronounced “java-see”) with the command:
![]()
Method 2: Find Version by Checking Path Where Java is Installed
There are two ways to find the path of the Java directory.
The first option includes running a single command:
update-alternatives --list javaThe system should respond with the path where Java is installed.
![]()
Note: This option may not work on CentOS systems. If you have issues finding the path of the Java directory with the command above, use the alternative outlined below.
Alternatively, you can use the whereis command and follow the symbolic links to find the Java path.
![]()
The output tells you that Java is located in /usr/bin/java.
2. List the content of the /usr/bin/java directory:
![]()
Inspecting the directory shows that /usr/bin/java is only a symbolic link for /etc/alternatives/java.
3. Just like in the previous step, list the content of the provided path by running:

Finally, the output displays /etc/alternatives/java is another symbolic link and that the real path of the Java directory is /usr/lib/jvm/java-11-openjdk-amd64/bin/java.
Method 3: Search for Java in the Installed Packages List
You can also prompt the system to list installed packages and search for Java, with its version number.
Find Java by listing all installed packages.
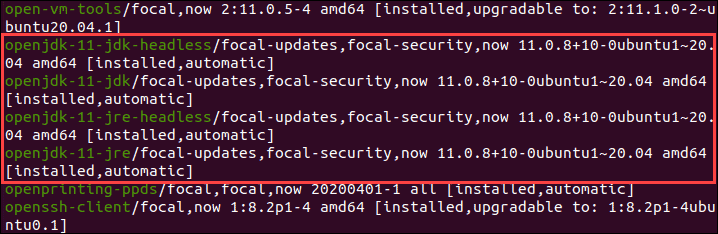
1. To generate a list of all installed packages, use the command:
2. Scroll up/down until you find the Java packages as shown in this example.
To avoid searching through all installed packages, list Java packages only. Prompt the system to list a specific software package. In this case, the package name is openjdk:
sudo apt list --installed | grep -i openjdk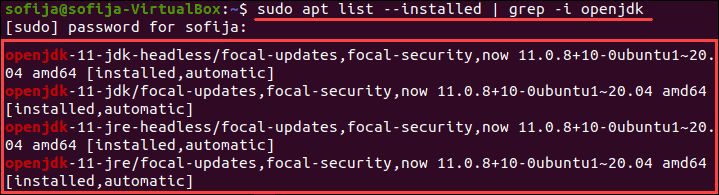
Note: CentOS users need to modify the commands for listing installed packages for their package manager. Use the commands: sudo yum list installed and sudo yum list installed | grep -i openjdk instead.
With this article, you have successfully checked the Java version installed on Linux. We also covered checking the Java path and searching for Java among the installed packages.
Once the Java version is confirmed, you can start developing anything from lightweight mobile to desktop applications.
Install the Java Runtime Environment
The Java Runtime Environment (JRE) is required to run Java programs. Nowadays there are many JRE packages available from a variety of projects and companies, but the two most popular on Ubuntu are OpenJDK and Oracle HotSpot. Using one package over the other should not create any functional difference in most applications; however, some prefer OpenJDK over Oracle HotSpot as the former does not contain closed-source components, has a much clearer licensing and support policy, and is maintained as part of the Ubuntu archive, with easier installation and upgrades.
In this guide, we’ll be going through the installation of both JRE packages. Of course, you generally only need to pick the one that best suits your needs and preferences.
What you’ll learn
What you’ll need
That’s all you need. If you have that, let’s proceed to the next step!
2. Installing OpenJDK JRE
With new versions of Java released every 6 months, there are multiple versions available for use. Nowadays, Java 11 is the current Long Term Support (LTS) version, but Java 8 is still widely used. Moreover, the non LTS versions of Java are bringing a steady stream of innovation into the language, and also see some adoption.
Ubuntu offers the default-jre package, which is regularly updated to ship the latest version of the current OpenJDK JRE in Long Term Support (LTS). The default-jre is an excellent choice for most situations, thanks to the outstanding track of backwards compatibility of the Java Virtual Machine.
(Alternatively, you may opt to use a specific Java version, using for example the openjdk-11-jre package; as updates are released for that version of the Java Virtual Machine, that packages will be updated, allowing you to stick to the latest and greatest update of one specific version of the Java language.)
To install the OpenJDK JRE, we run:
sudo apt install default-jre We can check if OpenJDK JRE was properly installed by running:
It should output the following:
openjdk version "11.0.11" 2021-04-20 OpenJDK Runtime Environment (build 11.0.11+9-Ubuntu-0ubuntu2) OpenJDK 64-Bit Server VM (build 11.0.11+9-Ubuntu-0ubuntu2, mixed mode) (Although the output may change in the future as new Java versions are promoted to LTS status, or the current LTS version receives updates.)
In the next step we’ll install Oracle HotSpot JRE.
3. Installing Oracle HotSpot JRE
Downloading the Oracle HotSpot JRE binaries
Download JRE binaries in .tar.gz (tarball) by heading over to their website. An Oracle account is needed to download the Oracle HotSpot JRE.
Oracle does not currently offer JRE packages for Java 11 or above from their website so, for this tutorial, we will use the Oracle HotSpot JRE version to be 8u291 (Java 8, update 291).
Installing
Create a directory to install JRE in with:
Move the JRE binaries into the directory:
sudo mv jre-8u291-linux-x64.tar.gz /usr/local/java Go into the install directory:
sudo tar zxvf jre-8u291-linux-x64.tar.gz Post-installation steps
To save space, delete the tarball by running:
sudo rm jre-8u291-linux-x64.tar.gz Let the system know where JRE is installed:
sudo update-alternatives --install "/usr/bin/java" "java" "/usr/local/java/jre1.8.0_291/bin/java" 1 After that’s done, check the installation by running:
It should output the following:
java version "1.8.0_291" Java(TM) SE Runtime Environment (build 1.8.0_291-b10) Java HotSpot(TM) 64-Bit Server VM (build 25.291-b10, mixed mode)