Dell
- Please be advised HP was previously blocking review of their software updates (BIOS, firmware, drivers, etc.) from non-Windows operating systems for many PC models. This was last identified for HP Pavilion Elite d5200t ATX CTO Desktop PC but has since been partially fixed. What happened previously was the Software & Drivers tab at the top was missing. If one uses any browser in Windows, the tab did show up. To work around this problem, one may change the URL from:
http://support.hp.com/us-en/product/HP-Pavilion-Elite-d5200-ATX-Desktop-PC-series/3824586/model/3824587
http://support.hp.com/us-en/drivers/selfservice/HP-Pavilion-Elite-d5200-ATX-Desktop-PC-series/3824586/model/3824587
Boot into BIOS (F10) to upgrade BIOS
- One may update the BIOS during startup via the F10 menu. Please keep in mind that the USB drive must be formatted with FAT32 (NTFS won’t work).
Lenovo
- Lenovo makes available up to three different methods with which to update the BIOS. They are presented in the order one should utilize them:
- A self-contained bootable ISO environment. There are instances where one may not update via the Windows .exe, and only update to a certain level via the ThinkVantage System Update. Hence, it is recommended to try this first.
- Windows only executable file.
- ThinkVantage System Update. In certain circumstances, the Windows only executable file may not work. However, the ThinkVantage System Update has a different update implementation, that may work when the Windows only executable file does not.
- MSI offers an update via a command from within the UEFI/BIOS to select and load a specific file from a USB drive.
- Boot into the BIOS setup (by pressing DEL-key while MSI splash screen is shown).
- Take note of the exact model (e.g. GE70 2oe).
- Take note of the currently installed BIOS version (e.g. E1757IMS.517).
- Take note of any changed configuration (as these will all be reset to defaults).
- Search MSI’s website for the exact model (if you can’t find it, try to create an account and register your device via its serial number from inside the battery compartment).
- Download and extract update file (~ 8 MB) to a USB stick following this guide.
- Reboot into BIOS and start the update by selecting the file (e.g. E1757IMS.520).
- If after the update Ubuntu isn’t starting and instead fails with a red failure dialog, check the boot options in your BIOS (e.g. try «UEFI with CSM»).
Samsung
- Unfortunately, for many models, Samsung does not provide via their website the option to see the latest BIOS version, the release notes for a given BIOS version, or allow one to download a dedicated, OS vendor independent BIOS upgrade method. Instead, they provide a Windows only software update program called Samsung PC Update or SW Update, that is used to both check if a BIOS update is available, and if so, then download and install via this program.
Toshiba
- Toshiba has made available a BIOS .exe for certain models (ex. Toshiba Satellite L305D-S5934) that when executed, generates an ISO to burn to disc, and in turn allows one to boot to the disc to update the BIOS. This .exe was successfully run in Ubuntu via WINE to generate this ISO, the ISO burned in Ubuntu, and the BIOS updated successfully.
Vendor independent updating methods
- Windows 10
- One may temporarily install Windows 10 to update the BIOS from here.
- Windows Evaluation
- One may utilize an evaluation copy of Windows from here to update when one may only use Windows.
- Windows System Repair Disc
- In Windows 7, create a System Repair disc. Put the BIOS file on a spare USB drive (formatted as FAT32), boot to to the System Repair disc, navigate to the USB via command line and execute the file.
- USB Recovery Drive
- In Windows 8.1, create a USB recovery drive. Put the BIOS file on the USB drive.
- Boot into Windows
- One may do this via swapping in dedicated drive, or dual boot.
- In a Windows Enterprise environment, use Windows To Go.
- Request or download Windows recovery media from the vendor, so one may utilize it for an update.
- FreeDOS
- Boot to FreeDOS and execute the .exe file. If one is using UEFI, one may want to use Legacy mode, versus UEFI.
- Step-by-step instructions — http://www.linuxinsight.com/how-to-flash-motherboard-bios-from-linux-no-dos-windows-no-floppy-drive.html
- flashrom
- http://www.flashrom.org/Supported_hardware
- WINE
- While Using WINE worked once for one person, for one piece of hardware, at one point in time of Ubuntu and WINE development, it would be considered a last resort. It would be conservative to believe that using WINE to update the BIOS holds a potentially higher risk in comparison to using Windows to damage your motherboard beyond troubleshooting, necessitating a warranty event or purchase of a new motherboard.
- Question: What tools in linux are available to indicate my BIOS would want to be upgraded?
Answer: One may utilize fwts, as well as review your dmesg logs for errors. - Question: Is updating the BIOS of a host possible with a virtualized guest environment?
Answer: No. - Question: Are BIOS updates risky?
Answer: No. OEMs typically advise when performing a BIOS update, do not interrupt the power supply. - Question: My logs advised to update my BIOS should I?
[ 1.770772] [drm] Wrong MCH_SSKPD value: 0x16040307 [ 1.770774] [drm] This can cause pipe underruns and display issues. [ 1.770775] [drm] Please upgrade your BIOS to fix this.
See Also
External Links
Обновление BIOS из под Ubuntu 10.10. Весь процесс от начала и до конца.
BIOS (базовая система ввода/вывода), позволяющая операционным системам и оборудованию корректно взаимодействовать друг с другом, присутствует в каждом современном компьютере и располагается в чипе на материнской плате.
Чтобы узнать версию BIOS , выполните в Ubuntu следующую команду:
keiz@ekz:~$ sudo dmidecode -s bios-version
Чтобы посмотреть дату релиза BIOS вашего компьютера , выполните команду:
keiz@ekz:~$ sudo dmidecode -s bios-release-date
Узнаем марку нашей материнской платы :
keiz@ekz:~$ sudo dmidecode —type baseboard
Handle 0x0002, DMI type 2, 8 bytes
Manufacturer: Gigabyte Technology Co., Ltd.
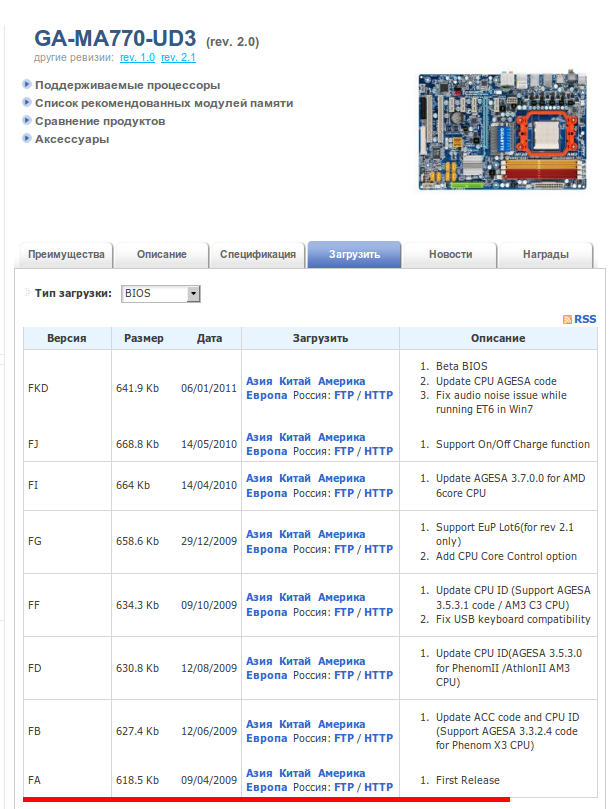
Product Name: GA-MA770-UD3
Как видим в моем случаем материнская плата фирмы Gigabyte. Заходим на официальный сайт и смотрим есть ли обновления для моего биоса. Оказывается я давненько не следил за обновлениями: у меня самый первый релиз.
Для обновления версии Биоса из под Операционной системы Ubuntu понадобится следующая утилита: — flashrom.
keiz@ekz:~$ sudo aptitude search flashrom
p flashrom — Identify, read, write, erase, and verify BIOS/ROM/flash chips
keiz@ekz:~$ sudo aptitude install flashrom
Перед записью новой прошивки в БИОС, желательно сохранить старую версию , то есть скопировать прошивку, которая уже прошита в БИОСе, чтобы потом можно было легко восстановить все обратно:
keiz@ekz:~$ mkdir bios
keiz@ekz:~$ cd bios/
keiz@ekz:~/bios$ sudo flashrom -r bios_fa_09_04_2009.bin
Смотрим информация по нашему файлу:
keiz@ekz:~/bios$ file bios_fa_09_04_2009.bin
Скачав последнюю версию Биоса обнаруживаем, что программа предназначена под операционную систему Windows, исправив это воспользуемся пакетом эмуляции wine, он поможет распаковать исполняемый файл.
Где файл MA77UD32.FKd — и есть сама прошивка с официального сайта (на сайте расположены exe-файлы, но это всего лишь SFX-RAR архив с самой прошивкой и программой-флэшером для ДОСа).
Записываем скачанную прошивку в Биос на свой собственный риск:
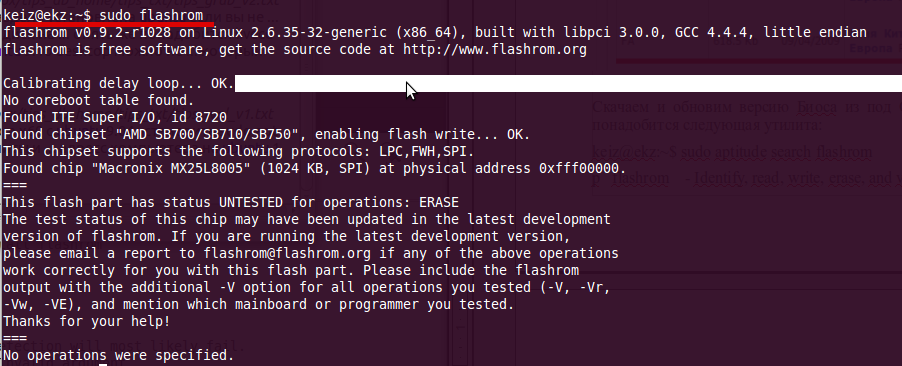
keiz@ekz:~/bios$ sudo flashrom -w MA77UD32.FKd
flashrom v0.9.2-r1028 on Linux 2.6.35-32-generic (x86_64), built with libpci 3.0.0, GCC 4.4.4, little endian
flashrom is free software, get the source code at http://www.flashrom.org
Calibrating delay loop… OK.
Found ITE Super I/O, id 8720
Found chipset «AMD SB700/SB710/SB750», enabling flash write… OK.
This chipset supports the following protocols: LPC,FWH,SPI.
Found chip «Macronix MX25L8005» (1024 KB, SPI) at physical address 0xfff00000.
This flash part has status UNTESTED for operations: ERASE
The test status of this chip may have been updated in the latest development
version of flashrom. If you are running the latest development version,
please email a report to flashrom@flashrom.org if any of the above operations
work correctly for you with this flash part. Please include the flashrom
output with the additional -V option for all operations you tested (-V, -Vr,
-Vw, -VE), and mention which mainboard or programmer you tested.
Flash image seems to be a legacy BIOS. Disabling checks.
Writing flash chip… Erasing flash before programming… Erasing flash chip… SUCCESS.
Теперь можно перезагрузиться с новым биосом .
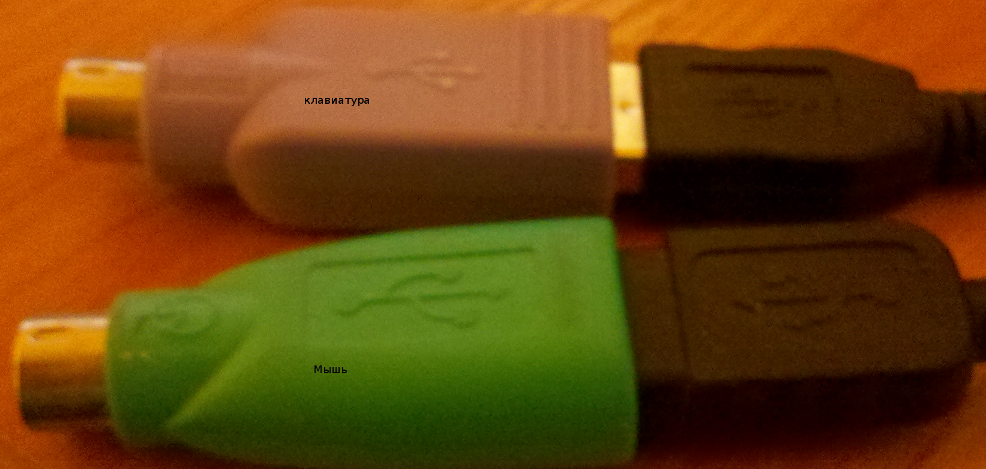
Хм, после перезагрузки отказала мышка (USB), клавиатура (USB), выходом пока почему, так получилось буду разбираться, а пока поставил работать мышь и клавиатуру через переходники PS/2 на usb.
В ходе анализ экрана самотестирования устройств при загрузки и логов системы, причиной не работающих устройств подключенных к USB оказалось, что в БИОСЕ была отключена поддержка.
Включаем поддержку через BIOS:
Перезагружаем компьютер, F2 — Integrated Peripherals — USB Controllers было DISABLED. Включаю :
USB Controllers — Enable
USB Legacy Function — Enable
USB Storage Funtion — Enable
Смотрим версию биоса и дату после обновления:
keiz@ekz:~/bios$ sudo dmidecode -s bios-version && sudo dmidecode -s bios-release-date
keiz@ekz:~/bios$
Таким вот образом можно пере прошивать БИОС из под нашей системы Ubuntu. На этом всё. А пока обновлю на предыдущий релиз.
От ekzorchik
Всем хорошего дня, меня зовут Александр. Я под ником — ekzorchik, являюсь автором всех написанных, разобранных заметок. Большинство вещей с которыми мне приходиться разбираться, как на работе, так и дома выложены на моем блоге в виде пошаговых инструкции. По сути блог — это шпаргалка онлайн. Каждая новая работа где мне случалось работать вносила новые знания и нюансы работы и соответственно я расписываю как сделать/решить ту или иную задачу. Это очень помогает. Когда сам разбираешь задачу, стараешься ее приподнести в виде структурированной заметки чтобы было все наглядно и просто, то процесс усвоения идет в гору.