- Определите тип кэша
- Очистка кэша страниц
- Очистка кеша Dentry и Inode
- Очистка кэша страниц, Dentry и Inode
- Проверьте сброс кэша
- Заключение
- How to Clear Cache on Linux
- How Linux File System Cache Works
- Using Free command to view Cache Usage
- Proc Sys VM Drop Caches Command
- Experimental Verification that Drop Caches Works
- Conclusion
- About the author
- Linux Wolfman
- Очищаем буфер и кеш в системе Linux
- Очистка кеша и буфер в Linux
- Увидеть, что находится в буферах и кеше
- fincore
- Очистка swap в Linux
- Очищаем сетевой кеш samba
- Очистка memcached в Linux
- RSS
Определите тип кэша
В системе Linux существует несколько типов кэшей, включая кэш страниц, кэш dentry и кэш inode. Вам необходимо определить тип кэша, который вы хотите сбросить, прежде чем продолжить. Вот какие типы кэша бывают:
- Кэш страниц: Это наиболее распространенный тип кэша в системе Linux. Он сохраняет недавно использованные данные с диска в памяти, что ускоряет доступ к ним в следующий раз, когда они понадобятся.
- Кэш Dentry: В этом кэше хранятся записи каталога, что ускоряет поиск путей к файлам.
- Кэш Inode: В этом кэше хранится информация о файлах, например, об их владельце, разрешениях и датах создания/модификации.
Наиболее распространенным кэшем является кэш страниц, в котором недавно использовались данные с диска в памяти. Чтобы проверить размер кэша страниц, используйте следующую команду:
Очистка кэша страниц
Чтобы очистить кэш страниц, вы можете использовать следующую команду:
$ sync && echo 1 > /proc/sys/vm/drop_cachesЭта команда запишет все отложенные данные на диск, а затем очистит кэш страниц.
Очистка кеша Dentry и Inode
Если вам нужно очистить кеш dentry и inode, вы можете использовать следующую команду:
sync && echo 2 > /proc/sys/vm/drop_cachesОчистка кэша страниц, Dentry и Inode
Чтобы очистить все три кэша одновременно, используйте следующую команду:
sync && echo 3 > /proc/sys/vm/drop_cachesПримечание: Важно использовать команду «sync» перед сбросом кэша, чтобы убедиться, что все данные записаны на диск до того, как они будут удалены из памяти.
Проверьте сброс кэша
После сброса кэша вы можете убедиться, что он был очищен, снова проверив размер кэша с помощью команды free:
Заключение
В этой статье мы обсудили, как сбросить кэш на сервере Linux. Очистка кэша может помочь повысить производительность системы за счет освобождения памяти, используемой устаревшими или поврежденными данными. Не забудьте использовать команду «sync» перед сбросом кэша и проверьте размер кэша после его сброса, чтобы убедиться, что он был успешно очищен.
How to Clear Cache on Linux
![]()
The linux file system cache (Page Cache) is used to make IO operations faster. Under certain circumstances an administrator or developer might want to manually clear the cache. In this article we will explain how the Linux File System cache works. Then we will demonstrate how to monitor the cache usage and how to clear the cache. We will do some simple performance experiments to verify the cache is working as expected and that the cache flush and clear procedure is also working as expected.
How Linux File System Cache Works
The kernel reserves a certain amount of system memory for caching the file system disk accesses in order to make overall performance faster. The cache in linux is called the Page Cache. The size of the page cache is configurable with generous defaults enabled to cache large amounts of disk blocks. The max size of the cache and the policies of when to evict data from the cache are adjustable with kernel parameters. The linux cache approach is called a write-back cache. This means if data is written to disk it is written to memory into the cache and marked as dirty in the cache until it is synchronized to disk. The kernel maintains internal data structures to optimize which data to evict from cache when more space is needed in the cache.
During Linux read system calls, the kernel will check if the data requested is stored in blocks of data in the cache, that would be a successful cache hit and the data will be returned from the cache without doing any IO to the disk system. For a cache miss the data will be fetched from IO system and the cache updated based on the caching policies as this same data is likely to be requested again.
When certain thresholds of memory usage are reached background tasks will start writing dirty data to disk to ensure it is clearing the memory cache. These can have an impact on performance of memory and CPU intensive applications and require tuning by administrators and or developers.
Using Free command to view Cache Usage
We can use the free command from the command line in order to analyze the system memory and the amount of memory allocated to caching. See command below:

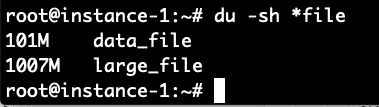
What we see from the free command above is that there is 7.5 GB of RAM on this system. Of this only 209 MB is used and 6.5 MB is free. 667 MB is used in the buffer cache. Now let’s try to increase that number by running a command to generate a file of 1 Gigabyte and reading the file. The command below will generate approximately 100MB of random data and then append 10 copies of the file together into one large_file.
# dd if=/dev/random of=/root/data_file count=1400000
# for i in `seq 1 10`; do echo $i; cat data_file >> large_file; done
Now we will make sure to read this 1 Gig file and then check the free command again:

We can see the buffer cache usage has gone up from 667 to 1735 Megabytes a roughly 1 Gigabyte increase in the usage of the buffer cache.
Proc Sys VM Drop Caches Command
The linux kernel provides an interface to drop the cache let’s try out these commands and see the impact on the free setting.

We can see above that the majority of the buffer cache allocation was freed with this command.
Experimental Verification that Drop Caches Works
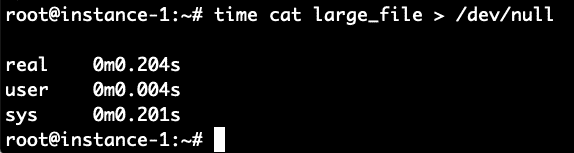
Can we do a performance validation of using the cache to read the file? Let’s read the file and write it back to /dev/null in order to test how long it takes to read the file from disk. We will time it with the time command. We do this command immediately after clearing the cache with the commands above.

It took 8.4 seconds to read the file. Let’s read it again now that the file should be in the filesystem cache and see how long it takes now.
Boom! It took only .2 seconds compared to 8.4 seconds to read it when the file was not cached. To verify let’s repeat this again by first clearing the cache and then reading the file 2 times.
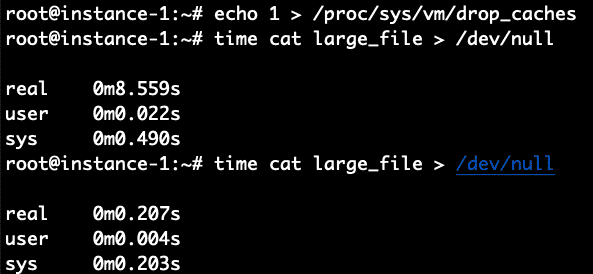
It worked perfectly as expected. 8.5 seconds for the non-cached read and .2 seconds for the cached read.
Conclusion
The page cache is automatically enabled on Linux systems and will transparently make IO faster by storing recently used data in the cache. If you want to manually clear the cache that can be done easily by sending an echo command to the /proc filesystem indicating to the kernel to drop the cache and free the memory used for the cache. The instructions for running the command were shown above in this article and the experimental validation of the cache behavior before and after flushing were also shown.
About the author
Linux Wolfman
Linux Wolfman is interested in Operating Systems, File Systems, Databases and Analytics and always watching for new technologies and trends. Reach me by tweeting to @linuxhint and ask for the Wolfman.
Очищаем буфер и кеш в системе Linux

Прежде чем приступить к практике, сперва поговорим о буферизации и кэш памяти в операционных системах Linux. Очистка кешей и буферов в Linux снижает производительность системы и в основном полезно только для бенчмаркинга.
Свободная память – неиспользуемая память – это потраченная память впустую.
Очистка кеша и буфер в Linux
Если вы хотите очистить в системе кеш и буфер, то вы можете использовать эту цепочку команд:
free && sync && echo 3 > /proc/sys/vm/drop_caches && freetotal used free shared buff/cache available Mem: 24729752 12590140 2704836 354028 9434776 11361684 Swap: 8388604 27592 8361012 total used free shared buff/cache available Mem: 24729752 12555168 10743364 354028 1431220 11397284 Swap: 8388604 27592 8361012 Вы можете сигнализировать ядру Linux, чтобы удалить различные аспекты кешированных элементов, изменив числовой аргумент на указанную выше команду.
echo 1 > /proc/sys/vm/drop_cachesecho 2 > /proc/sys/vm/drop_cachesecho 3 > /proc/sys/vm/drop_cachesПРИМЕЧАНИЕ. Вышеупомянутые команды должны выполняться от root пользователя.
Если вы пытаетесь сделать это с помощью sudo , вам нужно немного изменить синтаксис, примерно так:
sudo sh -c 'echo 1 >/proc/sys/vm/drop_caches' sudo sh -c 'echo 2 >/proc/sys/vm/drop_caches' sudo sh -c 'echo 3 >/proc/sys/vm/drop_caches'echo "echo 1 > /proc/sys/vm/drop_caches" | sudo sh echo "echo 2 > /proc/sys/vm/drop_caches" | sudo sh echo "echo 3 > /proc/sys/vm/drop_caches" | sudo shУвидеть, что находится в буферах и кеше
Посмотрите linux-ftools , если вы хотите анализировать содержимое буферов и кэша в вашей системе. В частности, если вы хотите посмотреть, какие файлы в настоящее время кэшируются.
fincore
С помощью этого инструмента вы можете видеть, какие файлы кэшируются в директории give.
fincore [options] files. Options: -J, --json use JSON output format -b, --bytes print sizes in bytes rather than in human readable format -n, --noheadings don't print headings -o, --output output columns -r, --raw use raw output format -h, --help display this help -V, --version display versionОчистка swap в Linux
первым делом смотрим сколько занимает наш swap места:
total used free shared buff/cache available Mem: 24150 12258 10391 356 1500 11121 Swap: 8191 26 8191 В данном случае swap занимает 26 Мб из 8 Гб
Очистим swap следующей командой:
sudo swapoff -a && sudo swapon -aЗатем используйте команду, чтобы посмотреть освободился ли swap:
total used free shared buff/cache available Mem: 24150 12258 10391 356 1500 11121 Swap: 8191 0 8191 Из вывода видно что swap теперь занимает 0 Мб.
Очищаем сетевой кеш samba
Для очистки сетевого кэша Samba воспользуемся следующей командой:
Очистка memcached в Linux
Есть несколько путей очистить кеша memcached.
Первый – это очистка с помощью подключения через telnet. Используем следующие команды:
telnet localhost 11211
flush_all
quit- localhost — хост где находится memcached (можно указывать и IP-адрес хоста).
- 11211 — порт который использует memcached.
Чтобы узнать порт и IP-адрес в терминале где установлен memcached наберите следующее:
netstat -natpl | grep "memcache[d]" tcp 0 0 127.0.0.1:11211 0.0.0.0:* LISTEN 755/memcached sudo ps aux | grep memcachememcache 755 0.0 0.2 420652 17608 ? Ssl апр14 2:14 /usr/bin/memcached -m 64 -p 11211 -u memcache -l 127.0.0.1 -P /var/run/memcached/memcached.pidВторой – перезапустить сервис memcached:
sudo service memcached restartТретий – установить утилиту memcflush для очистки кешей:
sudo apt install libmemcached-tools -yyum install libmemcached-* -yТеперь очищаем кеш memcached
memflush --servers=localhost:11211Если есть вопросы, то пишем в комментариях.
Также можете вступить в Телеграм канал, ВКонтакте или подписаться на Twitter. Ссылки в шапке страницы.
Заранее всем спасибо.
RSS
Если вы нашли ошибку, пожалуйста, выделите фрагмент текста и нажмите Ctrl+Enter.
Сегодня в статье настроим и русифицируем Ubuntu Server 16.04/18.04/20.04. Чтобы поддерживался русский язык, и перевод системы стал русским

Начиная с сентября 2017 года удостоверяющим центрам предписано обязательно проверять CAA-записи в DNS перед генерацией сертификата
В этой статье рассмотрим пример обновления Ubuntu Server 16.04 до Ubuntu Server 18.04 Все наши действия нам придется выполнять из Читать
В связи с последними блокировками IP-адресов Роскомнадзором, встала необходимость завести свой собственный VPN сервер. Если VPN у вас ещё не Читать