- Send TCP/UDP Packets on Linux using /dev/tcp & /dev/udp Pseudo Devices
- Base Command
- UDP
- TCP
- 👉 Any questions? Please comment below.
- Share on
- Leave a comment
- You may also enjoy
- [SOLVED] Fix Kubernetes Flannel & CoreDNS Failure with Error: x509: certificate is valid for , , not
- JavaScript: Remove element from Array — by index / value / position / range / filter function (programmatically)
- [SOLVED] Fix Kubernetes Client Certificates Issue with Error: Part of the existing bootstrap client certificate is expired . failed to run Kubelet: unable to load bootstrap kubeconfig: stat /etc/kubernetes/bootstrap-kubelet.conf: no such file or directory
- [SOLVED] Fix npm ERR! code EINTEGRITY , integrity checksum failed , tarball data seems to be corrupted , npm ERR! shasum check failed , npm WARN registry Unexpected warning issues during npm install
- Как отправить TCP или UDP пакет в Linux?
- Как отправить TCP пакет на определенный ip:порт в Linux
- Как отправить UDP пакет на определенный ip:порт в Linux
- Send and Receive UDP packets via Linux CLI
- Expectations:
- Netcat Command:
- General Set Up Diagram:
- Send UDP packet:
- Start Server:
- Start Client:
- Check Connection:
- Send UDP packets:
- Check packets in Wireshark:
- Other command to send UDP packets:
- Conclusion:
- References:
- About the author
- Bamdeb Ghosh
- RELATED LINUX HINT POSTS
Send TCP/UDP Packets on Linux using /dev/tcp & /dev/udp Pseudo Devices
Pseudo tools like /dev/tcp & /dev/udp can be used to easily send an instant TCP/UDP packet on Linux terminal.
Here is a quick tutorial on sending UDP and TCP data on Linux terminal using /dev/udp and /dev/tcp .
Base Command
UDP
$ echo "This is my UDP message" > /dev/udp/127.0.0.1/30000 TCP
$ echo "This is my TCP message" > /dev/tcp/127.0.0.1/30100 👉 Any questions? Please comment below.
Updated: January 02, 2020
Share on
Leave a comment
You may also enjoy
[SOLVED] Fix Kubernetes Flannel & CoreDNS Failure with Error: x509: certificate is valid for , , not
Use the correct cluster configuration for your control plane when regenerating new certificates
JavaScript: Remove element from Array — by index / value / position / range / filter function (programmatically)
Many ways to remove items from a JavaScript array
[SOLVED] Fix Kubernetes Client Certificates Issue with Error: Part of the existing bootstrap client certificate is expired . failed to run Kubelet: unable to load bootstrap kubeconfig: stat /etc/kubernetes/bootstrap-kubelet.conf: no such file or directory
Renew the expiring/expired Kubernetes PKI (client certificates & keys)
[SOLVED] Fix npm ERR! code EINTEGRITY , integrity checksum failed , tarball data seems to be corrupted , npm ERR! shasum check failed , npm WARN registry Unexpected warning issues during npm install
Clean npm cache, node_modules, package-lock.json files to recover from all ‘npm ERR! code EINTEGRITY’ error messages during ‘npm install’
Как отправить TCP или UDP пакет в Linux?
Часто при тестировании каких-либо приложений может возникнуть необходимость проверить, доходят ли определенные пакеты по udp/tcp до адресата, например, при проверке функционирования фаервола или же проверки работоспособности проброса портов. В данной статье будет описан простой способ это сделать с помощью командой строки.
Как отправить TCP пакет на определенный ip:порт в Linux
Для отправки tcp пакета на определенный IP адрес и определенный порт, можно воспользоваться следующей командой:
echo -n "test" >/dev/tcp/1.2.3.4/123451.2.3.4 — это IP адрес, на который мы будем посылать наш tcp пакет.
12345 — это порт, на который мы будем посылать наш tcp пакет Альтернативным вариантом может быть использование утилиты nmap:
sudo nmap -sT -p 12345 1.2.3.4Как отправить UDP пакет на определенный ip:порт в Linux
Для отправки udp пакета на определенный IP адрес и определенный порт, можно воспользоваться следующей командой:
echo -n "test" >/dev/udp/1.2.3.4/123451.2.3.4 — это IP адрес, на который мы будем посылать наш udp пакет.
12345 — это порт, на который мы будем посылать наш udp пакет Альтернативным вариантом может быть использование утилиты nmap:
sudo nmap -sU -p 12345 1.2.3.4Проверить получение tcp и udp пакетов на определенный порт на удаленном компьютере можно с помощью различных утилит, например, с помощью tcpdump.
tcpdump -i eth0 port 12345 -vvv -XSend and Receive UDP packets via Linux CLI
![]()
We already know about two main transport layer protocols like TCP and UDP. For more information about TCP and UDP, you can check the reference section. In this article, we will learn how to send and receive UDP packets via the Linux command-line interface (CLI) using nc (mainly) command.
Expectations:
Here are the key points to learn from this article
- To understand nc command in Linux.
- Use nc command for sending and receiving UDP packets through network.
- Send some human readable sentences through nc command.
- Capture the UDP packet sent by nc command.
- Check network packet in Wireshark.
- Find out any other command other than netcat for Linux.
Netcat Command:
Netcat(nc) command is installed by default in Linux OS. Open one terminal [Shortcut Alt+Ctrl+t] and use below command to check if nc is present or not.
Here is the expected output
This is nc from the netcat-openbsd package. An alternative nc is available
in the netcat-traditional package.
usage: nc [-46bCDdhjklnrStUuvZz] [-I length] [-i interval] [-O length]
[-P proxy_username] [-p source_port] [-q seconds] [-s source]
[-T toskeyword] [-V rtable] [-w timeout] [-X proxy_protocol]
[-x proxy_address[:port]] [destination] [port]
This means nc command is already exist in Linux.
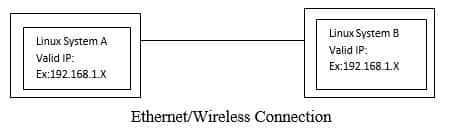
General Set Up Diagram:
Send UDP packet:
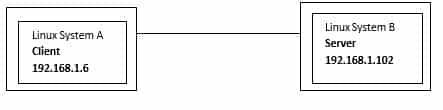
Let’s take an example like we will send UDP packet from System A to System B. So, in server-client concept, we have to run server at System B side and client at System A side.
Also we have valid IP addresses.
Start Server:
To start sever using nc command use below command in System B terminal

This command does not have any output to show as of now. This is just listening mode on port 9999.
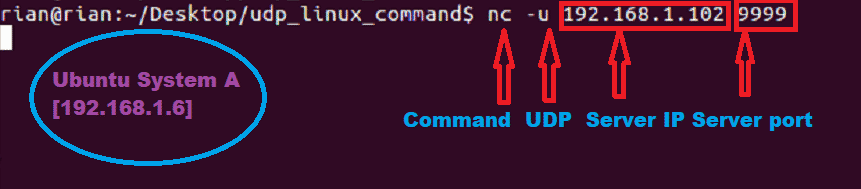
Start Client:
To connect to server using nc command use below command in System A terminal
Now system A has to connect to System B. So we have provided server IP address and port number.
Check Connection:
We can check the below command for the confirmation about client connation to server port.

Send UDP packets:
Now we can send udp packet from System A to B and vice versa.
Now go to system A and send any sentences like

We should able to see this in System B side. Here is the screenshot

We can also send UDP packets from System B to System A.
Go to System B and send sentence like
Here is the screenshot from System B

Here is the screenshot from System A

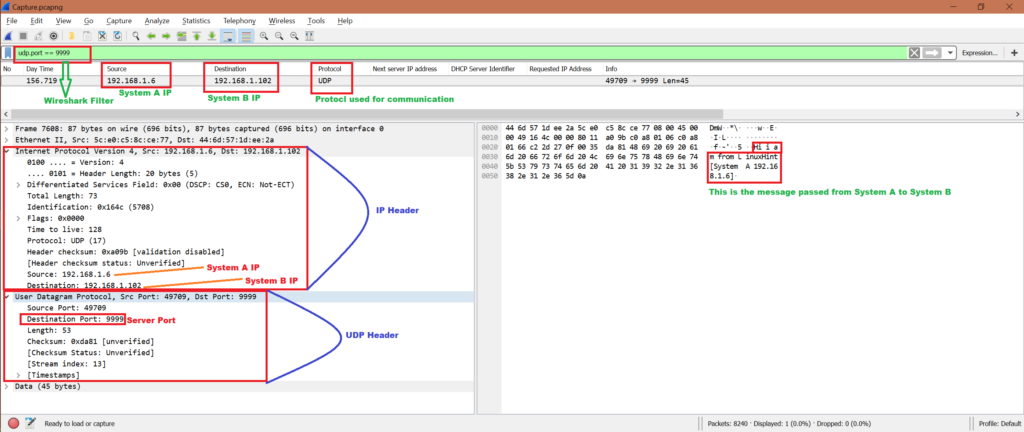
Check packets in Wireshark:
Now while we have been sending UDP packets from System A to System B and vice verse, we can start Wireshark in either System A or System B. Here we have the capture file, let’s do some analysis and confirm if this server and client communication used UDP protocol.
Note that we will only analyze the first communication:
System A has sent:
We will use filter “udp.port == 9999” to get only related packets in Wireshark. Refer below screenshot for analysis from Wireshark capture:
To know how to use Wireshark refer below link
Other command to send UDP packets:
There is another method to send UDP packets
Run below command at System A:
$ echo -n «hello» >/ dev / udp / 192.168.1.102 / 8000
192.168.1.102: System B’s IP
8000 : The server port
Message sent: “hello”
But we are able to send only one time “hello”. If we kill server and rerun then it’s working.
Conclusion:
From the above exercise we have learned the mechanism to send some messages using UDP protocol. And the best method is to use nc command in Linux.
References:
About the author
Bamdeb Ghosh
Bamdeb Ghosh is having hands-on experience in Wireless networking domain.He’s an expert in Wireshark capture analysis on Wireless or Wired Networking along with knowledge of Android, Bluetooth, Linux commands and python. Follow his site: wifisharks.com
RELATED LINUX HINT POSTS
Linux Hint LLC, editor@linuxhint.com
1309 S Mary Ave Suite 210, Sunnyvale, CA 94087
Privacy Policy and Terms of Use