- Как изменить название жесткого диска linux
- Решение
- RumusBin
- Vector_2
- RumusBin
- Peter_I
- ALiEN175
- Alie Alexandross
- ALiEN175
- tahr
- Alie Alexandross
- Алексиус
- Peter_I
- Using the Partition Editor
- Using the Command line
- Identify your Partition
- Install the Labeling Program
- Unmount the Partition
- Changing the Label
- Filesystems
- FAT16 and FAT32
- Check the current label
- Change the label
- Option 1
- Option 2
- Error message
- NTFS
- Check the current label
- Change the label
- ext2, ext3, and ext4
- Check the current label
- Change the label
- JFS
- Check the current label
- Change the label
- ReiserFS (v3)
- Change the label
- XFS
- Check the current label
- Change the label
- Verify the Change
- Other Resources
Как изменить название жесткого диска linux
Знает ли кто-нибудь, как простым способом изменить имя жесткого диска в Linux (через графический . способ, как на Windows, все это сделать?
Это удивительно, но когда я задался этим вопросом, то заходил также на форумы и был разочарован. Я даже читал сообщения о том что «изменение имени, возможно только путем переформатирования переименованного раздела», что, конечно, приводит к потере данных и, следовательно, необходимо сначала сделать резервную копию данных.
Собственно, нигде не давалась простая инструкция, лишь набор команд или глупости и сложный путь, но я все же узнал как это делать простым способом и поделюсь информацией этой с вами.
Если вы работаете в среде Windows или MacOS, тогда это кажется странным вопросом, потому что там вы просто щелкаете правой кнопкой мыши по разделу или диску, и вы можете настроить метку напрямую через свойства. Поэтому я никогда не думал, что под Linux это должно быть сделано по-другому.
Итак, когда пользователи начинают процесс переименовывания, и видят в меню пункт «Редактировать файловую систему…», они могут сознательно не смотреть дальше, чтобы переименовать диск или раздел. Но это на самом деле там.
Решение
Это действительно просто. В вашем дистрибутиве Linux (рассмотрим на примере Zorin OS 15, но это работает для каждого дистрибутива, если у вас есть приложение Disks), выполните следующие простые шаги, чтобы переименовать раздел без хлопот переформатирования:
1) Зайдите в ваши приложения.
2) Поиск дисков.

3) Нажмите на Диски, чтобы запустить приложение.
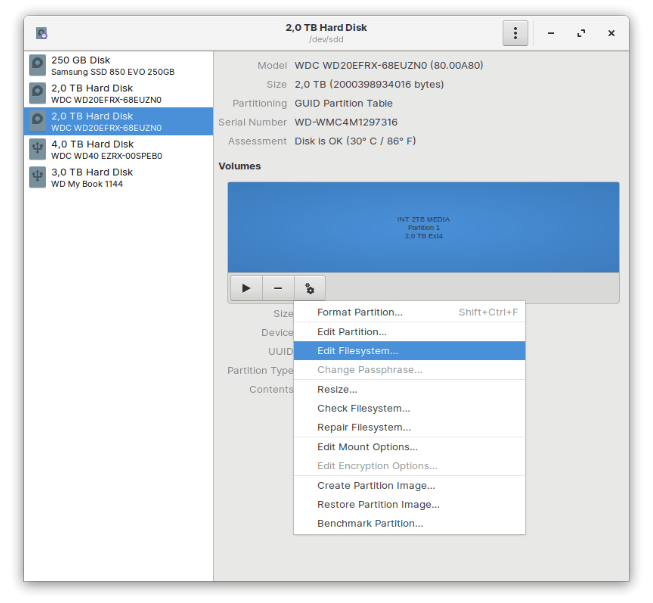
4) Выберите жесткий диск слева
5) Затем выберите раздел, который нужно переименовать, справа в разделе «Тома»
6) Нажмите на маленький значок блока / остановки, чтобы размонтировать раздел (Размонтировать выбранный раздел)
7) Нажмите на значок шестеренки
8 ) Выберите опцию «Редактировать файловую систему…»
9) Введите желаемое имя здесь в поле «Метка».
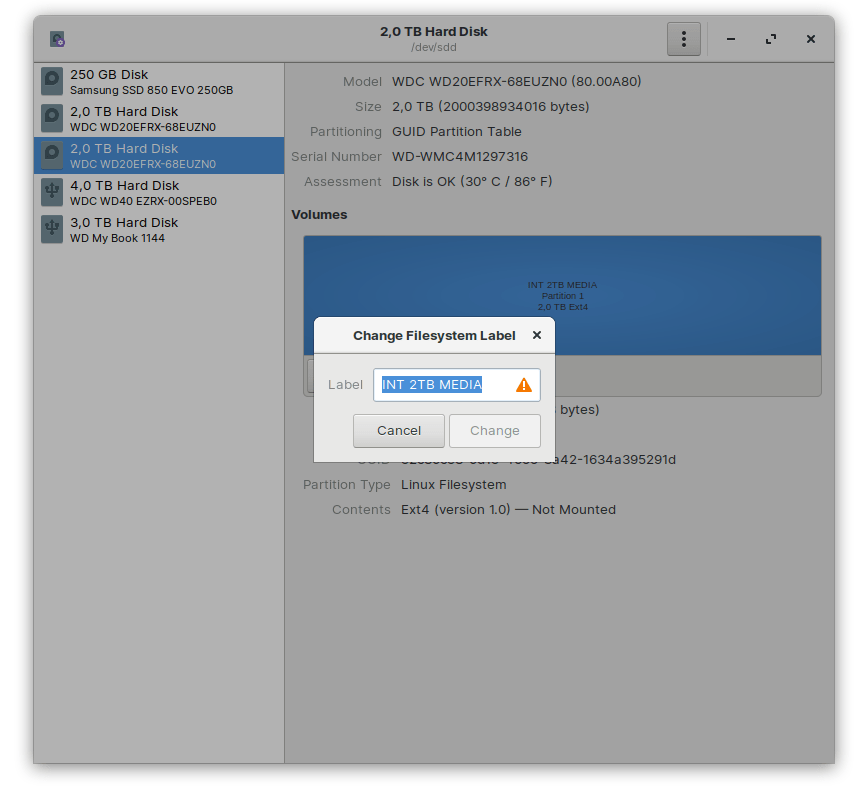
10) Нажмите Изменить.
11) Нажмите значок треугольника / воспроизведения, чтобы снова установить его (смонтировать выбранный раздел).
Теперь вы увидите раздел с новым именем в вашем файловом менеджере или прямо на рабочем столе. Это оказывается так просто!
Вопрос все еще в том, почему разработчики не назвали обсуждаемый вариант чем-то вроде «Изменить метку» вместо «Редактировать файловую систему». Это немного странно назвать эту опцию «Редактировать файловую систему», если вы можете только переименовать метку. Поэтому логично, что особенно начинающие пользователи Linux, не знают, где переименовать раздел и боятся потерять данные..
Страницы: [1] Вниз

Тема: Переименовать диск hdd? (Прочитано 4845 раз)
0 Пользователей и 1 Гость просматривают эту тему.

RumusBin

Доброго времени. Система Ubuntu 16.04 (которая используется сейчас) установлена на ноутбуке, на дополнительном ssd (который был установлен в замен cdrom-а). Старый HDD подключен смонтирован по адресу /media/user/ *** где вместо звезд прописано его имя, которое состоит из, примерно, 20-ти букв и цифр в произвольном порядке. Я не имею представления откуда это именование взялось и очень хотел бы заменить его, на более короткое и более читаемое, так как довольно часто обращаюсь к диску из терминала. Как это можно сделать? в графическом приложении «Диски» я ничего подобного не нашел?
ТС не появлялся на Форуме более полугода по состоянию на 14/07/2019 (последняя явка: 07/07/2018). Модератором раздела принято решение закрыть тему.
—zg_nico
« Последнее редактирование: 14 Июля 2019, 03:43:53 от zg_nico »
Vector_2
Можно с помощью Gparted задать метку разделу hdd.
RumusBin
Можно с помощью Gparted задать метку разделу hdd.
не могли бы поподробней, я не вижу в этой программе такой функции?
Peter_I
Можно с помощью tune2fs задать метку разделу hdd. Пакет e2fsprogs.
ALiEN175
Peter_I, tune2fs только для ext* фс
ASUS P5K-C :: Intel Xeon E5450 @ 3.00GHz :: 8 GB DDR2 :: Radeon R7 260X :: XFCE
ACER 5750G :: Intel Core i5-2450M @ 2.50GHz :: 6 GB DDR3 :: GeForce GT 630M :: XFCE
Alie Alexandross
Метки можно через e2label ставить, как выше написали. Предложу альтернативу:
Тот адрес ***, подозреваю, это uuid раздела. Посмотреть можно либо так
ls -l /dev/disk/by-uuid (без флага -l выведутся только uuid, без линка на устройство)
Если конфигурация дисков постоянная (этот hdd не вытаскивается/таскается с места на место), то и физические адреса разделов обычно не меняются — можно обращаться /dev/sdX.
Если проблема только в длинном названии каталога, в который монтируется раздел, тогда можно создать новую директорию с подходящим названием и монтировать диск туда через /etc/fstab по тому же uuid.
Загляните в fstab, там очень наглядная конфигурация. Для доп. сведений можно пройтись по манам:
Подпись автора jillsmitt истинна…
ALiEN175
Alie Alexandross, e2label аналогично — только для ext* файловых систем. Для FAT и NTFS — совершенно другие инструменты.
ASUS P5K-C :: Intel Xeon E5450 @ 3.00GHz :: 8 GB DDR2 :: Radeon R7 260X :: XFCE
ACER 5750G :: Intel Core i5-2450M @ 2.50GHz :: 6 GB DDR3 :: GeForce GT 630M :: XFCE
tahr
не могли бы поподробней, я не вижу в этой программе такой функции?
Раздел должен быть отмонтирован. Потом ПКМ по разделу и «Установить метку файловой системы».

Alie Alexandross
Alie Alexandross, e2label аналогично — только для ext* файловых систем. Для FAT и NTFS — совершенно другие инструменты.
Правда ваша, но сама не использовала (FAT|NTFS) — автору ничего советовать не могу. Зато с ext, reiserfs и xfs всё легко и понятно:
e2label /dev/sdX LABEL
reiserfstunes -l LABEL /dev/sdX
xfs_admin -L LABEL /dev/sdX
Хотя сама использовала лейблы только для указания корня в GRUB Legacy. Последний, в одно время, ухитрялся монтировать корень по uuid только три раза из пяти загрузок. С тех пор как поправили, LABEL для меня — лишнее телодвижение
Мой пост был с целью предложить альтернативный подход к решению проблемы, чем держать у себя непонятное /mnt/5f8d6af7-… которое и TAB -ом, в случае чего, не прокликаешь.
Подпись автора jillsmitt истинна…
Алексиус
в графическом приложении «Диски» я ничего подобного не нашел
Вроде должно быть
Разумеется, тоже требуется предварительно отмонтировать.
Peter_I
ALiEN175, Да, но в посте не была указана fs, а по смыслу можно было предположить, что там ext.
Страницы: [1] Вверх
- Using the Partition Editor
- Using the Command line
- Identify your Partition
- Install the Labeling Program
- Unmount the Partition
- Changing the Label
- FAT16 and FAT32
- NTFS
- ext2, ext3, and ext4
- JFS
- ReiserFS (v3)
- XFS
This guide is primarily for external drives such as USB hard drives, USB flash drives, and flash memory cards. You can label internal disks, but to change their mount points, use MoveMountpointHowto which uses the file called Fstab. This guide covers editing partition labels (disk names) for FAT16/FAT32, NTFS, ext2/ext3, JFS, ReiserFS, and XFS filesystems.
By default, external drives automatically mounted at /media/disk then /media/disk-1 and so on. This is not very helpful when trying to find the drive you are looking for, especially if you have multiple devices plugged in. Labeled devices that are automatically mounted will be mounted in the /media directory using their label as the mount point, /media/. ex: /media/my_external .
When choosing labels, be sure that the new mount point /media/ does not already exist since the directory will be created when the disk is mounted.
Using the Partition Editor
The file manager (Nautilus) currently does not support renaming disk partitions, but Gnome’s Partition Editor (GParted) does. To change a partition’s label, follow these directions. (Be careful using Partition Editor, as it’s capable of making your computer completely unusable if you do the wrong thing.)
- Open the System >Administration menu and see if there’s an entry for GParted (previously Partition Editor).
- If there is, launch it. If there isn’t, install the «gparted» package and it should now appear in the menu. Enter your password when prompted.
- Disk drives are divided up into partitions. To find the partition you want to re-label, you first have to find the disk drive that contains it, using the drop-down menu in the upper right. It will show a device name like /dev/sdb and the drive’s total size in parentheses. After selecting a drive, you will see a list of all partitions on that drive.
- If the partition is mounted (has a key icon next to it), right-click on the partition and select Unmount.
- With the key icon gone, right-click on the partition and select Label. If you can’t select it, install the ntfsprogs package.
- Enter the new partition name and press Ok.
- The label change is now pending, but has not been completed. Press the Apply button near the top of the window. After confirming, it should say «All operations successfully completed». The drive now has a new label.
Using the Command line
There are at least 6 separate command line tools used to label a partition — the program used depends on the partition’s filesystem type:
Identify your Partition
For help with the terminal, see UsingTheTerminal.
Plug in your USB device and list your partitions with:
You can also list your mounted devices and their descriptions with:
For the rest of this tutorial we will use the following:
Install the Labeling Program
Based on the package names listed above for each filesystem type, install the correct package for your partition:
Here are all the different ones:
sudo apt-get install mtools sudo apt-get install ntfsprogs sudo apt-get install e2fsprogs sudo apt-get install jfsutils sudo apt-get install reiserfsprogs sudo apt-get install xfsprogs
or install the appropriate package from Synaptic.
Unmount the Partition
Partitions generally need to be unmounted before you can fiddle with them, so unmount the partition of the device you want to change the label for:
If it was automounted, you can also unmount the drive by right clicking the desktop icon and clicking Unmount (or Eject in some cases).
Changing the Label
After you complete the appropriate porition for your filesystem, jump to the next section to verify the change.
Filesystems
FAT16 and FAT32
These filesystems are most often found on USB thumb drives, flash cards (like for a camera or cell phone), and older external USB hard drives.
Check the current label
Note that we’re using the special «::» drive which allows us to specify the device descriptor on the command line; otherwise we’d have to edit ~/.mtoolsrc to assign a drive letter (see Option 2 under «Change the label»).
Change the label
Option 1
After unmounting and checking the current label (above), use
sudo mlabel -i /dev/sdb1 ::my_external
Ignore the «Volume label is XYZ» output as this is the old label. Jump to the Verify the Change section below.
Option 2
For Ubuntu 8.10 and up, edit mtools.conf as sudo
add something like for each drive:
drive p: file="/dev/sdb1" drive q: file="/dev/sdb2"
(note the underscore _ should be used, as spaces are not allowed)
Error message
If you get a message like this:
Total number of sectors (7831520) not a multiple of sectors per track (63)!
You can easily ignore the check by running this command:
echo mtools_skip_check=1 >> ~/.mtoolsrc
NTFS
This filesystem is most often found on external USB and firewire hard drives or other Windows formatted disks.
Check the current label
Change the label
Note: 128 characters maximum.
sudo ntfslabel /dev/sdb1 my_external
Ubuntu caches the drive’s label so to see the full affects of the change it is not enough just to umount and mount it again. You have to umount, remove, put back, mount again.
ext2, ext3, and ext4
These filesystems are most often found on linux formatted drives.
Check the current label
Change the label
Note: 16 characters maximum.
sudo e2label /dev/sdb1 my_external
JFS
These filesystems are most often found on IBM and some linux formatted disks.
Check the current label
Change the label
Note: 16 characters maximum.
sudo jfs_tune -L my_external /dev/sdb1
ReiserFS (v3)
This filesystem is most often found on linux formatted disks.
Note: this could work with ReiserFS 4 too, I have not tried.
Change the label
Note: 16 characters maximum.
sudo reiserfstune -l my_external /dev/sdb1
XFS
This filesystem is most often found on UNIX formatted disks.
Check the current label
Change the label
Note: 12 characters maximum.
xfs_admin -l my_external /dev/sdb1
Verify the Change
Now for the easiest part: unplug the drive, wait a second, then plug it back in. It should appear on your desktop with the new label and have its new mount point.
Without unplugging and having the device remount, you can also just run:
Other Resources
Some other related material:
- MoveMountpointHowto
- LinuxFilesystemsExplained
- Fstab
- MountingWindowsPartitions


