- Clear disk space on CentOS/RHEL 6, 7, 8
- 1. Trim log files
- 2. Cleanup YUM cache
- 3. Remove orphan packages
- Check existing orphan packages
- Confirm removing orphan packages
- 4. Remove WP CLI cached WordPress downloads
- 5. Remove old kernels
- 7. Remove core dumps
- 8. Remove error_log files (cPanel)
- 9. Remove Node.js caches
- 10. Remove Mock caches
- 11. Clear generic program caches
- Want to say thanks?
- Share this:
- Like this:
- Related
- 16 thoughts on “ Clear disk space on CentOS/RHEL 6, 7, 8 ”
- Olubodun Agbalaya
- Raunak Sarkar
- Web Hosting
- Simon
- Jose Peña
- John Clarke
- Fedora Gold-image – Work-Pie
- Haris Durraniis Durrani
- RameshK
- Jonathan G
- Eric J Thornton
- Danila Vershinin
- pcgreengr
- How to Clean Up a Linux System
- 1. Overview
- 2. Cleaning Up the System Manually
- 2.1. Check for Largest Directories and Files With du
- 2.2. Find out the Disk Usage With ncdu
- 2.3. Remove Cached Files
- 2.4. Remove Old Logs
- 2.5. Remove Temporary Files
- 2.6. Remove Unused Dependencies
- 3. Bleachbit
- 5. Conclusion
Clear disk space on CentOS/RHEL 6, 7, 8
We have by far the largest RPM repository with NGINX module packages and VMODs for Varnish. If you want to install NGINX, Varnish, and lots of useful performance/security software with smooth yum upgrades for production use, this is the repository for you.
Active subscription is required.
The following are quick commands to clear disk space on CentOS 6 or CentOS 7 servers.
curl -Ls http://bit.ly/clean-centos-disk-space | sudo bash Scared to run that? Just run individual commands that the script runs.
Before anything, you have to install the yum-utils package:
1. Trim log files
find /var -name "*.log" \( \( -size +50M -mtime +7 \) -o -mtime +30 \) -exec truncate <> --size 0 \; This will truncate any *.log files on the volume /var that are either older than 7 days and greater than 50M or older than 30 days.
2. Cleanup YUM cache
The simple command to cleanup yum caches:
Note that the above command will not remove everything related to yum . For instance, metadata for disabled repositories will not be affected.
You may want to free up space taken by orphaned data from disabled or removed repositories:
Also, when you accidentally run yum through a regular user (forgot sudo ), yum will create user-cache. So let’s delete that too:
3. Remove orphan packages
Check existing orphan packages
package-cleanup --quiet --leaves Confirm removing orphan packages
Now, if happy with suggestions given by the previous command, run:
package-cleanup --quiet --leaves | xargs yum remove -y 4. Remove WP CLI cached WordPress downloads
WP CLI saves WordPress archives every time you setup a new WordPress website. You can remove those caches by the following command:
rm -rf /root/.wp-cli/cache/* rm -rf /home/*/.wp-cli/cache/* 5. Remove old kernels
Before removing old kernels, you might want to simply reboot first in order to boot up from the latest kernel.
That’s because you can’t remove an old kernel if you’re booted into it 🙂
The following commands will keep just 2 latest kernels installed:
(( $(rpm -E %) >= 8 )) && dnf remove $(dnf repoquery --installonly --latest-limit=-2 -q) (( $(rpm -E %) Note that with some VPS providers (Linode for example), servers use provider’s built kernels by default and not the ones on the server itself. So it makes little sense to keep more than 1 old kernel on the system. So:
(( $(rpm -E %) >= 8 )) && dnf remove $(dnf repoquery --installonly --latest-limit=-1 -q) (( $(rpm -E %) 6. Remove Composer cache
rm -rf /root/.composer/cache rm -rf /home/*/.composer/cache 7. Remove core dumps
If you had some severe failures with PHP which caused it to segfault and had core dumps enabled, chances are – you have quite a few of those.
They are not needed after you are done debugging the problem. So:
8. Remove error_log files (cPanel)
If you use the disgusting cPanel, you surely got dozens of error_log files scattered across your web directories. Much better if you can install the Citrus Stack. A temporary solution is to remove all those files:
find /home/*/public_html/ -name error_log -delete 9. Remove Node.js caches
rm -rf /root/.npm /home/*/.npm /root/.node-gyp /home/*/.node-gyp /tmp/npm-* 10. Remove Mock caches
Been building some RPM packages with mock ? Those root caches can be quite large.
If you no longer intend to build RPM packages on a given machine:
rm -rf /var/cache/mock/* /var/lib/mock/* 11. Clear generic program caches
Multiple programs have a convention of storing their caches under users’ home .cache subdirectory.
Example: /home/username/.cache/progname .
You may want to clear up those, but not the subdirectories of programs. Like so:
rm -rf /home/*/.cache/*/* /root/.cache/*/* Want to say thanks?
P.S. the plan is to make this into an easily installable app.
Share this:
Like this:
Related
16 thoughts on “ Clear disk space on CentOS/RHEL 6, 7, 8 ”
Olubodun Agbalaya
Raunak Sarkar
Web Hosting
Simon
Jose Peña
John Clarke
Fedora Gold-image – Work-Pie
[…] remove /var/log/* 11. dmesg -c 12. modify /etc/fstab for add-on disks 13. clean other files – https://www.getpagespeed.com/server-setup/clear-disk-space-centos 14. […]
Haris Durraniis Durrani
RameshK
Jonathan G
Hi Danila All these tips are great (thank you) but the biggest advance I found was to delete old mysql bin logs. (Centos 7 and 5.5.64-MariaDB) I ran the command below to show where I had files of more than 100M find / -type f -size +100M And the answer was loads of old Mysql bin (log) files in /var/lib/mysql. I followed the guide here to delete them and set up my.cnf to delete them automatically in future, after 10 days: https://dba.stackexchange.com/questions/30930/how-soon-after-updating-expire-logs-days-param-and-restarting-sql-will-old-binlo/30938#30938 And disk usage dropped from 94% to 26%! This page is really useful and I think it would be great to add this step too – with all the usual caveats on backups and caution – since I think it’s a very common problem. Jonathan
Eric J Thornton
Danila Vershinin
You can check how it’s not the same using web.archive.org. The contents here are original and pre-date your referenced article by 2 years in time. If Ryan, the “IT Project Manager, Web Interface Architect and Lead Developer for many high-traffic web sites” were to include reference to the original source, it would be welcome.
He at least did add some images and explanatory text, kudos to him for that. But I don’t think that’s crucial to the point of creating a rewritten article and not referencing me. Well, the Internet is an open network. I can’t force anyone to do anything 🙂
pcgreengr
My old ssd vps has a 60GB limit and it reached its limit while I was at the dentist (of course). Cpanel went down, email services went down, clients went nuts, could only ssh into it from my phone. Found this amazing one command script after Googling for a minute if there was such a script, executed it, took like 5 seconds, did a reboot, everything was back up, working better than ever and it saved me 15GB of space without breaking anything (I could only go down to 2-3GB by deleting things manually).
Simply amazing, you saved me. Thank you!
How to Clean Up a Linux System
![]()
The Kubernetes ecosystem is huge and quite complex, so it’s easy to forget about costs when trying out all of the exciting tools.
To avoid overspending on your Kubernetes cluster, definitely have a look at the free K8s cost monitoring tool from the automation platform CAST AI. You can view your costs in real time, allocate them, calculate burn rates for projects, spot anomalies or spikes, and get insightful reports you can share with your team.
Connect your cluster and start monitoring your K8s costs right away:
1. Overview
In this tutorial, we’ll discuss how we can clean a Linux system of unused files and directories to free up disk space. First, we’ll see how to carry out the clean-up process manually. We’ll make use of tools such as du and ncdu. Apart from that, we’ll also go over removing unused dependencies.
Finally, we’ll take a look at system cleaning tools such as Bleachbit if we’re on a graphical environment.
2. Cleaning Up the System Manually
Manually cleaning up our system can be time consuming. However, it gives us a lot of control over what’s being removed and kept.
In this section, we’ll go over the different steps to clean up our Linux system.
2.1. Check for Largest Directories and Files With du
du is a disk usage utility that displays the size and free space information of attached disks.
It’s pretty straightforward to use. By default, it recursively shows the size of files and directories in the current directory:
$ du | sort -nr 10039072 . 5231636 ./Downloads 3103376 ./GitHub 2836848 ./GitHub/books 1460532 ./GitHub/books/_ 1376280 ./GitHub/books/.git . Now, we’ll list the top ten largest directories in our root directory:
10039460 /home 6259300 /usr 902400 /var 67024 /boot 34816 /opt 8712 /etc 1052 /run 572 /root 20 /mnt 16 /lost+foundAs we can see, /home takes the most space out of all the directories. The /home directory is where we typically store our user data. So, we might need to investigate it further to find the unnecessary files and directories that take up a lot of space.
Using du is good for a general overview of the file sizes. However, going through a lot of files can be cumbersome. Therefore, we might need to use something that makes this process much easier, like ncdu.
2.2. Find out the Disk Usage With ncdu
ncdu is a command-line TUI utility that lets us analyze the disk space used by files in a more readable format.
By default, it doesn’t ship with most Linux distributions. However, it should be available in the package repository of our distribution and we can install it through a package manager using the package name ncdu.
Once, ncdu is installed, we simply type the command followed by the path that we want to analyze:
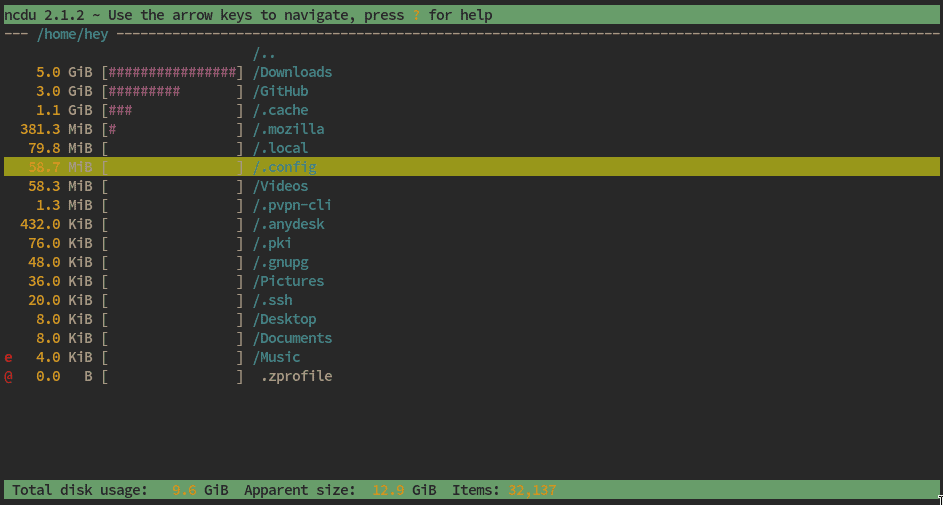
We can navigate through the file system using the arrow keys, to enter a directory, to go back, and to delete a file or a directory.
2.3. Remove Cached Files
Some programs are written in a way that they perform faster. For that reason, these programs might cache files that might take a lot of space. These cached files are safe to remove because they can be created by the program when required.
Most of the time, programs store cache contents in the ~/.cache directory. Therefore, we can use ncdu to remove the largest, unnecessary directories and files inside this directory.
Apart from that, our package manager also caches the installation packages, even after the installation. For instance, the apt package manager caches these packages inside the /var/cache/apt/archives directory. We can safely remove these packages after the installation process.
2.4. Remove Old Logs
System and application logs can take a huge amount of space depending on how long the system has been running. Sometimes, a Linux server is configured to store logs for an indefinite amount of time. Therefore, it’s obvious that the size of these files will increase over time.
The location of the system logs directory depends on the distribution we’re using. For instance, on Ubuntu, the logs are stored in the /var/log — specifically inside /var/log/syslog.
Let’s take a look at the /var/log directory, where our system stores logs:
The safest way to delete the log files is to leave the current log file and delete the old ones.
2.5. Remove Temporary Files
As the name suggests, temporary files are those that are removed once we reboot our system. But what if we plan on keeping our system up 24/7? For a long-running system, these temporary files will pile up and will take a lot of space.
By default, temporary files are stored inside the /tmp directory. We can use ncdu to remove the unnecessary files under this directory. However, we should avoid deleting files that we aren’t sure of because it might break the current session of our system.
2.6. Remove Unused Dependencies
Most distributions come with a package manager. This package manager is responsible for the management of packages and their dependencies. Most package managers, like apt, yum, and pacman, are quite good at removing dependencies that are not in use.
However, there are scenarios when our package manager decides to keep orphaned dependencies. For instance, the make dependencies often become unnecessary after building a package. Therefore, we might want to remove them.
We can use apt on Ubuntu-based distributions to remove the unused dependencies:
Similarly, we can use dnf on Fedora and RHEL:
On Arch-based distributions, we can use pacman to retrieve the unused packages first and, then, remove them.
3. Bleachbit
Bleachbit is a disk cleaner utility for Linux that has a GTK-based front-end.
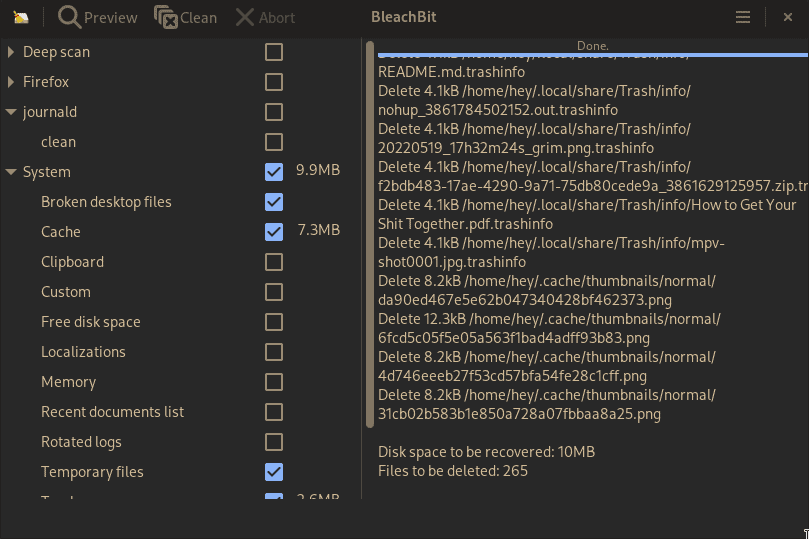
By default, it doesn’t ship with distributions. So, we might need to install it from the package repository using a package manager.
Bleachbit runs in two modes: user mode and root mode. In the user mode, we can clean up our home directory. In the root mode, we can clean up our whole system.
Once launched, we can check the required options from the list to clean. By default, Bleachbit runs in user mode. However, for root mode, we can simply launch it as root in the terminal:
5. Conclusion
In this article, we discussed how we can clean up our Linux system. First, we took a manual approach because it’s safer and gives us more control.
Finally, we covered the Bleachbit utility as an GUI-based alternative to the manual approach.