- Таблица маршрутизации в Linux
- Способы просмотра таблицы маршрутизации в Линукс
- Настройка
- ЗАКЛЮЧЕНИЕ
- 10+ ip route command examples in Linux [Cheat Sheet]
- Types of route
- Syntax for ip route command
- Different examples to use ip route command
- 1. List current routing table using ip route command
- 2. Add a new route using ip route command
- 3. Add a new default gateway route using ip route command
- 4. Add a new route to specific device with ip route command
- 5. Delete a route using ip route command
- 6. Modify an existing route using ip route command
- 7. Clear routes with flush using ip route command
- 8. Clear all the routes using ip route command
- 9. Get a single route to a destination
- 10. Get a single route from the source
- 11. List routes with given scope only
- 12. List routes for specified device only
- Conclusion
- What’s Next
- Further Reading
Таблица маршрутизации в Linux
Статическая маршрутизация — это процесс, в котором администратор сети вручную настраивает сетевые интерфейсы, таким образом, чтобы пакеты пересылались из одной сети в другую. Администратор создает так называемую таблицу маршрутизации, в ней описаны различные маршруты пакетов. Любому из маршрутизаторов необходимо понимать на какой хост отправлять следующий пакет. Вот про это и будет идти речь в данной статье. Сегодня мы раскроем вопрос про маршрутизацию в Линукс, функциональность, настройку правил и правильное функционирование. Когда хосту необходимо послать пакет другому хосту он просматривает таблицу маршрутизации. В данной таблице указаны IP-address конечного пункта назначения, метрика, название интерфейсов, адреса маршрутизаторов по которые могут отправить пакет конечному получателю. В случае отсутствия маршрута для узла, применяется так называемый default шлюз, default маршрут. Подобное можно наблюдать на маршрутизаторе. Он сравнивает необходимый IP-address с таблицей маршрутизации, затем посылает дальше. Ниже будем рассматривать проверку проходящих маршрутов в системе, процесс настройки новых.
Способы просмотра таблицы маршрутизации в Линукс
Для просмотра таблицы в ОС Линукс можно использовать команду: $ netstat -r  Как видно из скриншота выше, команда показала всего две записи. В первой записи указан шлюз (gateway) 192.168.168.254, вторая запись говорит о наличии доступа в подсеть 192.168.168.0 на интерфейсе eth0. Другой способ вывести информацию о статических маршрутов — использовать команду «route», однако, как правило утилита просит права супер пользователя, поэтому предварительно введем «su-«. $ su — # route
 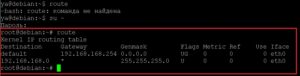 Бывает, выводимых данных route и netstat недостаточно, так как в них выводится легкая информация, ее не хватает для понимания всей картины. Чтобы получить более подробную таблицу, можно воспользоваться утилитой «routel». $ routel
 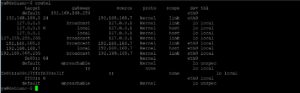 В этой информации содержится:
- target (цель) — IP-адрес.
- gateway — адрес шлюза.
- source — адрес отправителя.
- dev — интерфейс.
Наиболее подходящий метод для просмотра таблицы маршрутизации в ОС Линукс – использовать утилиту «ip».
$ ip route
Подробней про «ip» можно посмотреть в другой статье: https://www.vseprolinux.ru/komanda-ip

- default – IP-адрес по умолчанию.
- via 192.168.168.254 — адрес шлюза, куда будут отправлять пакеты по умолчанию.
- dev eth0 — интерфейс сети, за счёт него открывается доступ к шлюзу.
- proto kernel — обозначает, что маршрут устанавливался ядром, если static, то установка выполняется администратором.
Настройка
Для настройки таблицы маршрутизации будем использовать команду ip route. Добавим временный статический маршрут 192.168.22.0/24 через шлюз 192.168.168.254.
ip route add 192.168.22.0/24 via 192.168.168.254
ВАЖНО! При выполнении такой команды добавиться временный статический маршрут, после перезагрузки системы он сотрется.
Для проверки необходимо проверить, проходит ли пакет из сети 192.168.22.0. Для этого будем использовать ip route get.
ip route get 192.168.22.30
Как говорилось выше, после перезагрузки Linux все эти добавленные адреса сотрутся. Для того, чтобы данные не стирались, необходимо записать их в файле.
post-up route add -net 192.168.22.0 netmask 255.255.255.0 gw 192.168.168.254
pre-down route del -net 192.168.22.0 netmask 255.255.255.0 gw 192.168.168.254
- post-up — запустить команду после включения интерфейса.
- pre-down — запустить команду перед отключением интерфейса.
- net — задает целевую сеть
- netmask — сетевая маска.
- gw — шлюз.
Не так сложно, как могло показаться. После всей выполненной работы присоединенные маршруты будут работать даже после перезагрузки операционной системы Линукс.
Рассмотрим еще несколько примеров.
Изменяем статический маршрут:
ip route change 192.168.22.0/24 via 192.168.168.254
ЗАКЛЮЧЕНИЕ
Подобная работа написана для краткого рассмотрения функционирования маршрутизации в Линукс, как происходит настройка маршрутизации, а также для чего она необходима.
10+ ip route command examples in Linux [Cheat Sheet]
In Linux, ip command is used to show or manipulate routing, devices, policy routing and tunnels. ip route is a part of ip command. It helps to manage the route entries in the kernel routing tables that keep information about paths to other networked nodes. The routes can be set for different IP addresses (destination). You can use ip route command to add, delete, change, and list the routes.
Types of route
Following are the different types of routes.
- unicast: It describes real paths to the destinations covered by the route prefix.
- unreachable: Unreachable destinations. The packets are discarded and the ICMP message host unreachable is generated.
- blackhole: Unreachable destinations. The packets are discarded silently.
- prohibi: Unreachable destinations. The packets are discarded and the ICMP message communication administratively prohibited is generated.
- local: The destinations are assigned to this host.
- broadcast: The destinations are broadcast addresses. The packets are sent as link broadcasts.
- throw: The packets are dropped and the ICMP message net unreachable is generated.
- nat: A special nat route. The destinations covered by the prefix are considered dummy (or external) addresses and require translation to real (or internal) ones before forwarding.
- anycast: The destinations are anycast addresses assigned to this host. They are not implemented.
- multicast: A special type for multicast routing. It is not present in normal routing tables.
Syntax for ip route command
The syntax for ip route command is:
Some important commands in ip route are:
Different examples to use ip route command
1. List current routing table using ip route command
You can use ip route list or ip route show command to list current routes or routing table.
Sample Output:

2. Add a new route using ip route command
The ip route add command is used to add a new route for the specified network range. You will need root privileges to execute the command.
Sample Output:

You can also use ip route only to list the routing table.
3. Add a new default gateway route using ip route command
A default gateway is the IP address of the router that connects your host to remote networks. You can use the following command to add a new default gateway route.
$ sudo ip route add default via
Sample Output:

4. Add a new route to specific device with ip route command
The below command adds a new route specifying the network interface or network device as the gateway.
Sample Output:

5. Delete a route using ip route command
You can use the ip route delete command to delete a route from the routing table.
Sample Output:

6. Modify an existing route using ip route command
You can change a route using the ip route change command.
Sample Output:
For example, to change the default gateway route, you can use the below command.

7. Clear routes with flush using ip route command
The ip route flush command clears a route from the routing table for a particular destination.
Sample Output:

8. Clear all the routes using ip route command
You can also use ip route flush command to remove all the routes from the routing table.
$ sudo ip route flush table main Sample Output:

9. Get a single route to a destination
The below command is used to get a single route to a destination address and prints its contents.
$ ip route get to destination Sample Output:
deepak@ubuntu:~$ ip route get to 192.168.0.133 192.168.0.133 dev enp0s3 src 192.168.0.103 uid 1000 cache
10. Get a single route from the source
You can run the following command to get a single route from the source address.
$ ip route get destination from source Sample Output:
deepak@ubuntu:~$ ip route get to 192.168.0.133 from 192.168.0.103 192.168.0.133 from 192.168.0.103 dev enp0s3 uid 1000 cache 11. List routes with given scope only
You can run the below command to list routes with the given scope only.
$ ip route list scope scope_value Sample Output:

12. List routes for specified device only
The following command lists the routes with the specified device only.
Sample Output:
To view the routes with device name enp0s3, you can use:

Conclusion
In this tutorial, we have learned how we can manage the routing table using the ip route command in the Linux system. You can add, delete, change, and list the routes in the routing table. If you still have any confusion, feel free to ask us in the comment section.
What’s Next
Further Reading
Didn’t find what you were looking for? Perform a quick search across GoLinuxCloud
If my articles on GoLinuxCloud has helped you, kindly consider buying me a coffee as a token of appreciation.

For any other feedbacks or questions you can either use the comments section or contact me form.
Thank You for your support!!