- How to Uninstall (Oracle Java & openJDK) in Linux
- Why should we remove Java?
- 1) Checking current version of Java
- 2) Check if you have installed any other Java version
- 3) Checking Java installation method
- 3.a) Checking Java installation method on Debian/Ubuntu
- 3.b) Checking Java installation method on RPM based systems
- 4) Removing Java in Linux
- 4.a) Removing Java in Debian/Ubuntu
- 4.b) Removing Java in RPM based system
- 4.c) Uninstalling Oracle Java
- 5) Checking Java version
- Closing Notes
- Related Posts
- How to install Oracle Java (JDK/JRE) 8/11/12 in Linux?
- How to Enable Java plugin support on Firefox on Linux
- How To Install Oracle Java 7, 8 & 9 (JDK & JRE) on Debian Via Repository
- About Magesh Maruthamuthu
- 17 Comments on “How to Uninstall (Oracle Java & openJDK) in Linux”
- How to Completely Uninstall Java for Linux?
- How to Completely Uninstall Java for Linux?
- Conclusion
How to Uninstall (Oracle Java & openJDK) in Linux
Most of us believe that uninstalling Java is a difficult task in Linux, but it’s not as per my opinion, because I have installed Java on various distributions several times and removed it safely without any problems.
To do so, you need to check few things before removing JAVA.
In general, people install ‘Oracle Java’ or ‘openJDK’ depending on their need.
In this guide, we will show you how to uninstall/remove Java in Linux. By looking at the steps below, you will realize how easy it is.
Why should we remove Java?
You may need to uninstall Java from your system for below common reasons:
- You may need to install latest version due to application compatibility.
- You no longer need Java on your system
Refer the below link for installing Java on various Linux distributions.
1) Checking current version of Java
Installed Java version in Linux system can be verified using the following command. The below output shows that we have Oracle Java version “1.7.0_72” :
$ java -version java version "1.7.0_72" Java(TM) SE Runtime Environment (build 1.7.0_72-b14) Java HotSpot(TM) 64-Bit Server VM (build 24.72-b04, mixed mode)
2) Check if you have installed any other Java version
For various reasons, some users might have installed multiple Java versions which can all be listed together using the ‘update-alternatives’ command as shown below.
As per the following output, we have installed three Java versions and ‘Oracle Java 7’ is the one that’s currently active on the system:
$ sudo update-alternatives --config java There are 3 choices for the alternative java (providing /usr/bin/java). Selection Path Priority Status ------------------------------------------------------------ 0 /usr/lib/jvm/java-7-oracle/jre/bin/java 1072 auto mode 1 /opt/jdk1.8.0_20/bin/java 2 manual mode 2 /usr/lib/jvm/java-7-openjdk-amd64/jre/bin/java 1071 manual mode * 3 /usr/lib/jvm/java-7-oracle/jre/bin/java 1072 manual mode Press enter to keep the current choice[*], or type selection number:
3) Checking Java installation method
Before uninstalling Java, you should find how Java was installed in the system. It could be installed using one of the below methods:
- Manual method
- From the rpm file
- Distribution repository or Third-party repository
As stated in the beginning of the article, user would have installed Oracle Java or openJDK.
- OpenJDK : Everybody uses distribution official repository to install openJDK.
- Oracle JAVA : User might use one of these methods viz. Manual or Third-party repository or RPM file.
3.a) Checking Java installation method on Debian/Ubuntu
Use the below commands to check how JAVA was installed on an Ubuntu/Debian system. As per the below output, “OpenJDK 1.7.0_65” has been installed from the Ubuntu repository:
$ java -version java version "1.7.0_65" OpenJDK Runtime Environment (IcedTea 2.5.3) (7u71-2.5.3-0ubuntu1) OpenJDK 64-Bit Server VM (build 24.65-b04, mixed mode)
Feel free to double check whether “OpenJDK 1.7.0_65” was installed from the Ubuntu repository by running the below command, which in our case shows that it was installed from the Ubuntu official repository as shown below:
$ dpkg -l | grep openjdk ii openjdk-7-jdk:amd64 7u71-2.5.3-0ubuntu1 amd64 OpenJDK Development Kit (JDK) ii openjdk-7-jre:amd64 7u71-2.5.3-0ubuntu1 amd64 OpenJDK Java runtime, using Hotspot JIT ii openjdk-7-jre-headless:amd64 7u71-2.5.3-0ubuntu1 amd64 OpenJDK Java runtime, using Hotspot JIT (headless)
As per the below output, “Oracle Java 7” has been installed from third-party repository, namely «webupd8» :
$ dpkg -l | grep oracle-java ii oracle-java7-installer 7u72+7u60arm-0~webupd8~2 all Oracle Java(TM) Development Kit (JDK) 7
Also, we can see that “Oracle JAVA 8” was installed using the manual method, as it is located under the ‘/opt’ directory, see below:
$ sudo update-alternatives --config java Selection Path Priority Status ------------------------------------------------------------ 0 /usr/lib/jvm/java-7-oracle/jre/bin/java 1072 auto mode 1 /opt/jdk1.8.0_20/bin/java 2 manual mode 2 /usr/lib/jvm/java-7-openjdk-amd64/jre/bin/java 1071 manual mode * 3 /usr/lib/jvm/java-7-oracle/jre/bin/java 1072 manual mode
3.b) Checking Java installation method on RPM based systems
Use the below commands to find out how JAVA was installed on RPM based systems, such as RHEL, CentOS, Fedora and openSUSE. The following output shows that, “OpenJDK 1.7.0_71” was installed using the CentOS repository:
$ java -version java version "1.7.0_71" OpenJDK Runtime Environment (rhel-2.5.3.2.el6_6-x86_64 u71-b14) OpenJDK 64-Bit Server VM (build 24.65-b04, mixed mode)
You can double check the above result by running the below command:
$ rpm -qa | grep java java-1.7.0-openjdk-1.7.0.71-2.5.3.2.el6_6.x86_64
Also, the “Oracle Java 8” was installed manually using the RPM file as per the following output, because it doesn’t show the distribution version which was shown in the previous output:
$ rpm -qa | grep jdk jdk1.8.0_25-1.8.0_25-fcs.x86_64
4) Removing Java in Linux
Now that we have understood how to find out the installation method of JAVA on a Linux system, let’s proceed to understand how to remove/uninstall JAVA.
Uninstalling Oracle Java or openJDK can be done in multiple ways and you can use a suitable method as you see fit. This section summarizes some of those methods.
4.a) Removing Java in Debian/Ubuntu
You may need to run these commands based on section ‘3.a’ to uninstall ‘Oracle Java’ or ‘OpenJDK’ in Ubuntu/Debian systems:
[To uninstall Openjdk 7] $ sudo apt-get purge openjdk-7-* [To remove Oracle Java 7] $ sudo apt-get remove oracle-java7-installer [To Uninstall Oracle Java 8] $ cd /opt $ sudo rm -Rf jdk1.8.0_20
4.b) Removing Java in RPM based system
You may need to run these commands based on section ‘3.b’ to uninstall ‘Oracle Java’ or ‘OpenJDK’ in Red Hat, CentOS, Fedora and openSUSE systems:
[To Uninstall Openjdk] $ rpm -e (grep output from 3b) $ sudo rpm -e java-1.7.0-openjdk-1.7.0.71-2.5.3.2.el6_6.x86_64 [To Remove Oracle Java 8] $ sudo rpm -e jdk1.8.0_25-1.8.0_25-fcs.x86_64
4.c) Uninstalling Oracle Java
Alternatively, Oracle Java can be removed from the Linux system using the ‘update-alternatives’ command as shown below.
(replace the word (version)with your Java version. DO java -version to get yours. So if your version is 1.8.0-92, you would type sudo update-alternatives –remove “java” “/usr/lib/jvm/jdk1.8.0-92/bin/java”)
$ sudo update-alternatives --remove "java" "/usr/lib/jvm/jdk[version]/bin/java" $ sudo update-alternatives --remove "javac" "/usr/lib/jvm/jdk[version]/bin/javac" $ sudo update-alternatives --remove "javaws" "/usr/lib/jvm/jdk[version]/bin/javaws"
Now, remove the corresponding JDK folder by executing the following command:
$ sudo rm -r /usr/lib/jvm/jdk[version]
5) Checking Java version
At this stage, we have completely removed openJDK & Oracle Java from our system. If no Java version is installed on the system, you will get the following message:
$ java -version bash: /usr/bin/java: No such file or directory
Closing Notes
In this article, you learnt how to install ‘Oracle Java’ or ‘OpenJDK’ in various Linux distributions such as Ubuntu, Debian, RHEL, Fedora, CentOS and openSUSE.
If you found this article helpful, please do share with your friends and spread the knowledge. Please feel free to comment below if you have any queries/concerns. We will get back to you as soon as we can. Happy learning!
Related Posts
How to install Oracle Java (JDK/JRE) 8/11/12 in Linux?
October 25, 2017 January 16, 2020

How to Enable Java plugin support on Firefox on Linux
March 17, 2016 April 25, 2016
How To Install Oracle Java 7, 8 & 9 (JDK & JRE) on Debian Via Repository
February 9, 2016 February 8, 2016
About Magesh Maruthamuthu
Love to play with all Linux distribution
17 Comments on “How to Uninstall (Oracle Java & openJDK) in Linux”
im on kalilinux 2020.4 i installed java 11.0.9 and java jdk 8 u217
when i write java -version
lzh:permission denied java
it’s not about root there is another errorr help me plz
I see you don’t monetize your website, i think there is one opportunity to earn additional cash on your page,
search in google for: idol4jp makes money
linux-bi4s:~ # java -version
If ‘java’ is not a typo you can use command-not-found to lookup the package that contains it, like this:
cnf java
linux-bi4s:~ # update-alternatives –config java
update-alternatives: error: no alternatives for java
linux-bi4s:~ # rpm -qa | grep java
timezone-java-2014h-1.1.noarch
java-1_7_0-openjdk-1.7.0.71-1.1.x86_64
libjavascriptcoregtk-1_0-0-2.4.6-1.4.x86_64
java-1_7_0-openjdk-headless-1.7.0.71-1.1.x86_64
libjavascriptcoregtk-3_0-0-2.4.6-1.4.x86_64
libjavascriptcoregtk-4_0-18-2.6.1-1.1.x86_64
java-binfmt-misc-1.4-4.1.3.x86_64
linux-bi4s:~ # rpm -qa | grep jdk
java-1_7_0-openjdk-1.7.0.71-1.1.x86_64
java-1_7_0-openjdk-headless-1.7.0.71-1.1.x86_64
linux-bi4s:~ # rpm -e java-1_7_0-openjdk-1.7.0.71-1.1.x86_64
error: Failed dependencies:
jre-64 > 1.5 is needed by (installed) libreoffice-writer-extensions-4.3.2.2-1.3.x86_64
jre-64 > 1.5 is needed by (installed) libreoffice-calc-extensions-4.3.2.2-1.3.x86_64
linux-bi4s:~ # rpm -e java-1_7_0-openjdk-headless-1.7.0.71-1.1.x86_64
error: Failed dependencies:
java-1_7_0-openjdk-headless = 1.7.0.71-1.1 is needed by (installed) java-1_7_0-openjdk-1.7.0.71-1.1.x86_64
libawt.so()(64bit) is needed by (installed) java-1_7_0-openjdk-1.7.0.71-1.1.x86_64
libjava.so()(64bit) is needed by (installed) java-1_7_0-openjdk-1.7.0.71-1.1.x86_64
libjava.so(SUNWprivate_1.1)(64bit) is needed by (installed) java-1_7_0-openjdk-1.7.0.71-1.1.x86_64
libjvm.so()(64bit) is needed by (installed) java-1_7_0-openjdk-1.7.0.71-1.1.x86_64
libjvm.so(SUNWprivate_1.1)(64bit) is needed by (installed) java-1_7_0-openjdk-1.7.0.71-1.1.x86_64
linux-bi4s:~ #
How to Completely Uninstall Java for Linux?
In Linux, Java is a widely used and well-reputed programming language. Like other programming languages, it offers “JDK (Java Development Kit)” a complete environment for the execution of code. It contains development tools and the “JRE(Java Runtime Environment)” that stores libraries.
While working with Java in Linux, its installation and uninstallation have a key role.
This post shows the procedure to completely remove Java for Linux:
How to Completely Uninstall Java for Linux?
The uninstallation procedure of Java follows some essential steps that are described below:
Step 1: Check the JDK Version
First, check the “JDK” services installed in the system. It may be “Openjdk” or the “Oracle JDK”. To perform this task use the “java” followed by the “–version” flag in the terminal:

The currently installed “openjdk” version is “11.0.17”.
Step 2: Uninstall OpenJDK
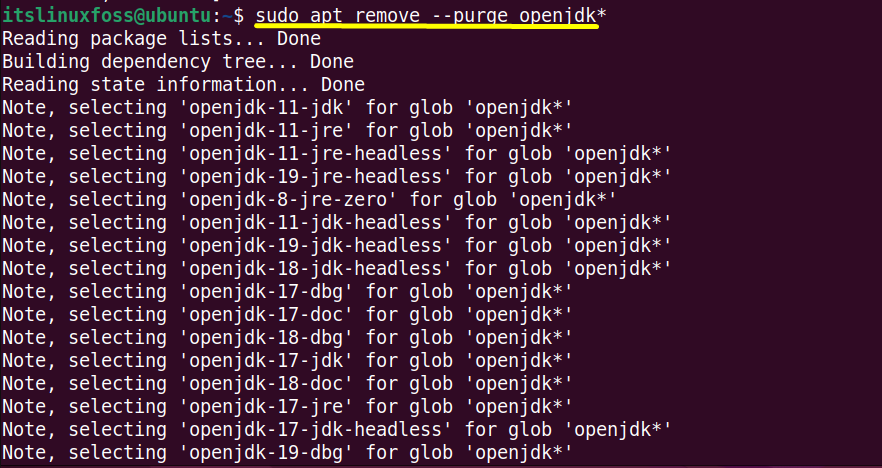
Now, execute the uninstallation command with the help of the default package manager of majorly used Linux distributions. The commands need the administrator privileges i.e “sudo”:
$ sudo yum remove jdk[version] #For CentOS/RHEL $ sudo dnf remove openjdk* #For Fedora $ sudo apt remove --purge openjdk* #For Ubuntu/Debain-Based
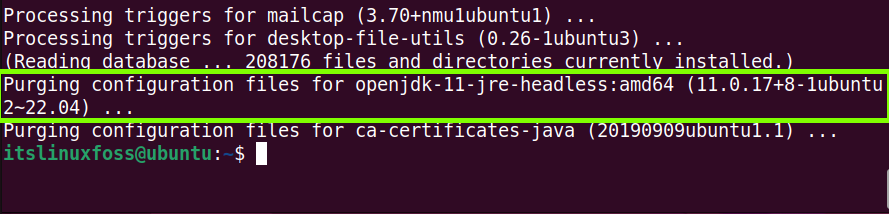
All the configuration and installation files of “OpenJDK” have been removed from the system completely.
Step 3: Completely Remove Java Files
The additional dependencies are installed while installing any application in a Linux system. These dependencies are useless after uninstalling the application.
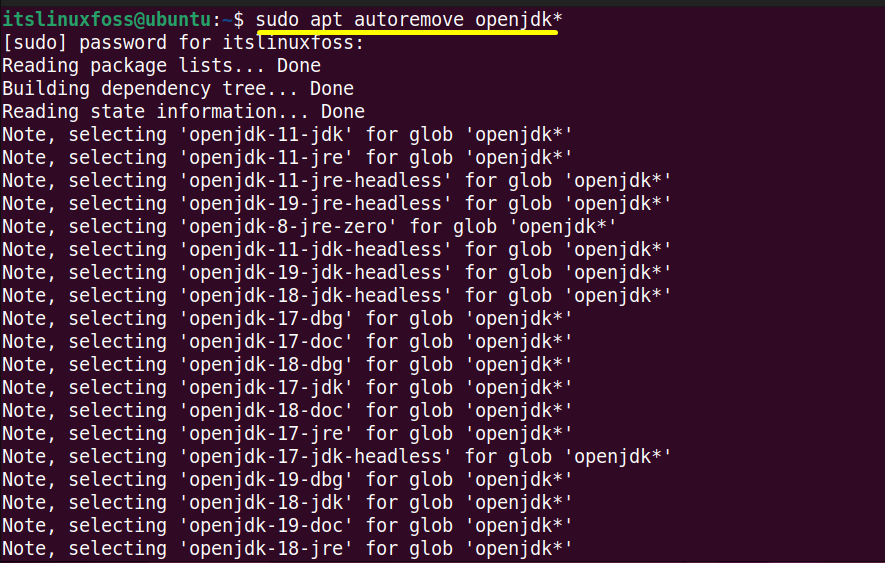
It is recommended to “auto-remove” all these unneeded dependencies using the default package managers of your Linux system:
$ sudo yum autoremove jdk[version] #For CentOS/RHEL $ sudo dnf autoremove java[version]openjdk #For Fedora $ sudo apt autoremove openjdk* #For Ubuntu/Debain-Based
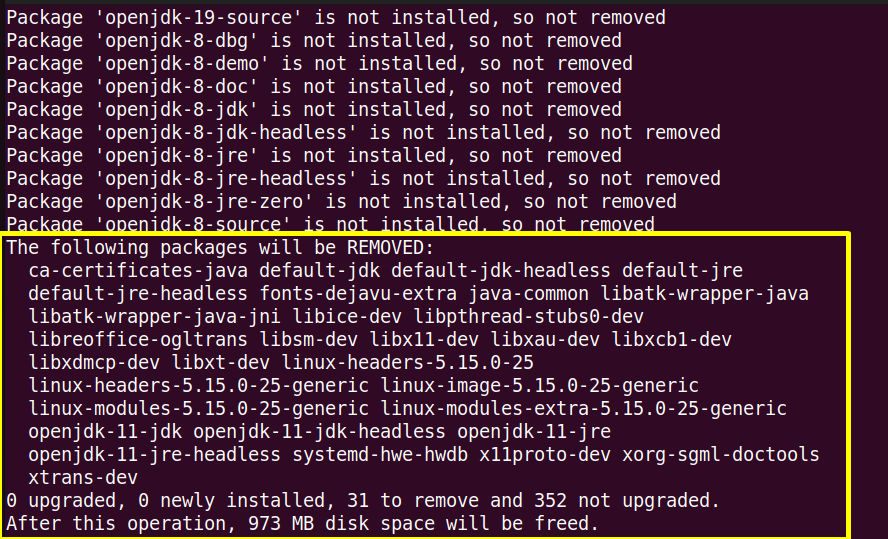
Here “31” Java packages have been removed from the current Linux system Ubuntu.
Step 4: Verify the Java
Again execute the “java” version command to verify whether it is completely removed or not:
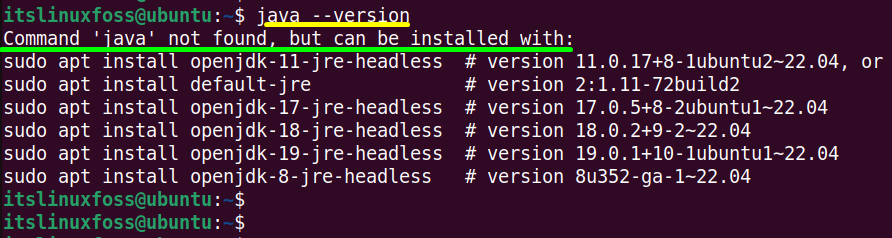
Now, the output shows that “java not found” which means that it is no more in the system.
Conclusion
In Linux and its frequently used distros, “java” can be completely uninstalled using their default package managers. For this purpose, the “remove” flag uninstalls the executable files of Java while “purge” removes its configuration files. This post has provided a brief detail to completely remove java for Linux.