- Install linux-headers-generic on Ubuntu: sudo apt-get install linux-headers-generic
- How to install linux-headers-generic on Ubuntu 12.04 LTS?
- How to uninstall/remove linux-headers-generic from Ubuntu 12.04 LTS?
- Apt get install build essential linux headers generic
- Правильная инструкция по установке linux-headers в Debian Stretch. uname -r|sed ‘s/[^-]*-[^-]*-//’ — работает неправильно?
- Как установить заголовочные файлы ядра в Linux
- Установка заголовочных файлов ядра в Debian, Ubuntu или Linux Mint
- Установка заголовочных файлов ядра в Fedora, CentOS или RHEL
- Using ‘sudo apt-get install build-essentials’
- 7 Answers 7
- What does `apt-get install linux-headers-generic` do
- 1 Answer 1
- Can’t install dkms #44
- Comments
- Andrew3019 commented Aug 2, 2017 •
- Mange commented Aug 3, 2017
- Andrew3019 commented Aug 4, 2017
- nomadmzl commented Aug 4, 2017 •
- Andrew3019 commented Aug 10, 2017
- nomadmzl commented Aug 10, 2017 •
- PanderMusubi commented Sep 10, 2017
- rahulm-gdb commented Jun 4, 2018
Install linux-headers-generic on Ubuntu: sudo apt-get install linux-headers-generic
Learn how to install linux-headers-generic with the command sudo apt-get install linux-headers-generic on Ubuntus.
Quick installation of linux-headers-generic:
Step 2: Install: linux-headers-generic
Ater updaing the OS run following command to install the packae:
sudo apt-get install linux-headers-generic
How to install linux-headers-generic on Ubuntu 12.04 LTS?
First of all update your system with the command:
Above command will download the package lists for Ubuntu 12.04 LTS on your system. This will update the list of newest versions of packages and its dependencies on your system.
After downloading the latest package list with the help of above you can run the installation process.
If linux-headers-generic is not installed on your compter then the command ‘dpkg -L linux-headers-generic’ will give followin error.
deepak@deepak-VirtualBox:~$ dpkg -L linux-headers-generic Package `linux-headers-generic' is not installed. Use dpkg --info (= dpkg-deb --info) to examine archive files, and dpkg --contents (= dpkg-deb --contents) to list their contents. deepak@deepak-VirtualBox:~$
After system update use the following command to install linux-headers-generic:
sudo apt-get install linux-headers-generic
Above command will confirm before installing the package on your Ubuntu 12.04 LTS Operating System. If you are not already logged in as su, installer will ask you the root password. After completion of the installation you can use the package on your system.
How to uninstall/remove linux-headers-generic from Ubuntu 12.04 LTS?
Now we will see the commands for uninstalling the linux-headers-generic from Ubuntu 12.04 LTS. For uninstalling this package you can easily use the apt command and remove the package from Linux Operating System.
To remove the linux-headers-generic following command is used:
sudo apt-get remove linux-headers-generic
Following command is used to remove the linux-headers-generic package along with its dependencies:
sudo apt-get remove --auto-remove linux-headers-generic
This will remove linux-headers-generic and all its dependent packages which is no longer needed in the system.
Completely removing linux-headers-generic with all configuration files:
Following command should be used with care as it deletes all the configuration files and data:
sudo apt-get purge linux-headers-generic
or you can use following command also:
sudo apt-get purge --auto-remove linux-headers-generic
Above command will remove all the configuration files and data associated with linux-headers-generic package. You can can’t recover the delete data, so, use this command with care.
Copyright © DevManuals.net 2016
Apt get install build essential linux headers generic
Правильная инструкция по установке linux-headers в Debian Stretch. uname -r|sed ‘s/[^-]*-[^-]*-//’ — работает неправильно?
Но почему apt-get устанавливает linux-headers откуда-то отсюда: Или нужно при установке обязательно указывать часть backports? apt-get install -t stretch-backports linux-headers-`uname -r`
Я читал это, но не понял что вот это делает: (uname -r|sed ‘s/[^-]*-[^-]*-//’)? uname -r — понятно, но sed.. ‘s/[^-]*-[^-]*-//’)?! Заменяет последовательность «[не минусы]минус[не минусы]минус» на пустую строку  Кстати, можно было написать uname -r | cut -d- -f3 , но люди почему-то любят использовать sed для всего.
  А как желательно писать при установку пакетов для архитектуры процессора amd64?
apt-get install linux-image-amd64 apt-get install linux-image-$(uname -r|sed ‘s/[^-]*-[^-]*-//’) Зачем это всё, когда есть мета-пакеты? Поставил мета-пакет и у тебя всегда будет актуальная версия ядра и хедеров после обновления. для amd64 одинаково, но это-то заклинание именно такое, чтобы не задавать новичку лишний раз вопрос об архитектуре системы, чтобы работало везде. 
Ещё есть apt-cache policy

linux-image-amd64 linux-headers-amd64 — если для обоих указать backports, то так и поставятся. Вместо того, чтобы в гугле на первой странице найти ответ на вопрос, ты лезешь на форум спрашивать. Нет предела тупости. А ну я уже поставил этот мета-пакет. Осталось только найти 5 пакетов для 390 драйвера. А эта установка мета-пакетов тоже нужна из backpor’ов насколько я понял.

Такой подход не всегда нужен. Иногда надо установить определённую версию, а не последнюю в случае указания мета-пакета. Так для меня актуально ядро 4.17, а не 4.18, на который указывает мета-пакет. в таком случае проще поставить нужную версию, чем колупать sed.
Как установить заголовочные файлы ядра в Linux
Когда вы компилируете драйвер устройства как модуль ядра, вам необходимы установленные заголовочные файлы ядра. Также они требуются, если вы собираете пользовательское приложение, которое взаимодействует напрямую с ядром. При установке заголовочных файлов ядра, необходимо убедиться, что их версия совпадает с версией ядра установленного в системе. Если версия вашего ядра не менялась после установки дистрибутива, или вы обновляли его с использованием системного менеджера пакетов (то есть apt-get, aptitude или yum) из системных репозиториев, то заголовочные файлы вы также можете установить с помощью пакетного менеджера. Однако если вы скачивали исходный код ядра и компилировали его самостоятельно, то заголовочные файлы необходимо устанавливать с помощью команды make. Здесь мы предполагаем, что ваше ядро установлено из основного системного репозитория вашего дистрибутива, и вы хотите установить соответствующие заголовочные файлы ядра.
Установка заголовочных файлов ядра в Debian, Ubuntu или Linux Mint
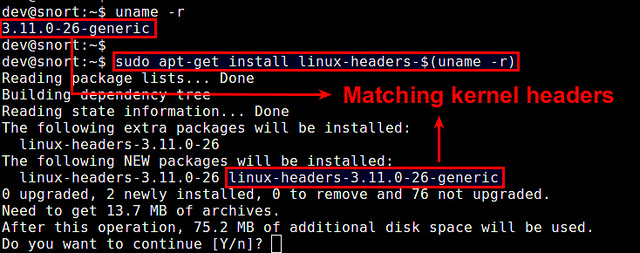
Если вы не компилировали ядро вручную, то можете установить соответствующие заголовочные файлы ядра с помощью команды apt-get.
Сначала проверьте, не установлены ли уже требуемые заголовочные файлы с помощью команды: Теперь установите заголовочные файлы, как показано ниже. Проверьте, что установка прошла успешно.
Установка заголовочных файлов ядра в Fedora, CentOS или RHEL
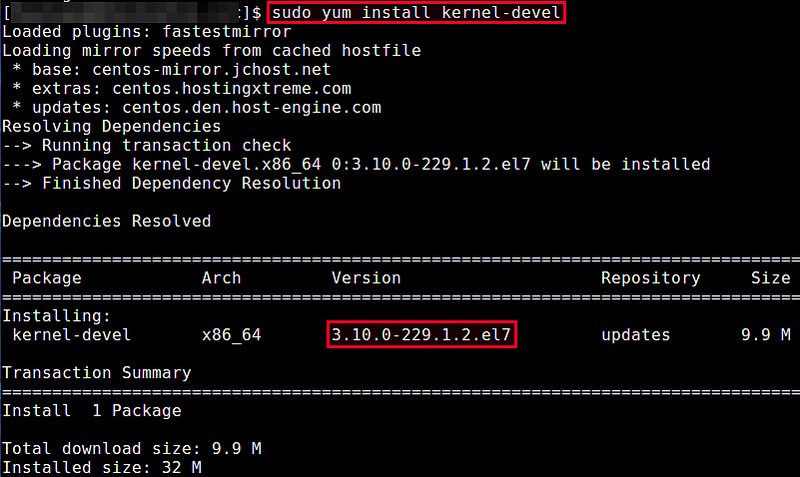
Если вы не обновляли ядро вручную, то можете установить соответствующие заголовочные файлы ядра с помощью команды yum.
Сначала проверьте, не установлены ли уже требуемые заголовочные файлы. По умолчанию заголовочные файлы ядра расположены в /usr/src/kernels/.
Если подходящих заголовочных файлов не установлено, вы можете установить их с помощью команды yum. Она автоматически найдет подходящий пакет. Если заголовочные файлы ядра, установленные с помощью вышеприведенной команды, не соответствуют установленному в системе ядре, значит оно устарело. В этом случае обновите ядро системы до последней версии с помощью приведенной ниже команды. После обновления необходимо перезагрузить систему. Теперь проверьте, что установлены заголовочные файлы соответствующей версии с помощью команды: Источник
Using ‘sudo apt-get install build-essentials’
I was trying to use sudo apt-get install build-essentials to install the g++ compiler on my Ubuntu Linux box. But it gave me the following message:

Building dependency tree
Reading state information. Done E: Unable to locate package build-essentials How do I fix this problem?
7 Answers 7
Drop the ‘s’ off of the package name. You want sudo apt-get install build-essential You may also need to run sudo apt-get update to make sure that your package index is up to date.

For anyone wondering why this package may be needed as part of another install, it contains the essential tools for building most other packages from source (C/C++ compiler, libc, and make). In my case, simply «dropping the s» was not the problem (although it is of course a step in the right direction to use the correct package name). I had to first update the package manager indexes like this: Then after that the installation worked fine: I know this has been answered, but I had the same question and this is what I needed to do to resolve it. During installation, I had not added a network mirror, so I had to add information about where a repo was on the internet. To do this, I ran: and added the following lines:
If you need to do this, you may need to replace «wheezy» with the version of debian you’re running. Afterwards, run: Hopefully this will help someone who had the same problem that I did. Источник
What does `apt-get install linux-headers-generic` do
Looking for explanation on apt-get install linux-headers-generic . What does installing linux-headers for a kernel do ? The significance of that command at the time of kernel installation and after a reboot.
1 Answer 1
In general, the kernel is distribued as a compiled binary. The headers are the source code for the kernel and are generally needed if you are building kernel modules, either manually or with some packages such as nvidia or virtualbox.
to define interfaces between the kernel and user space In general, user space programs are built against the header files provided by the distribution, typically from a package named glibc-devel, glibc-kernheaders or linux-libc-dev. Without additional information, hard to know what you needed the header for or if you can remove them. Источник
Can’t install dkms #44
Comments
Andrew3019 commented Aug 2, 2017 •
After using this:
pi@rpi: $ sudo apt-get install git linux-headers-generic build-essential dkms
This happens:
Reading package lists. Done Building dependency tree Reading state information. Done Package linux-headers-generic is not available, but is referred to by another package. This may mean that the package is missing, has been obsoleted, or is only available from another source E: Package ‘linux-headers-generic’ has no installation candidate And this won’t work: $ dkms add . -bash: dkms: command not found Copy link Quote reply
Mange commented Aug 3, 2017
Find the specific package name for the kernel headers for your distribution and install them instead of the «linux-headers-generic» package. Copy link Quote reply
Andrew3019 commented Aug 4, 2017
Sorry, I’m a noob at Linux. How exactly do you do that?
I’m trying to install the driver for my TP-LINK WN823N, which uses the rtl8192eu Linux driver.
It’s a raspberry pi 2b, that’s connected to Ethernet right now.
nomadmzl commented Aug 4, 2017 •
sudo apt-get install linux-headers-$(uname -r) build-essential dkms git
sudo git clone https://github.com/Mange/rtl8192eu-linux-driver.git
sudo dkms add ./rtl8192eu-linux-driver
sudo dkms install rtl8192eu/1.0
sudo depmod -a It usually works for me. Copy link Quote reply
Andrew3019 commented Aug 10, 2017
$ sudo apt-get install linux-headers-$(uname -r) build-essential dkms git Reading package lists. Done Building dependency tree Reading state information. Done E: Unable to locate package linux-headers-4.9.35-v7 E: Couldn’t find any package by regex ‘linux-headers-4.9.35-v7’ pi@rpi: $ sudo git clone https://github.com/Mange/rtl8192eu-linux-driver.git Cloning into ‘rtl8192eu-linux-driver’. remote: Counting objects: 1135, done. remote: Total 1135 (delta 0), reused 0 (delta 0), pack-reused 1135 Receiving objects: 100% (1135/1135), 3.90 MiB | 251.00 KiB/s, done. Resolving deltas: 100% (606/606), done. Checking connectivity. done. pi@rpi: $ sudo dkms add ./rtl8192eu-linux-driver sudo: dkms: command not found pi@rpi:
$ sudo dkms add sudo: dkms: command not found pi@rpi: $ dkms -bash: dkms: command not found Copy link Quote reply
nomadmzl commented Aug 10, 2017 •
Usually is a depencies issue, try running: sudo apt-get -f install and then try again sudo apt-get install dkms Copy link Quote reply
PanderMusubi commented Sep 10, 2017
The package is called raspberrypi-kernel-headers. This is now also documented in the README.md. This issue can be closed. Copy link Quote reply
rahulm-gdb commented Jun 4, 2018
Does it works on ubuntu 18? i’m tyrying to install it but it’s failing. Kernel preparation unnecessary for this kernel. Skipping. Источник