- Как установить и использовать PhotoRec для восстановления удаленных файлов в Ubuntu 20.04 — VITUX
- Установка PhotoRec
- Восстановление файлов с помощью PhotoRec
- Вывод
- XeroLinux: дистрибутив Linux на основе Arch, который выглядит красиво
- Как установить последнюю версию ядра Linux 5.15 на Ubuntu 20.04 — VITUX
- Как установить Rust Compiler и Toolchain на Rocky Linux 8
- Восстанавливаем удаленные файлы в linux
- Похожие статьи:
- How To Install and Use PhotoRec on Linux and Its Alternative
- In this article
- Part 1. What Is PhotoRec for Linux and What Can It Do?
- Functions of PhotoRec for Linux
- Compatibility of PhotoRec
- Part 2. How To Install PhotoRec on Linux
- Install PhotoRec on Debian/Ubuntu/Linux Mint
- Install PhotoRec on RHEL/CentOS/Fedora
- Install PhotoRec on Fedora 22+
- Install PhotoRec on Arch Linux
- Part 3. How To Recover Deleted Photos and Files on Linux Using PhotoRec
- Part 4. The Best Alternative to PhotoRec for Linux Data Recovery
Как установить и использовать PhotoRec для восстановления удаленных файлов в Ubuntu 20.04 — VITUX
PhotoRec — это программная утилита с открытым исходным кодом для восстановления потерянных или удаленных файлов мультимедиа, таких как фотографии, видео, документы и т. Д., С компакт-дисков, жестких дисков и памяти цифровой камеры. PhotoRec связан с TestDisk. TestDisk используется для восстановления удаленных разделов и снова делает незагрузочные диски загрузочными, а photoRec восстанавливает удаленные файлы мультимедиа или файлы документов. Он поддерживает и может восстанавливать более 480 расширений файлов.
Когда вы случайно удалили файл, вам лучше не добавлять больше файлов мультимедиа или документов в эту память или на жесткий диск, поскольку вы можете перезаписать потерянные данные. В этой статье мы установим и воспользуемся PhotoRec для восстановления удаленных файлов в ubuntu 20.04 LTS.
Установка PhotoRec
PhotoRec не имеет собственного пакета, но он будет поставляться вместе с пакетом при установке пакета TestDisk. Итак, чтобы установить TestDisk, выполните следующую команду.
$ sudo подходящее обновление
$ sudo apt install testdisk -y
После завершения установки вы можете выполнить задачу восстановления. Как вы можете видеть в следующем примере, я удалил некоторые изображения, и мы будем восстанавливать эти файлы.

Восстановление файлов с помощью PhotoRec
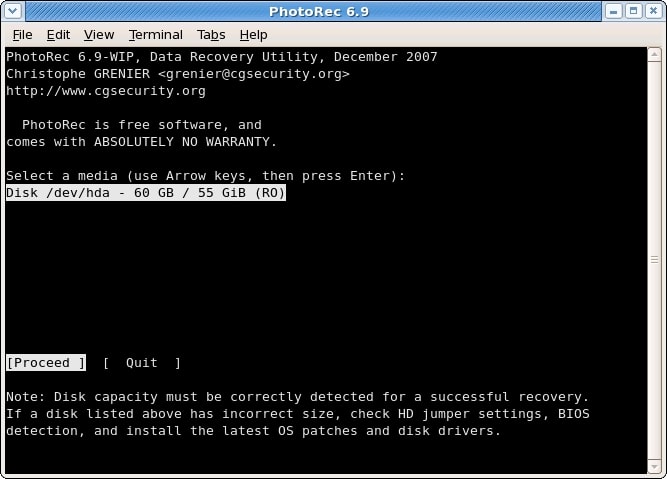
PhotoRec можно запустить с помощью следующей команды. При выполнении команды вы увидите следующий интерфейс, в котором вы можете выбрать свой диск.

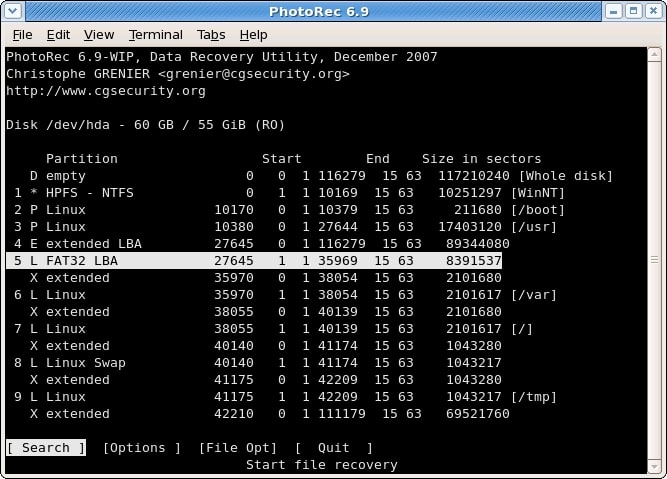
Теперь, когда диск выбран, выберите «Продолжить», используя левую и правую клавиши, затем нажмите Enter. Затем вы увидите следующий интерфейс, в котором вас попросят выбрать раздел. Вы можете выбрать File Opt и фильтровать файлы только в соответствии с выбранным расширением.

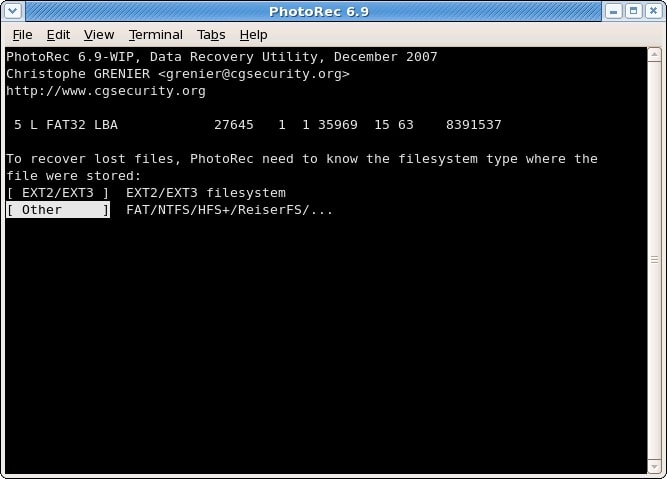
Вы можете выбрать раздел с помощью клавиш со стрелками вверх и вниз и нажать Enter для поиска. Затем выберите тип файловой системы, в которой будет храниться файл, и нажмите Enter.

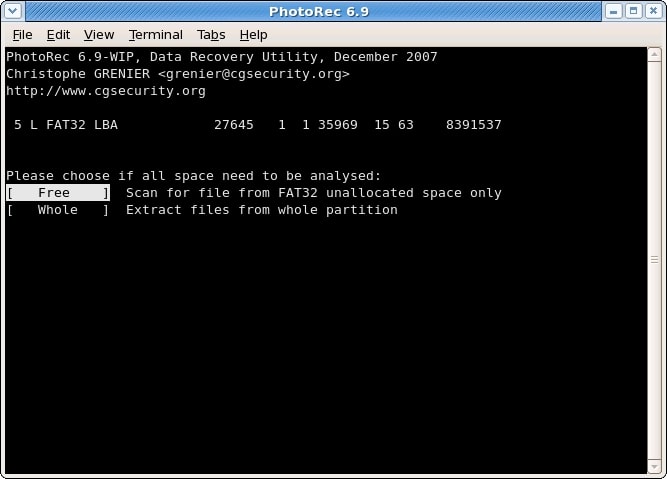
Теперь выберите часть пространства для анализа. Если вы выберете Бесплатно, будет просканировано только незанятое пространство выбранного раздела, и если вы выберете Весь все выделенные разделы будут просканированы.

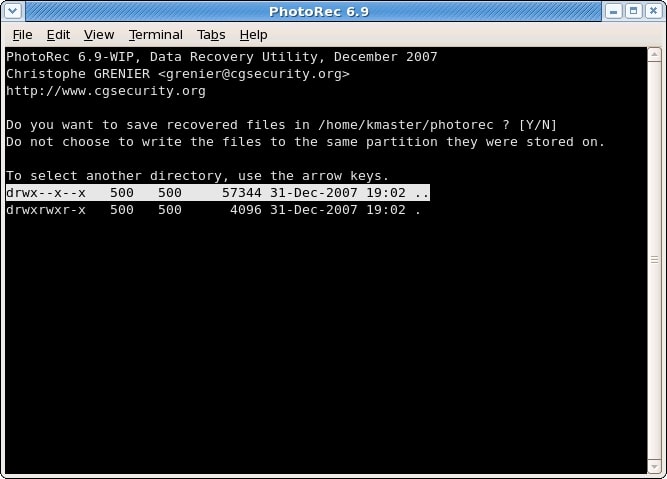
Теперь выберите каталог, в котором будет сохранен восстановленный файл, затем нажмите c, чтобы продолжить восстановление.

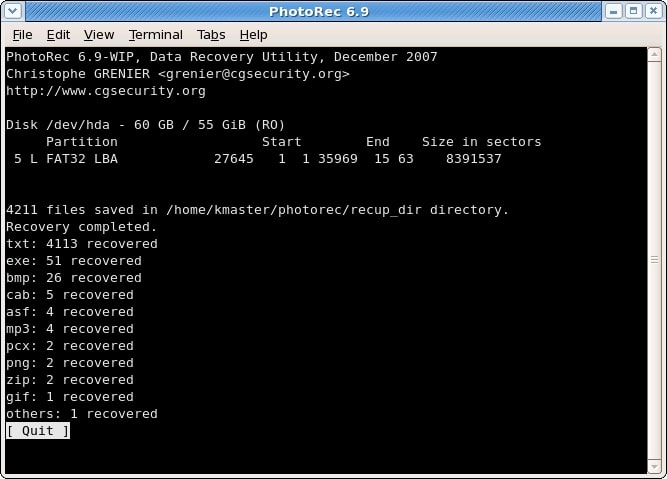
После завершения восстановления вы увидите следующий результат.

Все восстановленные файлы будут сохранены в каталоге recup_dir в каталоге, который вы установили перед началом восстановления. Вы можете заметить, что некоторые другие файлы также восстанавливаются, и имена файлов также меняются как имя PhotoRec в соответствии с его алгоритмом.
Вывод
В этой статье мы научимся восстанавливать удаленные или потерянные файлы с помощью PhotoRec в Ubuntu. Вы можете найти много другого программного обеспечения, такого как PhotoRec, но его гораздо проще использовать для восстановления медиафайлов и документов.
Как установить и использовать PhotoRec для восстановления удаленных файлов в Ubuntu 20.04
XeroLinux: дистрибутив Linux на основе Arch, который выглядит красиво
Arch Linux — популярный вариант для пользователей Linux, которым нужен больший контроль над своей операционной системой.В то время как многие опытные пользователи настраивают Arch Linux, чтобы обеспечить наилучшее взаимодействие с пользователем (с.

Как установить последнюю версию ядра Linux 5.15 на Ubuntu 20.04 — VITUX
Ядро Linux 5.15 было выпущено в качестве новейшего выпуска ядра с долгосрочной поддержкой (LTS) 31 октября 2021 года. Он предоставляет новые улучшения и функции, включая новый драйвер NTFS и встроенную поддержку дискретной графики Intel Alchemist.

Как установить Rust Compiler и Toolchain на Rocky Linux 8
Язык программирования Rust — это новый язык от Mozilla и команды Rust, который был разработан, чтобы привнести современные функции языка программирования и высокую производительность в системное программирование. В нем много новых концепций, хотя .
Восстанавливаем удаленные файлы в linux
От ошибок ни кто не застрахован, да и ещё есть дурацкая привычка удалять файлы через Shift+del у каждого третьего. Думаю понятно к чему я клоню: файл исчез и его надо вернуть. Для этого нам поможет программа photorec, которая работает из консоли и имеет псевдографический интерфейс, а главное то, что программа умеет восстанавливать файлы со всех популярных файловых систем(fat, ntfs, ext, маков и т.п.).
Установить photorec в ubuntu можно вместе с пакетом testdisk:
Программа требует права рута, а значит запускаем её через:
Хотя программа и на английском, но будет достаточно только базовых знаний языка. А если долистать статью до конца то думаю разберутся даже те, кто совершенно не знают английского.
Вначале программа спрашивает с каково диска будет восстанавливать данные:
Выбор диска для восстановления
Следует обратить, что можно восстанавливать данные и с флешки.
Далее отвечаем на вопросы о типе файловой системы:
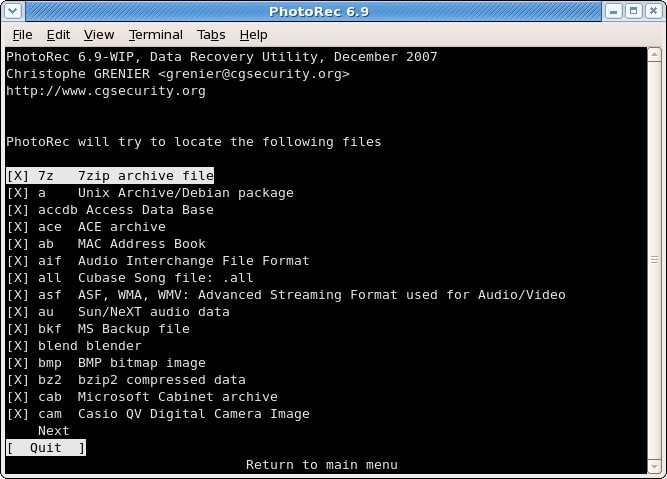
В случае необходимости выбираем типы восстанавливаемых файлов(по умолчанию всё включено) в «File Opt».
Выбираем какие типы файлов мы хотим восстановить.
И в завершении выбираем куда хотим сохранить восстановленные файлы:
Когда определились с папкой жмём «Y»
Осталось только наблюдать за процессом восстановления:
Программа работает относительно шустро и практически не грузит процессор, в отличии от аналогичных «восстановителей».
Добавлено: Выяснилось, что программа не работает с файлами, имена, которых написаны кириллицей.
Похожие статьи:
How To Install and Use PhotoRec on Linux and Its Alternative
Have you ever accidentally deleted files or photos on your Linux computer? This tutorial will look at how to use PhotoRec to recover deleted files in Linux. We previously discussed how to recover deleted files using TestDisk for Linux, and the same company developed the PhotoRec utility.
PhotoRec is well-known for its effectiveness in recovering data from other devices, such as a digital camera, and its compatibility with common file systems. Continue reading this post to understand better how to install PhotoRec on Linux. This article also introduces the best alternative to Photorec that can help you recover any data.
In this article
Part 1. What Is PhotoRec for Linux and What Can It Do?
PhotoRec is a Linux file data recovery program that recovers lost files such as video, archives, and documents from hard disks, CD-ROMs, and lost photos (hence Photo Recovery) from digital camera memory. Because PhotoRec ignores the file system and goes after the underlying data, it will still work even if the file system on your media has been severely damaged or reformatted.
PhotoRec for Linux is a free multi-platform open-source application distributed under the GNU General Public License. PhotoRec is a companion application to TestDisk, which is used to recover lost partitions on a wide range of file systems and to make non-bootable disks bootable again. PhotoRec uses read-only access to the drive or memory card from which you are about to recover lost data for added security.
Functions of PhotoRec for Linux
Files are stored in data blocks, also called clusters, under Windows. After being initialized during file system formatting, the cluster or block size remains constant at various sectors. Most operating systems attempt to store data contiguously to minimize data fragmentation. Because the seek time of mechanical drives is essential for writing and reading data to/from a hard disk, it is critical to keep fragmentation to a minimum.
In an ext3/ext4 file system, for example, the names of deleted files remain, but the place of the first data block has vanished. When a file is deleted, the metadata associated with that file is erased. It indicates that the information is still on the file system until some or all of it is replaced by new file information.
PhotoRec for Linux first tries to determine the data block size to recover these deleted files. If the file system is not damaged, this value can be read from the superblock or volume boot record. Otherwise, PhotoRec scans the media sector by sector while looking for the first ten files, using the locations of those files to determine the block/cluster size. After determining the block size, PhotoRec reads the media block by block. Each block is compared to a signature database included with the program and has expanded throughout PhotoRec’s development regarding the types of files it can recover.
Compatibility of PhotoRec
PhotoRec is compatible with the following Linux operating systems:
PhotoRec for Linux works even when the file system is severely damaged since it overlooks the file system. It can at least restore deleted files from:
Part 2. How To Install PhotoRec on Linux
Execute the appropriate command listed below for your version to install Testdisk:
Install PhotoRec on Debian/Ubuntu/Linux Mint
$ sudo apt-get install testdisk
Install PhotoRec on RHEL/CentOS/Fedora
$ sudo yum install testdisk
Install PhotoRec on Fedora 22+
$ sudo dnf install testdisk
Install PhotoRec on Arch Linux
Once the installation process is completed, you can download and run Photorec with the following command:
Part 3. How To Recover Deleted Photos and Files on Linux Using PhotoRec
Step 1. Select Storage Disk
Running the Photorec will list the available storage media on your Linux computer. To select the disk containing the lost files, use the Up/Down arrow keys. Then press Enter to continue.
Step 2. Select Source Partition
In the next screen, you will be asked to select the partition on which you lost your files. Use the Up/Down arrow keys to choose the partition and then click Search to begin the recovery process. You can also use the Left/Right arrow keys to go through Options for changing the options (Step 3), and File Opt to list the file types recovered by PhotoRec (Step 4).
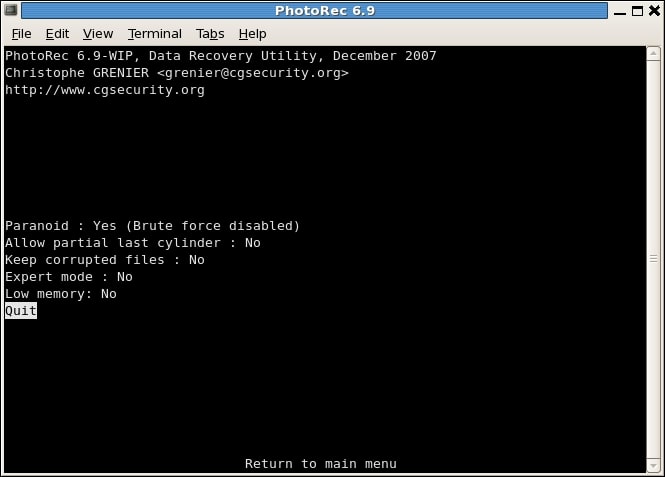
Step 3. PhotoRec Options
The PhotoRec options include the following:
- Paranoid: By default, recovered files are verified, while invalid files are rejected.
- Allow partial last cylinder: It changes how the disk geometry is determined; this should affect only non-partitioned media.
- Expert mode: The user can force the file system block size and offset.
- Keep corrupted files: This option keeps files even if they are invalid or damaged.
- Low memory: If your device does not have enough memory and crashes during recovery, select this option.
Step 4. Select the File Type to Recover
Enable or disable the recovery of specific file types in File Opt.
Step 5. Select File System Type
PhotoRec comprehends the data block distribution after a partition has been identified and confirmed with Search. Choose Other unless it is a Linux ext2/ext3/ext4 filesystem.
Step 6. Carve the Partition or Unallocated Space Only
PhotoRec for Linux can search for files in various locations: from the entire partition or a specific partition. Choose the option per your need.
Step 7. Select Where Recovered Files Should be Written
Now select where you want to store the recovered files. To access the drive list, use the arrow keys to select. Then, press Enter to choose the drive of your choice. When you get the anticipated location, verify with Yes.
Step 8. Recovery in Progress
PhotoRec is ready to restore deleted files from your Linux device, which may take a while, depending on the number of file types you’ve chosen. The number of recovered files is constantly updated. You can access the files even if the recovery is not complete.

Step 9. Recovery Is Completed
A summary is displayed once the recovery is complete. If you interfere with the recovery, you will be prompted to resume it the next time PhotoRec is launched.
Part 4. The Best Alternative to PhotoRec for Linux Data Recovery
PhotoRec is a powerful Linux data recovery tool that can recover lost or deleted files from various storage devices. However, it has some limitations, such as its inability to recover files from a crashed Linux computer or encrypted storage.
In light of these limitations, an alternative data recovery tool that is highly recommended is the Wondershare Recoverit Linux Recovery. This tool offers a broader range of recovery options and can recover a wider variety of file types, including compressed or encrypted ones. Furthermore, it has a user-friendly interface, which makes it easy to use even for those who need to be tech-savvy.