- Sysadminium
- Текущее время в системе Linux
- Настройка часового пояса
- Синхронизация времени
- Получение списка NTP серверов по DHCP
- Служба синхронизации времени
- Ещё один способ задать часовой пояс
- Итог
- How do I find my NTP server in Debian
- How do I find my NTP server on Debian
- Conclusion
- About the author
- Hammad Zahid
Sysadminium
В статье мы разберёмся с тем, как настроить время в Linux. Посмотрим текущее время, укажем часовой пояс и настроим синхронизацию времени.
Текущее время в системе Linux
Чтобы посмотреть текущее время на вашем сервере linux воспользуйтесь командой date:
alex@ubu:~$ date Ср 13 июл 2022 13:40:27 UTC
В выводе мы видим не только дату и время, но также и часовой пояс. Сейчас вместо часового пояса используется UTC.
Также можно использовать другую команду — timedatectl:
alex@s-ubu:~$ timedatectl Local time: Ср 2022-07-20 07:56:41 UTC Universal time: Ср 2022-07-20 07:56:41 UTC RTC time: Ср 2022-07-20 07:56:41 Time zone: UTC (UTC, +0000) System clock synchronized: yes NTP service: active RTC in local TZ: no
Без опций она покажет текущее время, часовой пояс, а также другую информацию связанную с синхронизацией времени. Например в примере выше видно что время успешно синхронизуется (System clock synchronized: yes) и синхронизация настроена (NTP service: active).
С помощью этой же утилиты (timedatectl) мы будем настраивать часовой пояс и следить за синхронизацией времени, об этом чуть ниже.
Настройка часового пояса
Вообще часовой пояс в системе определяется файлом /etc/localtime, который является символьной ссылкой (про ссылки я уже писал):
alex@ubu:~$ ls -l /etc/localtime lrwxrwxrwx 1 root root 27 апр 21 01:01 /etc/localtime -> /usr/share/zoneinfo/Etc/UTC
Можно вручную отредактировать эту ссылку и указать нужный часовой пояс:
alex@ubu:~$ sudo ln -sf /usr/share/zoneinfo/Europe/Moscow /etc/localtime
Или воспользоваться утилитой timedatectl:
alex@ubu:~$ sudo timedatectl set-timezone Europe/Moscow
Если вас не устраивает выбранный мною часовой пояс, то можете посмотреть список поддерживаемых часовых поясов так:
alex@ubu:~$ timedatectl list-timezones
Проверим время и часовой пояс:
alex@ubu:~$ timedatectl Local time: Ср 2022-07-13 16:50:39 MSK Universal time: Ср 2022-07-13 13:50:39 UTC RTC time: Ср 2022-07-13 13:50:39 Time zone: Europe/Moscow (MSK, +0300) System clock synchronized: yes NTP service: active RTC in local TZ: no
Как видим, часовой пояс уже изменился на Europe/Moscow (MSK, +0300).
Синхронизация времени
В настоящее время очень важно чтобы часы на ваших серверах были синхронизированы. Очень много систем полагаются на время, например:
- если часы на сервере kerberos и клиенте расходятся более чем на 5 минут, то клиенты не смогут пройти проверку подлинности на сервере;
- в различных финансовых системах транзакции должны выполняться в надлежащем порядке, поэтому серверы выполняющую эту работу должны быть строго синхронизированы по времени;
- правильное время также нужно для выполнения автоматизированный задач;
- системные журналы также полагаются на время.
Получение списка NTP серверов по DHCP
Если ваш сервер получает сетевые настройки по dhcp, то он может получить список NTP серверов (серверов времени для синхронизации). Это настраивается в файле /etc/dhcp/dhclient.conf. В строке request мы определяем что хотим получать от сервера dhcp. И здесь может быть указан параметр ntp-servers:
alex@ubu:~$ cat /etc/dhcp/dhclient.conf # часть текста пропустил request subnet-mask, broadcast-address, time-offset, routers, domain-name, domain-name-servers, domain-search, host-name, dhcp6.name-servers, dhcp6.domain-search, dhcp6.fqdn, dhcp6.sntp-servers, netbios-name-servers, netbios-scope, interface-mtu, rfc3442-classless-static-routes, ntp-servers; # часть текста пропустил
Само собой, вы получите список ntp-серверов, только в том случае если ваш dhcp сервер их распространяет.
Служба синхронизации времени
В системах работающих на systemd работает специальная служба синхронизации времени systemd-timesyncd.service. Можем посмотреть её статус:
alex@ubu:~$ systemctl status systemd-timesyncd.service ● systemd-timesyncd.service - Network Time Synchronization Loaded: loaded (/lib/systemd/system/systemd-timesyncd.service; enabled; vendor preset: enabled) Active: active (running) since Wed 2022-07-13 17:08:06 MSK; 23s ago Docs: man:systemd-timesyncd.service(8) Main PID: 399 (systemd-timesyn) Status: "Initial synchronization to time server 192.168.0.16:123 (192.168.0.16)." Tasks: 2 (limit: 2241) Memory: 1.3M CPU: 63ms CGroup: /system.slice/systemd-timesyncd.service └─399 /lib/systemd/systemd-timesyncd
Видим что синхронизация идет с сервером по адресу 192.168.0.16. У меня этот адрес прилетел по dhcp.
Обратите внимание, что служба эта стартует по запросу и останавливается после синхронизации времени!
Давайте выключим получение ntp серверов по dhcp:
alex@ubu:~$ sudo nano /etc/dhcp/dhclient.conf # в этой строке удалите опцию ntp-servers request subnet-mask, broadcast-address, time-offset, routers, domain-name, domain-name-servers, domain-search, host-name, dhcp6.name-servers, dhcp6.domain-search, dhcp6.fqdn, dhcp6.sntp-servers, netbios-name-servers, netbios-scope, interface-mtu, rfc3442-classless-static-routes;
Вы можете использовать следующий пул серверов времени для синхронизации — https://www.pool.ntp.org/zone/ru. Укажем первый сервер из этого пула в конфиге /etc/systemd/timesyncd.conf:
alex@ubu:~$ sudo nano /etc/systemd/timesyncd.conf [Time] NTP=0.ru.pool.ntp.org FallbackNTP=ntp.ubuntu.com RootDistanceMaxSec=5 PollIntervalMinSec=32 PollIntervalMaxSec=2048
В конфиге используются следующие опции:
- NTP — укажите 1 или несколько ntp серверов. Если хотите указать несколько серверов, разделяйте их пробелами;
- FallbackNTP — укажите 1 или несколько резервных ntp серверов;
- RootDistanceMaxSec — максимальное время в секундах, за которое пакет от сервера эталонного времени должен доходить до сервера к которому мы подлкючены;
- PollIntervalMinSec и PollIntervalMaxSec — минимальный и максимальный интервалы синхронизаций времени. Вначале используется минимальный интервал, а затем он увеличивается если система видит что локальное время со временем ntp-сервера не расходится.
После правки перезапустите службу синхронизаций времени:
alex@ubu:~$ sudo systemctl restart systemd-timesyncd.service
Дополнительно можно посмотреть информацию по синхронизации времени с помощью следующей команды:
alex@ubu:~$ timedatectl timesync-status Server: 91.209.94.10 (0.ru.pool.ntp.org) Poll interval: 34min 8s (min: 32s; max 34min 8s) Leap: normal Version: 4 Stratum: 2 Reference: 3EE70662 Precision: 1us (-25) Root distance: 4.012ms (max: 5s) Offset: -5.502ms Delay: 11.084ms Jitter: 2.886ms Packet count: 7 Frequency: +15,118ppm
Здесь мы видим адрес ntp-сервера, а также какой интервал синхронизации (34min 8s) использовался последний раз.
То-есть служба синхронизации времени systemd-timesyncd.service будет запускаться и останавливаться сейчас примерно раз в 34 минуты. Поэтому если увидите, что служба в состоянии loaded и inactive, не пугайтесь. По логам видно что она периодически запускается:
alex@ubu:~$ systemctl status systemd-timedated ○ systemd-timedated.service - Time & Date Service Loaded: loaded (/lib/systemd/system/systemd-timedated.service; static) Active: inactive (dead) Docs: man:systemd-timedated.service(8) man:localtime(5) man:org.freedesktop.timedate1(5) июл 19 15:54:24 s-ubu systemd[1]: systemd-timedated.service: Deactivated successfully. июл 19 15:55:41 s-ubu systemd[1]: Starting Time & Date Service. июл 19 15:55:41 s-ubu systemd[1]: Started Time & Date Service. июл 19 15:56:35 s-ubu systemd[1]: systemd-timedated.service: Deactivated successfully. июл 19 16:05:45 s-ubu systemd[1]: Starting Time & Date Service. июл 19 16:05:45 s-ubu systemd[1]: Started Time & Date Service. июл 19 16:06:15 s-ubu systemd[1]: systemd-timedated.service: Deactivated successfully. июл 19 16:28:42 s-ubu systemd[1]: Starting Time & Date Service. июл 19 16:28:42 s-ubu systemd[1]: Started Time & Date Service. июл 19 16:30:17 s-ubu systemd[1]: systemd-timedated.service: Deactivated successfully.
- Deactivated successfully — служба останавливается;
- Starting Time & Date Service… — служба стартует;
- Started Time & Date Service — служба стартовала;
- и так по кругу.
Ещё один способ задать часовой пояс
С помощью команды dpkg-reconfigure tzdata также можно задать часовой пояс:
alex@ubu:~$ sudo dpkg-reconfigure tzdata
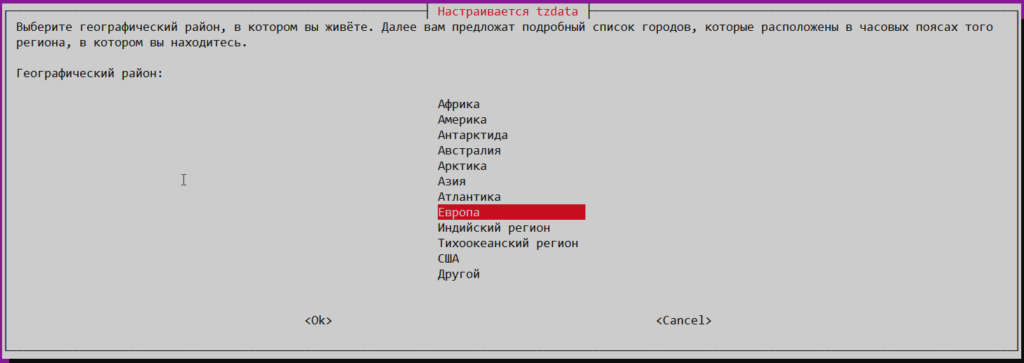
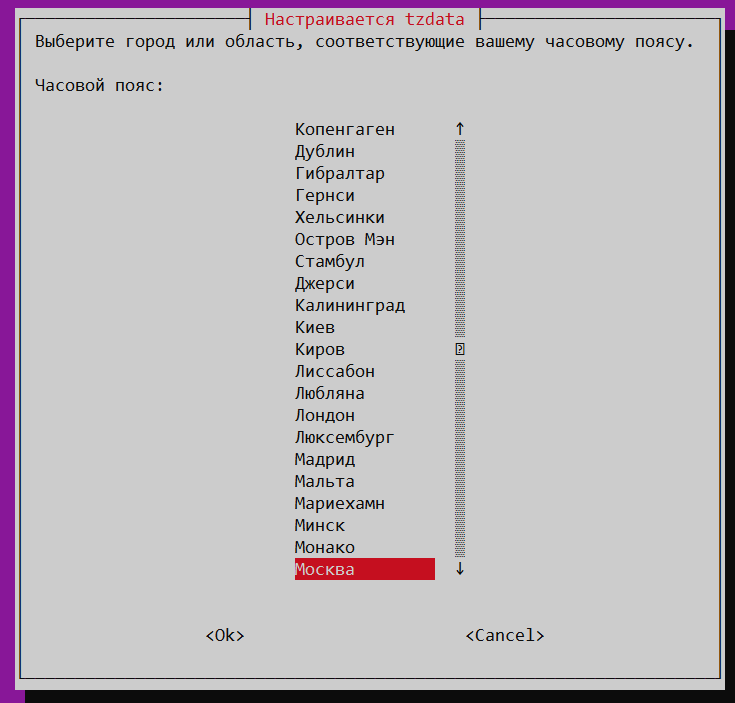
После выполнения вы можете использовать псевдографический интерфейс для настройки часового пояса. Вначале выберите географический район:
Итог
Теперь вы знаете как настроить время на сервере Debian или Ubuntu. Мы научились устанавливать часовой пояс и настраивать синхронизации времени с ntp серверами.
Узнали про следующие команды:
- date — покажет текущую дату, время и часовой пояс;
- timedatectl — покажет тоже самое что и date + синхронизуется ли время;
- timedatectl list-timezones — покажет список поддерживаемых часовых поясов;
- timedatectl set-timezone Europe/Moscow — установить часовой пояс Europe/Moscow;
- timedatectl timesync-status — покажет с какими ntp-серверами синхронизуется время и как часто;
- dpkg-reconfigure tzdata — установить часовой пояс.
- /etc/localtime — является символической ссылкой и содержит информацию о текущем часовом поясе;
- /etc/dhcp/dhclient.conf — настройки dhcp-клиента, который умеет запрашивать ntp-сервера для синхронизации времени;
- /etc/systemd/timesyncd.conf — настройки службы синхронизации времени.
Узнали про службу синхронизации времени:
- systemd-timedated.service — стартует по запросу, а после синхронизации времени отключается до следующей синхронизации.
How do I find my NTP server in Debian
![]()
NTP is an abbreviation of “Network Time Protocol” which is used to synchronize the time of the server and the client machine. In this process, the client machine requests the server for the current time and the server sends data in the form of packets. There is a standard of time that is universal and followed by everyone known as UTC (Coordinated Universal Time). Port 123 is by default allocated to the NTP server and this whole process is followed by the User Datagram Protocol (UDP).
In this post, we are focusing on finding the NTP server by installing and configuring the NTP in Debian.
How do I find my NTP server on Debian
NTP is a process in which the client machine requests the server to set its time. So first we will understand how to install and configure the NTP server then will learn how to find out the IP addresses of NTP.
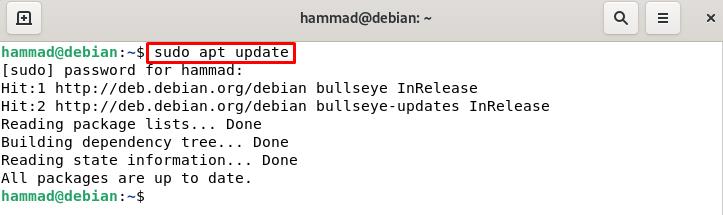
Installation and Configuration of NTP : First, we will update Debian’s repository:
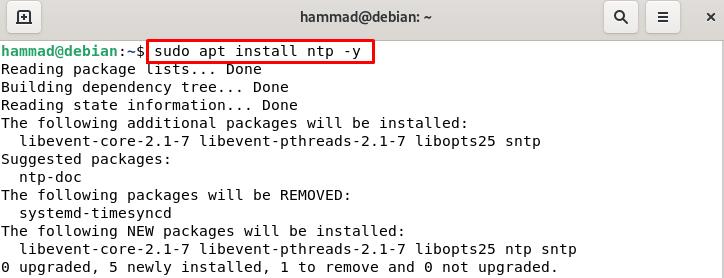
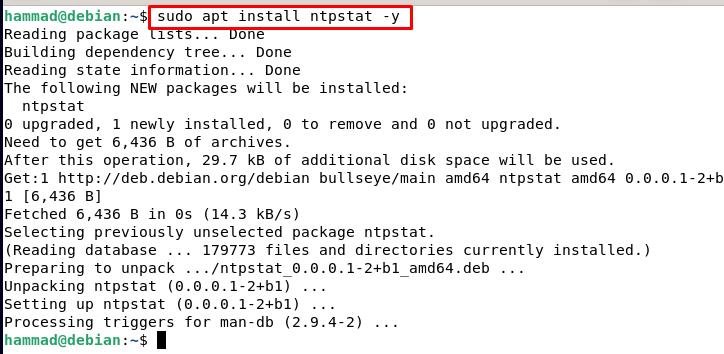
We will install the latest package available of NTP:
By default, after the installation, NTP should be of active status, you can confirm it by checking its status but if it is inactive, you can start the NTP server:

After restarting, check its status whether it is running or not:

Hence the NTP is running. Now, we will configure the firewall so it will allow the client to request the server else it will restrict the client to send any query and for this purpose will first go to the root mode.

Run these two commands here, asking the firewall to allow the queries on port 123 which is by default allocated to the NTP.
iptables -A OUTPUT -p udp —dport 123 -j ACCEPT
iptables -A INPUT -p udp —dport 123 -j ACCEPT

Now we will exit the root user mode as:
Verification of the NTP working using ntpstat : The ntpstat command shows us whether the connection is established between the server and client, if the connection is established, then the status will be “synchronized”. If ntpstat generates the error of “command not found” on running the command:

Then we can install ntpstat running the following command.
Now to check the status, again run the command.

The output shows the NTP server IP address along with the recent details of the correction of time with the server and to verify the status of synchronization of the clock we will run the command to get the exit status.
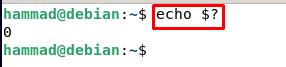
The outcome “0” means the client’s clock is synchronized with the server. The other outcomes can be either “1” which means the clock of the client machine is not synchronized with the server or “2” which means the client is not connected to the server.
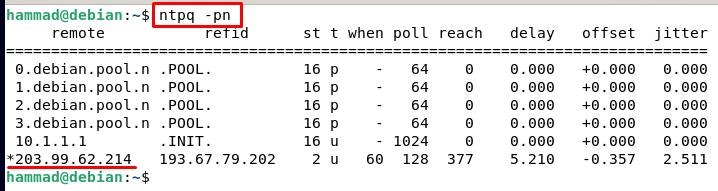
Checking the ntp server using ntpq command : Ntpq command monitors the NTP daemon, ntpd operations, and determines the performance of the NTP. We will use flags, p which means print the entire list of the peers known by the server with the summary of their state, and n which means display the host addresses.
Conclusion
NTP enables us to synchronize with the same time units that the world is following. NTP sets the time of its machine by asking the server to give it time information and then both are synchronized with the time of the internet. In this post, we have discussed two methods by which we can get the information about our NTP server in Debian. Hope this post will help you understand not only how to find our NTP server on Debian but also the installation and configuration of NTP on both server and client’s machine.
About the author
Hammad Zahid
I’m an Engineering graduate and my passion for IT has brought me to Linux. Now here I’m learning and sharing my knowledge with the world.