- How to Connect to Wi-Fi on Kali Linux
- Connecting to Wi-Fi on Kali (Graphical Mode):
- Connecting to Wi-Fi With Kali (Text Mode):
- Connecting to Wi-Fi With Kali Using nmcli:
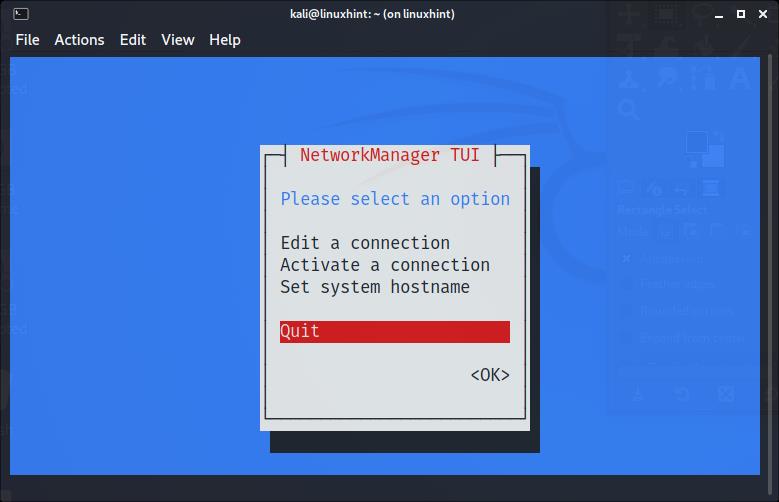
- Connecting to Wi-Fi With Kali Using nmtui:
- Troubleshooting Commands:
- Conclusion:
- About the author
- David Adams
- В Кали Линукс не работает Wi-Fi.
- И сразу про ошибки: установить Wi-Fi на Кали Линукс не получается.
- СРАЗУ
- Чего не хватает, или что там про Possible missing firmware /lib/firmware/i915?
- «Устанавливаем неустановленное».
- На Кали Линукс не работает Wi-Fi: процесс установки.
How to Connect to Wi-Fi on Kali Linux
![]()
After reading this tutorial, you’ll know how to connect to your wireless network from your graphical environment and the console using both nmtui and mncli tools.
Connecting to Wi-Fi on Kali (Graphical Mode):
Connecting to Wi-Fi from Kali Linux is the same as connecting from any other Linux distribution. Some users may find their wireless card disabled.

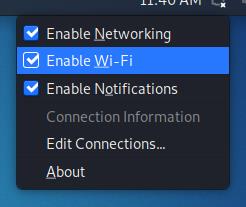
To begin, identify the network icon on your taskbar, which is displayed as:

As you can see, the network icon is located next to the clock. Once identified, right-click on it to show all available options, including Enable Wi-Fi, as shown in the image below. Make sure the option Enable Wi-Fi is marked:
Once enabled, left-click the network icon again, and you’ll see all available networks for connection. Then, press the one you want to connect to:
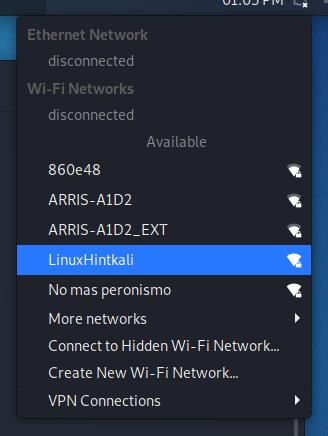
After clicking on your network, you should connect without problems.
Connecting to Wi-Fi With Kali (Text Mode):
Before connecting to a network using the terminal, let’s see how to detect all available networks. To scan for networks, you can use the iwlist command followed by your wireless device and the function scan below:
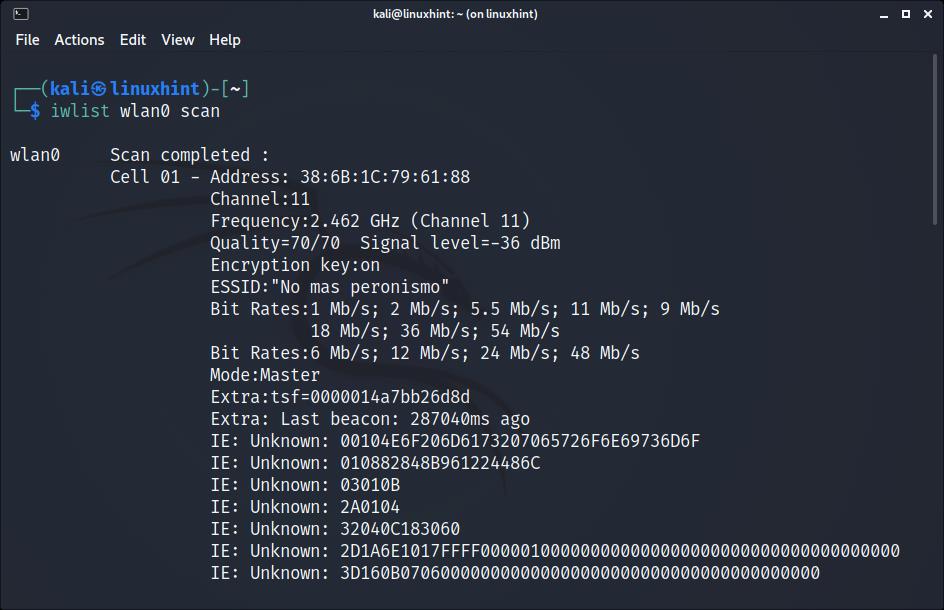
As you can see, depending on the quantity of available networks, the output will display a long list of data belonging to each network, but we are only interested in the ESSID.
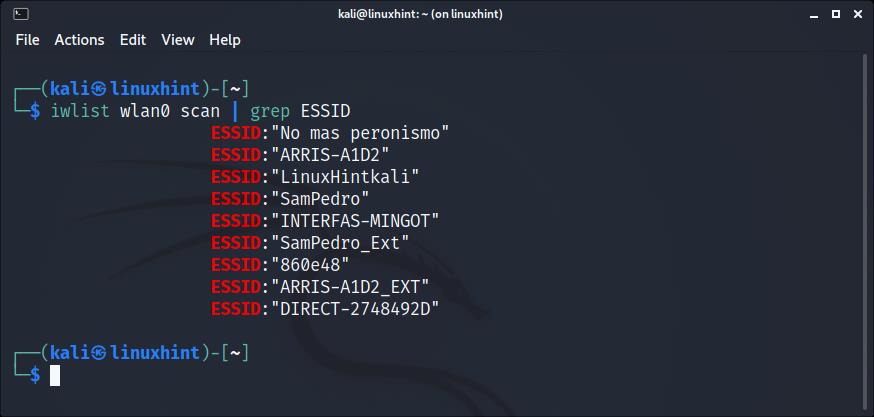
You can get a more human-friendly output by implementing grep as shown below; in this manner, iwlist will only print the networks ESSID:
Once you scanned all networks and identified the one you want to connect to, you can use different text-mode methods to establish a connection.
Connecting to Wi-Fi With Kali Using nmcli:
The nmcli command allows us to control the NetworkManager from the command line and using it is pretty simple. The following example shows how to connect to a network named LinuxHintkali, whose password is linuxhintpass.
After scanning and identifying your network with the iwlist command explained previously, run the command below, replacing LinuxHintkali with the ESSID of the network you want to connect to, and replacing linuxhintpass with its password:
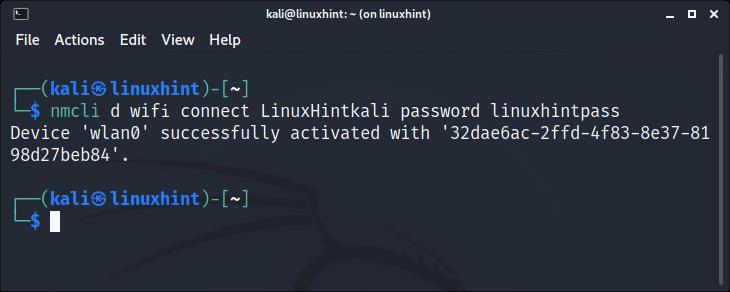
As you can see, the connection was established properly.
You can get additional information on nmcli at its man page https://linux.die.net/man/1/nmcli.
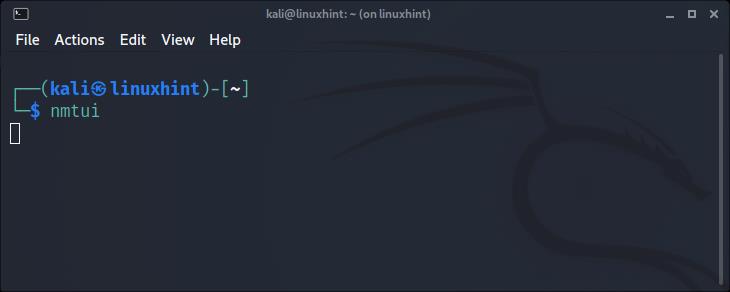
Connecting to Wi-Fi With Kali Using nmtui:
The nmtui command is a curses-based tool that allows you to control NetworkManager in an interactive mode.
To run it, simply execute the command below:
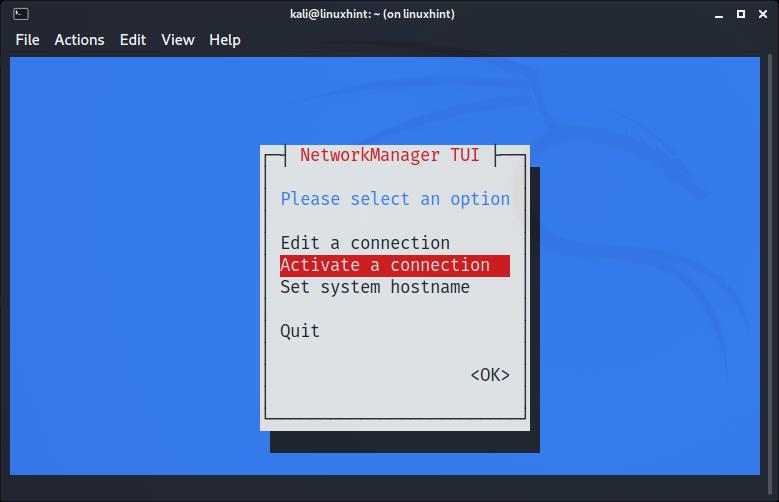
The following menu will show up. Use your keyboard arrows to select “Activate a connection” and press ENTER:
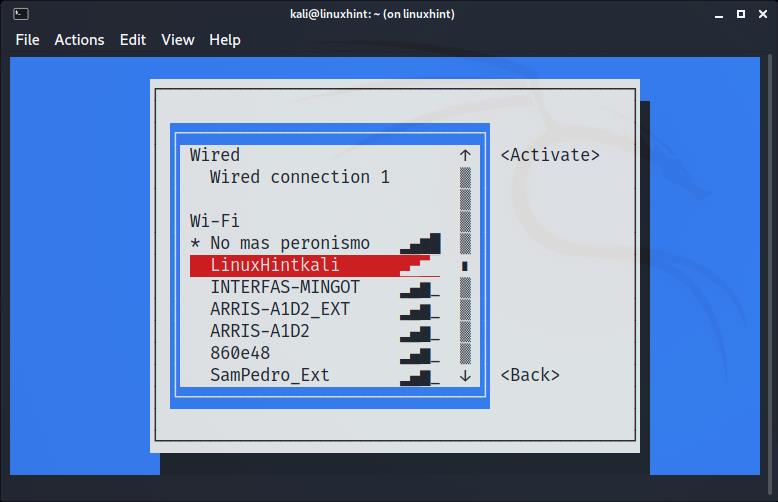
The next screen will show all available networks. Again, use your keyboard arrows to select the network you want to connect to and press ENTER:
The connection will be established. You already must have internet access:

Once connected, select Back and press ENTER:

Move to Quit, and press Enter to leave nmtui:
Troubleshooting Commands:
The following commands were not tested because my network card was properly detected. The first command shown below may be useful in case your Wi-Fi device’s drivers weren’t properly detected. This is not a common scenario when using Kali:
More probably than the command shown above to install drivers, your wireless card may be down. To set it up, first identify your network device name:
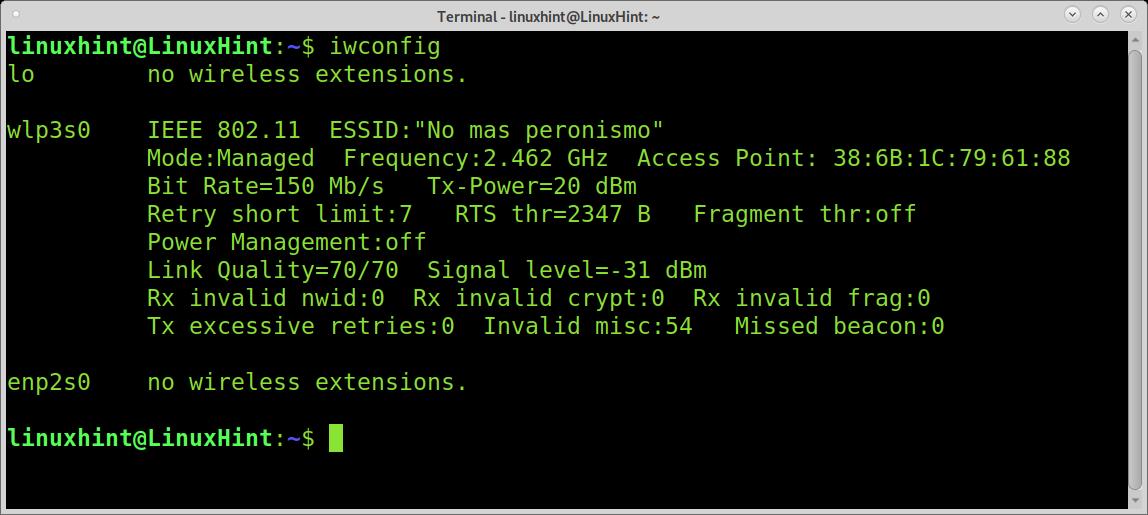
As you can see in the output above, my network device is named wlp3s0. To set it up, I run the following command:
Remember to replace wlp3s0 for your wireless card name.
Conclusion:
As you can see, connecting to Wi-Fi on Kali Linux should not be a problem even for basic Linux users. Linux, not only Kali, offers a variety of methods to establish connection. This tutorial was written after finding many Kali users report problems connecting. In most cases, their Wi-Fi adapter was disabled and enabling it from the taskbar, as shown in the first steps of this tutorial, solved the problem. Learning the text mode techniques explained in this article is especially important because they are almost universal for all Linux distributions and independent of their graphical environment.
Thank you for reading this tutorial explaining how to connect to Wi-Fi on Kali Linux, keep following us for more Linux tips and tutorials.
About the author
David Adams
David Adams is a System Admin and writer that is focused on open source technologies, security software, and computer systems.
В Кали Линукс не работает Wi-Fi.

На Кали Линукс не работает Wi-Fi: ошибки в новых версиях.
Устанавливая Кали на ноутбук, пользователь порой замечает, что Wi-Fi на Кали Линукс не работает. Чаще всего по той причине, что встроенный адаптер просто не обнаруживается. Рассмотрим вопрос, как можно попробовать установить Wi-Fi на Кали Линукс. Скорее всего, это будет ноутбук, так как приобретаемый отдельно модем обычно либо уже содержит пакет драйверов для Windows и Линукс либо доступен для скачивания на сайте производителя. А вот для лэптопов это нередко, действительно, проблема: Wi-Fi модуль встроен, а с установкой драйверов для Линукс беда до сих пор. Но в любом случае соединение с сетью вам понадобится. Учтите, что оборудование у различных производителей разное. По моей практике большинство встраиваемых модулей легко понимает язык драйверов Broadcom для Линукс, но у Dell, HP и других возможны свои правила.
И сразу про ошибки: установить Wi-Fi на Кали Линукс не получается.
Для Кали Линукс я использую «максимально прокачанную» модель старичка-ноутбука Lenovo B590 со встроенным Wi-Fi модулем. На которую драйвера от Broadcom традиционно садились на ура. Однако, к своему удивлению, в какой-то момент я обнаружил, что при установке на него версии 2022.3 Кали Линукс 5.18.0 ничего не произошло. Причём следовал своей же старой, но вполне работоспособной до недвнего времени инструкции по установке Wi-Fi в Кали Линукс. В статье я покажу как исправил ситуацию с неопределяющимся Wi-Fi модулем. А вы мотайте на ус; может, что и пригодиться.
СРАЗУ
На некоторых скриншотах я работаю прямо из root-терминала, потому префикс sudo вы видите не всегда. В командах же статьи он будет присутствовать. Будьте внимательны к ответу терминала об отсутствующих правах. Понятно, думаю.
Привычно обновляю систему с одновременной установкой полученных обновлений, сколько бы времени не понадобилось:
sudo apt-get update && sudo apt-get upgrade -y
После установки обновлений предпочитаю «зарибутить линуху» командой sudo reboot . Но сейчас предлагаю вам притормозить внимание на моей консоли. Эти предупреждения, сгенерированные update-initramfs, я, по причине торопыгости, заметил не сразу:
Possible missing firmware /lib/firmware/i915/bxt_guc_69.03.bin for module i915 W: Possible missing firmware /lib/firmware/i915/skl_guc_69.03.bin for module i915 W: Possible missing firmware /lib/firmware/i915/kbl_guc_69.03.bin for module i915 W: Possible missing firmware /lib/firmware/i915/cml_guc_69.03.bin for module i915 W: Possible missing firmware /lib/firmware/i915/glk_guc_69.03.bin for module i915 . и т.д. и т.п.
Да, ядро Линукс сообщает множественными строчками об отсутствующем оборудовании. Как многие уже догадались, именно в этом причина того, что Wi-Fi в моей Кали Линукс не хотел устанавливаться. Я допёр до этого не сразу, обращаясь к вроде бы нормально до того установленным библиотекам.
Чего не хватает, или что там про Possible missing firmware /lib/firmware/i915?
Я посчитал логичным, что подходящий пакет firmware-linux решит проблему с содержимым modinfo . Надеясь, на схожесть в версиях оборудования и пакетов, прибегнул к помощи APT (ну а чего же ещё). Кому интересно, можете пробить, на что обращает внимание терминал командами типа:

покажет «недостающее» и «неустановленное». Переходим теперь к делу.
«Устанавливаем неустановленное».
В принципе, все мои проблемные библиотеки лежат тут. Их можно скачать и скопировать в директорию /lib/firmware/i915/ и обновиться командами sudo update-initramfs -u -k all и sudo apt-get update -y . Я же пойду путём, которым может воспользоваться каждый. Расширяем список репозиториев, добавляя ещё три источника к официальному списку:
mousepad etc/apt/sources.list
deb http://deb.debian.org/debian buster main contrib non-free
deb http://deb.debian.org/debian-security/ buster/updates main contrib non-free
deb http://deb.debian.org/debian buster-updates main contrib non-free

Не забываем сохраниться. Ставим apt-file:
sudo apt update sudo apt install apt-file sudo apt-file update


Проверьте ошибку о недостающих модулях после команды обновления системы:
sudo apt-get update && sudo apt-get upgrade -y

На Кали Линукс не работает Wi-Fi: процесс установки.
Для установки модулей от Broadcom появился автоматизированный скрипт. Обращаемся за помощью к BroadcomInstaller2022 на Github. На странице следуем простой инструкции по установке из терминала. Сначала качаем из источника, переходим в нужный раздел, забираем права и запускаем установщик .sh:
git clone https://github.com/jaykali/BroadcomInstaller2022 cd BroadcomInstaller2022 chmod +x Broadcom.sh bash Broadcom.sh
На рисунки команды не попали, извиняюсь. Терминал вернёт опции в запущенной утилите, из которых выберем пункт 1 для установки драйвера Wi-Fi. Потребуется некоторое время. В том же терминале наверняка придётся согласиться на доустановку дополнительных обновлений, подтвердив выбор русской Д.


Вероятно, что ноутбук перезапустится сам . После перезагрузки значок с беспроводным соединением должен появиться где и положено: в правом верхнем углу. Ввожу пароль и пользуюсь.