- Kali Linux – How to Add or Remove Users
- Benefits of Standard User in Kali:
- Add user in Kali Linux:
- Login as new user
- Delete user in Kali Linux:
- How to create a new normal user with sudo permission in Kali Linux
- Here’s how you will create a normal user Link to heading
- Как создать нового пользователя в Linux
- Как создать нового пользователя в Debian, Kali Linux, Linux Mint, Ubuntu
- Как создать нового пользователя в Arch Linux, Manjaro, BlackArch и их производных
- Опции команды useradd
- Изменение значений по умолчанию для создания новых пользователей
- Файлы
- How to Create a New User in Kali Linux?
- Kali Linux (2020.1) How to Create a New User?
- Adding to the Sudo Group
- Using The `su` Command
- Updating Kali
- Logging in with a New User
Kali Linux – How to Add or Remove Users
The main reason I wanted to try this to demonstrate the followings:
- Add a user with all user directories already in place (thereby avoiding “Could not update .ICEauthority var/lib/gdm3/.ICEauthority” or any error containing .ICEauthority or permission in general.
- Add user to sudo group to allow him to use root commands. You can also add user to ‘lpadmin’ group to allow printing for Canonor HP and such.
- Change default shell from chsh to bash. Or any shell like Bourne Shell (sh), Bourne-Again Shell (bash), C Shell (csh) or Korn shell (ksh) etc.
- Login as that user and demonstrate there were no errors.
- Be able to use sudo and show groups affinity.
- Delete that user safely.
Benefits of Standard User in Kali:
Few benefits you have as non-root or standard user in Kali
- Install and run Google Chrome
- Install and run Gnome User and Groups manager (Install gnome-system-tools)
- Use Kali as Primary Operating System without worrying about breaking it all the time.
Now let’s move onto actual guide.
Add user in Kali Linux:
- First of all let’s confirm which version of Linux and Kernel I’m running.In command prompt type in

- Now let’s add user. Open terminal and type following to create new user (replace user1 with your desired user name)

(Note: -m means create home directory which is usually /home/username)
- Now set password for this user

Enter desired password twice
- Add user to sudo group (to allow user to install software, allow printing, use privileged mode etc.)

(Note: -a means append or add and –G mean to specified group/groups)
- Change default shell of previously created user to bash

(Note: chsh mean change login shell, -s is the name of the specified shell you want for the user, in this case /bin/bash) Nice, all worked out as expected.
Let’s logout and login back as our new Standard Non-root user (user1)
Login as new user
- Once logged in, let’s confirm from command line who I really am! In terminal type in the following

Take note of user1@kali prompt. That also confirms who you are.
And let’s check my group affinity, type in the following in terminal:

Looks good to me so far. I am part of user1 group (my primary) and sudo group. That means I can run privileged commands or just become root myself if required.
Become root!

and type in user1’s password to become root. See the prompt becomes root@kali instead of user1@kali. That means you’re now root and get to run anything Kali got to offer.
Lets confirm that using whoami command

So far so good. Now how do you delete a user?
Delete user in Kali Linux:

(Note: -r means delete all files and home directory for user1) You can replace user1 with your desired user name. I have an error “user1 is currently used by process 5866”. So process ID 5866 is being used by user1. (I know that it’s the gnome–keyring process running in background when I used sudo su – command earlier. (Gnome–Keyring error is quite common in Debian when you install multiple Windows or Desktop Managers. Let do that.
Type in the following in terminal to kill the process used by user1.

This kills the process immediately. (Note: don’t kill root or system processes unless you know what you’re doing)
Now let’s try to delete the user again.

We have a message. “userdel: user1 mail spool (/var/mail/user1) not found”. (Note: -r means delete all files and home directory for user1) Are we going to worry about it? Not really, we never created a mailbox for user1.
Just to confirm everything for user1 was deleted list files in home directory

Nothing.. that’s good news, all files and folders were deleted for user1.
Want to double-check?

Perfect user1 was deleted successfully.
How to create a new normal user with sudo permission in Kali Linux
Kali Linux, the pentester’s Linux does not need an introduction. Today, I’ll show you how to create a normal user under Kali Linux. You might ask, Why would someone want to create a normal/standard user in Kali? What’s wrong with root only? Well, simply saying, being root all the time is not so good. Some applications won’t work in root. (Google chrome won’t work in root by default). If you want to use Kali as a day to day operating system, I’d suggest you to create a standard user and use it. If you want to do pentesting and stuff, you could ‘sudo’ or just log in as root.
Note: This procedure can be used in any Linux distro to add a normal user. That includes ubuntu, Linux mint, or even Centos
Here’s how you will create a normal user Link to heading
Open a terminal and issue the following command.
useradd -m username # -m creates a home directory for the user. Now we have to set a password for the user.
It will ask you to create a new password.
At this point, we have a new user account. But we might want to add our new user to the “sudoers” group, so that we can use “sudo” to do administrative actions.
usermod -a -G sudo username The option -a means to add and ‘-G sudo’ means to add the user to the sudo group. If you want to know more about the usermod command, issue man usermod command to know more about usermod
Now we have to specify the shell for our new user.
chsh command is used to change the login shell for a user.
All done.! you are all set. You could logout and login to your new account.
Как создать нового пользователя в Linux
При вызове без опции -D команда useradd создаёт новую учётную запись пользователя, используя значения, указанные в командной строке, плюс значения по умолчанию из системы. В зависимости от параметров командной строки команда useradd обновит системные файлы, а также может создать домашний каталог нового пользователя и скопировать исходные файлы.
По умолчанию для нового пользователя также будет создана группа (смотрите опции -G, -N, -U и USERGROUPS_ENAB).
Имена пользователей должны начинаться со строчной буквы или символа подчёркивания, и должны состоять только из строчных букв, цифр, символов подчёркивания и минус. Они могут
заканчиваться знаком доллара. Это можно описать регулярным выражением: [a-z_][a-z0-9_-]*[$]?
Имена пользователей могут быть длиной не более 32 знаков.
Как создать нового пользователя в Debian, Kali Linux, Linux Mint, Ubuntu
Для создания нового пользователя запустите команду вида:
sudo useradd -m -G sudo -s /bin/bash НОВЫЙ_ПОЛЬЗОВАТЕЛЬ
Замените НОВЫЙ_ПОЛЬЗОВАТЕЛЬ на желаемое имя.
Установите пароль для нового пользователя:
passwd НОВЫЙ_ПОЛЬЗОВАТЕЛЬ
Как создать нового пользователя в Arch Linux, Manjaro, BlackArch и их производных
Для создания нового пользователя с sudo (замените НОВЫЙ_ПОЛЬЗОВАТЕЛЬ на настоящее имя) выполните команду вида::
sudo useradd -m -g users -G wheel,video -s /bin/bash НОВЫЙ_ПОЛЬЗОВАТЕЛЬ

Установите пароль для созданного пользователя:
passwd НОВЫЙ_ПОЛЬЗОВАТЕЛЬ
Опции команды useradd
Рассмотрим несколько важных опций утилиты useradd.
-s, —shell ОБОЛОЧКА
Имя оболочки входа пользователя. По умолчанию это поле остаётся пустым, в результате чего система выбирает оболочку входа по умолчанию, заданную переменной SHELL в /etc/default/useradd, или пустую строку по умолчанию.
-m, —create-home
Создать домашний каталог пользователя, если он не существует. Файлы и каталоги, содержащиеся в каталоге скелета (который может быть определён с помощью параметра -k), будут скопированы в домашний каталог.
По умолчанию, если этот параметр не указан и CREATE_HOME не включён, домашние каталоги не создаются.
-g, —gid GROUP
Имя или числовой идентификатор первичной группы пользователя. Группа с таким именем должна существовать. Идентификатор группы должен указывать на уже существующую группу.
Если не указано иное, поведение useradd будет зависеть от переменной USERGROUPS_ENAB в /etc/login.defs. Если для этой переменной задано значение «yes» (или в командной строке указано -U/—user-group), для пользователя будет создана группа с тем же именем, что и его имя для входа. Если для переменной задано значение no (или в командной строке указано -N/—no-user-group), useradd установит для первичной группы нового пользователя значение, указанное переменной GROUP в /etc/default/useradd или 100 по умолчанию.
-G, —groups GROUP1[,GROUP2,…[,GROUPN]]]
Список дополнительных групп, членом которых является пользователь. Каждая группа отделяется от следующей запятой без пробелов. На группы распространяются те же ограничения, что и на группу, указанную с параметром -g. По умолчанию пользователь принадлежит только к начальной группе.
-k, —skel SKEL_DIR
Скелетный каталог, содержащий файлы и каталоги, которые должны быть скопированы в домашний каталог пользователя, когда домашний каталог создаётся с помощью useradd.
Эта опция действительна, только если указана опция -m (или —create-home).
Если этот параметр не установлен, каталог скелета определяется переменной SKEL в /etc/default/useradd или, по умолчанию, etc/skel.
Если возможно, выполняется копирование ACL и расширенных атрибутов.
Изменение значений по умолчанию для создания новых пользователей
При вызове только с параметром -D, useradd отобразит текущие значения по умолчанию.
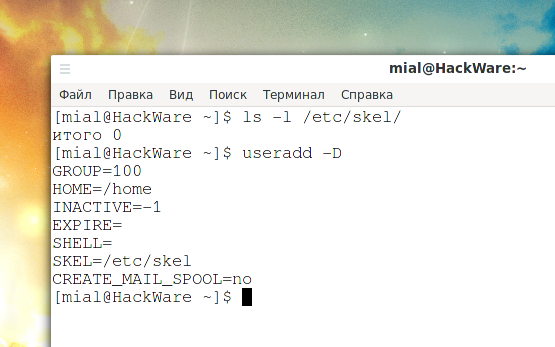
Эти значения будут применятся при создании новых пользователей если не используются опции, которые переопределяют их.
При вызове с -D плюс другие параметры, useradd обновит значения по умолчанию для указанных параметров. Допустимые варианты изменения по умолчанию:
-b, —base-dir BASE_DIR
Префикс пути к домашнему каталогу нового пользователя. Имя пользователя будет добавлено в конец BASE_DIR для формирования имени домашнего каталога нового пользователя, если опция -d не используется при создании новой учётной записи.
Этот параметр устанавливает переменную HOME в /etc/default/useradd.
-e, —expiredate EXPIRE_DATE
Дата, когда учётная запись пользователя заблокирована.
Эта опция устанавливает переменную EXPIRE в /etc/default/useradd.
-f, —inactive INACTIVE
Число дней, которые должны пройти после устаревания пароля, перед тем как учётная запись будет заблокирована.
Эта опция устанавливает НЕАКТИВНУЮ переменную в /etc/default/useradd.
-g, —gid ГРУППА
Имя или идентификатор группы для начальной группы нового пользователя (когда используется -N/—no-user-group или когда для переменной USERGROUPS_ENAB установлено значение no в /etc/login.defs). Указанная группа должна существовать, а числовой идентификатор группы должен иметь существующую запись.
Эта опция устанавливает переменную GROUP в /etc/default/useradd.
-s, —shell ОБОЛОЧКА
Имя командной оболочки пользователя.
Эта опция устанавливает переменную SHELL в /etc/default/useradd.
Файлы
содержит информацию о пользователях
содержит защищаемую информацию о пользователях
содержит информацию о группах
содержит защищаемую информацию о группах
/etc/default/useradd
значения по умолчанию для создаваемой учётной записи
каталог, содержащий файлы по умолчанию
Per user subordinate group IDs.
Per user subordinate user IDs.
/etc/login.defs
содержит конфигурацию подсистемы теневых паролей
How to Create a New User in Kali Linux?

We will explain how to create a new user and get root privileges in Kali Linux. As we entered 2020, the new Kali version was released and we installed and tried this new version on my virtual machine. The familiar root/toor user no longer exists. When we put the machine down and the system up for the first time, we realized it when we tried logging in. In Kali Linux 2020.1, we log in by typing the default user kali/kali .
Kali Linux (2020.1) How to Create a New User?
The user will be created using useradd the command. Then we will set the password with the passwd command. The -m command will create the user’s home directory on kali. It will enable login with the user you created.
sudo useradd -m username // add -m new user sudo passwd username // creating a password for the user we created

Adding to the Sudo Group
In this section, we will add the user to the sudo group and finally change the default shell of the newly added user to bash.
sudo usermod -a -G sudo username sudo chsh -s /bin/bash username

Using The `su` Command
We can switch to the user we created using the su command.

Updating Kali
You should update the Kali Linux system as soon as possible with every reboot or make some basic changes for more stable and secure. You can update and upgrade the Kali with the command below.
sudo apt-get update && apt-get upgrade
Logging in with a New User
To log in to the new user, log out of the root user.


Whoami command
As you can see, the new user has been logged in and we have seen that the user is “omer” with the “whoami” command.