- Kali linux and mac
- What You’ll Need
- Kali Linux Live USB Install Procedure
- Creating a Bootable Kali USB Drive on macOS/OS X (DD)
- Creating a Bootable Kali USB Drive on macOS/OS X (Etcher)
- Kali linux and mac
- Installation Prerequisites
- Kali Linux Installation Procedure
- Kali Linux Installation Procedure
- Troubleshooting macOS/OS X
- Post Installation
Kali linux and mac
Our favourite way, and the fastest method, for getting up and running with Kali Linux is to run it “live” from a USB drive. This method has several advantages:
- It’s non-destructive — it makes no changes to the host system’s hard drive or installed OS, and to go back to normal operations, you simply remove the “Kali Live” USB drive and restart the system.
- It’s portable — you can carry Kali Linux in your pocket and have it running in minutes on an available system
- It’s customizable — you can roll your own custom Kali Linux ISO image and put it onto a USB drive using the same procedures
- It’s potentially persistent — with a bit of extra effort, you can configure your Kali Linux “live” USB drive to have persistent storage, so the data you collect is saved across reboots
In order to do this, we first need to create a bootable USB drive which has been set up from an ISO image of Kali Linux.
What You’ll Need
- A verified copy of the appropriate ISO image of the latest Kali build image for the system you’ll be running it on: see the details on downloading official Kali Linux images.
- If you’re running under macOS/OS X, you can use the dd command, which is pre-installed on those platforms, or use Etcher.
- A USB thumb drive, 4GB or larger. (Systems with a direct SD card slot can use an SD card with similar capacity. The procedure is identical.)
Kali Linux Live USB Install Procedure
The specifics of this procedure will vary depending on whether you’re doing it on a Windows, Linux, or macOS/OS X system.
Creating a Bootable Kali USB Drive on macOS/OS X (DD)
macOS/OS X is based on UNIX, so creating a bootable Kali Linux USB drive in an macOS/OS X environment is similar to doing it on Linux. Once you’ve downloaded and verified your chosen Kali ISO file, you use dd to copy it over to your USB drive. If you would prefer to use Etcher, then follow the same directions as a Windows user. Note that the USB drive will have a path similar to /dev/disk2.
WARNING: Although the process of imaging Kali on a USB drive is very easy, you can just as easily overwrite a disk drive you didn’t intend to with dd if you do not understand what you are doing, or if you specify an incorrect output path. Double-check what you’re doing before you do it, it’ll be too late afterwards.
- Without the USB drive plugged into the system, open a Terminal window, and type the command diskutil list at the command prompt.
- You will get a list of the device paths (looking like /dev/disk0, /dev/disk1, etc.) of the disks mounted on your system, along with information on the partitions on each of the disks.

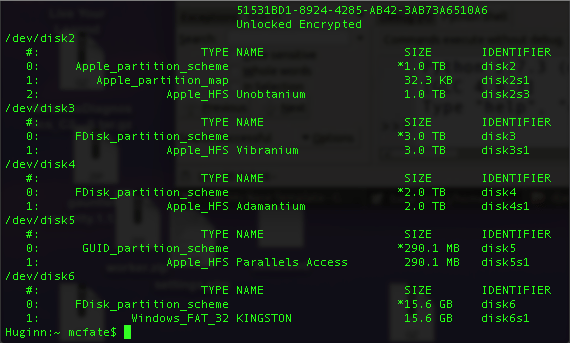
3. Plug in your USB device to your Apple computer’s USB port and run the command diskutil list a second time. Your USB drive’s path will most likely be the last one. In any case, it will be one which wasn’t present before. In this example, you can see that there is now a /dev/disk6 which wasn’t previously present.
4. Unmount the drive (assuming, for this example, the USB drive is /dev/disk6 — do not simply copy this, verify the correct path on your own system!):
- Proceed to (carefully!) image the Kali ISO file on the USB device. The following command assumes that your USB drive is on the path /dev/disk6, and you’re in the same directory with your Kali Linux ISO, which is named “kali-linux-2023.2-live-amd64.iso”. We will replace /dev/disk6 with /dev/rdisk6 to improve the write speeds:
There is a chance you may receive an error when running the above command, that you will receive the following error:
If this is the case, please change the 4M to be 4m . Additionally, increasing the blocksize (bs) will speed up the write progress, but will also increase the chances of creating a bad USB drive. Using the given value on macOS/OS X has produced reliable images consistently.
Another potential error will be that status=progress does not work on your version of macOS. If this is the case, remove this section and instead use CTRL+T to measure status.
Imaging the USB drive can take a good amount of time, over half an hour is not unusual, as the sample output below shows. Be patient!
The dd command provides no feedback until it’s completed, but if your drive has an access indicator, you’ll probably see it flickering from time to time. The time to dd the image across will depend on the speed of the system used, USB drive itself, and USB port it’s inserted into. Once dd has finished imaging the drive, it will output something that looks like this:
Creating a Bootable Kali USB Drive on macOS/OS X (Etcher)
Alternatively, Etcher can be used.
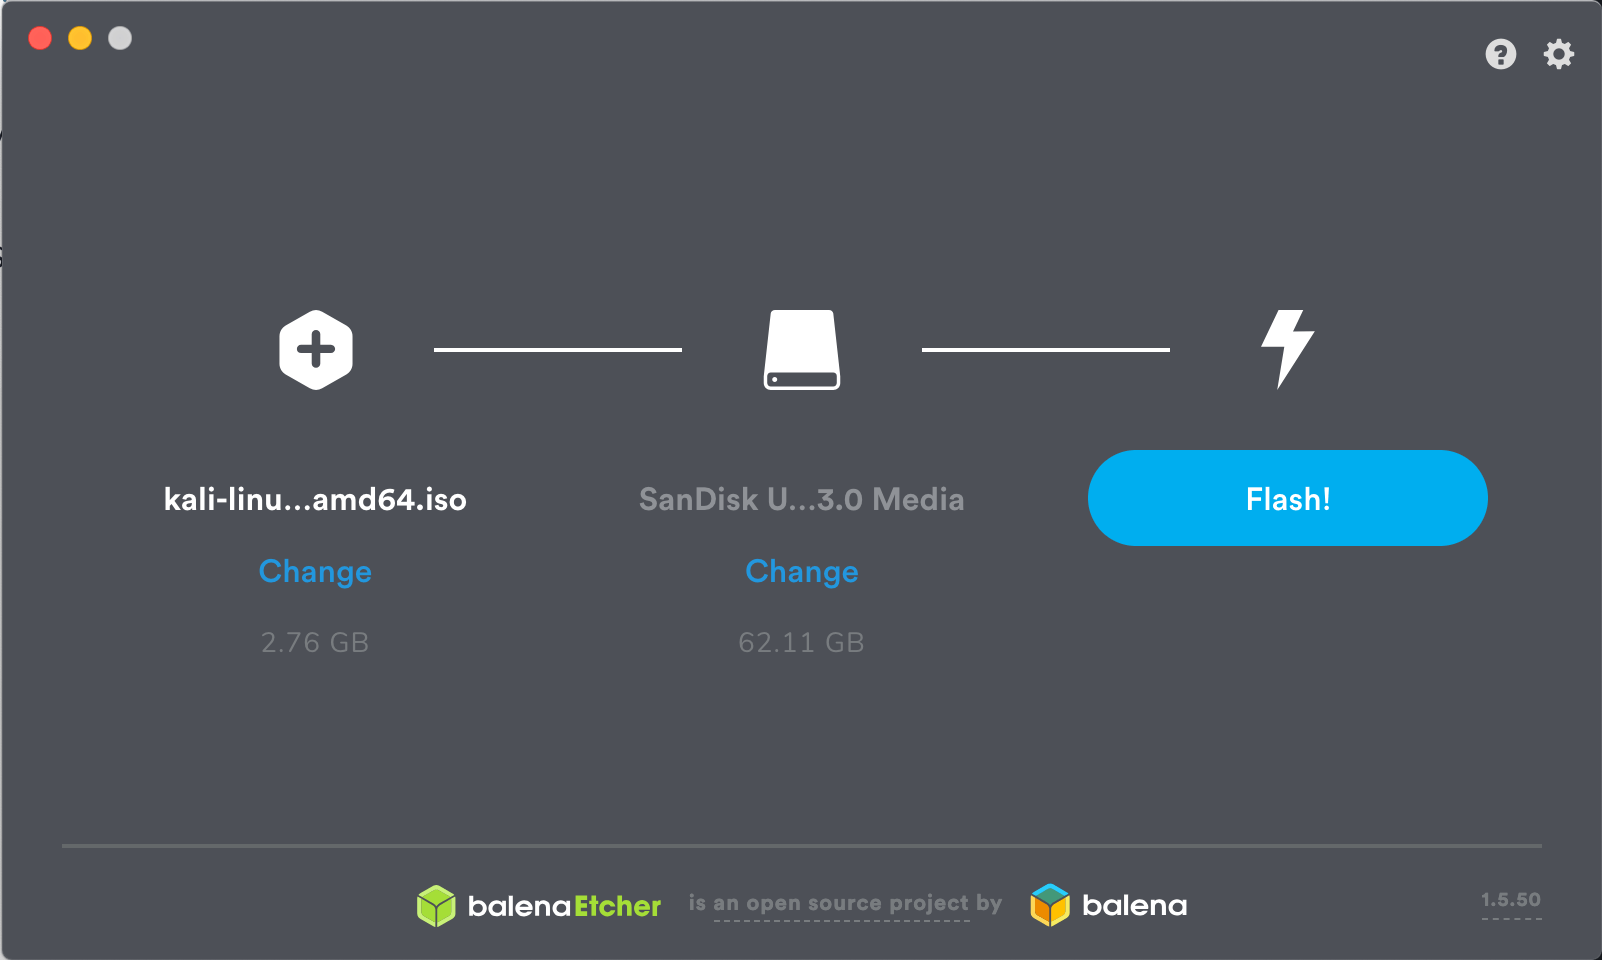
- Download and run Etcher.
- Choose the Kali Linux ISO file to be imaged with “select image” and verify that the USB drive to be overwritten is the correct one. Click the “Flash!” button once ready.
3. Once Etcher alerts you that the image has been flashed, you can safely remove the USB drive.
You can now boot into a Kali Live / Installer environment using the USB device.
To boot from an alternate drive on an macOS/OS X system, bring up the boot menu by pressing the Option key immediately after powering on the device and select the drive you want to use.
Updated on: 2023-May-30
Author: g0tmi1k
Kali linux and mac
IMPORTANT! Newer Mac hardware (e.g. T2/M1 chips) do not run Linux well, or at all. This is true for Linux in general, not just Kali Linux.
The model & year of the device will determine how successful your experience will be.
Installing Kali Linux (Single boot) on Apple Mac hardware (such as MacBook/MacBook Pro/MacBook Airs/iMacs/iMacs Pros/Mac Pro/Mac Minis), can be a straight forward, if the hardware is supported. Most of the time, there are a few issues that come up, so there is a bit of trial and error.
This guide will show you how to replace macOS/OS X with Kali Linux. However, if you wish to keep macOS/OS X, you will want to refer to our dual-boot guide instead.
In our example, we will be installing Kali Linux on a Mac Mini (Mid 2011) using macOS High Sierra (10.13). The same procedure has also been tested on a Mac Book Air (Early 2014) using macOS Catalina (10.15).
Installation Prerequisites
This guide will make the following assumptions:
- You have read our single boot Kali Linux install guide, as this has the same Installation Prerequisites (System requirements, setup assumptions and install media).
- Currently running macOS/OS X 10.7 or higher (later versions are more preferred) as this means the hardware is Intel (and not a PowerPC CPU).
- Depending on the Mac hardware model & year, you may find:
- Different results when trying to boot by using either a CD/DVD or a USB drive.
- You may be able to increase the chances of booting (especially older hardware and non-EFI) from a USB drive by having rEFInd pre-installed.
We will be wiping any existing data on the hard disk, so please backup any important information on the device to an external media.
Kali Linux Installation Procedure
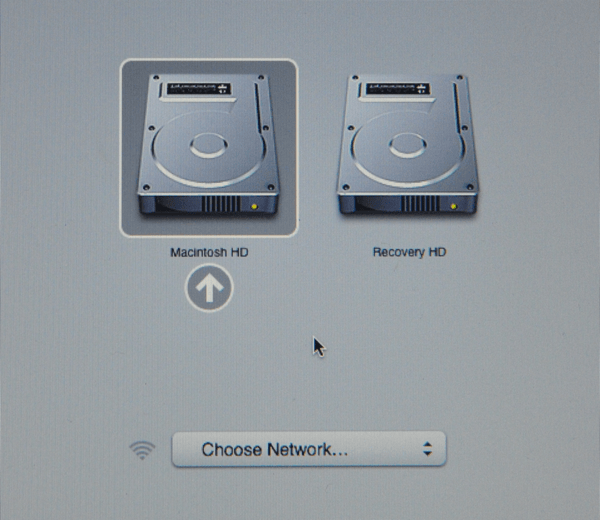
- To start your installation, make sure you insert your Kali Linux installation medium and power on the device. Immediately press and hold the Option (or Alt) ⌥ key until you see the boot menu (rEFInd if installed, else the default macOS/OS X). You may or may not have a Recovery HD depending on your macOS/OS X setup.

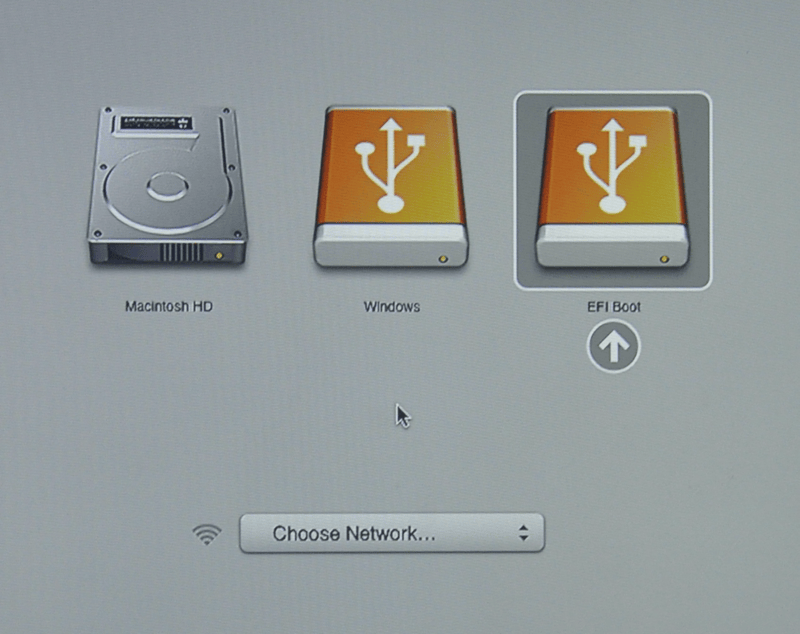
- When the boot menu appears, if everything works as expected, you should see two volumes:
- EFI Boot — Newer hardware which support UEFI. It is common for GUID Partition Table (GPT) partitions to be used.
- Windows — “Non-EFI” boot. This use on older hardware which uses BIOS. You often see Master Boot Record (MBR) partition tables here.
If you only see one volume (EFI Boot), then the installation media is not supported for this device. This could be because the age of the firmware on the device.
You may wish to install rEFInd, as it is a boot manager, and try again.Even though Kali Linux is based on Debian, macOS/OS X always detects non-EFI boot media as Windows. We suggest that you select the EFI Boot volume to continue. However, if the installation hangs at this point, power cycle and select Windows (Being Kali Linux non-EFI/BIOS). The success depends on the Mac hardware’s model & year.
Kali Linux Installation Procedure
- The installation procedure from this point onwards is the same as our Kali Linux Hard Disk install guide.
- After that is complete, all that is left is to reboot, take out the installation media, and enjoy Kali Linux.
Troubleshooting macOS/OS X
If you have issues installing Kali Linux on macOS/OS X, there are a few options you can try:
- Install the latest version of macOS/OS X (App store, Recovery or USB) and applying any updates as this may upgrade the firmware.
- Install rEFInd boot manager to replace the default boot manager.
- If you’re using a DVD, refresh rEFInd once the drive has stop spinning by pressing ESC .
- Switch from EFI to BIOS boot when trying to boot Kali Linux.
- Switch from GPT drive to Hybrid MRB drive (using the Live image may help).
Post Installation
Now that you’ve completed installing Kali Linux, it’s time to customize your system.
The General Use section has more information and you can also find tips on how to get the most out of Kali Linux in our User Forums.
Updated on: 2023-Mar-06
Author: g0tmi1k
- Different results when trying to boot by using either a CD/DVD or a USB drive.