- #26 Kali Linux для начинающих. Превращаем Kali Linux в веб-сервер.
- How To Install apache2 on Kali Linux
- What is apache2
- Install apache2 Using apt-get
- Install apache2 Using apt
- Install apache2 Using aptitude
- How To Uninstall apache2 on Kali Linux
- Uninstall apache2 And Its Dependencies
- Remove apache2 Configurations and Data
- Remove apache2 configuration, data, and all of its dependencies
- References
- Summary
- How to Configure Apache Server in Kali Linux Guide for Beginners
- What is an apache Web Server?
- How to Configure Apache Server in Kali Linux?
- OLD Method to start Restart Apache2 web service
- Use GUIs to Start Restart Apache2 web Server in Linux
- Check the status of Apache server
- Start, Stop and Restart the Apache webserver in Kali Linux
- Another way to start, stop of restart Apache2 service by following commands
- The Default Web Page
#26 Kali Linux для начинающих. Превращаем Kali Linux в веб-сервер.
В этом уроке мы рассмотрим базовую конфигурацию сервера.
Мы узнаем, как запускать сервисы, в том числе Apache и SSH, а также мы научимся загружать файлы и информацию, с помощью этих сервисов.
SSH означает безопасный шелл, который используется для удаленного получения доступа к машине. Иными словами, если Вы хотите подключиться к машине в Вашей сети, или сторонней в интернете, то следует использовать безопасный шелл. Безопасный шелл дает полный контроль над удаленной машиной, и мы будем иметь доступ к командной строке системы.
Apache – это веб-сервер Linux, на котором можно размещать информацию.
Представим ситуацию, что мы взломали машину, и нам нужно скачивать или закачивать информацию на или со взломанного сервера. Далее нам нужно просканировать сеть на наличие других машин в системе. Для этого используются инструменты «nmap» и «nessus» для примера. Возможно мы взломаем еще какую-либо машину в сети, и нам нужно будет использовать взломанный хост для сканирования других сетей, в которых он может находиться. Нам нужно загрузить инструменты с нашей машины на Kali, на взломанный хост. Это делается с помощью SSH, и если быть точнее, то SCP, для безопасного копирования, или веб-сервера Apache.
Допустим, у Вас получилось взломать Linux — систему, и получить учетные данные пользователей. Теперь нам нужны учетные данные, для верификации, если запущен SSH. Нам не нужно каждый раз взламывать систему.
Переходим к практике, и давайте я покажу Вам как поднять веб-сервер Apache на Kali Linux.
Примечательно то, что при поднятии сервера Apache, мы можем получить доступ к нашему серверу на Kali. Попробуем подключиться к локалхосту:
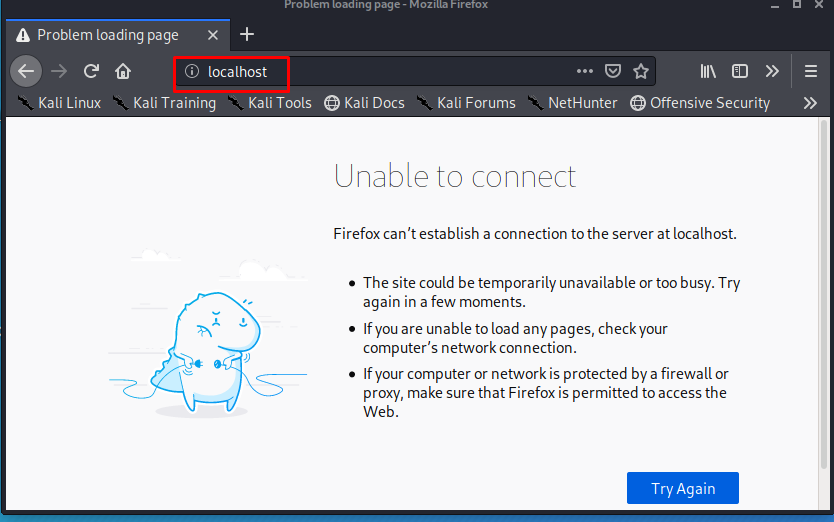
Иными словами, когда я пытаюсь подключиться по адресу locahost, на самом деле я подключаюсь к ip-адресу «127.0.0.1». Этот адрес является локальным в нашей сети.
Как видим ничего не происходит.
Давайте запустим веб-сервер Apache с помощью команды «service apache2 start»:
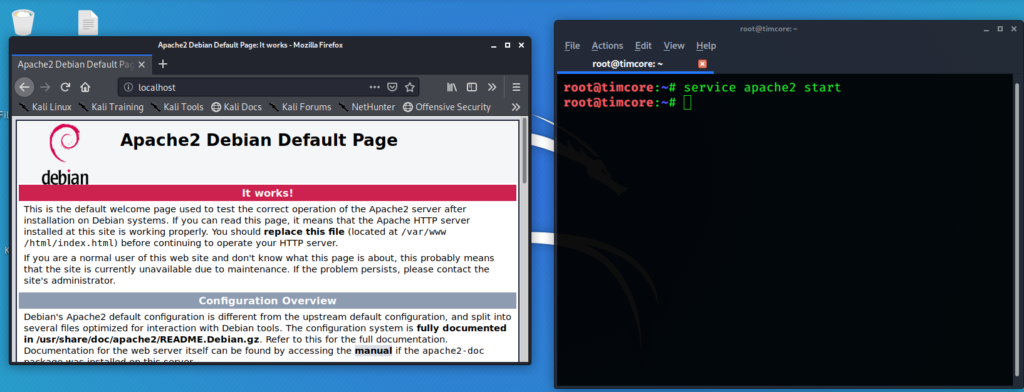
Видим открытое окно с сервером по дефолту (информация).
Веб-сервер был запущен успешно.
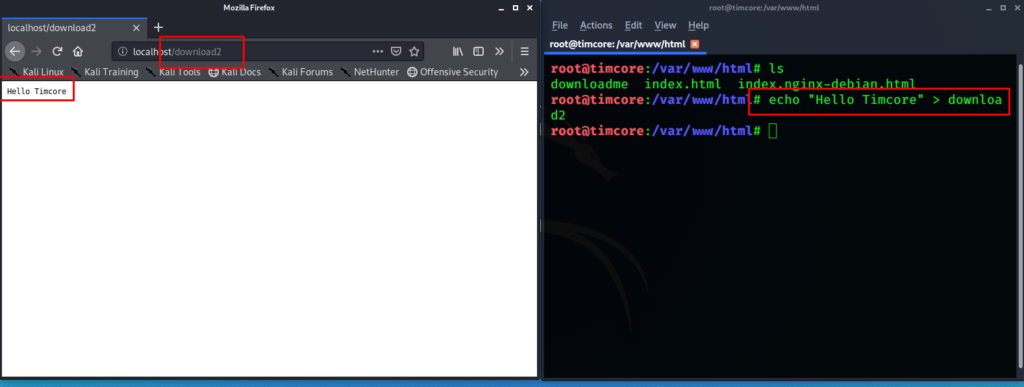
Теперь давайте добавим какие-либо файлы на сервер. Для начала нам нужно перейти в директорию «/var/www/html/»:

Добавим некоторые файлы в нашем сервере.
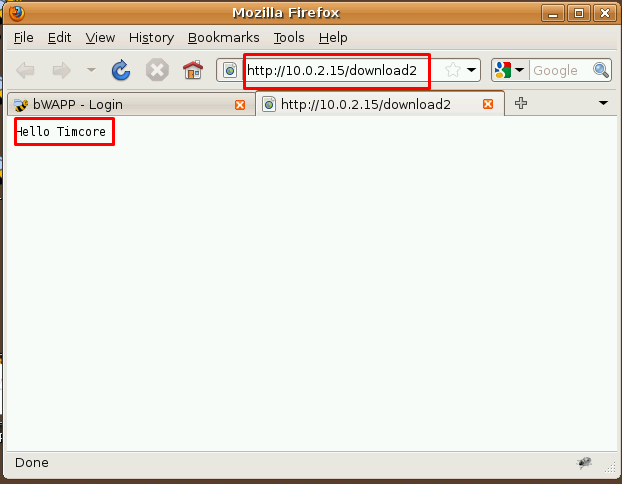
Команда для добавления: «echo “Hello Timcore” > download2»:
На этом все. Всем хорошего дня!
How To Install apache2 on Kali Linux
In this tutorial we learn how to install apache2 on Kali Linux.
What is apache2
The Apache HTTP Server Project’s goal is to build a secure, efficient and extensible HTTP server as standards-compliant open source software. The result has long been the number one web server on the Internet.
Installing this package results in a full installation, including the configuration files, init scripts and support scripts.
There are three ways to install apache2 on Kali Linux . We can use apt-get , apt and aptitude . In the following sections we will describe each method. You can choose one of them.
Install apache2 Using apt-get
Update apt database with apt-get using the following command.
After updating apt database, We can install apache2 using apt-get by running the following command:
sudo apt-get -y install apache2 Install apache2 Using apt
Update apt database with apt using the following command.
After updating apt database, We can install apache2 using apt by running the following command:
sudo apt -y install apache2 Install apache2 Using aptitude
If you want to follow this method, you might need to install aptitude first since aptitude is usually not installed by default on Kali Linux. Update apt database with aptitude using the following command.
After updating apt database, We can install apache2 using aptitude by running the following command:
sudo aptitude -y install apache2 How To Uninstall apache2 on Kali Linux
To uninstall only the apache2 package we can use the following command:
sudo apt-get remove apache2 Uninstall apache2 And Its Dependencies
To uninstall apache2 and its dependencies that are no longer needed by Kali Linux, we can use the command below:
sudo apt-get -y autoremove apache2 Remove apache2 Configurations and Data
To remove apache2 configuration and data from Kali Linux we can use the following command:
sudo apt-get -y purge apache2 Remove apache2 configuration, data, and all of its dependencies
We can use the following command to remove apache2 configurations, data and all of its dependencies, we can use the following command:
sudo apt-get -y autoremove --purge apache2 References
Summary
In this tutorial we learn how to install apache2 using different package management tools like apt, apt-get and aptitude.
How to Configure Apache Server in Kali Linux Guide for Beginners

In the article, I am going to cover how to configure apache server in Kali Linux, webserver apache in Kali Linux. Apache web server is similar methods are used in other Linux distribution. Simple commands can make an expert in using the webserver.
Originally this post is written on Jun 11, 2014, and last updated in April 2021. This article is not related to the cheap web server, web hosting, business web hosting, cloud hosting or any type of dedicated hosting service. This article defines only local webserver on Kali Linux for local Penetration testing.
What is an apache Web Server?
A web server is a type of server, that delivers web pages to the clients as per their request. Every Web server has an IP Address and domain name for identification. Server Administrator can make local webserver setup.
You can make a simple computer to work as a web server, It may be Windows, Linux or mac. You can install any web server software on your basic system. For example Xamp, Wamp etc.
Both of these software has apache web server.
I dont want to go in depth related this topic. So come back on the topic Web server in Kali Linux.
This is time to say thanks to Kali Linux developers, who have installed already Apache webserver in Kali Linux. But by default, apache service is not running.
I will explain in this article about configuration of apache server.
How do you know you web server is running or not? what happened if server is running.
When your server is ready to deliver web pages then you can access through web browser.
Clients access the web pages through a Web browser like Google Chrome, Firefox, Safari, etc.
You need to enter URL or IP address into the address bar of the web browser and the page will be delivered by Web server scripting.
If you enter https://www.cyberpratibha.com/blog in the Address bar it will be served by Web Server.
How to Configure Apache Server in Kali Linux?
In Kali Linux, you don’t need to set up a web server because Kali Linux has a pre-installed apache server. Hacker uses this webserver to deliver a web page containing malicious code to the victim by the help of a local webserver or by doing port forwarding.
We can trap them by using social engineering method for example Phishing. There are others who use the HTTP service in penetration testing.
it manages dedicated web server capacity to deliver pages and have web server load balancing.
OLD Method to start Restart Apache2 web service
Use GUIs to Start Restart Apache2 web Server in Linux
It is the easiest way to start, stop and restart the Apache2 service in GUI mode. Select Applications from the top bar of the Kali screen, next sub-menu bar will be displayed, Select Kali Linux menu, another fly-out display bar will appear, then go on the services menu, again next fly-out menu bar will display, In this bar web service can be start, stop and restart.

Once a selection happened, a command shell will open and the status of service will be displayed. When the Apache server has been started, the default page will be display by typing Attacker’s ip address in the web browser. IceWeasle is default web browser in Kali Linux distribution.
Note: GUI to start, stop, restart apache2 is not support in Kali Linux 2016.2 version.
Check the status of Apache server
Your first step to check the apache server is installed on your machine or not. Use the following command to check installed package apache2
apt list –installed apache2
In the above result, you can see apache2 installed.
Next check the status of apache web server in Kali Linux. Use the following command to do that:
[email protected]:~#service apache2 status ● apache2.service - The Apache HTTP Server Loaded: loaded (/lib/systemd/system/apache2.service; disabled; vendor preset: Active: inactive (dead) Docs: https://httpd.apache.org/docs/2.4/ [email protected]:~#
Press the “q” to exit command.
You can see in the result apache service status is inactive. If the service is inactive then you can access its web pages.
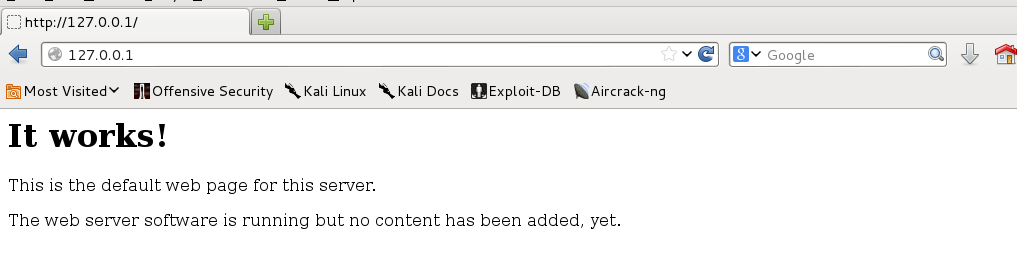
Open a web browser and type localhost/127.0.0.1 then hit enter.
You will get an error “Unable to connect”.
It means the webserver is not running on your Kali Linux machine. Now your next step to start the apache server.
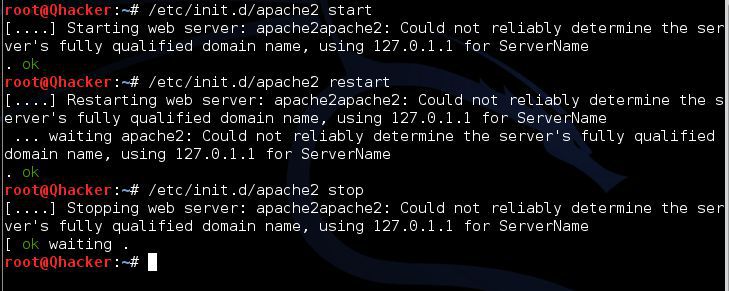
Start, Stop and Restart the Apache webserver in Kali Linux
It is easy to start, stop and restart Web Server using the simple command in the terminal /etc/init.d/apache2 followed by requested action (stop, start or restart). Following commands are used
#/etc/init.d/apache2 start
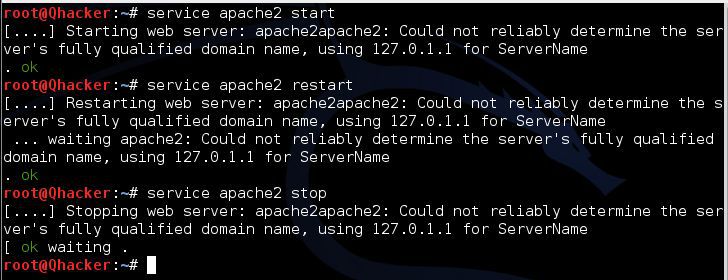
Another way to start, stop of restart Apache2 service by following commands
The Default Web Page
Once the Apache service is up and running the default (It works!) page may need to be changed, to do this make the web content that ought to be shown on the page and spare it as index.html in the /var/www/ index. Then again, the current index.html document in this area could be modified what’s more new pages might be included.

MODULE 3:- Basics of Kali Linux