- How to Connect to Wi-Fi on Kali Linux
- Connecting to Wi-Fi on Kali (Graphical Mode):
- Connecting to Wi-Fi With Kali (Text Mode):
- Connecting to Wi-Fi With Kali Using nmcli:
- Connecting to Wi-Fi With Kali Using nmtui:
- Troubleshooting Commands:
- Conclusion:
- About the author
- David Adams
- How To Connect Wi-Fi On Kali Linux (GUI, Command, Hidden, …)
- Kali Linux: Wi-Fi connection during the system installation
- Wireless card not detected?
- Wi-Fi configuration during Kali Linux installation
- Connect to Wi-Fi via the desktop interface on Kali Linux
- Quick connection from the top bar
- Advanced settings
- Install a wireless driver
- Using the command line to connect to a Wi-Fi network on Kali Linux
How to Connect to Wi-Fi on Kali Linux
![]()
After reading this tutorial, you’ll know how to connect to your wireless network from your graphical environment and the console using both nmtui and mncli tools.
Connecting to Wi-Fi on Kali (Graphical Mode):
Connecting to Wi-Fi from Kali Linux is the same as connecting from any other Linux distribution. Some users may find their wireless card disabled.

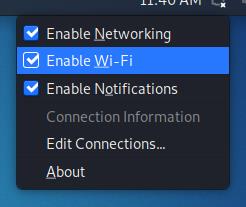
To begin, identify the network icon on your taskbar, which is displayed as:

As you can see, the network icon is located next to the clock. Once identified, right-click on it to show all available options, including Enable Wi-Fi, as shown in the image below. Make sure the option Enable Wi-Fi is marked:
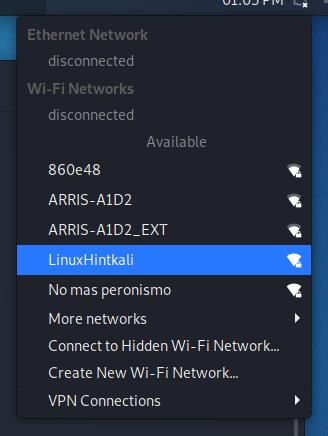
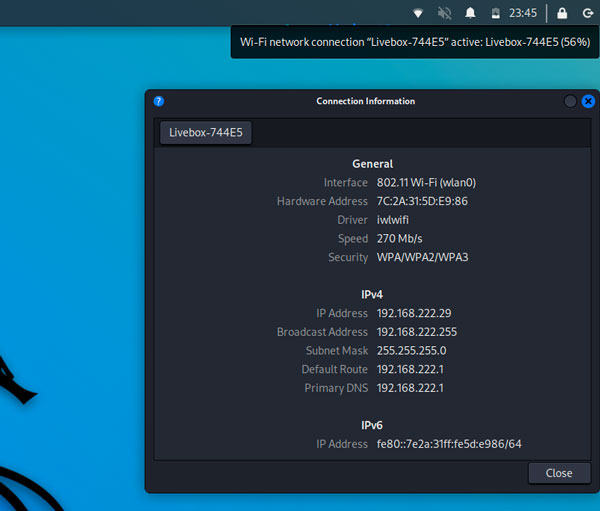
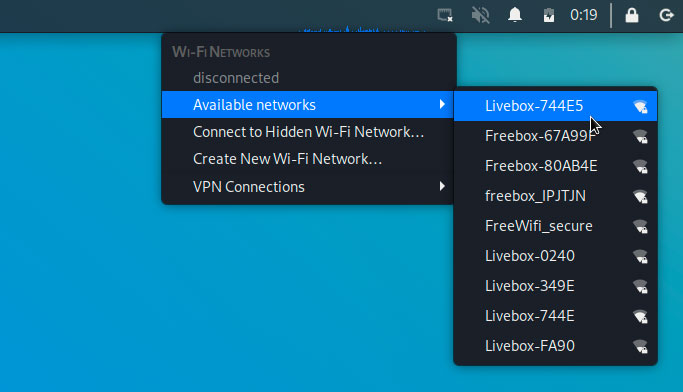
Once enabled, left-click the network icon again, and you’ll see all available networks for connection. Then, press the one you want to connect to:
After clicking on your network, you should connect without problems.
Connecting to Wi-Fi With Kali (Text Mode):
Before connecting to a network using the terminal, let’s see how to detect all available networks. To scan for networks, you can use the iwlist command followed by your wireless device and the function scan below:
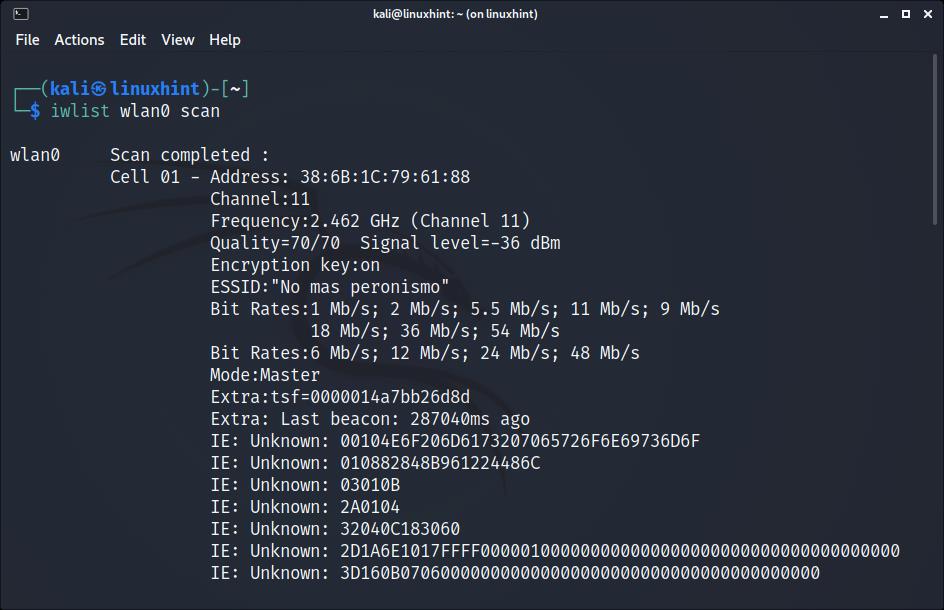
As you can see, depending on the quantity of available networks, the output will display a long list of data belonging to each network, but we are only interested in the ESSID.
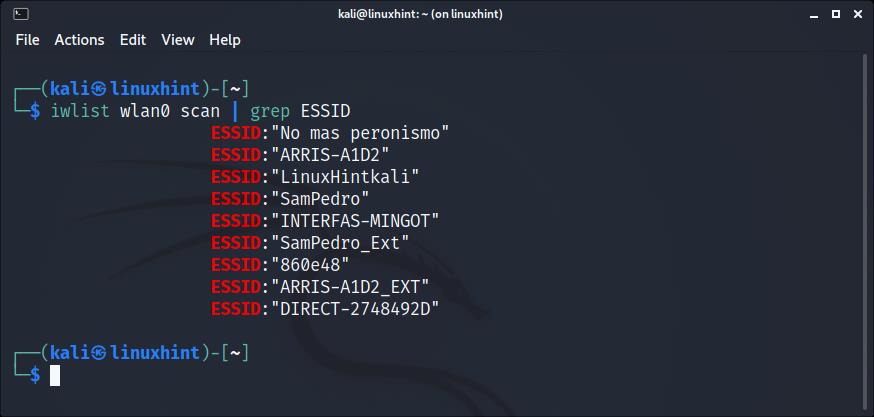
You can get a more human-friendly output by implementing grep as shown below; in this manner, iwlist will only print the networks ESSID:
Once you scanned all networks and identified the one you want to connect to, you can use different text-mode methods to establish a connection.
Connecting to Wi-Fi With Kali Using nmcli:
The nmcli command allows us to control the NetworkManager from the command line and using it is pretty simple. The following example shows how to connect to a network named LinuxHintkali, whose password is linuxhintpass.
After scanning and identifying your network with the iwlist command explained previously, run the command below, replacing LinuxHintkali with the ESSID of the network you want to connect to, and replacing linuxhintpass with its password:
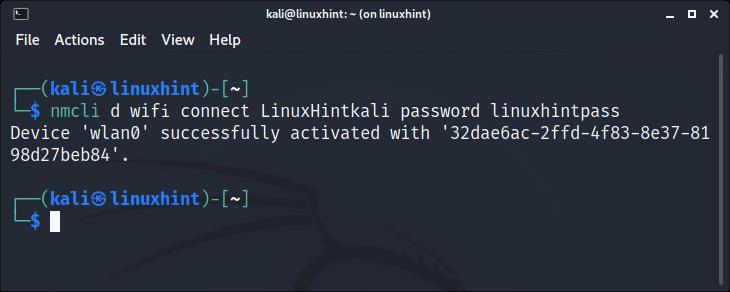
As you can see, the connection was established properly.
You can get additional information on nmcli at its man page https://linux.die.net/man/1/nmcli.
Connecting to Wi-Fi With Kali Using nmtui:
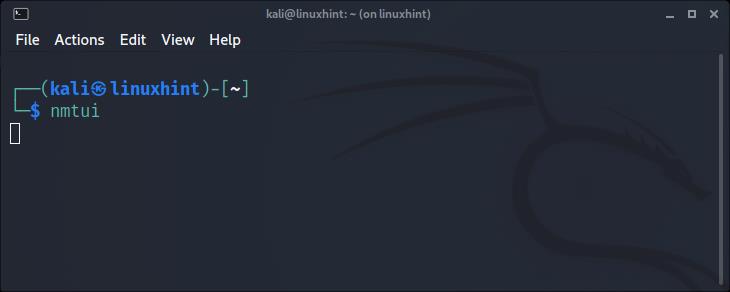
The nmtui command is a curses-based tool that allows you to control NetworkManager in an interactive mode.
To run it, simply execute the command below:
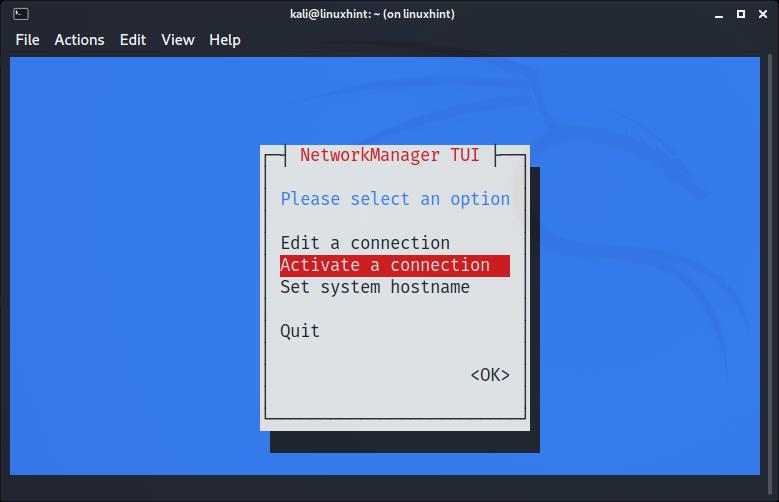
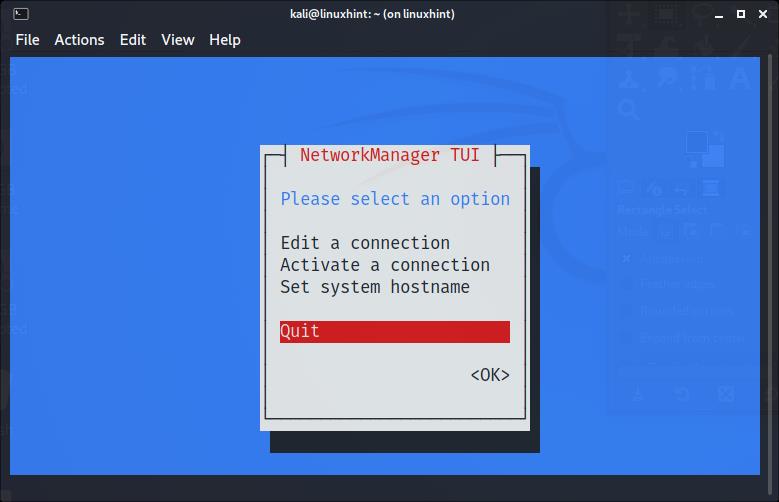
The following menu will show up. Use your keyboard arrows to select “Activate a connection” and press ENTER:
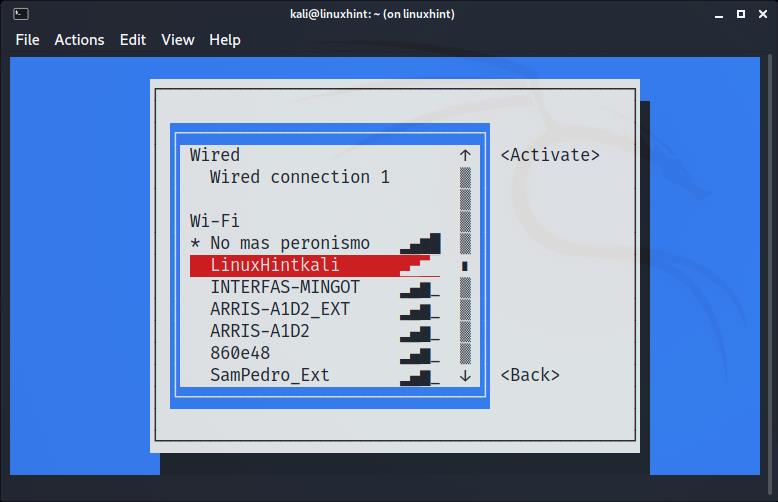
The next screen will show all available networks. Again, use your keyboard arrows to select the network you want to connect to and press ENTER:
The connection will be established. You already must have internet access:

Once connected, select Back and press ENTER:

Move to Quit, and press Enter to leave nmtui:
Troubleshooting Commands:
The following commands were not tested because my network card was properly detected. The first command shown below may be useful in case your Wi-Fi device’s drivers weren’t properly detected. This is not a common scenario when using Kali:
More probably than the command shown above to install drivers, your wireless card may be down. To set it up, first identify your network device name:
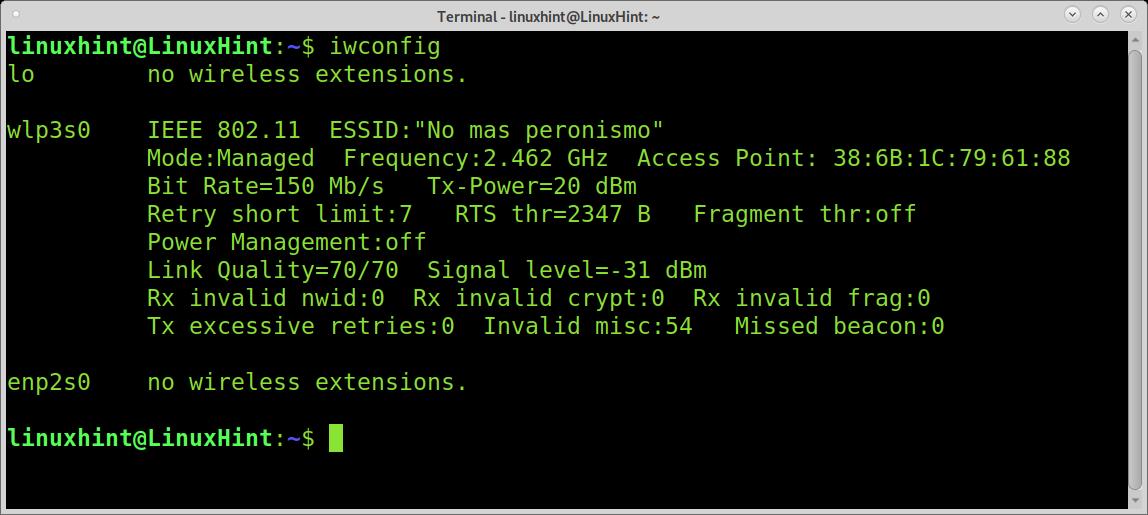
As you can see in the output above, my network device is named wlp3s0. To set it up, I run the following command:
Remember to replace wlp3s0 for your wireless card name.
Conclusion:
As you can see, connecting to Wi-Fi on Kali Linux should not be a problem even for basic Linux users. Linux, not only Kali, offers a variety of methods to establish connection. This tutorial was written after finding many Kali users report problems connecting. In most cases, their Wi-Fi adapter was disabled and enabling it from the taskbar, as shown in the first steps of this tutorial, solved the problem. Learning the text mode techniques explained in this article is especially important because they are almost universal for all Linux distributions and independent of their graphical environment.
Thank you for reading this tutorial explaining how to connect to Wi-Fi on Kali Linux, keep following us for more Linux tips and tutorials.
About the author
David Adams
David Adams is a System Admin and writer that is focused on open source technologies, security software, and computer systems.
How To Connect Wi-Fi On Kali Linux (GUI, Command, Hidden, …)

Connecting to a Wi-Fi network on Kali Linux is often an important step, especially if you keep the Ethernet connection free for other purposes (or don’t have other choice). Anyway, whether you try to connect to the Wi-Fi during the installation, via the GUI or in command line, this guide will help you to get connected quickly.
Kali Linux can be connected to a Wi-Fi network by using the SSID and password from one of these interfaces: during the installation, from the desktop interface or by using command lines in a terminal.
Let’s see how to do this in each situation.
Note: I’m explaining here how to connect to your own wireless network, not how to hack another Wi-Fi network. You need the SSID and password before going further, whatever the option you choose.
Kali Linux: Wi-Fi connection during the system installation
Hide your IP address and location with a free VPN:
Try it for free now, companies are paying for you.
1500 servers in 120 countries. It’s free. Forever. No email required.
A network connection is mandatory to install Kali Linux on a computer. If you don’t use a network cable, a Wi-Fi network needs to be configured during the installation.
Wireless card not detected?
Kali Linux is based on Debian, so most wireless adapters should work with it. If you are not using something too new or exotic, your wireless card will be detected and can be used directly.
Stay tuned with the latest security news!
You’ll enjoy receiving the recent articles directly in your inbox every week!
If you aren’t lucky, you may need to install an additional driver to make it work. In this case, I would recommend completing the installation with a RJ45 cable plugged to your network, and fix the wireless connection later. It will be easier from the full interface rather than doing it during the installation.
Wi-Fi configuration during Kali Linux installation
If you don’t have any network cable connected, a Wi-Fi connection will be asked during the installation of Kali Linux. As most packages are downloaded from the Internet servers, a connection is mandatory.
Here is how to connect to a Wi-Fi network during the installation:
- Start the installation by configure your locales (localization, language, keyboard layout, etc.).
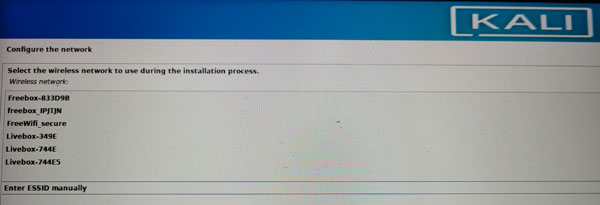
- The wizard will then detect your network configuration, and ask for a Wi-Fi network:

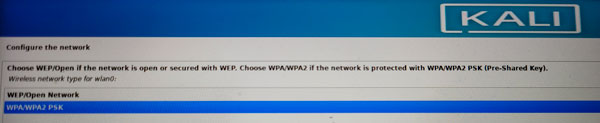
You can pick one in the list, or choose “Enter ESSID manually” if your Wi-Fi network is hidden or not displayed there. - You’ll then have the options to configure it, mostly choose the security options and type the password:
- If everything goes as expected, you’ll be connected to your Wi-Fi network, and the installer will use it to download packages and updates from the Kali Linux servers.
- Once the system installed, you’ll be automatically connected to the same network, nothing more to do after that:
Connect to Wi-Fi via the desktop interface on Kali Linux
The easiest way to connect to a Wi-Fi network on Kali Linux is to use the desktop interface after the installation. XFCE includes various tools and shortcuts to do it quickly and easily.
Quick connection from the top bar
If your wireless adapter is detected, you can quickly connect to your Wi-Fi network by clicking on the network icon in the top panel:

Kali Linux For Beginners
Learn how the good and the bad guys hack!
Learn from the pros how to use Kali Linux easily and quickly.
- Click on the network icon in the top-right corner.
It should be a “disconnected” network icon if you don’t have any network configured, or the “connected” alternative if you only have the RJ45 configuration done. - When you click on it, you’ll get the option to choose a network, or connect to a hidden network manually:
- Type your password, and you’ll be connected to it a few seconds later.
That’s it, in most cases it shouldn’t be that complicated.
I understand it might be new for you if you have no experience with Linux, but it’s not different from configuring it on other Linux distributions, the interface is really intuitive.
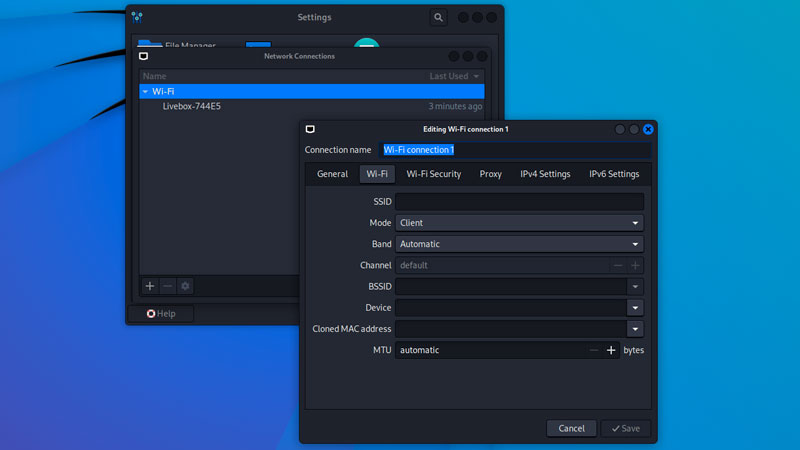
Advanced settings
If your Wi-Fi setup requires more advanced options, you can open the system settings from the main menu and go to the “Advanced Network Configuration” tool to get more options.
It looks like that:
Stay tuned with the latest security news!
You’ll enjoy receiving the recent articles directly in your inbox every week!
From there, you can either edit an existing configuration, or create a new one, with all the advanced options you might need (channel, MAC address, security, proxy, IP configuration, etc.).
For example, if there is no DHCP on your network, you will need this tool to set your IP address, gateway and DNS server.
Install a wireless driver
As explained earlier, even if Kali Linux comes with the most common wireless drivers, you may have a situation where your hardware is not detected, and you can’t connect directly to a Wi-Fi network. In this case, you’ll need to download and install the driver manually before you can use the Wi-Fi.
A few steps are involved, so I recommend watching this video to understand the idea:

Obviously, it will be slightly different depending on your Wi-Fi adapter manufacturer, but I hope it will help you to understand the procedure, so you can then do your research for your specific needs.
Using the command line to connect to a Wi-Fi network on Kali Linux
If you don’t have other options, it’s still possible to connect to a Wi-Fi network from a terminal on Kali Linux. Just expect to be a little more challenging, but it’s doable by following these steps:
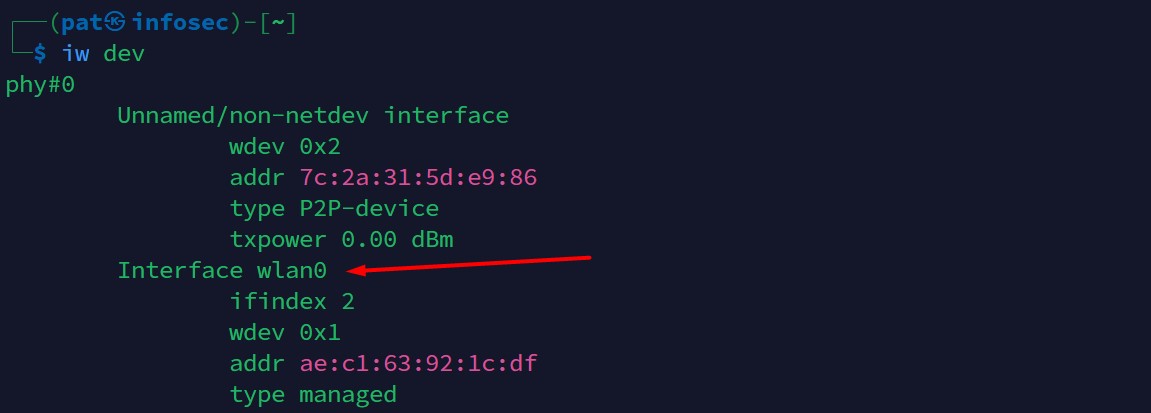
- First, make sure your Wi-Fi interface is detected, and take not of it’s name:
iw dev
You’ll get something like that:
In most cases, the interface’s name will be “wlan0”. - You can then do a scan to find all the SSID available:
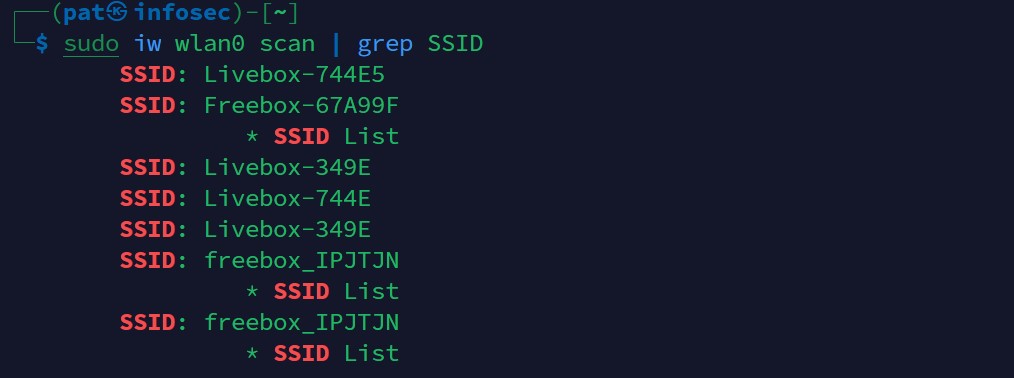
sudo iw wlan0 scan
You can use grep to filter the results and display only the networks names:
sudo iw wlan0 scan | grep SSID - We’ll now generate a configuration file, with the SSID we want to use and the corresponding password:
sudo su
wpa_passphrase >> /etc/wpa_supplicant.conf
Type the Wi-Fi password when asked for it, it will create the wpa_supplicant configuration file for you.
It looks like sudo doesn’t work for this command, so I used “sudo su” to switch to the administrator account.
You can then get back to the normal user with:
exit - The last step is to connect to your Wi-Fi network with wpa_supplicant:
wpa_supplicant -B -i wlan0 -c /etc/wpa_supplicant.conf
If there is any issue with your configuration, you’ll get the error directly in the terminal.
You can remove the “-B” option (run in background) to see all the details, and the next attempts. It will be held to understand and debug any misconfiguration at this point.
Hi, my name is Patrick, I’m a web developer and network administrator. I have always been interested in security, and I created this website to share my findings with you.