- How To Install grub-linuxbios on Kali Linux
- What is grub-linuxbios
- Install grub-linuxbios Using apt-get
- Install grub-linuxbios Using apt
- Install grub-linuxbios Using aptitude
- How To Uninstall grub-linuxbios on Kali Linux
- Uninstall grub-linuxbios And Its Dependencies
- Remove grub-linuxbios Configurations and Data
- Remove grub-linuxbios configuration, data, and all of its dependencies
- Dependencies
- References
- Summary
- How to Re-Install GRUB EFI
- 1. Overview
- 2. Computer Startup Process
- 3. Grand Unified Bootloader Version 2
- 4. Reinstalling GRUB 2 on a Live System
- 5. Fixing a Corrupted or Broken System
- 5.1. Using boot-repair
- 5.2. Using a Live CD/USB
- 5.3. Reinstall GRUB 2 for Kali Linux
- 5.4. Using chroot
- 6. Conclusion
- Free Hosting Online for WorkStations
How To Install grub-linuxbios on Kali Linux
In this tutorial we learn how to install grub-linuxbios on Kali Linux.
What is grub-linuxbios
This is a dummy transitional package that depends on grub-coreboot.
There are three methods to install grub-linuxbios on Kali Linux. We can use apt-get , apt and aptitude . In the following sections we will describe each method. You can choose one of them.
Install grub-linuxbios Using apt-get
Update apt database with apt-get using the following command.
After updating apt database, We can install grub-linuxbios using apt-get by running the following command:
Install grub-linuxbios Using apt
Update apt database with apt using the following command.
After updating apt database, We can install grub-linuxbios using apt by running the following command:
Install grub-linuxbios Using aptitude
If you want to follow this method, you might need to install aptitude on Kali Linux first since aptitude is usually not installed by default on Kali Linux. Update apt database with aptitude using the following command.
After updating apt database, We can install grub-linuxbios using aptitude by running the following command:
How To Uninstall grub-linuxbios on Kali Linux
To uninstall only the grub-linuxbios package we can use the following command:
Uninstall grub-linuxbios And Its Dependencies
To uninstall grub-linuxbios and its dependencies that are no longer needed by Kali Linux, we can use the command below:
Remove grub-linuxbios Configurations and Data
To remove grub-linuxbios configuration and data from Kali Linux we can use the following command:
Remove grub-linuxbios configuration, data, and all of its dependencies
We can use the following command to remove grub-linuxbios configurations, data and all of its dependencies, we can use the following command:
Dependencies
References
Summary
In this tutorial we learn how to install grub-linuxbios package on Kali Linux using different package management tools: apt , apt-get and aptitude .
How to Re-Install GRUB EFI
![]()
The Kubernetes ecosystem is huge and quite complex, so it’s easy to forget about costs when trying out all of the exciting tools.
To avoid overspending on your Kubernetes cluster, definitely have a look at the free K8s cost monitoring tool from the automation platform CAST AI. You can view your costs in real time, allocate them, calculate burn rates for projects, spot anomalies or spikes, and get insightful reports you can share with your team.
Connect your cluster and start monitoring your K8s costs right away:
1. Overview
In this article, let’s talk about GRUB 2 and how we can reinstall and fix it. GNU GRUB is a multiboot bootloader, capable of loading several operating systems. GRUB 2 is the current released version and replaced the legacy GRUB, from version 0.9x. It can be installed or run from any device, including a hard drive, CD-ROM, or USB drive.
2. Computer Startup Process
When we press the power button of the system, there are many background processes that run as the computer starts up. The system passes through four distinct stages to completely turn on and boot.
In the first stage, it goes through BIOS where it performs an integrity check, called POST. During this diagnostic check, POST ensures that all the hardware components are functioning. In case a single one fails, it throws an error message.
After POST, the BIOS loads and executes the MBR (Master Boot Record) containing the GRUB 2 bootloader, which eventually brings up the kernel. The kernel initializes the devices and their drivers and mounts the primary filesystem. It then starts the init process, which sets the remainder of the system startup process in motion.
3. Grand Unified Bootloader Version 2
Linux normal installation automatically integrates GRUB 2 installation within it. When we’re not dual booting, the installation uses the entire disk. Otherwise, we must select the partition to which the Linux installation process embeds the bootloader information.
After completing the installation, it becomes the default bootloader for the system. If the system has multiple operating systems, GRUB 2 takes over the boot process and its menu will contain the other operating systems detected.
Under some circumstances, we may want to reinstall GRUB 2. This might be due to any of the following reasons:
- First, when we want to repair a broken system where a user gets a screen with no prompt or cannot boot
- Second, when we want to return control to Linux bootloader after adding a second operating system, which added its own
- Third, when we want to create a backup by adding boot information to an additional drive
- Fourth, when we want to restore GRUB 2’s missing files, which are either corrupted or deleted intentionally
- Finally, when we want to upgrade the Linux bootloader to the most recent
4. Reinstalling GRUB 2 on a Live System
When we use the grub-install command, it does not generate a new GRUB 2 menu config. Instead, it updates and writes to the designated drive. If files are missing or intentionally deleted, it will restore them. The files restored and updated are core.img, grubenv, and device map. To reinstall GRUB 2 in a working system, we run the command:
This writes the MBR information on the current drive (X). If we specify a partition instead of the drive, it will throw an error. After running grub-install, we update the GRUB 2 menu by running:
5. Fixing a Corrupted or Broken System
A corrupted boot sector or a failed GRUB 2 can cause a system to break. We can repair this using the boot-repair graphical tool or a live CD/USB.
5.1. Using boot-repair
boot-repair is a graphical tool that fixes several GRUB 2 issues. We can use it from a live CD/USB or a running system. To start reinstalling GRUB 2 with boot-repair, we first create a live USB/CD and boot from it. During this process, we should ensure that our system has internet access. Next, we open the terminal and execute the following commands sequentially:
$ sudo add-apt-repository ppa:yannubuntu/boot-repair && sudo apt update $ sudo apt install -y boot-repair && boot-repair $ sudo reboot5.2. Using a Live CD/USB
When we’re using a live CD/USB to boot, we need to be aware of the disk or partition where we have installed the system. In case we’re not sure, we can run a couple of commands to find out. To identify the Linux partition, we look for the one that has ext4 format:
After this, we run grub-install. This restores the missing files. Often, this does not restore all the files, so we need to expunge GRUB 2 and reinstall it. This will restore all the files:
$ sudo mount /dev/sdXY /mnt $ sudo grub-install --boot-directory=/mnt/boot /dev/sdX $ sudo update-grub $ sudo rebootIn these examples, X is the drive letter while Y is the partition number. For older versions with BIOS, we run:
$ sudo grub-install --root-directory=/mnt /dev/sdX5.3. Reinstall GRUB 2 for Kali Linux
To reinstall GRUB 2 for kali, we need to open a terminal and run a series of commands after booting from either a live USB or CD:
$ mount /dev/sdaY /mnt $ mount --bind /dev /mnt/dev $ mount --bind /dev/pts /mnt/dev/pts $ mount --bind /proc /mnt/proc $ mount --bind /sys /mnt/sys $ chroot /mnt $ grub-install /dev/sdX $ update-grub $ exit $ umount /mnt/dev/pts $ umount /mnt/dev $ umount /mnt/proc $ umount /mnt/sys $ umount /mnt5.4. Using chroot
We can also reinstall GRUB 2 using the chroot command. Once we have live-booted from a CD/USB and issued the chroot command, the live CD/USB treats the broken system as its own. After opening the terminal, we run:
$ sudo mount /dev/sdXY /mnt $ sudo mount /dev/sda1/mnt/boot/efi #use only if /boot is on a different partition $ for i in /dev /dev/pts /proc /sys /run; do sudo mount -B $i /mnt$i; done $ sudo chroot /mnt $ grub-install /dev/sda $ update-grubBe sure to exit chroot with Ctrl+d after the update is complete. Then, reboot the system:
6. Conclusion
This article looks at the various ways we can reinstall and repair our GRUB 2. Up until recently, most Linux distros that use GRUB 2 still referred to it as GRUB. When creating a bootable CD/USB it is recommended that we use the same version of the system we’re running. Finally, we should know where the system or /boot partition is.


You are here: Home Documentation
Free Hosting Online for WorkStations
Installing the GRUB Boot Loader
The boot loader is the first program started by the BIOS. This program loads the Linux kernel into memory and then executes it. The boot loader often offers a menu that allows you to choose the kernel to load or the operating system to boot.
Due to its technical superiority, GRUB is the default boot loader installed by Debian: it works with most file systems and therefore doesn’t require an update after each installation of a new kernel, since it reads its configuration during boot and finds the exact position of the new kernel.
You should install GRUB to the Master Boot Record (MBR) unless you already have another Linux system installed that knows how to boot Kali Linux. As noted in Figure 4.17, “Install the GRUB Boot Loader on a Hard Disk ” [page 83], modifying the MBR will make unrecognized operating systems that depend on it unbootable until you fix GRUB’s configuration.
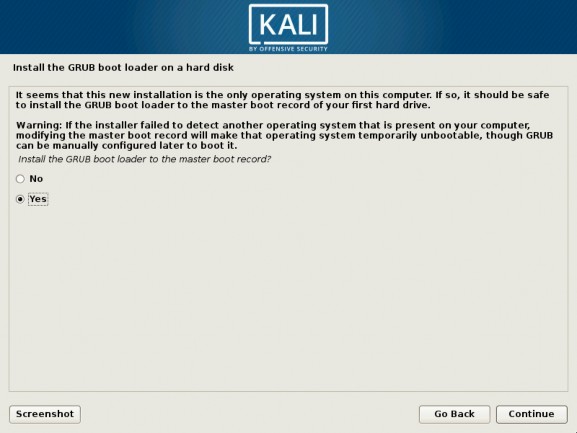
Figure 4.17 Install the GRUB Boot Loader on a Hard Disk
In this step (Figure 4.18, “Device for Boot Loader Installation ” [page 84]), you must select which device GRUB will be installed on. This should be your current boot drive.

Figure 4.18 Device for Boot Loader Installation
By default, the boot menu proposed by GRUB shows all the installed Linux kernels, as well as any other operating systems that were detected. This is why you should accept the offer to install it in the Master Boot Record. Keeping older kernel versions preserves the ability to boot the system if the most recently installed kernel is defective or poorly adapted to the hardware. We thus recommend that you keep a few older kernel versions installed.
Beware: The Boot Loader This phase in the installation process detects the operating systems that are already
and Dual Boot installed on the computer and will automatically add corresponding entries in the boot menu. However, not all installation programs do this.
In particular, if you install (or reinstall) Windows thereafter, the boot loader will be erased. Kali will still be on the hard drive, but will no longer be accessible from the boot menu. You would then have to start the Kali installer with the rescue/enable=true parameter on the kernel command line to reinstall the boot loader. This operation is described in detail in the Debian installation manual.