Quick Creds with Responder and Kali Linux
Responder is a powerful tool for quickly gaining credentials and possibly even remote system access. It is a LLMNR, NBT-NS & MDNS poisoner that is easy to use and very effective against vulnerable networks.
For the last few years one of the favorite tools in the pentester’s toolbox has been Responder. Responder works by imitating several services and offering them to the network. Once a Windows system is tricked into communicating to responder via one of these services or when an incorrect UNC share name is searched for on the LAN, responder will respond to the request, grab the username & password hash and log them. Responder has the ability to prompt users for credentials when certain network services are requested, resulting in clear text passwords. It can also perform pass-the-hash style attacks and provide remote shells.
In this article we will see how to use Responder in Kali Linux. In the next article we will dig a little deeper and look at some of the additional tools that are included with Responder.
Basic Usage
Responder is installed by default in Kali Linux. To view the Responder help screen and see what options are available, just use the “-h” switch.
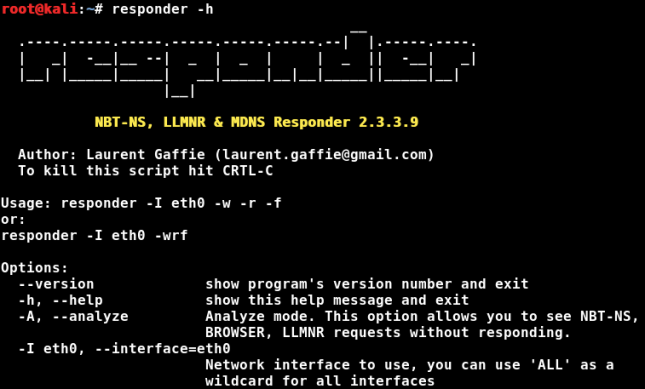
From the help screen, the usage is:
responder -I eth0 -w -r -f
responder -I eth0 -wrf
So, basically run the program, provide your network interface with the “-I” switch and then any other switches that you want. You can combine the switches together if you wish, as shown in the second usage example above. You can also use the verbose switch, “-v” to increase the text output of the program for more formation.
Analyze mode
A good place to start is “Analyze mode”. This mode runs responder but it does not respond to requests. It is specified with the “-A” switch. This can be handy to see what types of requests on the network responder could respond to, without actually doing it.

Any events will be shown on the screen, as below:
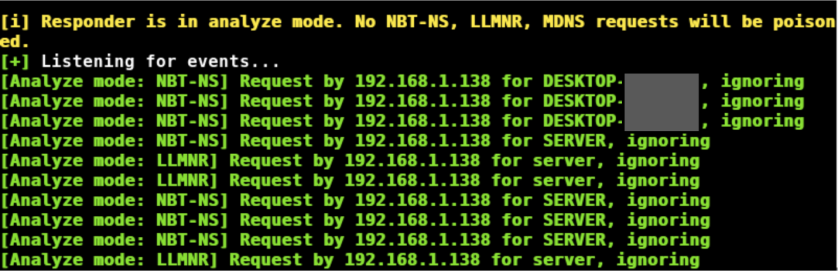
Analyze mode is also a good way to passively discover possible target systems.
Enough intro, let’s see Responder in action.
Poisoning with Responder
You can start Responder with the basic poisoner defaults by just typing:
responder -I eth0
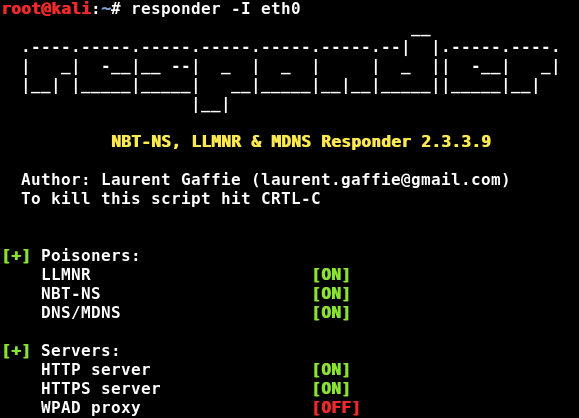
Responder will poison responses and, if it can, capture any credentials. If a user tries to connect to a non-existing server share, Responder will answer the request and prompt them with a login prompt for access. If they enter their credentials, Responder will display and save the password hash:
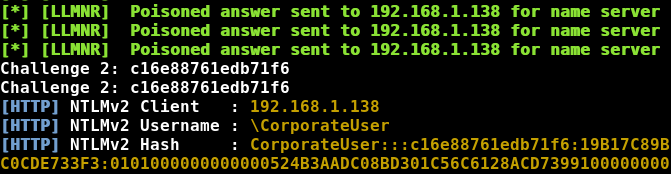
We could then take the hash and attempt to crack it.
Basic Authentication & WPAD
WPAD is used in some corporate environments to automatically provide the Internet proxy for web browsers. Many Internet browsers have “enable system proxy” set by default in their internet settings, so they will seek out a WPAD server for a proxy address.
We can enable WPAD support in Responder to have it respond to these requests. If we use WPAD with the “Force Basic Authentication” option, Responder prompts users with a login screen when they try to surf the web and grabs the entered creds in clear text.
Responder -I eth0 -wbF
- “-w” Starts the WPAD Server
- “-b” Enables basic HTTP authentication
- “-F” Forces authentication for WPAD (a login prompt)

When a user goes to surf the web, the browser will reach out for proxy settings using WPAD. Responder will respond to the request and trigger a login prompt:
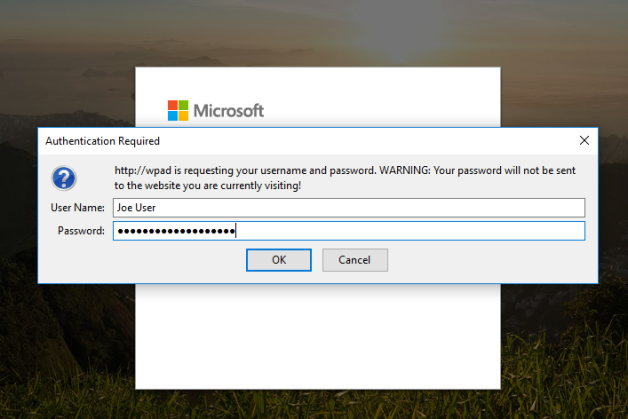
If the user enters their credentials, you get a copy of them in clear text. No cracking needed!

As you can see in the picture above, the user “Joe User” is using the password, “SuperSecurePassword”, which it isn’t. 🙂
Log Files
Log files for Responder are located in the /usr/share/responder/logs directory:

Along with the regular program log files, any credentials recovered will be stored in a file that includes the IP address of the target. You can view these files to see the hash or clear text creds:

If only the password hashes were recovered you can take the hash file and use it directly with your favorite cracking program:
john [responder password hash file]

Obviously, this is just an example as corporate networks should never allow “12345” as a password. But sadly enough, I have seen companies remove password complexity requirements so users could continue to use simple passwords.
Conclusion
In this article we saw how easy it is to use Responder to obtain both clear text and password hashes. How would you defend against this tool?
Basic Network Security Monitoring (NSM) will pick up and flag Basic plain text authentication attempts and WPAD auto-proxy requests. This is just one reason why NSM is so important.
You can disable the services that Responder is taking advantage of, but you must be sure that this will not affect your network functionality before you do, especially in environments with old systems still running.
For WPAD based attacks, provide an entry for WPAD in DNS, or don’t use the “system proxy” setting in the browser. In the next article, we will look at some of the extra tools included with Responder.
Also, check out my new book that has an entire chapter on Responder & Multi-Relay – “Basic Security Testing with Kali Linux, 3rd Edition“!
Easy creds . Установка и настройки.
Приветствую вас, сейчас будем рассматривать установку скрипта easy-creds на кали линукс, у меня версия Кали 2.0, на предыдущую easy-creds станет также без проблем. Скрипт easy creds — идеальное решение для того, кто хочет быстро (в последующем) и изящно создать поддельную беспроводную ТД, попутно запуская сниферы и анализаторы трафика. Сейчас — только установка и коррекция кода во избежание ошибок, которые будут сопровождать хакера в последующем.
Настоятельно советую часть с ручной правкой кода советую не пропускать. Работа с easy creds в том виде, как она поступает, порой невозможна, так как некоторые из установленных утилит из состава пакета aircrack-ng в обновлённой версии идут с ошибками. Так что, если «каменный цветок не выходит», обратитесь к статье Ошибка airbase-ng — что за сеть default ?
Easy creds . Приступаем к установке.

Последнюю версию easy creds можно скачать на Sourceforge.net Вы скачаете архив tar.gz, который и распакуем. Отправляемся в папку загрузок:
Видим в ней искомый архив, откроем в папке терминал и вводим команду на распаковку архива (просто скопируйте его имя полностью):

Переходим в подкаталог /easy-creds:

Посмотрим, что там есть командой ls:

Ставим доступ к файлам и дополнительным атрибутом исполняем скрипт:
chmod +x installer.sh

Ещё раз команда ls и запустим установщик:
./installer.sh


Выбираем в новом окне версию нашей операционной системы. Для Кали Линукс, напомню, это 1-й пункт:
Выберем директорию по умолчанию:

Началась установка. Некоторые библиотеки, установленные в моей Кали, имеют более новые версии, и установщик это видит:

Удачная установка заканчивается пожеланием удачной охоты …happy hunting !. Попробуем запустить. Откройте новое окно терминала и наберите easy creds

и сразу выберем первый пункт для завершения настроек Prerequisites & Configurations.
Мы попадём в следующее окошко и выберем пункт 1 Edit etter.conf. В окне редактора стрелочкой ВНИЗ доходим до пункта привилегий [privs] и обнулим их значения:
ec_uid = 0
ec_gid = 0


Окно не закрываем. Спустимся ещё ниже (нажмите три раза клавишу PageDown) и найдите настройки Linux. В пункте if you use iptables в обеих строчках снимите значки « # «. Теперь строчки выглядят так:

Сохранимся через Ctrl + O, Enter; командой Ctrl + X закроем окно редактора.
В окне easy creds теперь выберем второй пункт Edit etter.dns и снова запустим редактор. Клавишей PageDown ищем пункт с характерным названием microsoft sucks 😉 redirect to www.linux.org и добавим некоторые строчки для перехвата поиска будущих жертв по конкретным сайтам. Этот список мы ещё не раз будем редактировать, пока введём, скажем, самую популярную соцсеть facebook. Сделайте вот так:

Причём указанный адрес IP — это адрес вашей карты (модема). Его легко узнать, набрав в новом окне терминала команду ifconfig

Сохраняемся как в прошлый раз: Ctrl + O, Enter; командой Ctrl + X закроем окно редактора. И ещё раз обратимся к меню программы. Теперь переходим к 3-му пункту easy-creds: установка dhcp сервер. Просто выберите 3 и через пару мгновений сервер у вас на борту. Это же можно сделать и в новом окне терминала командой
apt-get install dhcp-server
Лично мне хватило команд из меню easy-creds . Теперь нас интересует 5-й пункт утилиты: установка, а точнее, добавление интерфейса для запускаемого в будущем сервера. В появившемся окне редактора прокрутите клавишей «вниз» до последней строке и установите значение
INTERFACES=»at0″ (запомните название интерфейса, оно будет нас сопровождать постоянно):

Сохраняемся, клавиша «Ёптер» и выходим. Закрываем терминал, перезагружаемся. Easy-creds настроена для создания поддельной точки. Остальные настройки будут касаться конкретных задач и будут рассмотрены на конкретных примерах.
CISO Musings
At the time of this post there is a lot of wrong information on how to setup a fake AP on Kali Linux. This seems to be mostly because Kali Linux uses the isc-dhcp-server package and not dhcp3. Right now SET’s fake AP doesn’t work due to this. I’m sure that will be fixed soon, @dave_rel1k puts a lot of effort into that tool which is why it is so great. But for right now, it doesn’t work for setting up a fake AP. So if you google around you find videos about Websploit like this one: http://www.youtube.com/watch?v=DXGj2vxdzvo
Well that doesn’t work either for the same reason. How frustrating is that? I found two tools that do work with some setup. Easy-Creds and PwnSTAR. While both worked I decided I liked Easy-Creds better but I’ll help you get both going now.
Check the github page and see if Brav0Hax added the install.sh script there yet https://github.com/brav0hax/easy-creds. If so, download everything from github. If there is no install.sh file download the tarball from there: http://sourceforge.net/projects/easy-creds/files/easy-creds-v3.7.3.tar.gz/download. Untar the file and run the install.sh script.
Two things will fail but that is OK. First, it tries to install and older version of lilssl, no worries. The other is the dhcp3 server. So manually run apt-get install isc-dhcp-server. Now in case you played with dhpc3 or another script that I mentioned above, make sure there is no /etc/dhcp3 directory. If there is delete it or things won’t work. The directory isc-dhcp-server uses is /etc/dhcp and there is a dhcpd.conf file in there, that is the one you will use.
Now download the current version of the easy-creds.sh script from github https://github.com/brav0hax/easy-creds and copy if over the version that you installed with install.sh (probably /opt/easy-creds/easy-creds.sh).
Run updatedb one last time for good luck.
The cool thing about this install script is it always setups FreeRADIUS-WPE for you all automated, which is another whole blog post.