- Kali linux enable ssh
- SSH server: automatic host keys generation
- How to enable SSH in Kali Linux. How to connect to Kali Linux via SSH
- SSH on Kali Linux on ARM computers
- SSH in Kali Linux on desktop computers
- How to connect to Kali Linux via SSH
- Why SSH does not accept root password
- How to configure key authentication in Kali Linux (SSH without password)
- Related articles:
- How to Enable and Start SSH on Kali Linux
- About the Author
- Corey Batiuk
Kali linux enable ssh
Since our release of Kali Linux 2022.1 it is possible to easily configure the SSH client for wider compatibility to allow Kali to talk to as many SSH servers as possible. In wide compatibility mode, legacy key exchange algorithms (such as diffie-hellman-*-sha1) and old ciphers (such as CBC) are enabled. As a result, tools used inside of Kali are able to communicate using these outdated methods. This is done to help increase Kali’s ability to talk to older, obsolete SSH servers that are still using these older protocols. Older services using this may be at end of life, thus increasing the chances of discovering vulnerabilities or other problems.
Note that this is not the default. Out of the box, the SSH client in Kali Linux is configured for Strong Security to enforce communication over more secure channels.
This setting can be changed easily using the kali-tweaks tool. Simply:
- Open a terminal and run kali-tweaks .
- From there, select the Hardening menu.
- Now you can choose between Strong Security(the default) and Wide Compatibility.
Note: This is achieved by creating or deleting the configuration file /etc/ssh/ssh_config.d/kali-wide-compat.conf .
SSH server: automatic host keys generation
Since the release of Kali Linux 2022.1, the SSH host keys are automatically generated if missing. This is achieved via the systemd service regenerate-ssh-host-keys .
So what are SSH host keys exactly? Those keys are required for the SSH server to be functional. They are supposed to be unique for each machine. Those keys can be found under /etc/ssh and are named ssh_host_*_key . This is how it usually looks like:
[email protected]:~$ ls -l /etc/ssh/ssh_host_* -rw------- 1 root root 1373 Feb 3 23:50 /etc/ssh/ssh_host_dsa_key -rw-r--r-- 1 root root 599 Feb 3 23:50 /etc/ssh/ssh_host_dsa_key.pub -rw------- 1 root root 505 Feb 3 23:50 /etc/ssh/ssh_host_ecdsa_key -rw-r--r-- 1 root root 171 Feb 3 23:50 /etc/ssh/ssh_host_ecdsa_key.pub -rw------- 1 root root 399 Feb 3 23:50 /etc/ssh/ssh_host_ed25519_key -rw-r--r-- 1 root root 91 Feb 3 23:50 /etc/ssh/ssh_host_ed25519_key.pub -rw------- 1 root root 2590 Feb 3 23:50 /etc/ssh/ssh_host_rsa_key -rw-r--r-- 1 root root 563 Feb 3 23:50 /etc/ssh/ssh_host_rsa_key.pub Since these keys must be unique for each machine, they can’t be embedded in pre-built Kali images such as the Kali Linux VM images or the ARM images. It’s usually up to the user to create those keys before running the SSH server for the first time. However, for most users who are not familiar with SSH, this is a hurdle, as they are not aware of this technical detail.
To make it easier, Kali Linux now comes with a systemd service that takes care of that automatically, and generate those keys if they are missing. In theory, it’s only during a first boot of a pre-built image that the service kicks in. On subsequent boots, the keys already exist and therefore nothing happens. This may not be the case for users who may remove these keys themselves.
For those who are not comfortable with this automatic behavior, it’s very simple and straightforward to disable it:
[email protected]:~$ sudo systemctl disable regenerate-ssh-host-keys.service Updated on: 2023-Mar-06
Author: arnaudr
How to enable SSH in Kali Linux. How to connect to Kali Linux via SSH
SSH allows ones to connect to a remote computer and execute commands on it, connecting and transmitting data occurs via an encrypted channel, which is protected from various attacks of interception and data sniffing and spoofing.
SSH includes two programs: a server and a client. The server is installed on a remote machine, to which you need to connect and execute commands on it. The client is designed to connect to a remote machine.
The SSH server acts as a service that listens on port 22 by default. When connecting by default, password authentication is used – you need to enter the user password on the remote Linux system. You can also configure public key based authentication – this option is more convenient (no password is required) and more secure (keys are less prone to brute force).
Speaking about SSH in Kali Linux, you need to consider that this distribution is available in various versions (see details ‘Where to download Kali Linux. What is the difference between Kali Linux versions’): for personal computers, for ARM computers, for mobile phones, for virtual machines. Consider the specific of SSH in Kali Linux for PC and for ARM.
SSH on Kali Linux on ARM computers
Since usually ARM devices are resource-limited computers without a display, you can only manage them by connecting via SSH. For this reason, the SSH service on such devices is already installed and running by default.
In such systems, use a couple as login credentials:
The problem with ARM devices without a screen may be that their IP address is not known, because in most local networks IP addresses are automatically assigned by the DHCP protocol. Typically, routers allow you to view a list of devices and their IP addresses. If you do not have such an opportunity, then IP can be found by scanning the network, for example, with the command:
sudo nmap -p 22 _gateway/24
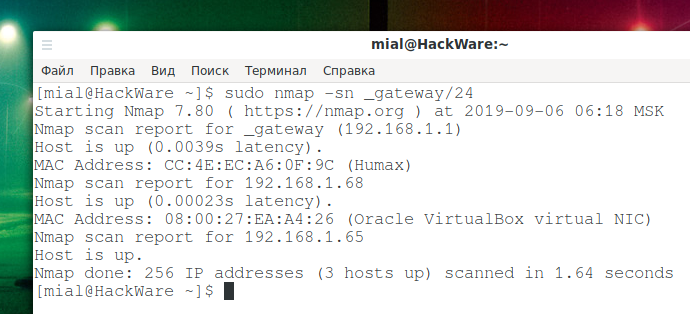
Instead of _gateway, the Linux operating system will substitute the IP address of your router, as a result, you will get _gateway/24, that is, your local network will be scanned, for example, 192.168.1.0/24. Or, explicitly specify the range for scanning.
SSH in Kali Linux on desktop computers
Kali Linux has already installed the SSH package, but its automatic launch is disabled (like all other network services). Therefore, to connect to Kali Linux via SSH, you need to start this service. If desired, it can be added to auto startup.
There are two options for starting the SSH service:
- ssh.service – SSH service will always be running
- ssh.socket – the system will open port 22 for listening and will wait for a connection to it. If connection happened, the system will start the SSH service. For the rest of the time (when there is no SSH connection), the SSH service will be stopped and will not consume system resources.
The second option is more preferred.
To start the SSH service on Kali Linux:
sudo systemctl start ssh.socket
To add a service to startup:
sudo systemctl enable ssh.socket
To check the status of a service:
systemctl status ssh.socket

How to connect to Kali Linux via SSH
The command to connect is as follows:
ssh REMOTE_ USER@IP_ADDRESS
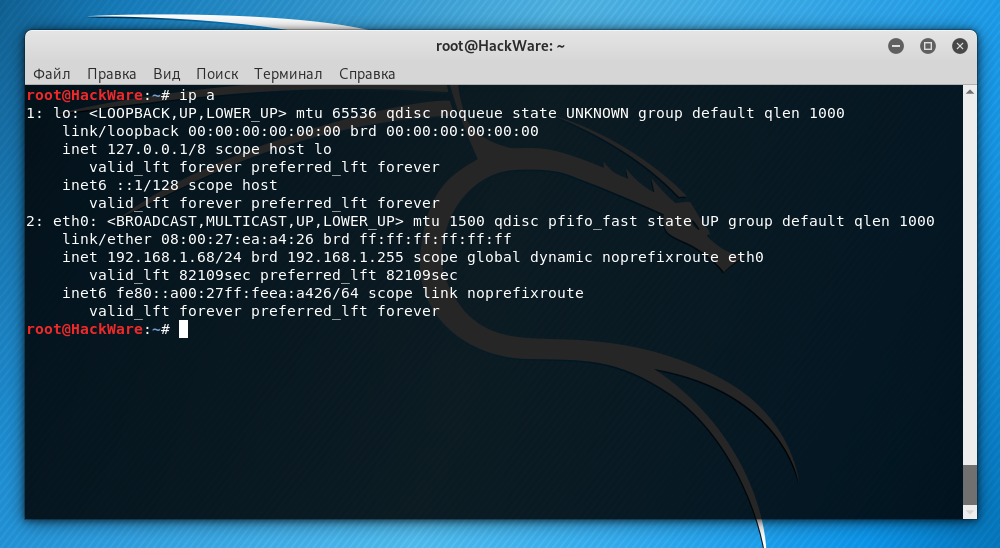
As the IP_ADDRESS of the remote system, you need to specify its IP. You can find out the IP address with the command:
By the way, in order for Kali Linux to always have the same IP address after rebooting, you need to configure a static IP, as described in the article “How to configure Kali Linux to use a static IP address”.
In this case, the Kali Linux IP address is 192.168.1.68. The default user is root. Then the command should be as follows:
But the problem is that in SSH, by default, the authentication via password for the root user is blocked. There are two options to cope the problem:
We will consider both of them, but I recommend the second option, as safer and more convenient.
Why SSH does not accept root password
SSH service configuration is performed in the /etc/ssh/sshd_config file. Let’s open it:
#PermitRootLogin prohibit-password
You do NOT need to restart the SSH service, because when you select the ssh.socket option, this service is already stopped and will only be launched the next time you try to connect via SSH.
At the very first connection, the program will display a message:
Are you sure you want to continue connecting (yes/no/[fingerprint])?
We type: yes
Then enter the password and we find ourselves in Kali Linux:
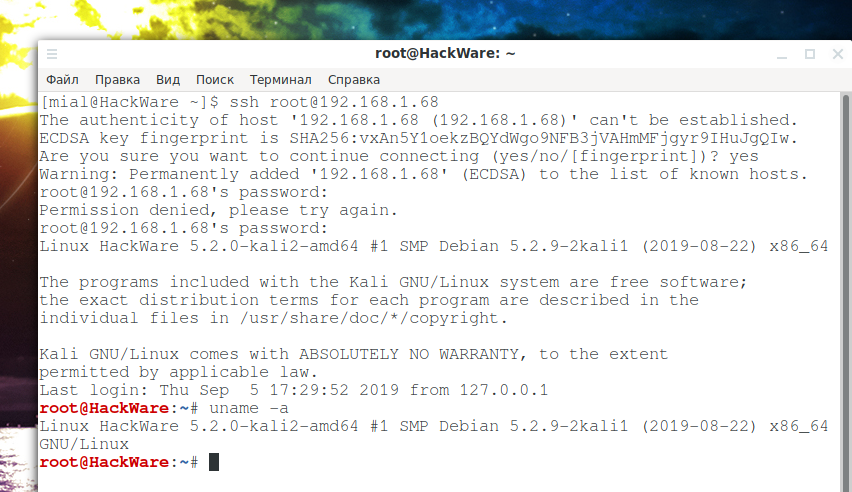
The fact that we are in a different system is indicated by the changed command line prompt – now there is the username and host name of the remote system.
How to configure key authentication in Kali Linux (SSH without password)
Disconnect from the remote machine. And on the local machine, execute the command:
Again, without a preliminary connection, we execute the command on the remote machine (change the IP and username to yours):
ssh root@192.168.1.68 mkdir .ssh
Now we need to copy the contents of the id_rsa.pub file to the remote machine. It is very simple to do this (do not forget to change the data to your own):
cat .ssh/id_rsa.pub | ssh root@192.168.1.68 'cat >> .ssh/authorized_keys'
After that, we connect as usual, but the login will no longer require a password:
Related articles:
How to Enable and Start SSH on Kali Linux
Here at LMG Security, we’re passionate about providing excellent cybersecurity services to organizations around the world. We’re also passionate about increasing cybersecurity awareness through our various training programs. Thanks for visiting our blog and we hope you find this post helpful!
The Linux distribution Kali used by many penetration testers (including those here at LMG Security) recently released version 2017.1 of their rolling release. For quite some time now (Since version 2.0) Kali has used Systemd (System Management Daemon) in place of an init system. This change brought with it a new way of enabling and starting services, even though many still use the old commands, which often still work but may also lead to errors. This post will go over the Systemd method for enabling and starting the SSH (Secure Shell) service on Kali Linux.
The openssh-server package should already be installed, to verify this you can use the following command:
You should see the version with [installed] after it like this:

If it’s not installed, you can use this command to install it:
# apt install openssh-server
When enabling the service, be sure to fully secure SSH first. I will cover some of the basics briefly, but this is not meant to be a guide on securely running an SSH server. Since Kali comes with pre-generated SSH keys, to make it more secure, the first thing we will do is generate new ones.
To backup the original keys first as a precaution use:
# mkdir /etc/ssh/default_keys # mv /etc/ssh/ssh_host_* /etc/ssh/default_keys/
Then to regenerate the keys:
# dpkg-reconfigure openssh-server
The next step is to edit the SSH server configuration file with the settings you need:
If you are only planning on using SSH briefly the defaults are probably fine. If you think you will use it for a length of time I would recommend at minimum enabling public key authentication:
Then disabling password authentication:
PasswordAuthentication no
You could also allow the root user login here, but instead consider creating a non-privileged user account instead.
It’s useful to know that Systemd has different units, a unit configuration file encodes information. The units relevant to SSH are ssh.service and ssh.socket. At a basic level a service unit controls a process and a socket unit controls a filesystem or network socket.
If you only need to temporarily start up the SSH service it’s recommended to use ssh.socket:
# systemctl start ssh.socket
To instead permanently enable the SSH service to start whenever the system is booted use:
# systemctl enable ssh.service
Then to use SSH immediately without having to reboot use:
# systemctl start ssh.service
To check the status of the service you can use:
# systemctl status ssh.service
To stop the SSH service use:
# systemctl stop ssh.service
And to disable the SSH service so it no longer starts at boot:
# systemctl disable ssh.service
This gives you the basics of starting and enabling the SSH service in Kali Linux. If you are planning on using the system for any length of time I highly recommend going further with securing the SSH service. If you have any questions or comments about SSH on Kali Linux, contact us at [email protected]
About the Author

Corey Batiuk
Corey Batiuk is LMG Security’s Pentest Team Lead and has been working in technology over 13 years. Corey has wide experience in testing, including: Internal and External Penetration Testing, Mobile Application Security Assessments, Web Application Security Assessments, Wireless Security Assessments, Social Engineering Testing, and Threat Hunting. Prior to that he worked as an engineer for a managed service provider. Corey graduated with honors from the University of Montana with a bachelor’s degree in Psychology and a minor in Sociology. Corey has also presented at several security conferences.