- Kali linux файловый сервер
- Как сделать общую сетевую папку в Linux (настройка SMB в Linux)
- How To Install samba on Kali Linux
- What is samba
- Install samba Using apt-get
- Install samba Using apt
- Install samba Using aptitude
- How To Uninstall samba on Kali Linux
- Uninstall samba And Its Dependencies
- Remove samba Configurations and Data
- Remove samba configuration, data, and all of its dependencies
- References
- Summary
- Samba сервер на Kali Linux или расшариваем папки
Kali linux файловый сервер
Since our release of Kali Linux 2021.4, the Samba client has been configured for wider compatibility to allow Kali to talk to as many Samba servers as possible. This means that legacy protocols (such as LANMAN1, LANMAN2 and NT1) are enabled by default. This is a change from standard behavior, as these are disabled to enforce communication over more secure channels. As a result of this change tools used inside of Kali will be able to communicate using these outdated methods. This is done to help increase Kali’s ability to talk to older, obsolete Samba servers that are still using these older protocols. Older services using this may be at end of life, thus increasing the chances of discovering vulnerabilities or other problems.
However, if you would rather keep Samba as secure as possible using today’s modern standards, you can enable the Strong Security mode.
These settings can be changed easily using the kali-tweaks tool. Simply:
- Open a terminal and run kali-tweaks .
- From there, select the Hardening menu.
- Now you can choose between Wide Compatibility(the default) and Strong Security.
Note: This is achieved by changing the setting client min protocol in the Samba configuration file /etc/samba/smb.conf .
Updated on: 2023-Mar-06
Author: arnaudr
Как сделать общую сетевую папку в Linux (настройка SMB в Linux)
Начните с установки пакетов samba и smbclient.
В Debian, Linux Mint, Ubuntu, Kali Linux и их производных для установки samba выполните команду:
sudo apt install samba smbclient
В Arch Linux, BlackArch и их производных выполните команду:
sudo pacman -S samba smbclient
Следующая команда не сработает, если отсутствует файл /etc/samba/smb.conf. Если у вас тоже нет этого файла, то создаёте его заглушку — к настройке самого файла smb.conf мы вернёмся позже:
sudo touch /etc/samba/smb.conf
Теперь нужно добавить пароль для пользователя Samba. Действует следующее правило: имя пользователя должно быть таким же, как у вашего текущего пользователя, а пароль можно установить иной, отличный от вашего системного пароля.
Для установки пароля Samba, выполните следующую команду:
Если вы хотите, чтобы у пользователя не было пароля, то укажите опцию -n.
Создайте папку, которая станет совместно используемой:
Узнаем абсолютный путь до папки ~/linuxshare:
Откройте для редактирования файл /etc/samba/smb.conf:
sudo gedit /etc/samba/smb.conf
Добавьте туда строки вида:
[ИМЯ_ПАПКИ] comment = Samba на Linux path = /home/ИМЯ_ПОЛЬЗОВАТЕЛЯ/ИМЯ_ПАПКИ valid users = ИМЯ_ПОЛЬЗОВАТЕЛЯ read only = no browsable = yes
Обратите внимание, что все пробелы в строках выше являются обязательными.
Для моих данных это строки:
[linuxshare] comment = Samba на Linux path = /home/mial/linuxshare valid users = mial read only = no browsable = yes
Теперь запустим службу SMB:
sudo systemctl start smb.service
Для добавления службы в автозагрузку выполните:
sudo systemctl enable smb.service
Для подключения к этой общей сетевой папке на Linux нужно использовать IP адреса компьютера Linux.
Создадим файл, чтобы сетевая папка не была пустой:
echo "Документ на Linux" > ~/linuxshare/document.txt
Посмотрите локальный IP адрес компьютера, на котором запущена Linux:
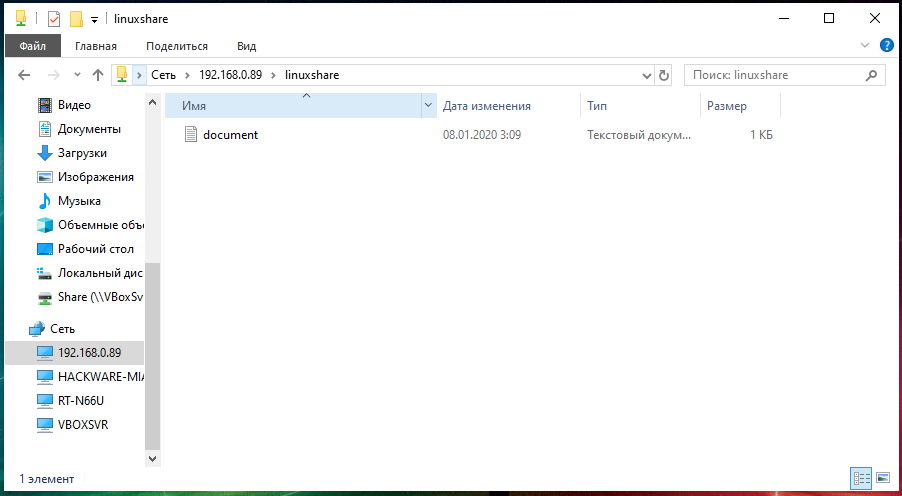
У меня этим IP является 192.168.0.89, а папку, как мы помним, я создал с именем linuxshare, тогда в Windows я перехожу в проводнике во вкладку «Сеть» и подключаюсь к этой папке следующим образом:
Вводим учётные данные (которые мы установили командой smbpasswd):

Видим содержимое совместно используемой папки, размещённой на Linux с помощью SMB:
Для подключения к сетевой папке из консоли Linux, запустите команду вида:
sudo smbclient //IP_АДРЕС/Папка -U ПОЛЬЗОВАТЕЛЬ
sudo smbclient //192.168.0.89/linuxshare -U mial
После ввода пароля нам становится доступным содержимое сетевой папки.
How To Install samba on Kali Linux
In this tutorial we learn how to install samba on Kali Linux.
What is samba
Samba is an implementation of the SMB/CIFS protocol for Unix systems, providing support for cross-platform file and printer sharing with Microsoft Windows, OS X, and other Unix systems. Samba can also function as an NT4-style domain controller, and can integrate with both NT4 domains and Active Directory realms as a member server.
This package provides the components necessary to use Samba as a stand-alone file and print server or as an NT4 or Active Directory domain controller. For use in an NT4 domain or Active Directory realm, you will also need the winbind package.
This package is not required for connecting to existing SMB/CIFS servers (see smbclient) or for mounting remote filesystems (see cifs-utils).
There are three ways to install samba on Kali Linux . We can use apt-get , apt and aptitude . In the following sections we will describe each method. You can choose one of them.
Install samba Using apt-get
Update apt database with apt-get using the following command.
After updating apt database, We can install samba using apt-get by running the following command:
sudo apt-get -y install samba Install samba Using apt
Update apt database with apt using the following command.
After updating apt database, We can install samba using apt by running the following command:
Install samba Using aptitude
If you want to follow this method, you might need to install aptitude first since aptitude is usually not installed by default on Kali Linux. Update apt database with aptitude using the following command.
After updating apt database, We can install samba using aptitude by running the following command:
sudo aptitude -y install samba How To Uninstall samba on Kali Linux
To uninstall only the samba package we can use the following command:
Uninstall samba And Its Dependencies
To uninstall samba and its dependencies that are no longer needed by Kali Linux, we can use the command below:
sudo apt-get -y autoremove samba Remove samba Configurations and Data
To remove samba configuration and data from Kali Linux we can use the following command:
sudo apt-get -y purge samba Remove samba configuration, data, and all of its dependencies
We can use the following command to remove samba configurations, data and all of its dependencies, we can use the following command:
sudo apt-get -y autoremove --purge samba References
Summary
In this tutorial we learn how to install samba using different package management tools like apt, apt-get and aptitude.
Samba сервер на Kali Linux или расшариваем папки

Так как в моей сети присутствуют компьютеры и мобильные устройства на которых установлены разные операционные системы, а также установлен и настроен медиаплейер на Raspberry Pi то компьютер на Kali Linux часто выполняет роль файлового сервера.
В связи с тем что samba сервер в Kali Linux установлен его необходимо настроить и запустить. Для этого необходимо выполнить следующие действия: 1.Правим конфигурационный файл /etc/samba/smb.conf в любом текстовом редакторе под рутом

[Docum]
writable = yes
admin users = nobody
path = /media/
guest ok = yes
create mask = 777
directory mask = 777
delete readonly = Yes
# The path below should be writable by all users so that their
# profile directory may be created the first time they log on
;[profiles]
; comment = Users profiles
; path = /home/samba/profiles
; guest ok = no
; browseable = no
; create mask = 0600
; directory mask = 0700
[Share]
writable = yes
admin users = nobody
path = /media/
guest ok = yes
create mask = 777
directory mask = 777
delete readonly = Yes
[printers]
comment = All Printers
browseable = no
path = /var/spool/samba
printable = yes
guest ok = no
read only = yes
create mask = 0700
В моем случае все жесткие диски под ntfs расшариваются и свободно можно подключаться без ввода логина и пароля
3. Стартуем сервер: