- Как правильно форматировать флешки на Kali Linux
- Форматирование флешки на Kali Linux с помощью Gparted
- Форматирование USB-накопителя в терминале Kali Linux
- Идентификация флешки
- Создание таблицы разделов
- Какой формат должен иметь флешка для Linux
- Как монтировать USB-накопители в Kali Linux
- How To Format USB Drives The Right Way On Kali Linux
- Method 1: Use Gparted to format your USB drive
- Method 2: Format USB drives from the terminal
- Identify your USB drive
- Optional: Create a partition table and partition
- Format a partition in command line
- FAQ
- What format does a USB drive need to be for Linux?
- How to mount USB drives on Kali Linux?
Как правильно форматировать флешки на Kali Linux
Kali Linux имеет большой арсенал инструментов для взлома и безопасности, но в нем нет большого разнообразия софта для работы с флешками (USB-накопителями). В этой статье я покажу 2 способа форматирования флешки на Kali Linux.
Самый простой способ отформатировать USB-накопители na Kali Linux — использовать предустановленный Gparted (Gnome Partition Editor) — менеджер разделов с графическим интерфейсом (GUI), позволяющий создавать, форматировать и монтировать разделы в несколько кликов.
Далее покажу, как отформатировать флешку на Kali Linux с помощью Gparted и в терминале Linux.
Форматирование флешки на Kali Linux с помощью Gparted
Шаг 1: Подключите USB-накопитель.
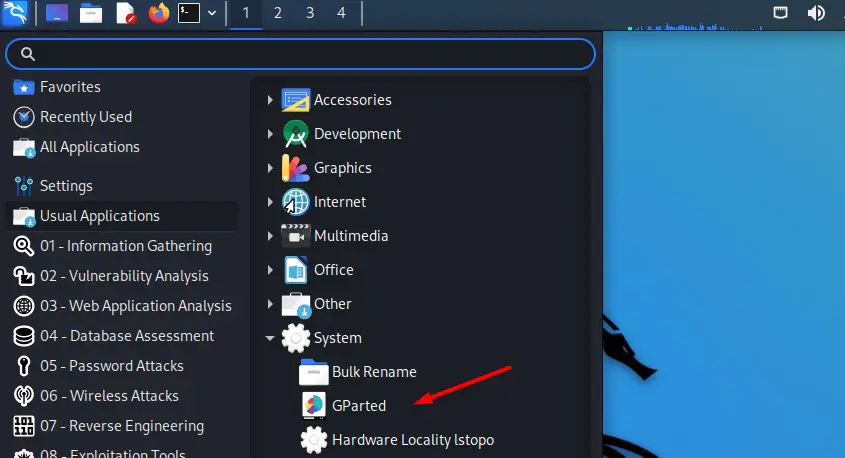
Шаг 2: В главном меню выберите Обычные приложения (Usual Aplications) —> Система (System) —> Gparted. Вы также можете использовать поисковую строку.

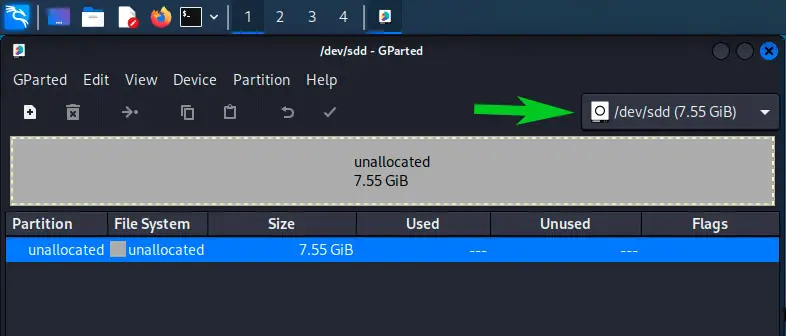
Шаг 3: Выберите флешку в правом верхнем углу. Вы должны увидеть текущую таблицу разделов.

Здесь вы можете удалить существующий раздел, создать новый, создать новый раздел и отформатировать его по своему усмотрению.
Для форматирования раздела кликните правой кнопкой мыши по полю Нераспределенное (Unallocated) и создайте новую таблица раздела.
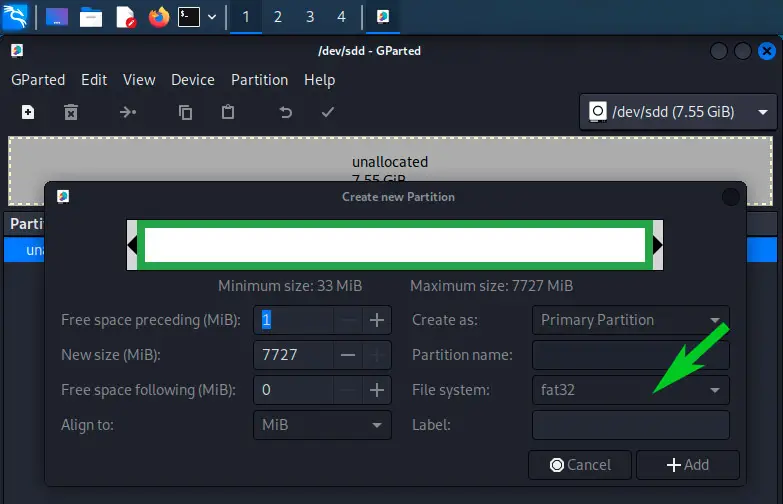
Создайте новый раздел, выбрав файловую систему.

Я выберу fat32 (в конце статьи, объясню почему).
Нажмите Применить (Apply).

Примените изменения, нажав на зеленную галочку.
Через несколько секунд на флешке будет создан новый раздел.
Форматирование USB-накопителя в терминале Kali Linux
Флешку также можно подключить в терминале или через SSH. Команда fdisk перечислит диски подключенные к компьютеру, а команда mount выполнит монтирование.
Идентификация флешки
Подключите USB-накопитель к компьютеру и определите имя диска. Формат имени диска выглядит примерно так:
Где X представляет собой букву от «a» до «f», в зависимости от количества имеющихся жестких дисков.
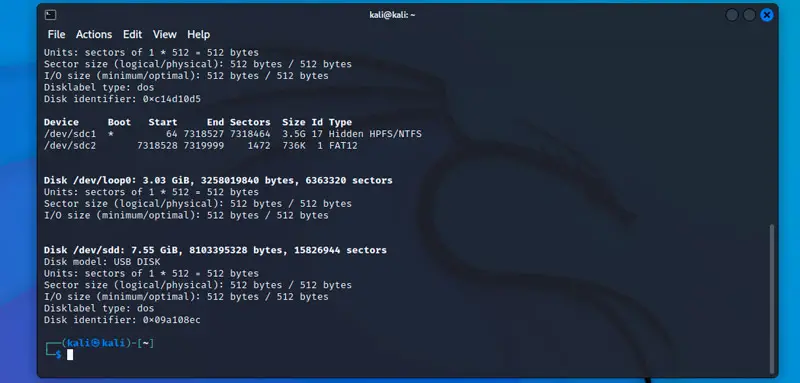
Используйте следующую команду, чтобы вывести список всех ваших дисков:
Вы увидите что-то вроде этого:

Флешка будет находится последней в списке (в моем случае это «/dev/sdd»). На нем написано «USB DISK», и размер 7,55 гб.
Я сделал пример с пустым USB-накопителем, поэтому для меня есть дополнительный шаг: инициализация USB-накопителя.
Создание таблицы разделов
Этот шаг является необязательным. Если на вашем USB-накопителе уже есть один раздел, вы можете просто пропустить его и сразу перейти к форматированию. Но с новым USB-накопителем вам нужно сделать следующее:
Мы будем использовать fdisk для управления таблицей разделов и создания нового раздела:
Предупреждение: убедитесь, что вы используете правильное имя диска.
Выполнение этого шага с неправильным выбором приведет к удалению всего хранилища контента на этом диске.
Создайте новую таблицу разделов:
Он задаст несколько вопросов, просто оставьте значения по умолчанию.
Подтвердите с помощью «Y», чтобы удалить подпись, если потребуется.
Запишите изменения на свой диск с помощью:

И вы можете снова использовать fdisk, чтобы проверить результат:

Как вы можете видеть на скрине выше, теперь у меня есть один раздел на флешке, мне просто нужно его отформатировать.
Форматирование раздела в терминале не такое уж сложное, основной синтаксис выглядит так:
Файловая система обычно будет FAT32 (vfat), EXT4 (ext4) или NTFS (ntfs).
Итак, соответствующая команда может быть:

Я хочу отформатировать свой в FAT32, поэтому я использую первую команду.
Обратите внимание, что на этот раз мы используем имя раздела (/dev/sdd1), а не имя устройства (/dev/sdd).
Какой формат должен иметь флешка для Linux
Большинство дистрибутивов Linux могут читать и записывать разделы различных форматов, но наиболее распространенными являются:
- FAT32: совместим со всеми операционными системами, но только с файлами размером менее 4 ГБ.
- NTFS: для использования с компьютерами Windows (без ограничений).
- EXT4: Только для использования в системах Linux.
Как монтировать USB-накопители в Kali Linux
Теоретически Kali Linux должна автоматически монтировать USB-накопители при их подключении.
Если это не так, вы можете использовать несколько командных строк, чтобы смонтировать его вручную:
Обратите внимание на имя раздела в Gparted (в моем случае /dev/sdd1, см. скрин ниже).
При необходимости измените следующие команды на путь к вашему разделу.
Используйте «fdisk -l», если у вас нет графического интерфейса.
Создайте новый каталог, в который вы будете монтировать раздел, например:
How To Format USB Drives The Right Way On Kali Linux

Kali Linux comes handy with many tools pre-installed for hacking and security, but there is nothing magical to handle your USB drives. It’s Linux, and you have to learn a few things before being comfortable with it. Don’t worry, I’ll show you 2 ways to format your USB drives with Kali Linux in this article.
The easiest way to format USB drives on Kali Linux is to use Gparted, which is preinstalled. It’s a graphical partition manager, allowing you to create, format and mount partitions in a few clicks.
Never used it? No problem, I’ll explain each step in details. And I’ll also give you the instructions to do it via the command line if you don’t have access to the desktop environment.
Method 1: Use Gparted to format your USB drive
Gparted is an excellent tool to see and manage storage drives on Linux. It’s preinstalled on Kali Linux and can be used to format USB drives.
Hide your IP address and location with a free VPN:
Try it for free now, companies are paying for you.
1500 servers in 120 countries. It’s free. Forever. No email required.
Here is how to use it:
- Plug your USB drive
- In the main menu, go to Usual applications > System

- Find Gparted in the list.
You can also use the search engine to find the shortcut directly. - The main window looks like this:
- Select your USB drive in the top-right corner.
You should see the current partition table directly.
If you are reading this, I guess there is nothing on the USB drive, or an unsupported file system.
From there, you can do everything visually: delete the existing partition table, create a new one, create a new partition and format it as you want.
So, if like me your USB drive is empty, you can follow these steps:
- Do a right-click on the unallocated space, and create a new partition table.
- Do it again, and create a new partition:
A form like this shows up. The only thing mandatory here is to select the file system.
Keeping “fat32” is probably a good idea, but I explain the different possibilities at the end of this article if you need further information. - You can create several smaller partitions, use labels or give them different names if you like. But most of the time, you’ll only create one big partition that takes up all the free space.
- Click “Add” to see your changes on the main screen:
- The last step is to click the green tick in the top bar, to apply your changes on the drive.
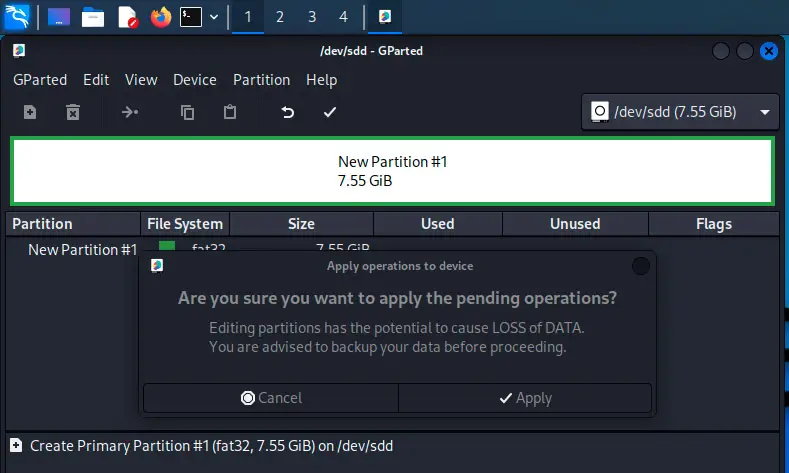
After a few seconds, your USB drive will be updated and your partition read to use.
Stay tuned with the latest security news!
You’ll enjoy receiving the recent articles directly in your inbox every week!
From there, you should get access to your USB drive directly in the file explorer each time you plug it back to your computer. FAT32 should work on all operating systems (including Windows).
Check the FAQ at the end of this article if your USB drive is not mounted automatically.
Method 2: Format USB drives from the terminal
USB drives can also be mounted from a terminal or via SSH when no desktop environment is available. The fdisk command list the drives connected to the computer, and the mount command can then be use to get access the drive content.
Identify your USB drive
The first step is to plug your USB drive to your computer running Kali Linux, and then identify the disk name. The disk name format is generally something like /dev/sdX where X is often a letter between “a” and “f”, depending on the number of hard drives you have.
Anyway, use this command to list all your drives:
sudo fdisk -l
You’ll get something like that:

Kali Linux For Beginners
Learn how the good and the bad guys hack!
Learn from the pros how to use Kali Linux easily and quickly.
The USB drive will often be the last one in the list, in my case it’s “/dev/sdd”. It says “USB DISK” and the size matches (7.55 GiB).
I did the example with an empty USB drive, so there is an additional step for me: initializing the USB drive.
Optional: Create a partition table and partition
- We’ll use fdisk to manage the partition table and create the new partition:
sudo fdisk /dev/sdd
Warning: make sure you are using the correct disk name here.
Following this step with the wrong one will delete all the content store on this disk. - Create a new partition table:
n - It will ask a few questions, just keep the default values.
- Confirm with “Y” to remove the signature if asked.
- Write the changes to your disk with:
w
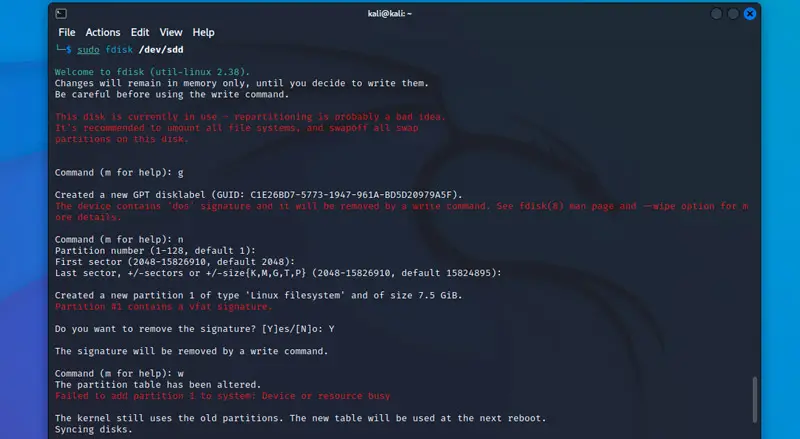
Here is the full trace of my test:
Stay tuned with the latest security news!
You’ll enjoy receiving the recent articles directly in your inbox every week!
And you can use fdisk again to check the result:
sudo fdisk -l /dev/sdd
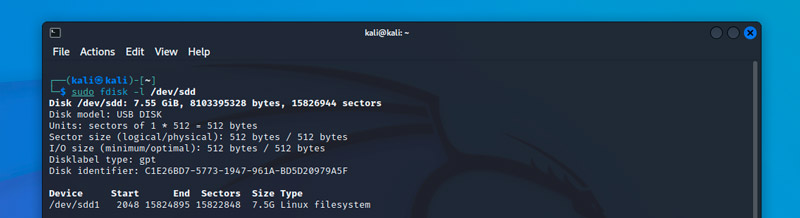
As you can see on this screenshot, I now have one partition available on my USB drive, I just need to format it.
Format a partition in command line
Formatting a partition in a terminal is not that complicated, the main syntax looks like this:
sudo mkfs.
The file system will generally be FAT32 (vfat), EXT4 (ext4) or NTFS (ntfs).
So, the corresponding command can be:
sudo mkfs.vfat /dev/sdd1
sudo mkfs.ext4 /dev/sdd1
sudo mkfs.ntfs /dev/sdd1
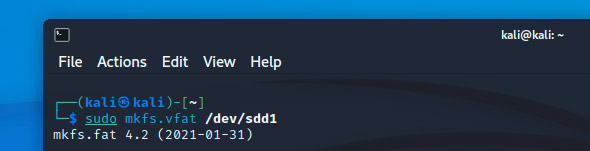
I want to format mine in FAT32, so I’m using the first command.
Notice that this time we use the partition name (/dev/sdd1), not the device name (/dev/sdd).
Read the FAQ below to know how to mount your USB drive if it doesn’t work automatically when you plug it.
FAQ
What format does a USB drive need to be for Linux?
- FAT32: Compatible with all operating systems, but limited to files smaller than 4 GB.
- NTFS: To be used with Windows computers (no limitation).
- EXT4: To be used on Linux systems only.
How to mount USB drives on Kali Linux?

In theory, Kali Linux should automatically mount USB drives when you plug them.
If it’s not the case, you can use a few command lines to mount it manually:
- Note the partition name in Gparted (/dev/sdd1 in my case, see the screenshot below).
Change the following commands with your partition path if needed.
Use “fdisk -l” if you don’t have a graphic interface. - Create a new directory where you’ll mount the partition, for example:
sudo mkdir /mnt/usb - Use the mount command:
sudo mount /dev/sdd1 /mnt/usb - This will give you access to the files stored on your USB drive.
It shouldn’t be necessary on Desktop, but at least you know how to do it if needed.
Hi, my name is Patrick, I’m a web developer and network administrator. I have always been interested in security, and I created this website to share my findings with you.