Can’t install Kali Linux from USB, fails to find CD-ROM drive
I successfully made a live USB of the Kali Linux. When I boot from the USB it gives an option to install. I clicked on that option. At one point it was detecting and mounting CD-ROM drives. As I have no CD-drive or any ROM-drive on my laptop, it gives an error
I tried the «live something» option that takes me directly to Kali Linux and it loads successfully but I can’t install it permanently. I want to install it so I won’t have to waste my time plugging and unplugging the USB. How to get past the CD-ROM detection and make the installation finish correctly?
1. How did you create USB installation? I did it using program unetbootin many times and never had any problems. It works with Kali 2.0 without any problems. 2. Did you try to use expert install option? Usually in expert install mode you can skip certain steps by moving to next one in the menu/installation agenda.
See the point no 2 in my previous comment. Kali is based on Debian so it has the same installer. Try to use expert install and skip CDROM step.
I have the same exact issue. It says «You have failed to insert a Debian instalation medium» as if it is trying to detect the USB as a CD-ROM. However, I can Live boot no problem, just can’t install.
6 Answers 6
You could resolve the error by repeating the steps :
Create the directory cdrom directly on the root of the file system:
Note : If you got problems making the directory /cdrom, disable the CD-rom player in BIOS or disconnect the cable
Mount the USB as if it is a CD-ROM:
Where sdb1 is your USB device.
You could carry on installation now
After executing mount -t vfat /dev/sdb1 /cdrom , cd into the /cdrom directory and do an ls to see if the files are there. Then press ALT — F1 to go back, continue and re-select «detect CDROM»
- Unplug your USB from system and re insert it
- wait for mount/ detection (usb LED glow)
- Hit Continue
You could do what I did. Hit escape, type install, hit enter, skip CD drive.
after executing mount -t vfat /dev/sdb1 /cdrom cd into the /cdrom directory and do a ls to see if the files are there. Then press ALT-F1 to go back, continue and reselect «detect CDROM»
For those where this doesn’t work: go to «Execute Shell» if trying to run Kali linux and type in dmesg . You may be getting errors but it’s a start to debugging why no one’s solution will work. In my case, it may actually be a kernel bug, or I’ve put the wrong installation on. I’m not sure, as it takes forever to download the distro from their site but hey, it may just be that.
If you use Rufus (v 2.x) to burn the ISO to USB drive, make sure the option is «DD Image» in «Create a bootable disk using«. Not sure if Unetbootin offers the same option. If image is copied using this method, you don’t need to go to terminal and manually mount it.
With Rufus (v 3.x), you can not explicitly choose DD mode. IF the ISO is hybrid or has DD mode, Rufus will prompt you to choose ISO or DD mode AFTER clicking start button.
I tried all the answers here and more google results, but none worked. I eventually figured it out, the issue is the file format is not vfat, but iso9660.
When you get the CDROM not found error follow these steps:
Enter a shell ( CTRL + Alt + F2 )
Note: Kali told me to press ( Alt + F2 ), but this didn’t work
Get a list of devices with blkid:
~ # blkid /dev/sdc1: UUID="2018-04-12-12-04-16-00" LABEL="Kali Live" TYPE="iso9660" PARTUUID="81c5e086-01" Note: I have shortened my list to the relevant row. Also you can see the storage type is iso9660, not vfat
Mount the Kali CD with the mount command:
~ # mount -t iso9660 /dev/sdc1 /cdrom Check the contents of /cdrom are as expected:
~ # ls /cdrom autorun.inf efi g2ldr.mbr md5sum.txt win32-loader.ini boot efi.img install pool debian firmware isolinux setup.exe dists g2ldr live tools Switch back to the installer ( CTRL + Alt + F5 )
Note: Kali told me to press ( Alt + F1 ), but this didn’t work. I tried F1 through to F5 until I found the correct combination
From the menu tell it to mount the CDROM, if asked choose /dev/sdc1 and /cdrom. I know we have already mounted the drive, but for some reason this step didn’t work previously, but worked fine after following the previous steps.
The install will now continue as normal.
Kali linux install errors
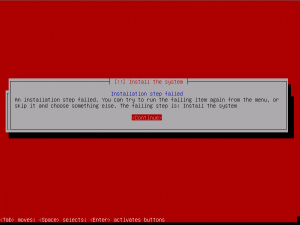
There can be a wide variety of reasons for a Kali Linux installation to fail. This could include issues such as a corrupt or incomplete ISO download, not enough disk space on the target machine, etc. The following article will give you some pointers on what to look for when your Kali Linux installation has failed. The following is an example of the dreaded “Red Screen”, indicating the installation encountered a problem.
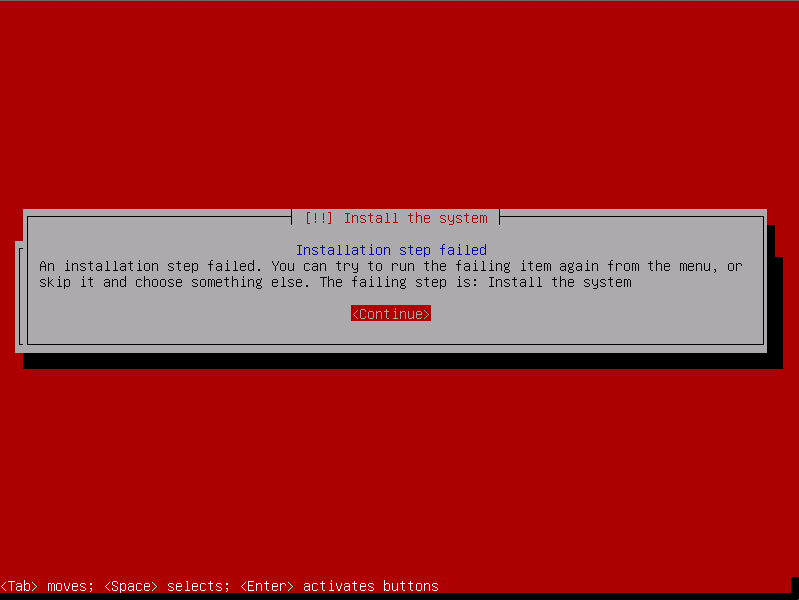
Hitting the continue button should take you to the Debian installer main menu. From that main menu, browse to the “save debug logs”:
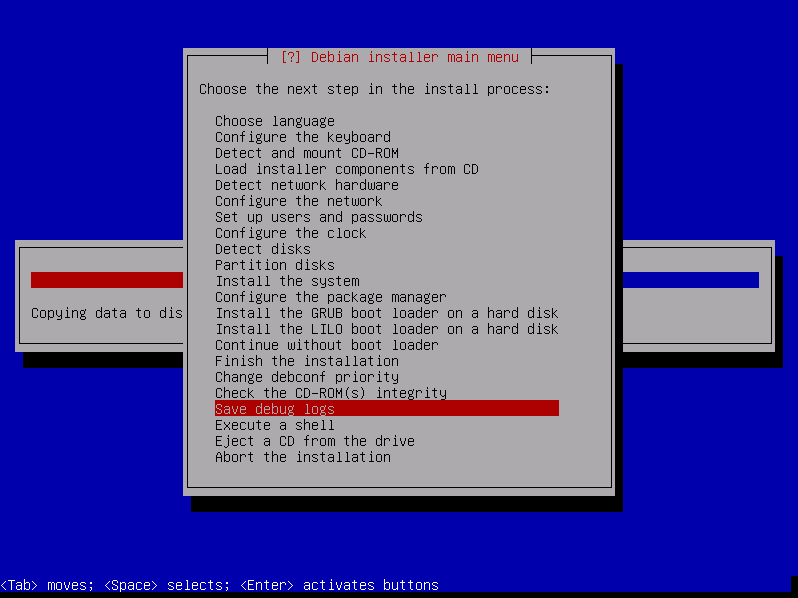
Going into the debug logs, you are presented with several ways of transferring the installation log files away from the failed installation. The most convenient way is usually to start a web server on the machine undergoing the installation.
![]()
Once you choose this option, a web server is started from which you are able to download or view several installation log files.

Look over the logs files for anything irregular, or any error messages which look like they might be the cause of your failed installation. In this case, the target machine did not have enough disk space to install Kali Linux, as was seen towards the end of the syslinux log file
Updated on: 2023-Mar-06
Author: g0tmi1k
Ошибки установки Kali Linux
Мануал
Неисправности установки Kali Linux
Во время установки Kali Linux может возникнуть множество причин для ошибок.
Это может включать в себя такие проблемы, как поврежденная или неполная загрузка ISO, недостаточное дисковое пространство на целевой машине и т. д.
В следующей статье вы найдете несколько указаний о том, что искать, когда ваша установка Kali Linux не удалась.
Ниже приведен пример страшного «красного экрана», указывающий на то, что в установке возникла проблема.
Нажатие кнопки «Continue» приведет вас в главное меню установщика Debian.
В этом главном меню найдите «save debug logs»:

Переходя в журналы отладки, вам предоставляется несколько способов переноса файлов журнала о неудачной установке.
Наиболее удобным способом является, как правило, запуск веб-сервера на машине, проходящей установку.
После выбора этой опции запускается веб-сервер, с которого вы можете загружать или просматривать несколько файлов журнала установки.
Просмотрите файлы журналов для любых нерегулярных или любых сообщений об ошибках, которые выглядят так, как будто это может быть причиной неудачной установки.
В этом случае на целевой машине не было достаточного дискового пространства для установки Kali Linux, как было видно в конце файла журнала syslinux
Aug 19 23:45:05 base-installer: error: The tar process copying the live system failed (only 152937 out of 286496 files have been copied, last file was ). Aug 19 23:45:05 main-menu[927]: (process:7553): tar: write error: No space left on device Aug 19 23:45:05 main-menu[927]: WARNING **: Configuring 'live-installer' failed with error code 1 Aug 19 23:45:05 main-menu[927]: WARNING **: Menu item 'live-installer' failed. Aug 19 23:50:23 main-menu[927]: INFO: Modifying debconf priority limit from 'high' to 'medium' Aug 19 23:50:23 debconf: Setting debconf/priority to medium Aug 19 23:56:49 main-menu[927]: INFO: Menu item 'save-logs' selec
Пожалуйста, не спамьте и никого не оскорбляйте. Это поле для комментариев, а не спамбокс. Рекламные ссылки не индексируются!

- Аудит ИБ (49)
- Вакансии (12)
- Закрытие уязвимостей (105)
- Книги (27)
- Мануал (2 306)
- Медиа (66)
- Мероприятия (39)
- Мошенники (23)
- Обзоры (820)
- Обход запретов (34)
- Опросы (3)
- Скрипты (114)
- Статьи (352)
- Философия (114)
- Юмор (18)

Anything in here will be replaced on browsers that support the canvas element
OpenVPN Community Edition (CE) – это проект виртуальной частной сети (VPN) с открытым исходным кодом. Он создает защищенные соединения через Интернет с помощью собственного протокола безопасности, использующего протокол SSL/TLS. Этот поддерживаемый сообществом проект OSS (Open Source Software), использующий лицензию GPL, поддерживается многими разработчиками и соавторами OpenVPN Inc. и расширенным сообществом OpenVPN. CE является бесплатным для […]
Что такое 404 Frame? Большинство инструментов для взлома веб-сайта находятся в 404 Frame. Итак, что же представляют собой команды? Вы можете отдавать команды, используя повседневный разговорный язык, поскольку разработчики не хотели выбирать очень сложную систему команд. Команды Команды “help” / “commands” показывают все команды и их назначение. Команда “set target” – это команда, которая должна […]
В этой заметке вы узнаете о блокировке IP-адресов в Nginx. Это позволяет контролировать доступ к серверу. Nginx является одним из лучших веб-сервисов на сегодняшний день. Скорость обработки запросов делает его очень популярным среди системных администраторов. Кроме того, он обладает завидной гибкостью, что позволяет использовать его во многих ситуациях. Наступает момент, когда необходимо ограничить доступ к […]
Знаете ли вы, что выполняется в ваших контейнерах? Проведите аудит своих образов, чтобы исключить пакеты, которые делают вас уязвимыми для эксплуатации Насколько хорошо вы знаете базовые образы контейнеров, в которых работают ваши службы и инструменты? Этот вопрос часто игнорируется, поскольку мы очень доверяем им. Однако для обеспечения безопасности рабочих нагрузок и базовой инфраструктуры необходимо ответить […]
Одной из важнейших задач администратора является обеспечение обновления системы и всех доступных пакетов до последних версий. Даже после добавления нод в кластер Kubernetes нам все равно необходимо управлять обновлениями. В большинстве случаев после получения обновлений (например, обновлений ядра, системного обслуживания или аппаратных изменений) необходимо перезагрузить хост, чтобы изменения были применены. Для Kubernetes это может быть […]