- Kali linux install from ubuntu
- Installation Prerequisites
- Resize Linux Procedure
- Kali Linux Installation Procedure
- Post Installation
- Install Kali Linux Apps on Ubuntu [100% Working]
- Install Kali Linux Apps on Ubuntu — Getting Started
- What is Katoolin?
- Requirements
- Step-1: Install Git
- Step-2: Install Python 2.7
- Step-3: Install Katoolin
- Step-4: Launch Katoolin
- Step-5: Add Kali Repositories & Update
- Step-6: View Categories to install Kali Linux Apps on Ubuntu
- Step-7: Install the Classic Menu indicator
- Step-8: Install Kali Menu
- Conclusion
Kali linux install from ubuntu
Installing Kali Linux alongside another Linux installation can be quite useful. However, you need to exercise caution during the setup process. First, make sure that you’ve backed up any important data on your Linux installation. Since you’ll be modifying your hard drive, you’ll want to store this backup on external media. Once you’ve completed the backup, we recommend you peruse our Kali Linux Hard Disk install guide, which explains the normal procedure for a basic Kali Linux install.
In our example, we will be installing Kali Linux alongside an installation of Ubuntu (Server 18.04), which is currently taking up 100% of the disk space in our computer. We will start by resizing our current Linux partition to occupy less space and then proceed to install Kali Linux in the newly-created empty partition.
Installation Prerequisites
This guide will make the following assumptions:
- You have read our single boot Kali Linux install guide, as this has the same Installation Prerequisites (System requirements & setup assumptions).
- When downloading Kali Linux, pick the live image, rather than the installer option.
- A single disk to install to (rather than a dedicated disk per operating system).
We need to use a different image from the single boot Kali Linux install guide, as we need the live image. This is because we need to edit the disk structure without mounting any partitions (otherwise they would be in-use). After we have finished altering the disk layout, we can still install Kali Linux using the live image, but there will be a few differences such as:
Both of these can be addressed post installation, as it saves swapping to the installer image (as you will need either multiple CD/DVD/USBs or to re-image half way though).
This installation has the potential to go wrong very easily as it involves editing existing partitions. Be aware of what partitions you are modifying and where you are installing Kali Linux to.
Having a backup of your Linux files available is a good idea in the event something goes wrong.
Resize Linux Procedure
Before we can install Kali Linux, there needs to be room on the hard disk. By booting into a live Kali Linux session with your chosen installation medium, we can resize the partition to our desired size, as the disk will not be in use because Kali Linux will all be in memory.
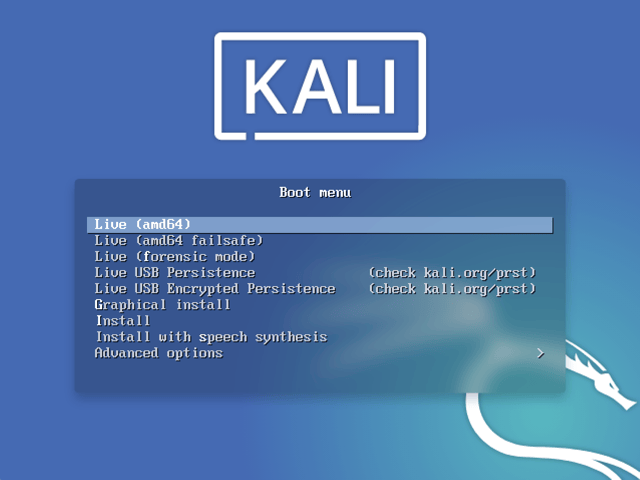
- To start resizing, make sure you insert your Kali Linux installation medium and power on the device. If needed, press any keyboard shortcuts for a “boot order menu” (depends on each manufacture) or boot into BIOS/UEFI and change the boot order to point to the installation medium first.
- When the boot menu/options appears, you should see at least one new option. Depending on the manufacture, hardware, how the system is configured and install medium, you may see more options (e.g. Can you boot into non-UEFI?).
You may need to try a few different options in order to find success.
- You should be greeted with the Kali Linux boot screen. Select Live, and you should be booted into the Kali Linux default desktop.
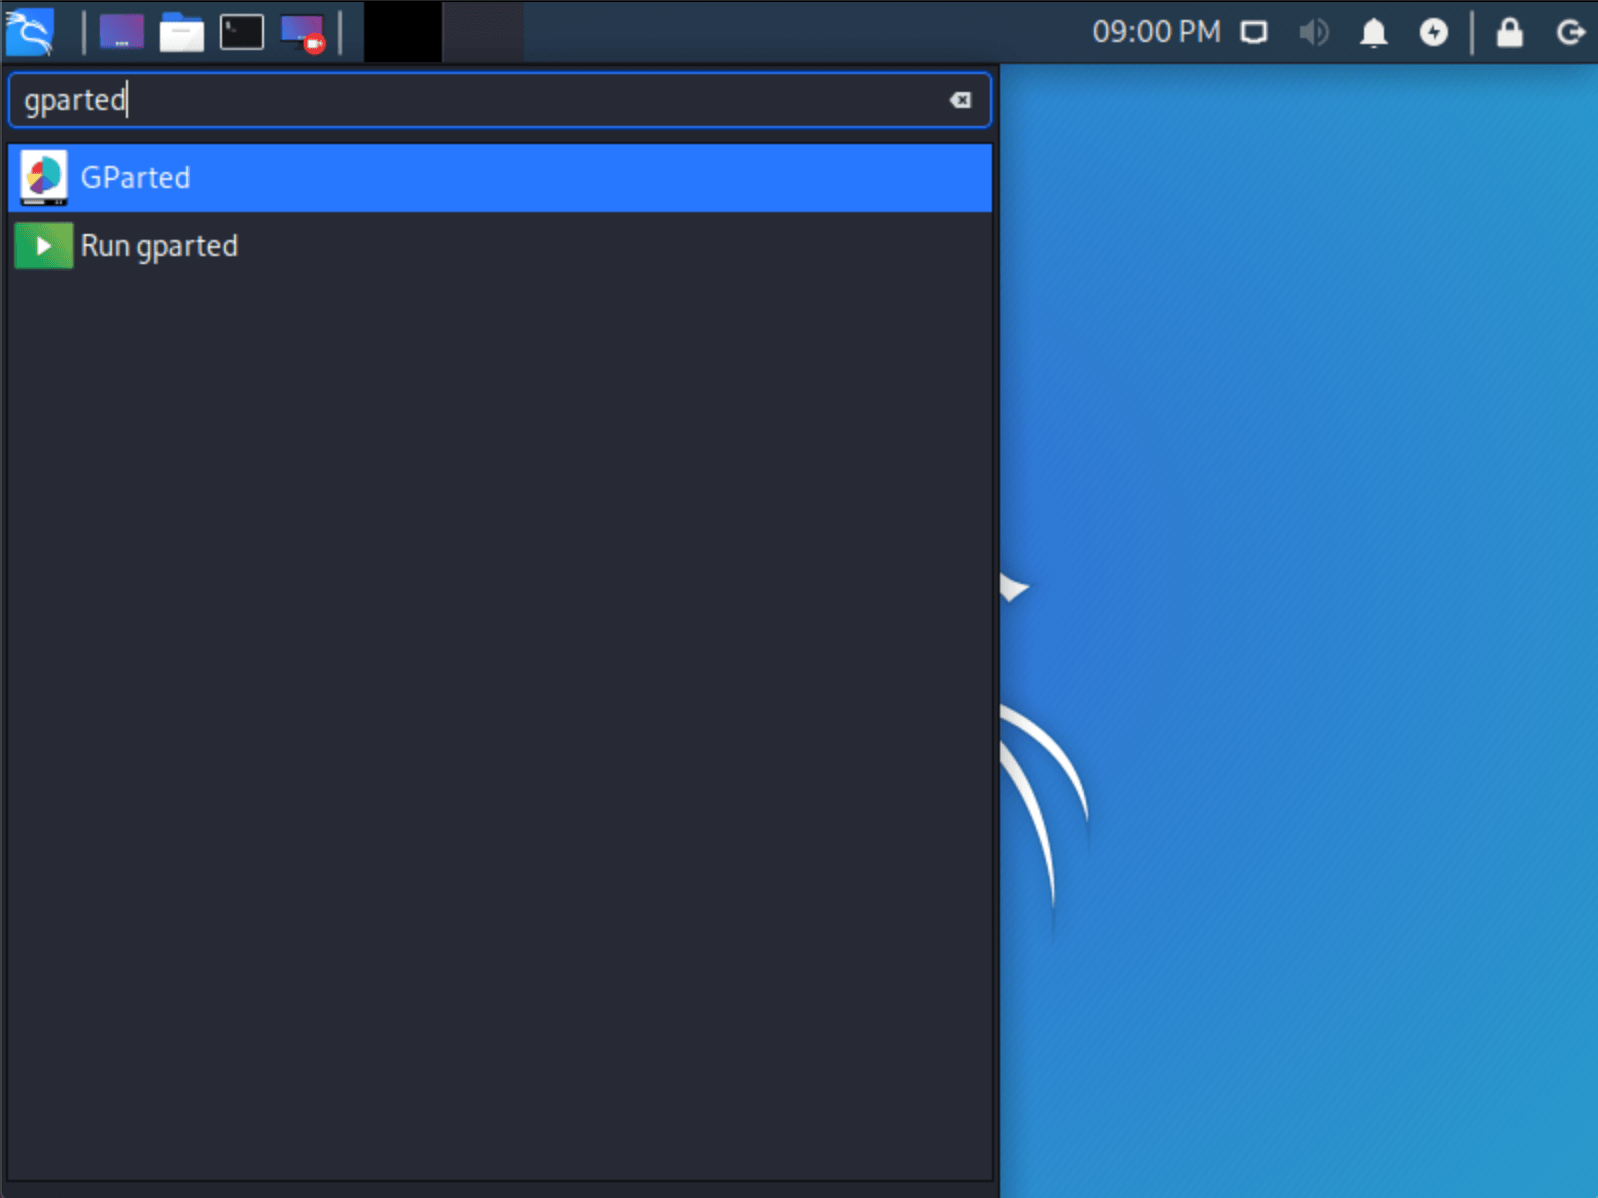
- Now launch GParted, which we’ll use to shrink the existing Linux partition to give us enough room to install Kali Linux in the free space.
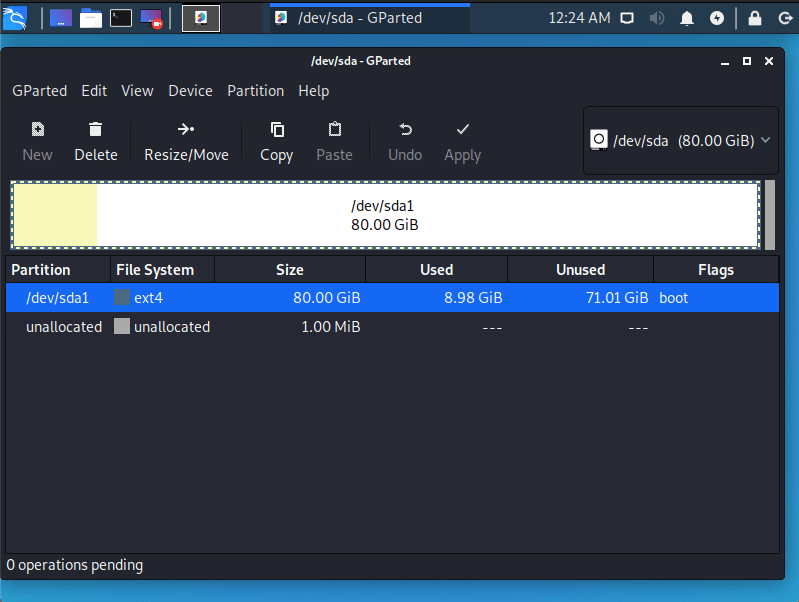
- Once GParted has opened, select your Linux partition ( /dev/sda1 ) & resize it leaving enough space (we recommend at least 20 GB) for the Kali Linux installation.
Depending on your setup, the disk structure may be different to include:
You often just want to select the largest partition (commonly the data/home directory)
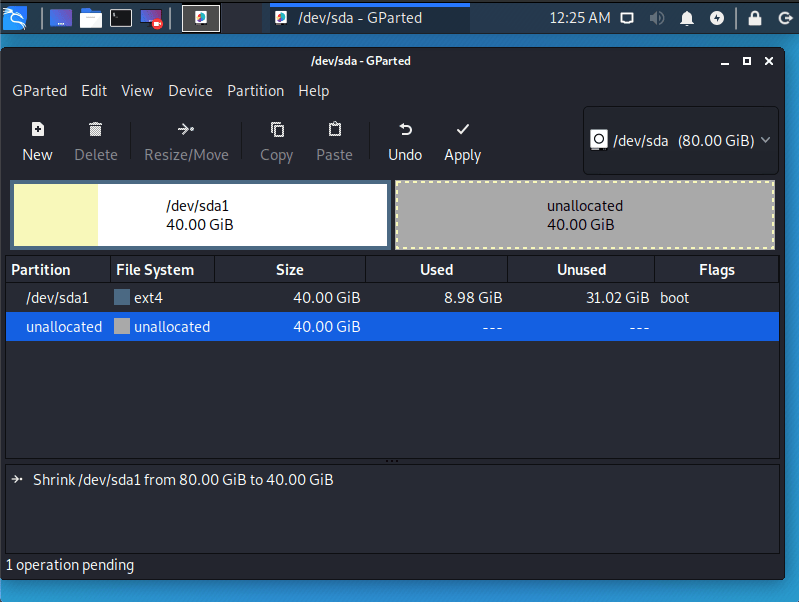
If you are moving past into any non-white in the partition then you are editing a section that is in use.
Only remove from the area of the partition that is not in use.
If you wish to organize the partition to group all the Linux partitions together, placing the free space at the end, you may do so.
- Once you have resized your Linux partition, ensure you “Apply All Operations” on the hard disk. Exit gparted and reboot.
Kali Linux Installation Procedure
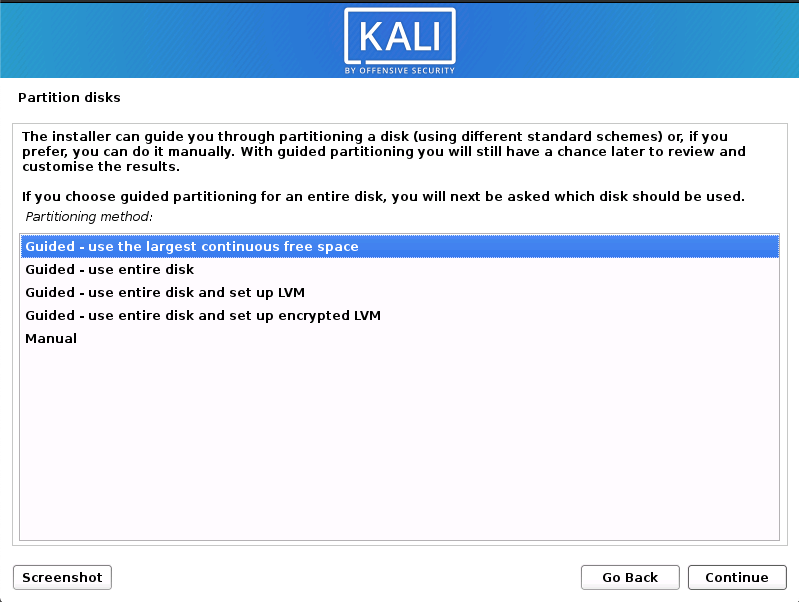
- The installation procedure from this point onwards is similar to a Kali Linux Hard Disk install, until the point of the partitioning. At this point, you need to select “Guided — use the largest continuous free space” (rather than “Guided — the entire disk”) which got created earlier with gparted.
- You can carry on following the single boot Kali Linux install guide, expect you will not have the option to select desktop environment or metapackages as you are using the live image. Once the installation is done, reboot.
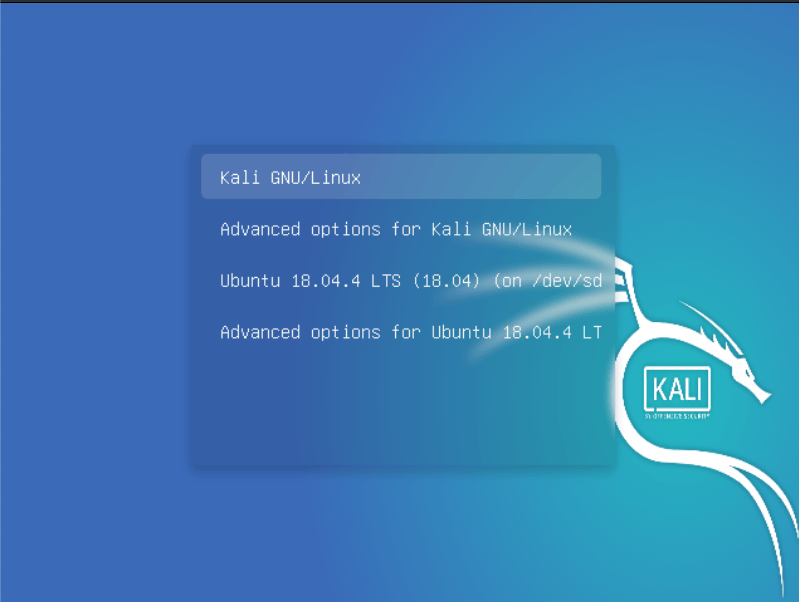
You should be greeted with a GRUB boot menu, which will allow you to boot either into Kali Linux or the other Linux operating system.
Post Installation
Now that you’ve completed installing Kali Linux, it’s time to customize your system.
The General Use section has more information and you can also find tips on how to get the most out of Kali Linux in our User Forums.
Updated on: 2023-Mar-06
Author: gamb1t
Install Kali Linux Apps on Ubuntu [100% Working]
Install Kali Linux Apps on Ubuntu — Getting Started
Unlike most other operating systems, Linux gives users the ability to customize a distribution to their liking. For example, Kali Linux and Parrot are the most popular Linux distributions used in penetration testing and security auditing. However, that doesn’t mean you can’t use another Linux distribution for penetration testing. All you need is to find a way to install all the security tools in your desired distribution. Unfortunately, the whole process of installing all these tools one by one sometimes gets complicated and time-consuming since Kali Linux has more than 300 pentesting tools. In this case, Katoolin comes quite in handy.
What is Katoolin?
Katoolin is a free, open-source python script developed by Lionsec to install all Kali Linux apps at once or manually one by one in all Linux distributions of your choice. This post will give you a step-by-step guide on installing Kali Linux on Ubuntu 20.04 LTS using Katoolin.
Requirements
To successfully install Kali Linux apps on Ubuntu, we will need to meet the requirements below.
Step-1: Install Git
In most recent Linux distributions, Git comes installed by default. However, if that’s not the case, use the command below to install Git.
After a successful install, use the command below to check the version of Git installed.
![Install Kali Linux Apps on Ubuntu [100% Working]](https://www.golinuxcloud.com/wp-content/uploads/Git-Version.png)
Sample Output:
Step-2: Install Python 2.7
Ubuntu 20.04 LTS comes pre-installed with Python 3. Unfortunately, the Katoolin script is written in Python 2. To get started, run any of the commands below.
sudo apt install python-minimal
When done, run the —version command to check the installed version of Python with the command below.
![Install Kali Linux Apps on Ubuntu [100% Working]](https://www.golinuxcloud.com/wp-content/uploads/Python2-Version.png)
Sample Output:
Since most distributions come installed with Python version 3, when you want to use Python version 2, always use the command python2.
Step-3: Install Katoolin
After successfully installing Python2, we can now go ahead and install Katoolin. Execute the command below to clone the Katoolin GitHub repository.
sudo git clone https://github.com/LionSec/katoolin.git
![Install Kali Linux Apps on Ubuntu [100% Working]](https://www.golinuxcloud.com/wp-content/uploads/Katooling-Git-Repo.png)
Sample Output:
When you run ls command, you should see a new folder with the name «katoolin.» To install Katoolin in our Ubuntu system, we will move/copy the katoolin folder script into the /usr/bin directory with the command below.
sudo cp katoolin/katoolin.py /usr/bin/katoolin
![Install Kali Linux Apps on Ubuntu [100% Working]](https://www.golinuxcloud.com/wp-content/uploads/Install-Katoolin.png)
Sample Output:
Make the script executable using the command below.
sudo chmod +x /usr/bin/katoolin
Step-4: Launch Katoolin
To start using katoolin, run any of the commands below:
sudo python2 /usr/bin/katoolin
![Install Kali Linux Apps on Ubuntu [100% Working]](https://www.golinuxcloud.com/wp-content/uploads/Katoolin-Interface.png)
Sample Output:
As of writing this article, Katoolin gives you four options to install kali linux apps on Ubuntu:
- Add Kali repositories & Update
- View Categories
- Install classicmenu indicator
- Install Kali menu
- Help
Step-5: Add Kali Repositories & Update
To install all Kali Linux apps on Ubuntu, we will need to add Kali repositories to our system. That will enable us to download applications available in Kali repositories. In the Katoolin menu, enter 1 to «add Kali Linux repositories» on the Ubuntu system.
Linux repositories are storage locations where the system retrieves updates and applications. You will see a prompt, «What do you want to do.»
Press 1 again to select the option «Add Kali Linux repositories.«
![Install Kali Linux Apps on Ubuntu [100% Working]](https://www.golinuxcloud.com/wp-content/uploads/Add-Kali-repos.png)
If you get the error gpg: keyserver receive failed: No name , as shown in the image above, don’t panic. Press Ctrl + C to close the katoolin interface and execute the command below.
wget -q -O - archive.kali.org/archive-key.asc | sudo apt-key add sudo apt update
![Install Kali Linux Apps on Ubuntu [100% Working]](https://www.golinuxcloud.com/wp-content/uploads/Add-repo-key.png)
Sample Output:
Now run the katoolin command again to open the katoolin interface.
Select option 1 to «Add Kali Linux repositories.»
Select option 2, «Update,» on the next prompt since we had already added the repositories.
![Install Kali Linux Apps on Ubuntu [100% Working]](https://www.golinuxcloud.com/wp-content/uploads/Update-Kali-repos.png)
When done, type gohome to return the katoolin main interface window.
Step-6: View Categories to install Kali Linux Apps on Ubuntu
After successfully adding Kali repositories to your system, we can now start installing the various security tools. Enter «2» to select the «View Categories» option.
![Install Kali Linux Apps on Ubuntu [100% Working]](https://www.golinuxcloud.com/wp-content/uploads/View-categories.png)
You will see a list of all the various security tools categories available. If you have used Kali Linux before, you will realize these categories are arranged just as they appear on the Kali Linux application menu. If you want to install all the tools in their various categories, enter zero (0). To install tools in a particular category, enter the option of that category.
For example, in this post, we will install «Information Gathering» tools. We will press one (1) and hit enter. That will open a whole new list of all the information-gathering tools available for install. To install all the tools in this category, press zero (0). To install only a single tool, press the tool number. In our case, we will install Nmap. Therefore, we will press 18 and hit enter.
![Install Kali Linux Apps on Ubuntu [100% Working]](https://www.golinuxcloud.com/wp-content/uploads/Install-information-gathering-tools.png)
You can use this method to install any Kali Linux tool in your system or all of them if you wish. Once done, type «gohome» to go back to the main interfaces window.
Step-7: Install the Classic Menu indicator
The classic menu indicator is an indicator applet for the Ubuntu Desktop environment. It’s a reliable notification applet that sits on your Ubuntu notification bar. On the katoolin main interfaces, type 3 and hit enter to install the Classic Menu indicator. The menu will appear at the top of the window, as shown in the image below.
![Install Kali Linux Apps on Ubuntu [100% Working]](https://www.golinuxcloud.com/wp-content/uploads/CLASSIN-MENU.png)
Step-8: Install Kali Menu
If you have installed all the Kali Linux tools, it would be good to install the Kali Linux menu to manage the different categories. Type «gohome» to go back to the main window and press 4 to install the Kali menu. When done, you should see the menu icon on your Ubuntu top bar as shown in the image below.
![Install Kali Linux Apps on Ubuntu [100% Working]](https://www.golinuxcloud.com/wp-content/uploads/KALI-MENU.png)
Conclusion
That’s it! I believe by now; you can easily install Kali Linux apps on Ubuntu system. Luckily the procedure in this post can be replicated on any other Debian-based Linux distribution. If you found this post helpful, please share the love by sharing it with friends on your social platforms.