Kali linux iso boot
One of the fastest method, for getting up and running with Kali Linux is to run it “live” from a USB drive. This method has several advantages:
- It’s non-destructive — it makes no changes to the host system’s hard drive or installed OS, and to go back to normal operations, you simply remove the Kali Live USB drive and restart the system
- It’s portable — you can carry Kali Linux in your pocket and have it running in minutes on an available system
- It’s customizable — you can roll your own custom Kali Linux ISO image and put it onto a USB drive using the same procedures
- It’s potentially persistent — with a bit of extra effort, you can configure your Kali Linux “live” USB drive to have persistent storage, so the data you collect is saved across reboots
In order to do this, we first need to create a bootable USB drive which has been set up from an ISO image of Kali Linux.
The specifics of this procedure will vary depending on whether you’re doing it on a Linux, macOS/OS X, or Windows system.
What You’ll Need
- A verified copy of the appropriate ISO image of the latest Kali build image for the system you’ll be running it on.
- If you’re running under Windows, there is not one tool that is considered the overall best for imaging. We recommend Etcher(installer or portable) as it is simpler to use, however Rufus is another popular option with its advance options. If one does not work for you, consider the other.
- A USB drive, 8GB or larger (Systems with a direct SD card slot can use an SD card with similar capacity. The procedure is identical.)
During this procedure, you might see some warnings telling you that Kali Linux contains malware, trojan, virus or whatever. This message usually comes from Windows Defender or USB Defender, or a third-party antivirus. Those warnings are expected: Kali Linux is packed with pentesting tools that are likely to be flagged as malware. Just ignore the warnings.
Creating a Bootable Kali USB Drive on Windows (Etcher)
- Plug your USB drive into an available USB port on your Windows PC, note which drive designator (e.g. “ G:\ ”) it uses once it mounts, and launch Etcher.
- Click Flash from file, and locate the Kali Linux ISO file to be imaged with.
- Click Select target and choose the USB drive you want to make bootable.
- Click the Flash! button once ready.
Note: You may get a UAC prompt asking for administrator privileges that you will need to accept.

5. Once Etcher alerts you that the image has been flashed, you can safely remove the USB drive and proceed to boot into Kali with it.
At the time of writing, Etcher will use MBR. This is to allow for the most hardware compatibility.
Creating a Bootable Kali USB Drive on Windows (Rufus)
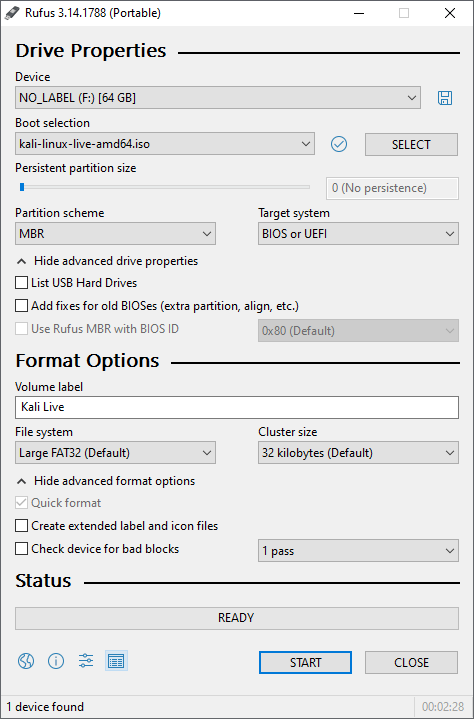
- Plug your USB drive into an available USB port on your Windows PC, note which drive designator (e.g. “ G:\ ”) it uses once it mounts, and launch Rufus.
- With Device, check the dropdown list of options for the USB drive (e.g. “ G:\ ” and size).
- Boot selection needs to point to point to the Kali Linux ISO file, which can be done by clicking the SELECT button
- Depending on your configuration, you can set the Partition scheme, as well as Target system. If you are not sure, leave it as the default values.
While you can easily create a persistent live usb with the integrated options in Rufus by increasing the persistence slider, this is not the officially supported method (check Adding Persistence to a Kali Linux Live USB Drive), as it doesn’t work for all images, like the Kali Everything Live ISO introduced in release 2022.1.
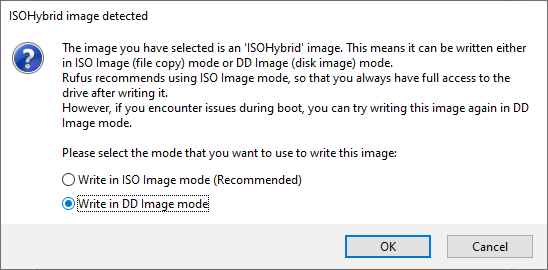
6. You may get a prompt saying about ISOHybird image. Selecting ISO image, will allow you to edit the files from the Kali Linux ISO, but at the potential lose of hardware compatibility. As a result, we recommend selecting DD Image.
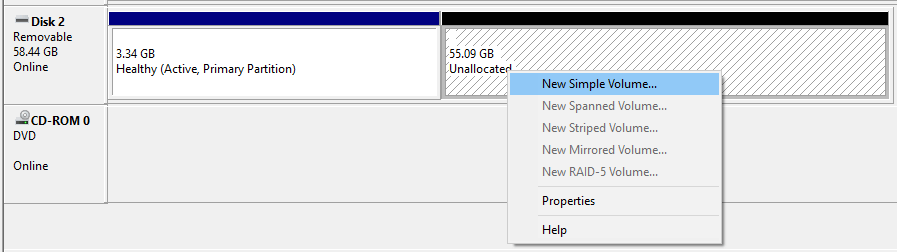
Note: If you select “DD Image” option, you can create another partition on the USB drive, allowing you to use the rest of the space. Start -> Run (Windows + R) -> diskmgmt.msc -> Locate the USB drive -> Right-click in “Unallocated” -> New Simple Volume -> Follow the rest of the wizard with next, next, next…
Booting A USB Drive In Windows
Depending on the system (such as BIOS or UEFI), as well as the version of Windows, and how they are each configured, you may need to re-image the USB drive.
- Master Boot Record (MBR) is often used on legacy systems that use BIOS as well as UEFI which has Compatibility Support Module (CSM) enabled
- GUID Partition Table (GPT) is required where UEFI has CSM disabled, forcing to use the modern standard
After writing the image to the USB drive, reboot Windows with the USB inserted. Depending on the motherboard manufacture, will also depend on the next stage. Some motherboard’s support a “temporary” boot menu, allowing for a one off selection. Others you need to enter BIOS/UEFI to configure it to try and boot from USB first. Entering either location, also depends on the motherboard. You can look up on the manufactures website and read the manual, try and read the screen when booting (however the text may be shown too quick or full logos used), or try common key combinations (such as ESC , F1 , F2 , F3 , F4 , F8 , F10 , F11 , F12 or DEL ).
Updated on: 2023-May-18
Author: g0tmi1k
Как создать загрузочную флешку Кали Линукс?

В статье я покажу как быстро записать на флешку Кали Линукс, сделав её при этом загрузочной. Формат статьи основан на способах установки предыдущего поколения. Возможно, что сейчас разработчики представят обновлённый способ установки Кали на флешку. Работать будем, несмотря на формат блога, именно из Windows. Версия Windows значения не имеет, но именно она является подавляющим вариантом ОС на компьютерах пользователей. При этом, как и в случае с другими современными утилитами, записать загрузочную флешку Кали Линукс у нас с вами получится всего в несколько щелчков мышью. Специальных требований нет — от вас лишь потребуются права даминистратора в учётной записи Windows.
Что будем использовать?
- Бесплатную программу PowerISO для записи образа.
- Столь же бесплатную Rufus
- Флешка подходящего объёма (у меня 32 Гб и этого, кстати, может не хватить для последующих обновлений в режиме persistent).
- Скачанный из сети образ последней версии Кали Линукс.
Разобьём процесс в несколько этапов.
Сначала приобретаем образ. Советую воспользоваться самым быстрым и надёжным — официальный сайт. Туда вас и направляю:

По ссылке вы увидите несколько версий, начиная с самой полноценной для установки на прямую на диск. Там же версия, выпуск, размер, способ скачивания и разрядность процессора. Выбирайте под стать своей машине и ожидайте окончания загрузки.
ВНИМАНИЕ. На сегодняшний момент наиболее подходящим вариантом будет Live Boot, созданный для «живых» систем (Live CD).

Пока качается Кали, можно отправиться за PowerISO. Отправляю на официальный сайт:
Когда обе закачки на борту, устанавливайте вторую. У меня после запуска PowerISO вылезает 5-ти секундное окно с призывом приобрести ключ. Если у вас также — игнорируем его. Далее отправляемся по настройкам программы:

Выбираем панель Инструменты — > Создать загрузочный USB привод. Далее указываем на местонахождение только что скачанного образа Кали Линукс:

Теперь выставляем Прямую запись и не забудем указать на флешку:

Жмём Старт. О том, что данные на флешке затрутся, напоминать, думаю, не стоит?

Вобщем, статью писал дольше, чем записывал флешку. Запись шла менее пяти минут. Об успешном окончании записи сообщит следующее окно:

Из PowerISO выходим. Проверяем записанное. Для этого я перезагружу компьютер и после POST проверки из меню быстрого запуска (у меня на Lenovo это клавиша F12 сразу после включения) выберу загрузку с флешки. В меню Кали выберу Live amd64:


Всё работает, даже автоматически смонтированы все тома. Можете устанавливать на компьютер или использовать в таком виде.
Как создать загрузочную флешку Кали Линукс с помощью Rufus?
Очередная и почти всесильная утилита, которая также может помочь в записи Кали на флеш-носитель. Основные настройки программы можно выразить в следующем окне:

Важным этапом в настройке программы ползунок Постоянного размера раздела сдвинуть поближе к конечному объёму флешки. Пусть размер займёт чуть больше его половины: теперь ваша флешка будет комфортно работать в режиме persistence из меню, т.е. сохранять изменения после перезагрузки. Это значит, что можно обновлять систему, файлы, устанавливать скрипты. Ну, на ISO образ укажете сами, схема раздела — конечно, MBR. Если год выпуска машинки далеко не свежий — обратите внимание на пункт Добавить исправление для старых BIOS . Если программа попросит что-то доустановить, не мешайте:


В какой-то момент форматирование остановится на 100% — не торопитесь закрывать окно:


Следует учесть, что обновление такой флешки через apt-get идёт нестерпимо долго: на моём двухъядерном с 8 Гб RAM это заняло почти сутки. Так что не торопитесь расстраиваться из-за «остановившегося» в какой-то момент терминала при распаковке очередного пакета обновлений. Скорости через USB порты очень низкие.