- How to setup proxychains for 100% anonymity [Step-by-Step]
- Pre-requisites
- Proxychains features
- Step 1: Getting proxies to setup proxychains
- Step 2: Using proxychains
- Step 3: Adding proxies to the proxy list
- Types of chains in proxychain
- Step 4: Avoiding dns leak
- Step 5: Running proxychains
- Conclusion
- Leave a Comment Cancel reply
- Ethical Hacking Tutorial
- Пошаговая настройка прокси для Linux
- Видеоинструкция по настройке прокси в Linux
- Настройка прокси в Astra Linux
- Настройка прокси в Kali Linux
- Настройка прокси в Ubuntu Linux
- Пошаговая настройка прокси для Linux
- Видеоинструкция по настройке прокси в Linux
- Настройка прокси в Astra Linux
- Настройка прокси в Kali Linux
- Настройка прокси в Ubuntu Linux
How to setup proxychains for 100% anonymity [Step-by-Step]
Hello learners, in this guide we will setup proxychains when using the internet to ensure anonymity. Proxychains is a tool used by both black hat and white hat hackers to carry out their daily duties. White hat hackers use proxychains to expose system vulnerabilities that would have been exploited by the black hats. Malicious hackers setup proxychains to help cover their identities and bypass intrusion detection systems.
When a hacker attacks a system using proxychains, the intermediary IP address is left on the target system. This makes it difficult for forensic experts to trace the source of the attack. A proxy serves as an intermediary between the attacking computer and the target computer. i.e. Hackers will setup proxychains with nmap when scanning their target hosts to hide their identities from law enforcement agencies and the host security.
Pre-requisites
- Have Kali linux installed.
- Have knowledge of using the terminal.
- Have an editor installed. (In this guide we will use a terminal based tool nano)
Proxychains features
- Proxychains allows us to use different types of proxies in the proxy list. The proxies don’t have to be in any order.ie. Different proxies can be mixed.
- It has and supports different chaining methods. Proxychains use three types of chains; string chain, random chain and dynamic chain method also known as smart option.
- Proxychains have support for HTTP, SOCKS 4 and SOCKS 5 proxy servers.
- DNS resolving through proxy is possible when using proxychains.
- Different TCP client applications can be handled when using proxychains.
Step 1: Getting proxies to setup proxychains
We need to get proxies to add in our proxychains configuration. The internet is a good source for free proxy services. We will be using proxyscrape to get free proxies for this tutorial. Proxyscrape has options to choose depending on what you want to use to ensure anonymity as shown on the image below.

In our case, we will be using SOCKS4 proxies for our proxylist. As you can see above, I have filtered proxies so that I am left with proxies that have a timeout of 50ms or lower. A lower timeout helps increase the speed of the connection.
Step 2: Using proxychains
We need to setup proxychains before we can use it. To edit and add new proxies to our proxy list, we need to edit proxychains.conf found on our system. To open proxychains.conf we will use “nano” which is a command line text editor tool using the below command.

Once we run the above command, we will be able to edit and add proxies to use in our proxy list.
Step 3: Adding proxies to the proxy list
We have our downloaded proxies list. We will copy them to our proxychain.conf for us to use them as shown below. By default, traffic is sent through 127.0.0.1 on port 9050 which is a default Tor configuration hence it should be commented out when we are not using Tor as we setup proxychains.

Types of chains in proxychain
In the configuration file, we have three different types of chaining to use when we setup proxychains. Each working different from the other as expalined below.
- Dynamic chain – In dynamic chain dead proxies will be skipped, all other proxies will be used in the chain.
- Strict chain — Strict chain uses all the proxies in the list in order. No proxy is skipped.
- Random chain – random combination of proxies in the proxies list is used. A user can be able to specify the number of proxies to be used. It is prefferred for Intrusion Detection Testing.
In order to use any of the chains, we have to edit them in the configuration file while we setup proxychains. We can also uncomment the chain_len as it helps us determine the number of proxies to use anytime we use proxychains.
We will be using dynamic chain so we edit our configuration to use dynamic chain and remove the default strict chain as shown in the image below by removing and adding “ # ”.

Step 4: Avoiding dns leak
While using proxychains, a dns leak may expose your real identity. To avoid such a scenario, proxychains has an option “ proxy_dns ” which helps avoid identity leaks. If the proxy_dns option is not active, dns will be resolved normally using your system and when active it will redirect dns resolution making it fairly more complicated.

Step 5: Running proxychains
After we finish to setup proxychains, we are now ready to use it to ensure anonymity as we scan our target host. We will add the command “proxychains” on each command we run targeting our host. For example, if we want to run a scan against our host using nmap, we will use the below command.
Conclusion
In this guide we have been able to setup proxychains to ensure our anonymity. Free proxy servers have been used to illustrate how to use proxychains. It should be noted that although free proxies will help to make you anonymous, it is recommended not to share personal information while using free proxies since we do not know who has control of the proxy servers our information is going through before it reaches its destination.
Sharing your personal information may lead to identity theft and other related online frauds.
As we setup proxychains, we should also check and remove the dead proxies and those that have a higher timeout to ensure the internet speed is relatively fast. It is recommended that we use private proxies. In some sophisticated attacks, the hackers use a pivoting method to attack systems which are not directly connected to the internet. A hacker will look for a machine within that system which is directly connected to the internet and use it at a pivot to attack the system.
Cyber laws will differ depending with the country where a proxy server is located. Using many proxy servers while we setup proxychains from around the world will make it difficult for law enforcement to trace an attacker due to differing cyber laws and jurisdiction used in different countries.
Didn’t find what you were looking for? Perform a quick search across GoLinuxCloud
If my articles on GoLinuxCloud has helped you, kindly consider buying me a coffee as a token of appreciation.

For any other feedbacks or questions you can either use the comments section or contact me form.
Thank You for your support!!
Leave a Comment Cancel reply
Ethical Hacking Tutorial
- Install Kali Linux
- Create Kali Linux bootable USB
- Dual boot Ubuntu with Kali Linux
- Install Kali Linux on VirtualBox
- Install Kali Linux on Raspberry Pi
- Install Kali Linux on Android
- Install Kali Linux on Apple M1 with UTM
- Setup Virtual PenTesting Lab
- Setup Android Pentesting Lab
- Setup Hacking Lab
- Manage Pentest Projects with Cervantes
- Nettacker — Automated Pentesting Framework
- MobSF: Android App Pentesting
- APKHunt: Android App Pentesting
- Hack Social Media Accounts — ZPhisher
- Analyze phishing email — Thephish
- Install Gophish phishing framework
- Gophish Phishing Campaign
- FiercePhish Phishing Campaign
- Snapchat Phishing using Grayfish
- Using SocialFish to Hack Credentials
- Social Engineering Toolkit Credentials Phishing
- Lockphish V2.0 PIN phishing attack
- Evil Twin WiFi Attack with Airgeddon
- Browser-in-the-Browser Attack
- Install Caine OS for Forensic Analysis
- Install Metasploit Framework
- Install OWASP Juice Shop
- Install DVWA
- Install Tor Browser
- Install Pyrit
- Embed payload in PDF File
- Embed Metasploit Payload on APK
- Payload Injection — Shellter
- Obfuscate Android Payload — ApkBleach
- Create windows undetectable payload — Technowlogger
- Learn hacking with Metasploitable
- Network Reconnaissance with Nmap
- BEeF Hacking Framework
- Intercept Network Traffic
- Track IP Address using Image
- Find Hidden Endpoints
- Using WiFi Honeypot for Ethical Hacks
- Hack Wi-Fi password
- Encode message in image — Steganography
- Shodan — The Search Engine for Hackers
- L3MON — Hack Android Mobile Remotely
- Torshammer — Perform DDoS attack
- Local File Inclusion Attack
- Using Xerosploit
- Using Arpspoof
- DVWA SQL Injection Exploitation
- DVWA Exploits
- Kali Vulnerability Scanner Tools
- WPScan: WordPress Vulnerability Scanner
- The Best 5 OSINT Tools
- Using Infooze Tool
- Using Mitaka Tool
- Create Reverse Shell
- WordPress Reverse Shell
- Subdomain Enumeration Tools
- SMTP Enumeration Tools
- DNS Enumeration Tools
- Wordlist Generator using Crunch
- Automate SSH Brute Force Attack
- Fuzzing Tools for Web Application Pentesting
- Bypass CSRF Protection
- Password Cracker — John The Ripper (JTR)
- Crack Hashed Password — Hashview
- Attack Login Forms with Burpsuite and THC-Hydra
- Perform Postgres DB Brute Force Attack
- Perform VNC Brute Force Attack
Пошаговая настройка прокси для Linux
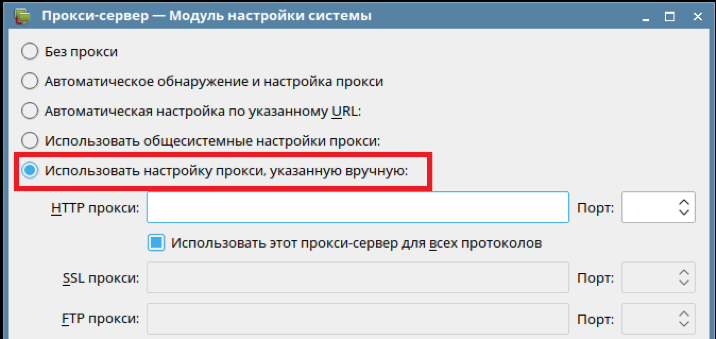
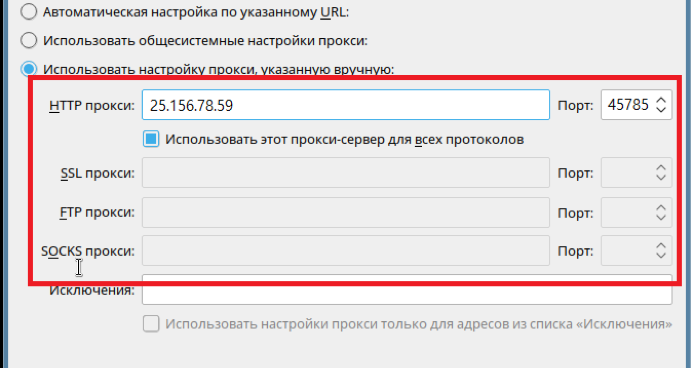
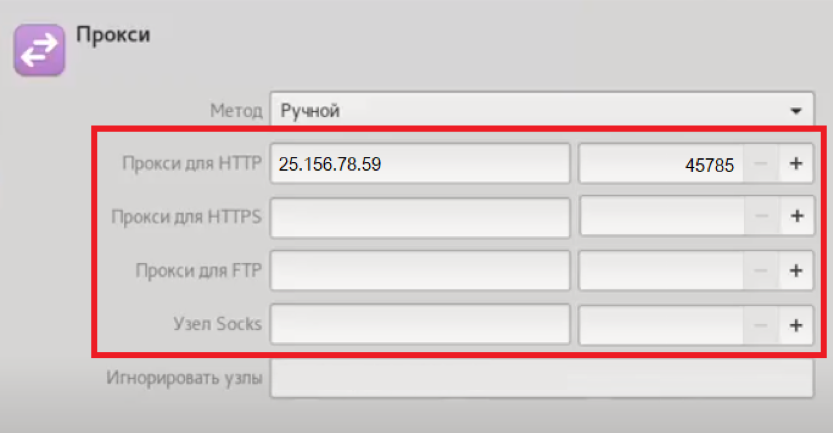
Операционные системы на базе Linux достаточно удобные и несложные в использовании, но не могут гарантировать пользователем полную безопасность в сети. Чтобы защитить своё устройство, вам нужен прокси для Linux. Прокси-сервер сменит ваш IP-адрес, обезопасит данные от взломов, поможет оставаться анонимным в Интернете и обходить любые ограничения.
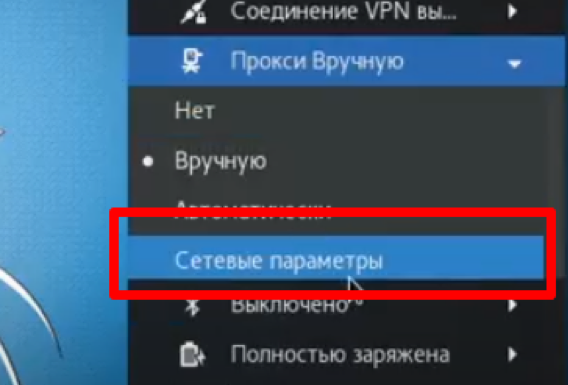
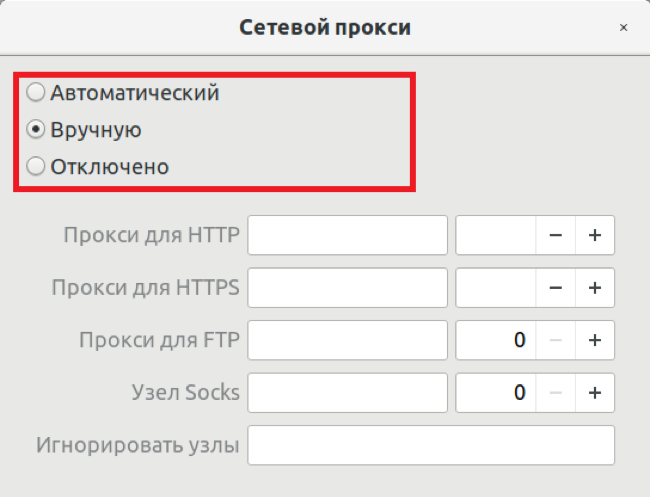
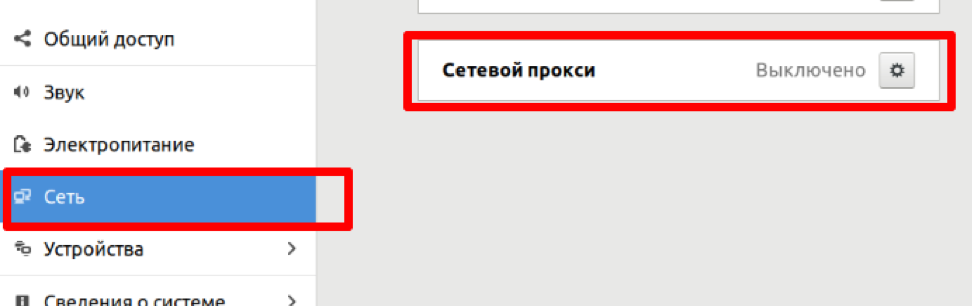
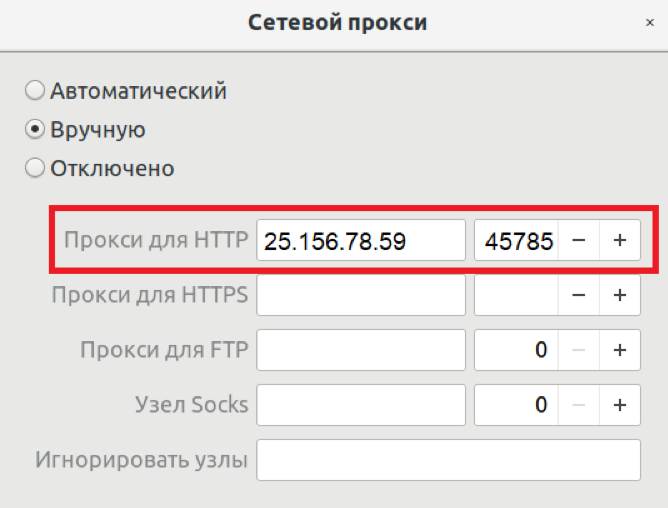
Мы покажем, как настроить прокси для ОП Linux через графический интерфейс.
Видеоинструкция по настройке прокси в Linux
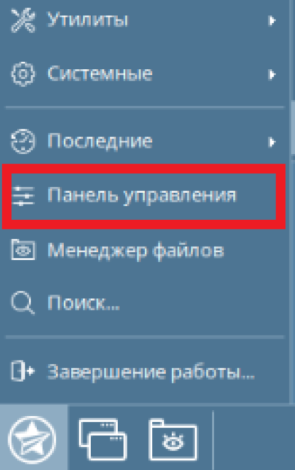
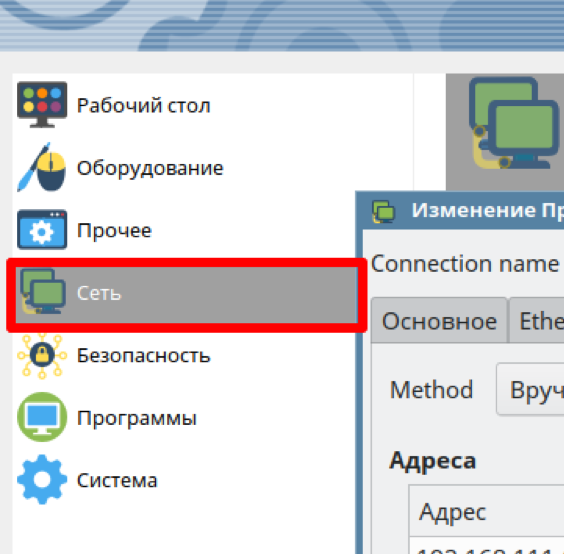
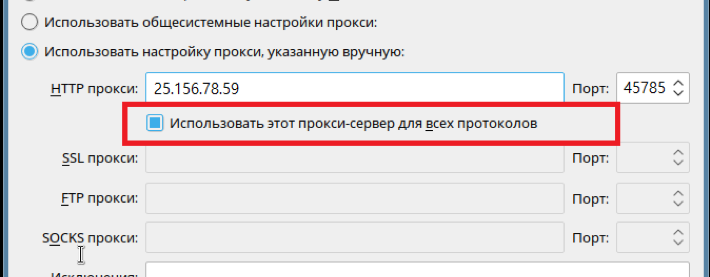
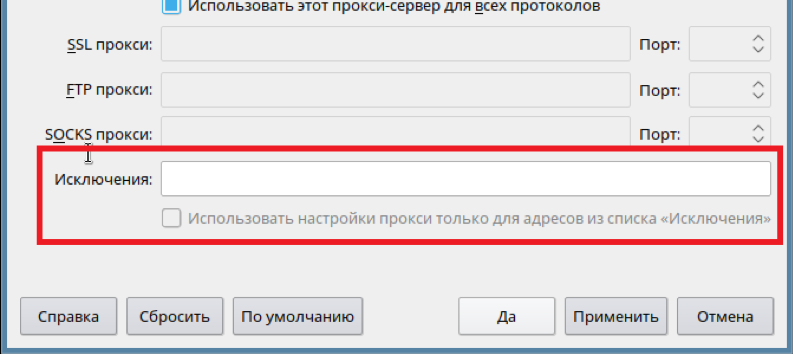
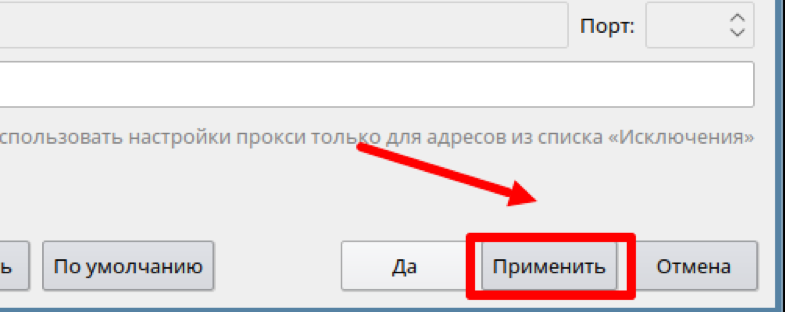
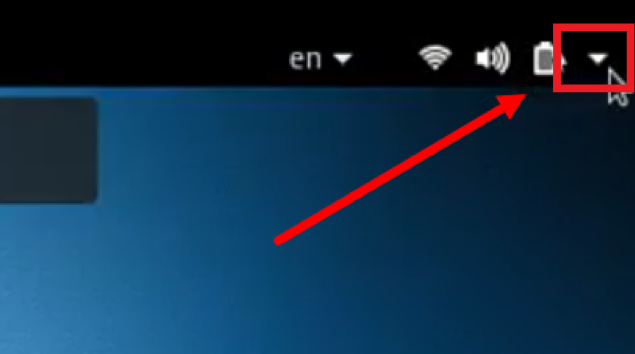
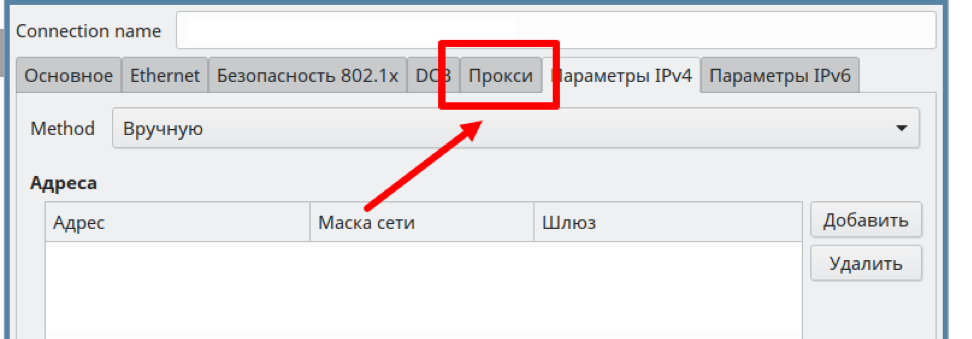
Настройка прокси в Astra Linux


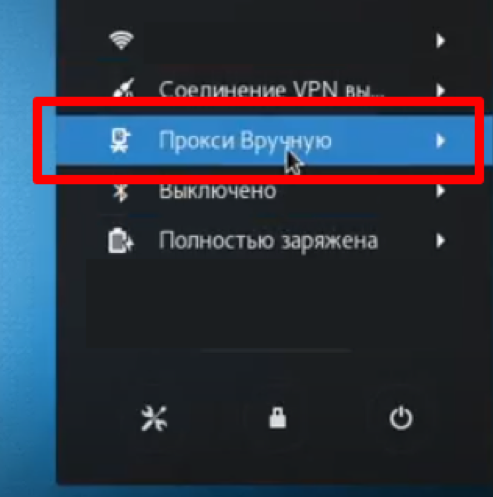
Настройка прокси в Kali Linux


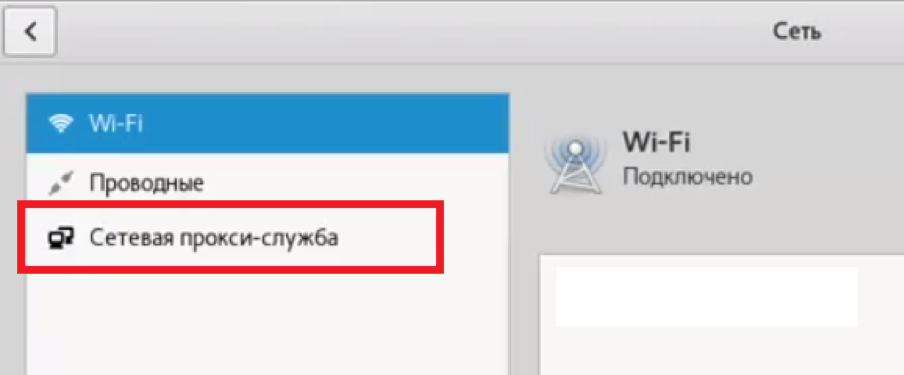
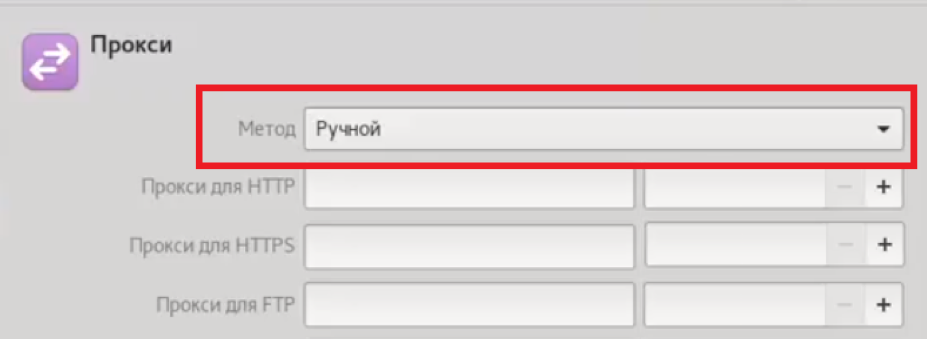
Настройка прокси в Ubuntu Linux


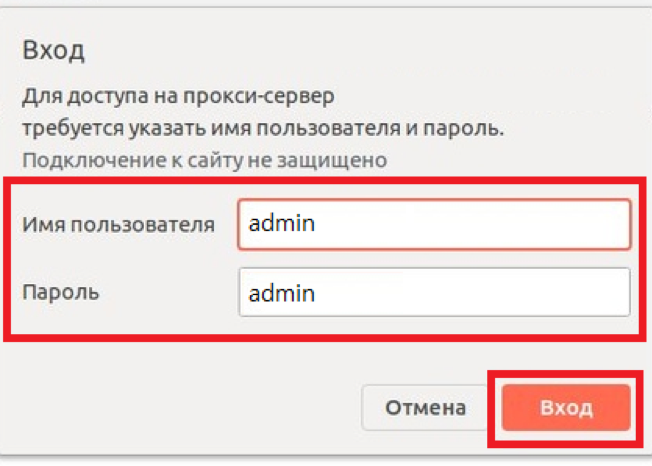
Теперь вы знаете, как настроить прокси в популярных ОП на базе Linux! Чтобы проверить, правильно ли вы установили прокси-сервер, откройте браузер и введите в строке поиска «Узнать IP-адрес» или «Какой мой IP-адрес» и выберите любой сайт, который вам понравится. Если IP на сайте и IP вашего прокси совпадают – установка прошла успешно!
Пошаговая настройка прокси для Linux
Операционные системы на базе Linux достаточно удобные и несложные в использовании, но не могут гарантировать пользователем полную безопасность в сети. Чтобы защитить своё устройство, вам нужен прокси для Linux. Прокси-сервер сменит ваш IP-адрес, обезопасит данные от взломов, поможет оставаться анонимным в Интернете и обходить любые ограничения.
Мы покажем, как настроить прокси для ОП Linux через графический интерфейс.
Видеоинструкция по настройке прокси в Linux
Настройка прокси в Astra Linux
Настройка прокси в Kali Linux
Настройка прокси в Ubuntu Linux
Теперь вы знаете, как настроить прокси в популярных ОП на базе Linux! Чтобы проверить, правильно ли вы установили прокси-сервер, откройте браузер и введите в строке поиска «Узнать IP-адрес» или «Какой мой IP-адрес» и выберите любой сайт, который вам понравится. Если IP на сайте и IP вашего прокси совпадают – установка прошла успешно!