- Kali linux net creds
- Kali Linux
- What’s Included in Kali Linux
- Windows
- Tools I Use That Need Adding to Windows
- Saved searches
- Use saved searches to filter your results more quickly
- License
- DanMcInerney/net-creds
- Name already in use
- Sign In Required
- Launching GitHub Desktop
- Launching GitHub Desktop
- Launching Xcode
- Launching Visual Studio Code
- Latest commit
- Git stats
- Files
- README.md
Kali linux net creds
All the software tools I use for penetration and security testing are free, and most of them are open source. I am always diligent in focusing on the free and open source tools, as it makes it easier:
- To pitch tooling acquisition to managers, and those that hold the purse strings
- To learn how the tools work and contribute to the security ecosystem
Kali Linux
In the words of Offensive Security (Creators of Kali Linux), Kali Linux is an advanced Penetration Testing and Security Auditing Linux distribution. For those that are familiar with BackTrack, basically Kali is a newer creation based on Debian rather than Ubuntu, with significant improvements over BackTrack.
Offensive Security Kali Linux is free and always will be. It is also completely open (as it is based on Debian) to modification of its OS or programmes.
Kali is also FHS compliant in that the file system complies to the Linux File-system Hierarchy Standard.
Wireless device support is vast, including wireless USB devices.
As with BackTrack 5, the Kali ISO also has an option to boot into forensics mode. No drives are written to (including swap) and no drives will be auto mounted upon insertion.
Some of the following recommendations have come from my blog post originally used in a PenTest Magazine article.
When it comes to actually installing Kali on hardware, there are a multitude of options available.
All externally listening services are disabled by default, but very easy to turn on if/when required. The goal is to reduce chances of detecting the presence of Kali.
Kali also provides a simple way to create your own ISO image from the latest source. You can include the packages you want and exclude the ones you don’t, you can also customise the kernel. The options are virtually limitless.
The default desktop environment in Kali 2.0 is Gnome3, but Kali also provides an easy way to configure which desktop environment you use.
The alternative options provided are: KDE, LXDE, XFCE, I3WM and MATE.
Kali has really embraced the Debian ethos of being able to be run on pretty well any hardware with extreme flexibility. This is great to see.
What’s Included in Kali Linux
There are more than 300 security programmes packaged with the operating system. Before installation you can view the tools included in the Kali repository, or once installed, by issuing the following command:
Provide USB privileges to guest:
First of all, you need to add the user that controls the guest to the vboxusers group on the host, so that VMs can control USB devices. Be sure to logout of the host, then log back in.
Provide USB recognition to guest:
Install the appropriate VirtualBox Extension Pack on to the host. These packs can be found here (https://www.virtualbox.org/wiki/Downloads) for the most recent,
and older builds here: (https://www.virtualbox.org/wiki/Download_Old_Builds_5_0). Do not forget to checksum the pack before you add the extension. The version of the extension pack must match that of the VirtualBox installed. Now in your guest, check to see if you have the appropriate linux-headers package installed. If you do not, run the following:
- apt-get update
- apt-get upgrade
- apt-get dist-upgrade
- apt-get install linux-headers-$(uname -r)
- Shutdown Linux guest OS
- Apply extension to VirtualBox in the host at: File -> Preferences -> Extensions
Blacklist Wi-Fi Module on Host:
Unload the ath9k_htc module to take effect immediately, and blacklist it so that it does not load on boot. The module needs to be blacklisted on the host in order for the guest to be able to load it. Now we need to check to see if the module is currently loaded on the host with the following command:
We are looking for ath9k_htc . If it is visible in the output produced from the previous command, unload it with the following command:
Next you will need to create a blacklist file in /etc/modprobe.d/
Create /etc/modprobe.d/blacklist-ath9k.conf and add the following text into it and save:
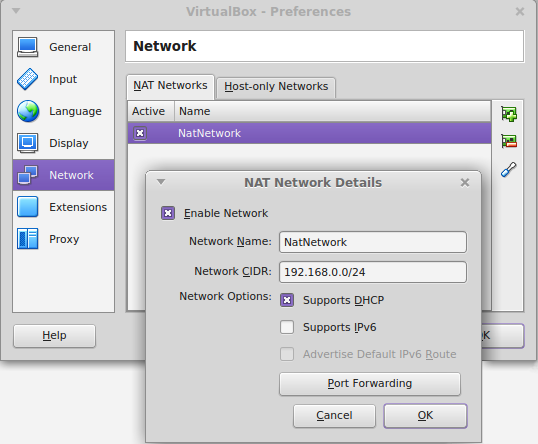
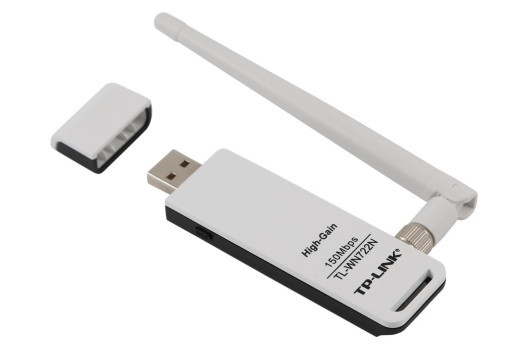
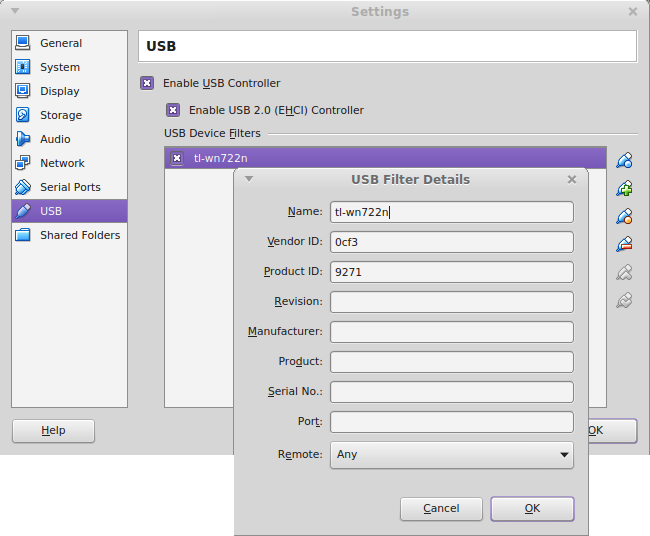
I had to do the following step on Kali 1.1, but it seems it is no longer necessary in Kali 2016.1 rolling. If you are still on 1.1, go into the settings of your VM -> USB -> and add a Device Filter. I named this tl-wn722n and added the Vendor and Product IDs we discovered with lsusb . Make sure Enable USB 2.0 (EHCI) Controller is also enabled.
Test:
Plug your Wi-Fi adapter into your laptop.
In the Devices menu of your guest -> USB Devices, you should be able to select the ATHEROS USB2.0 WLAN adapter.
Run dmesg | grep htc , you should see something similar to the following printed:
[4.648701]usb2-1: ath9k_htc: Firmware htc_9271.fw requested[4.648805]usbcore: registered new interface driver ath9k_htc[4.649951]usb2-1: firmware: direct-loading firmware htc_9271.fw[4.966479]usb2-1: ath9k_htc: Transferred FW: htc_9271.fw, size:50980[5.217395]ath9k_htc2-1:1.0: ath9k_htc: HTC initialized with33credits[5.860808]ath9k_htc2-1:1.0: ath9k_htc: FW Version:1.3
You should now be able to select the phone’s wireless hot-spot you want to connect to in network manager.
Windows
We will be exploiting Windows machines and networks in Fascicle 1, so for that, you will need a Windows 7, optional Windows 10, and any other Windows Operating Systems you can get set-up to help you hone your knowledge of the systems, how to defend and attack them. Most of the tools I have used have been installed / set-up on a Windows 7 VM. This way we can use the VM for both offence and exploitation. Then just restore to a previous snapshot after each test.
Tools I Use That Need Adding to Windows
I now take a backup in case I need to revert. With VirtualBox it is very easy to take a snap-shot that can be reverted to at any time. Snap-shots are excellent for returning to a known state between penetration tests. Testing is not really testing at all unless you can reproduce the same results during each test. Starting from a known state is essential for this.
MinGW
I tried installing this in July of 2015 and ran into troubles (detailed under the Hyperion section), looks like they have applied a fix now though. The following worked for me:
- First of all have a read of http://www.mingw.org/wiki/Getting_Started
- Then downloaded and install MinGW from http://sourceforge.net/projects/mingw/, we just need gcc selected
- I also read http://www.mingw.org/wiki/HOWTO_Install_the_MinGW_GCC_Compiler_Suite for some more information
- I also needed to add C:\MinGW\bin to my System Path
Hyperion
In July of 2015, this was my process:
I started following these directions: http://e-spohn.com/blog/2012/08/02/pe-crypters-hyperion/.
Kali does not have g++ in /root/.wine/drive_c/MinGW/bin/ but I did not see any point in installing it into wine as it would still have the same issues it had on windows.
I followed the directions on setting up the MinGW compiler to compile hyperion, this did not work, I kept getting errors.
I made a fix on one of the files (http://www.gaia-gis.it/spatialite-2.4.0-3/mingw_how_to.html#libgeos), but kept getting more errors, and just ended up copying the Hyperion-1.2 from http://nullsecurity.net/tools/binary.html to the Windows 7 desktop.
I installed MinGW from http://sourceforge.net/projects/mingw/, but did not end up using it as it had to many errors.
It was missing a file libgcc_s_dw2-1.dll from C:\MinGW\bin\ so I got this from the archive here: http://sourceforge.net/projects/mingw/files/MinGW/Base/gcc/Version4/Previous%20
Release%20gcc-4.4.0/ as discussed here: http://stackoverflow.com/questions/14502080/missing-libgcc-s-dw2-1-dll-error-when-launching-mingw-compiled-exe. Then after reading this: http:
//mingw-users.1079350.n2.nabble.com/Question-libgmp-10-dll-not-found-td7443661.html realised that to get hyperion to run, I would be best to copy libgcc_s_dw2-1.dll and libstdc++-6.dll from C:\MinGW\bin to C:\Users\testaccount\Desktop\Hyperion-1.2
Now in 2017 MinGW is installing and running without problem, it should be a simple case of just downloading, checking the MD5 sum, although it is not over HTTPS, Join their IRC channel to confirm the MD5 sum, extract and run make and you should have the binary.
psmsf
Useful for creating PowerShell payloads with embedded Metasploit payloads via msfvenom.
git clone https://github.com/nixawk/psmsf.git /opt/psmsf
Nishang
These are also a collection of PowerShell scripts useful for exploitation and post-exploitation.
git clone https://github.com/samratashok/nishang.git C:/Source/nishang
PowerSploit
PowerSploit includes PowerShell scripts for all phases of an assessment.
Saved searches
Use saved searches to filter your results more quickly
You signed in with another tab or window. Reload to refresh your session. You signed out in another tab or window. Reload to refresh your session. You switched accounts on another tab or window. Reload to refresh your session.
Sniffs sensitive data from interface or pcap
License
DanMcInerney/net-creds
This commit does not belong to any branch on this repository, and may belong to a fork outside of the repository.
Name already in use
A tag already exists with the provided branch name. Many Git commands accept both tag and branch names, so creating this branch may cause unexpected behavior. Are you sure you want to create this branch?
Sign In Required
Please sign in to use Codespaces.
Launching GitHub Desktop
If nothing happens, download GitHub Desktop and try again.
Launching GitHub Desktop
If nothing happens, download GitHub Desktop and try again.
Launching Xcode
If nothing happens, download Xcode and try again.
Launching Visual Studio Code
Your codespace will open once ready.
There was a problem preparing your codespace, please try again.
Latest commit
Git stats
Files
Failed to load latest commit information.
README.md
Thoroughly sniff passwords and hashes from an interface or pcap file. Concatenates fragmented packets and does not rely on ports for service identification.
- URLs visited
- POST loads sent
- HTTP form logins/passwords
- HTTP basic auth logins/passwords
- HTTP searches
- FTP logins/passwords
- IRC logins/passwords
- POP logins/passwords
- IMAP logins/passwords
- Telnet logins/passwords
- SMTP logins/passwords
- SNMP community string
- NTLMv1/v2 all supported protocols: HTTP, SMB, LDAP, etc.
- Kerberos
Auto-detect the interface to sniff
Choose eth0 as the interface
sudo python net-creds.py -i eth0
Ignore packets to and from 192.168.0.2
sudo python net-creds.py -f 192.168.0.2
python net-creds.py -p pcapfile
sudo easy_install pip sudo pip install scapy sudo pip install pcapy brew install libdnet --with-python mkdir -p /Users/username>/Library/Python/2.7/lib/python/site-packages echo 'import site; site.addsitedir("/usr/local/lib/python2.7/site-packages")' >> /Users/username>/Library/Python/2.7/lib/python/site-packages/homebrew.pth sudo pip install pypcap brew tap brona/iproute2mac brew install iproute2mac Then replace line 74 ‘/sbin/ip’ with ‘/usr/local/bin/ip’.