- Kali linux on android root
- 1. NetHunter support and pre-built images
- 2. Putting your device in “Developer Mode”
- 3. — 5. Unlocking, rooting, and installing a custom recovery on your android device
- 6. Flashing Universal DM-Verity & ForceEncrypt Disabler
- 7. — 9. Installing the NetHunter Image
- How To Install Kali Linux On Android (Step-By-Step Guide)
- Requirements To Install Kali Linux On Android (With Root)
- Steps To Install Kali Linux on Android With Root
- How to install kali linux on android without root
- Install kali linux on android step by step no root
- How To Install Kali Linux With Limbo PC Emulator
- How To Install Kali Linux Using Termux
- Conclusion:
- Kali linux on android root
- Prerequisite:
- Installation:
- Usage:
- NetHunter Editions:
- Tips:
Kali linux on android root
Installing NetHunter requires the following steps:
1. NetHunter support and pre-built images
You can confirm that your device and Android version is supported via our gitlab live reports: List of quarterly published NetHunter images NetHunter kernel statistics NetHunter kernel table with
The NetHunter team builds and publishes images for a selected list of devices, on the official NetHunter download page.
If you devices is supported by NetHunter but not available as a pre-build image, you can easily build your own image by following the steps in our “Building NetHunter” documentation
2. Putting your device in “Developer Mode”
Before the installation begins, you must enable Developer mode on your device. This is done by navigating to Settings -> About and tapping on the Build number field 7 times until you receive the notification that developer mode has been enabled. Go back to the main settings page and you will have a new section titled Developer options. Tap on the new Developer options section and enable both the Advanced Reboot and Android Debugging options.
3. — 5. Unlocking, rooting, and installing a custom recovery on your android device
NetHunter supports over 60 different devices running Android versions from Kitkat though to Android Q. Whilst we have standardised the NetHunter installation procedure, the steps to unlock, root, and install a custom recovery varies from device to device and even differs between Android versions. The preferred custom recovery for NetHunter is TWRP. The preferred software to root the device for NetHunter is Magisk. Please refer to the appropriate guide to unlock, root, and install a custom recovery on your device from your preferred internet resource, such as the XDA Developers Forum
6. Flashing Universal DM-Verity & ForceEncrypt Disabler
IMPORTANT NOTE for Android 9, 10, & 11 users: Please ensure that you flash the Universal DM-Verity, ForceEncrypt Disabler and format the data partition prior to installing NetHunter. Magisk does not support user context changes on encrypted data partitions, which leads to errors when connecting to the Kali rootfs via ssh (i.e. “Required key not available”) if the data partition is encrypted.
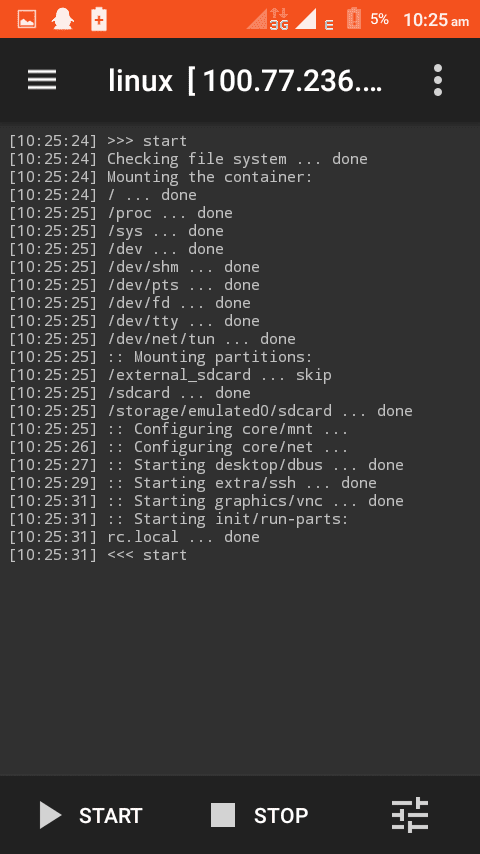
7. — 9. Installing the NetHunter Image
Now that your Android phone is ready, transfer the NetHunter image to it, reboot in recovery mode, and flash the zip on your phone. Once done, reboot and launch the NetHunter app to complete the setup!
IMPORTANT NOTE for Android 10 & 11 users: Please update the NetHunter app from the NetHunter store after flashing NetHunter. Android 10 introduced “scoped storage” restrictions which prevents NetHunter from using the storage location we traditionally used to save configuration files. We are in the process of moving the location and implementing an import/export function but updating the app after flashing NetHunter provides a workaround that allows us to continue accessing the current storage location until the new features are implemented.
Updated on: 2023-Mar-06
Author: re4son
How To Install Kali Linux On Android (Step-By-Step Guide)
As You Know Kali Linux is the Most popular Linux Distribution Used For Pentesting, and it is widely used by Security Researchers, Ethical Hackers and even Cyber Criminals.
Now In This Tutorial Let’s See How We Can Install The Kali Linux Distribution In Our Android SmartPhone with Root and Without Root
There is a tutorial on installing Kali Linux in android by official Kali Linux you can read it here
But the tutorial is only for root users
Let’s Explore Our Top 3 Ways To Install Kali On Android Without Root & With Root
Requirements To Install Kali Linux On Android (With Root)
- Android Device with at Least 5 GB Free Space, RAM at Least 1GB
- A Speed Internet Connection
- Device Must Be Fully Charged
- Root Access
- BusyBox Must Be Installed
We can Install Kali Linux Without Root, Firstly Let’s See How To Install With Root
Steps To Install Kali Linux on Android With Root
Step1: Download And Install Busybox Installer from Playstore, and Install The Compatible Version Of BusyBox On your Android,
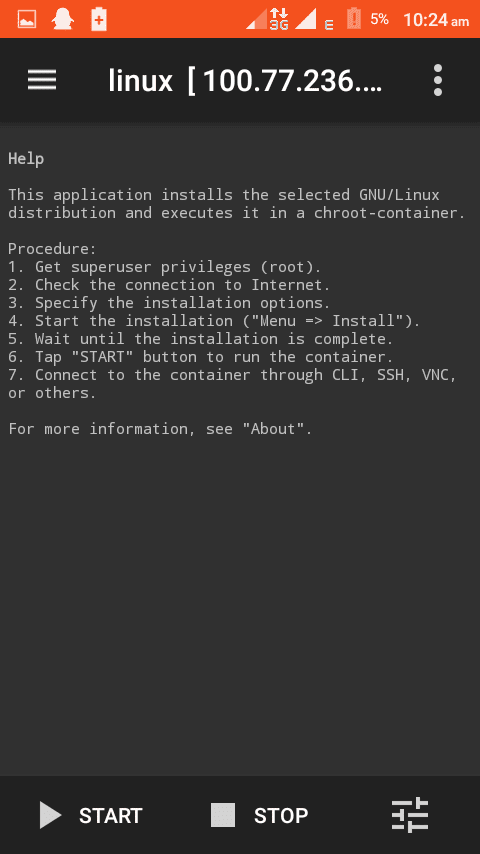
Step2: Now Download and Install Linux Deploy from Playstore
• After Installing, Open Linux Deploy and Click On Three Dots (On Bottom Right Side) as Shown In the screenshot
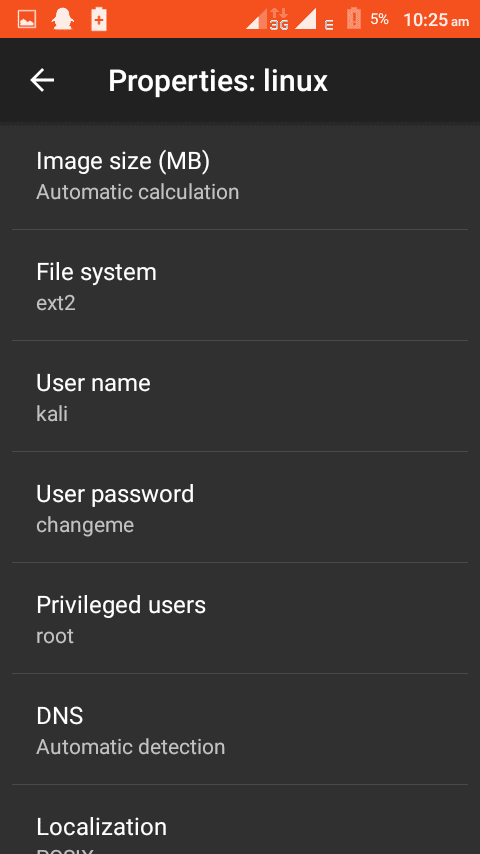
• In The Distribution section Select Kali Linux,

• Scroll Down And Define your desired Username and Password In The Username and Password Fields
• Now Save All The Settings
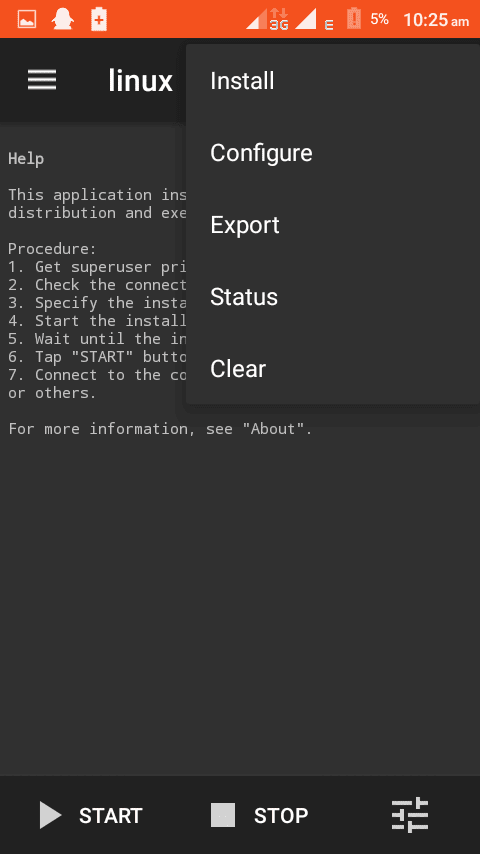
• Now Click On Three Dots, you will see Install just Tap on It
• It will take 5-10 Minutes to Install Kali Linux On Your Android, after installation success, click on Start Button
• Now You Have To Install VNC Viewer From Play store
• After Installing, Goto Linux Deploy and Click On Start Button
• Now Goto VNC Viewer App and make a new connection, In The Address Field type localhost and Name Field as Kali Linux
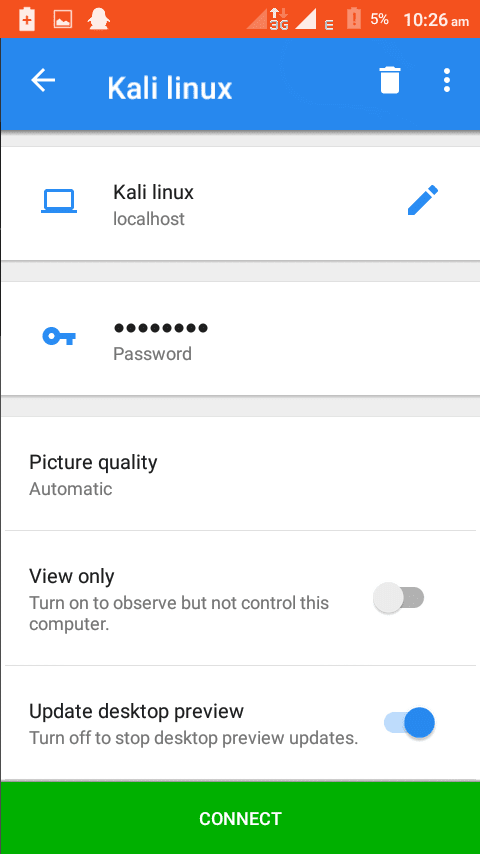
• Now Tap On Connect, you will be asked to enter username and password, just enter the username and password which you have chosen
Finally, click on connect, that’s all you will be able to use Kali Linux On Your Android

How to install kali linux on android without root
In the past Root Is Required To Install Kali Linux On any Android Device, But Now You Can Install Kali Linux on Android Without Rooting Your Android
Install kali linux on android step by step no root
There are two more ways to Install Kali Linux without Root
Let’s see
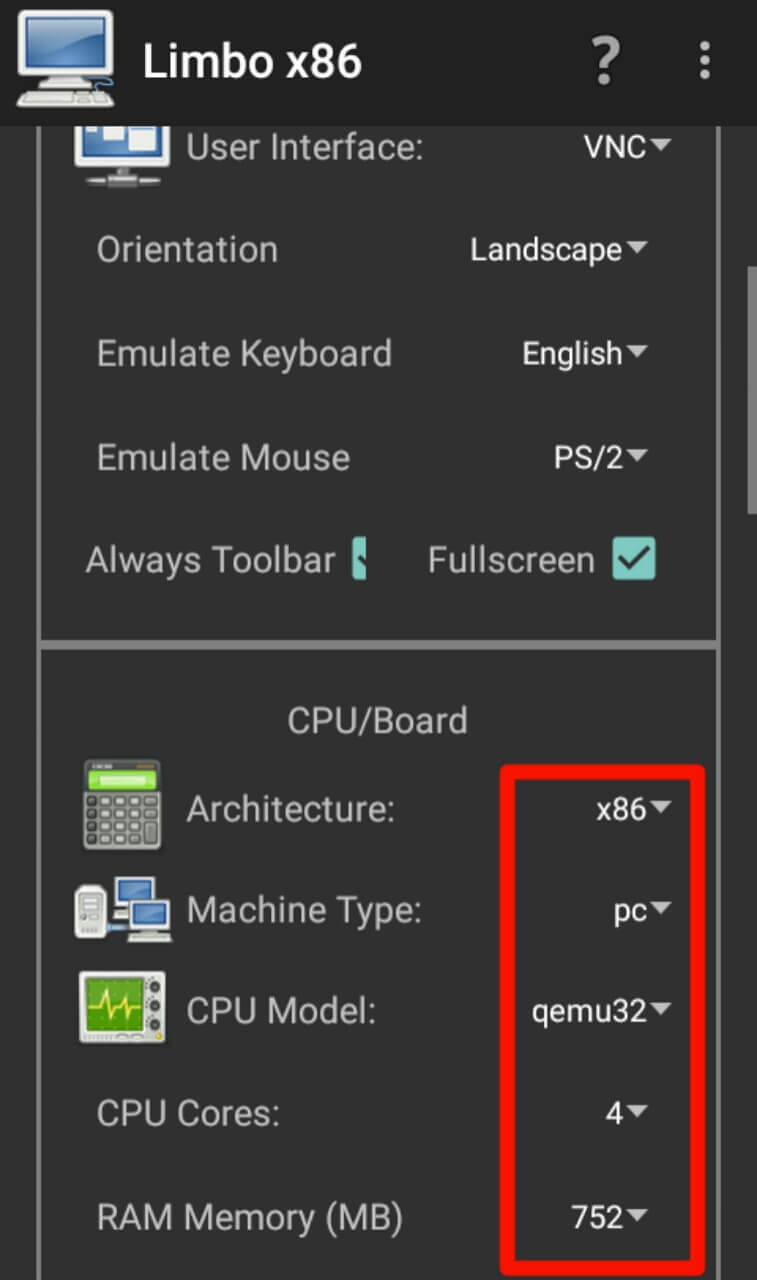
How To Install Kali Linux With Limbo PC Emulator
The Limbo PC Emulator is a Good PC Emulator For Android, which we are going to run Kali Linux through it
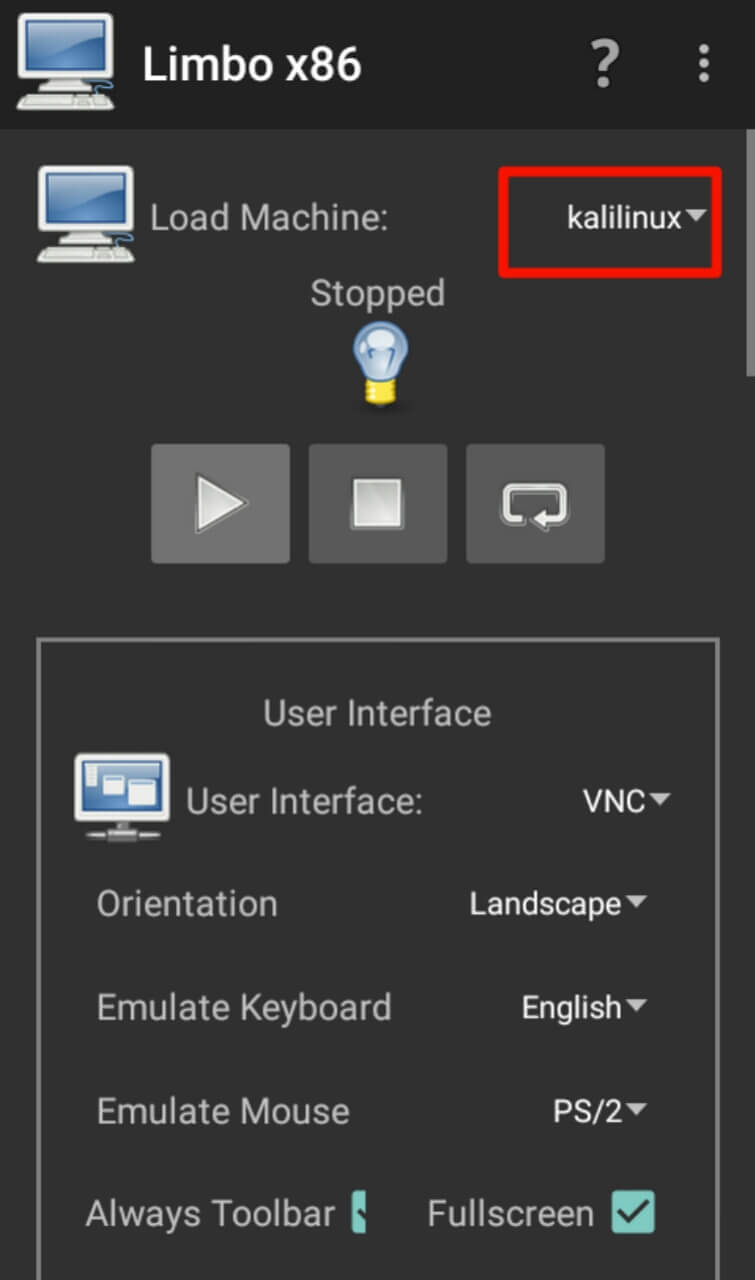

Note:
Different Devices supports different methods of booting, if booting fails then select booting from Different Methods
You can do the same by using Bochs Android App
Firstly download and install Bochs from play store

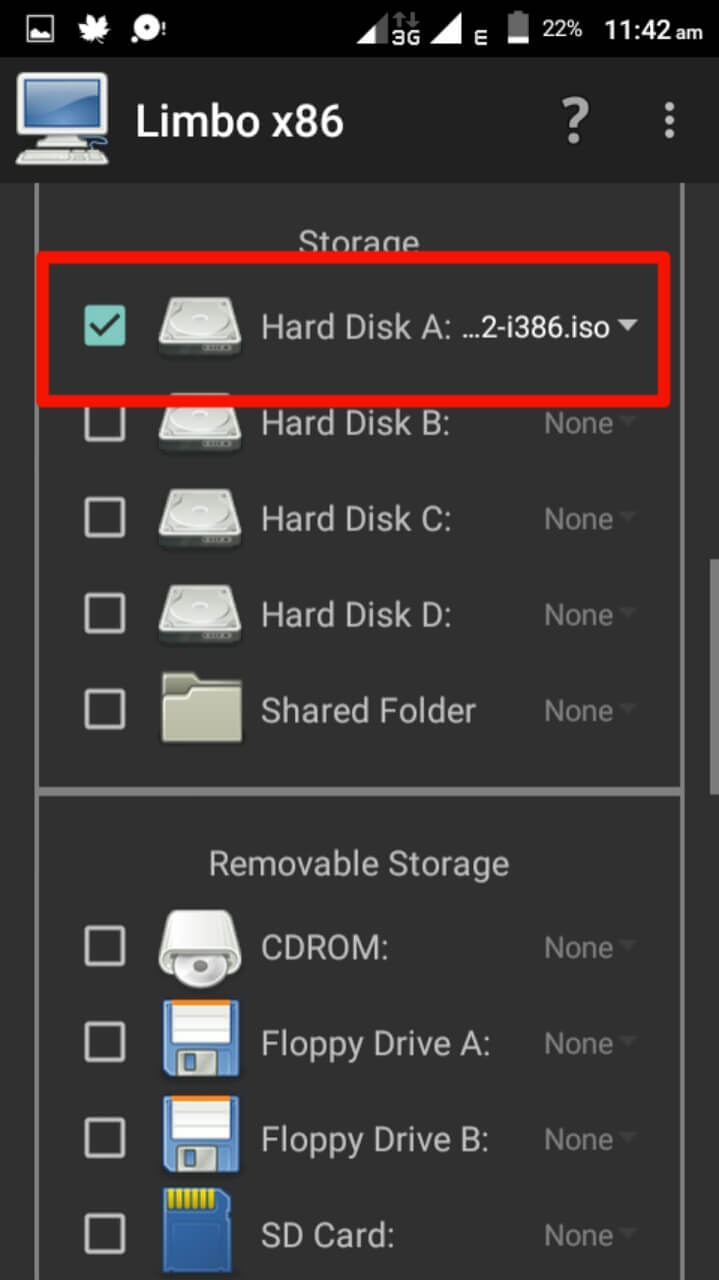
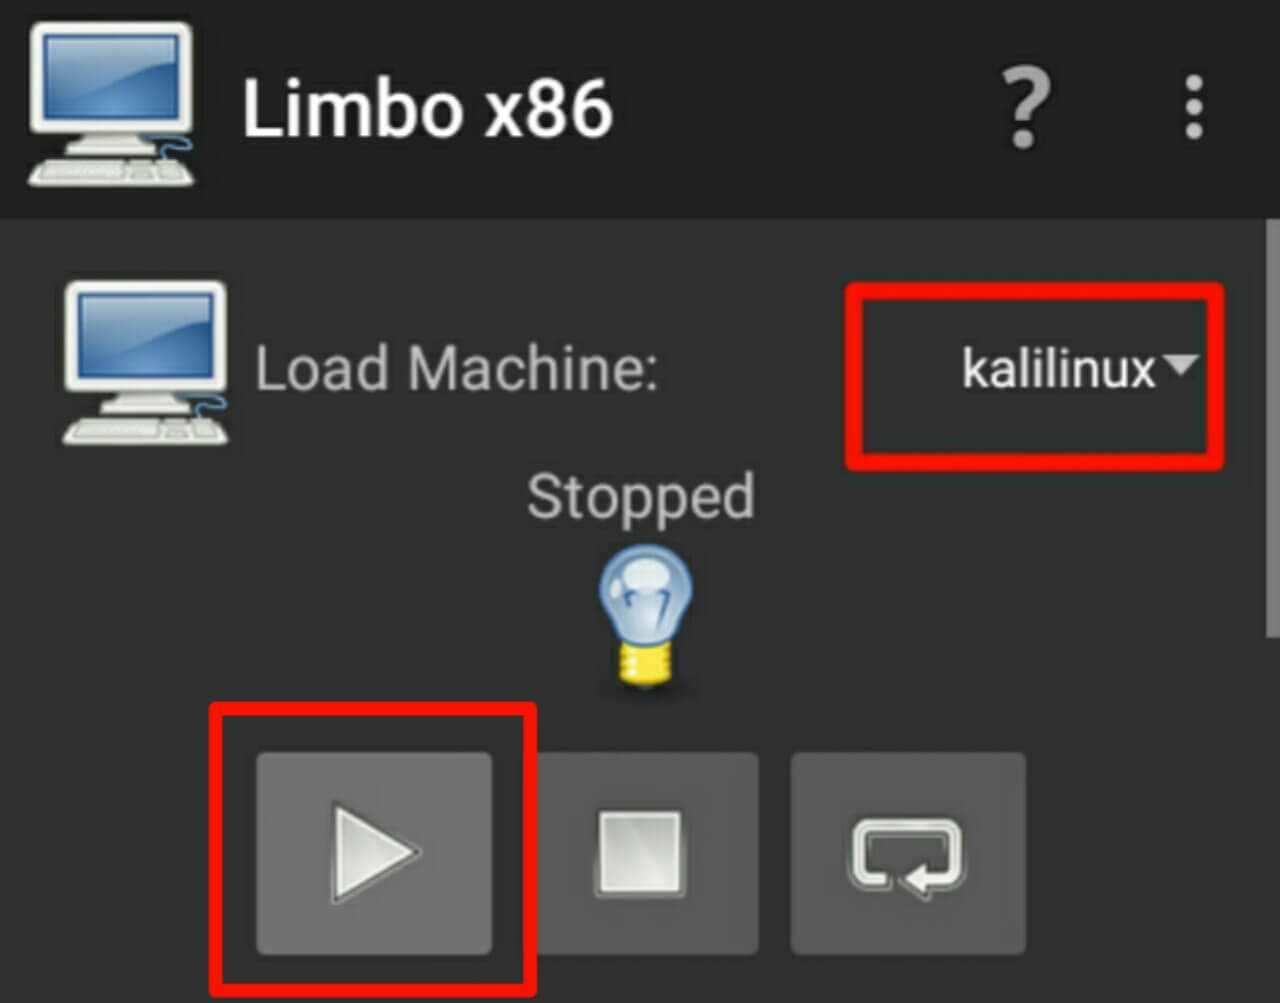
After that, open Bochs And On The Storage Tab Tick on ata0-master
And Select Cdrom then Select the Kali Linux iso file
In the Boot Section Select CD Rom

Assign The RAM You wanna use for Kali Linux
After that just click on the Start Button (In The Top Right Corner)
That’s all You Will Be Able To Use Kali Linux On Android without Rooting
How To Install Kali Linux Using Termux
If you’re wondering how to install kali linux on termux then this section is for you
Now we can install kali linux in android by using termux that too without root
Just Follow below simple steps to install and know how to use kali linux in termux
•You must have at least 2GB Free Space on Your Device
•You have to Install Termux and Anlinux App From Playstore
•Device Must be Fully Charged
Then Open Anlinux and Click on Dashboard
And Choose Kali as the Destro and you will get the commands
just click on copy
Now Open Termux and Paste the Commands in Termux and hit Enter
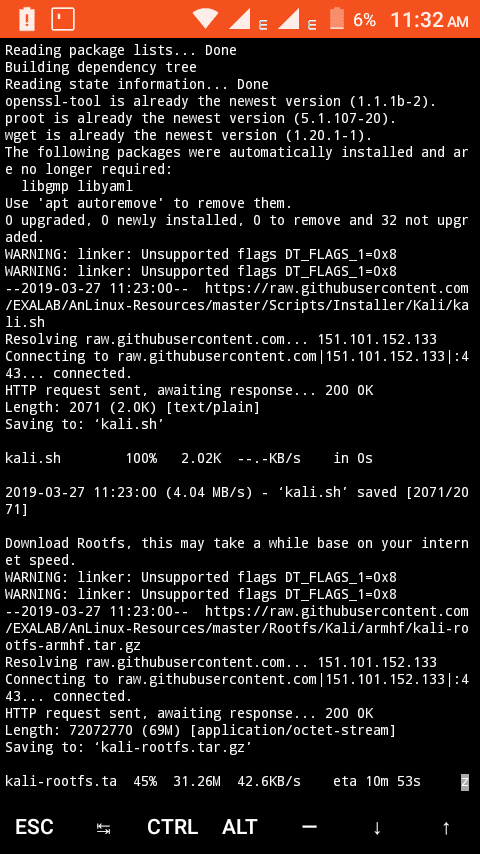
it will take some time to install kali
After Successful installion you will be able to start kali by typing
In the same way you can install Parrot Os, Arch Linux, Ubuntu and many other popular os in your android
just have a look at the dashboard in Anlinux App
Now we need Kali Desktop Environment so Open Anlinux App and Click On Dashboard

then select Environment to Xfce4

You Will Get the Commands just click on copy
Now Open Termux and start kali by typing
./start-kali.sh
it will take some time to install kali desktop image

after successful installation, You have to select language, Keyboard Type and set a password
if you have done the above then you can start the vnc server by typing
Note:
The command vncserver-start
must be typed inside the kali machine, ie. after starting kali by ./start-kali.sh
vncserver-stop command is used to stop vnc server
Now Download VNC Viewer From Playstore
and Make a new connection
In the address field type localhost:1
and give any name as you wish

Boom.. You are able to use kali linux on android through Termux
Conclusion:
Hope You Guys, liked our tutorial on how to install kali linux on android , if you face any problem During Installation of Kali Linux on your Android, then feel free to comment below
Kali linux on android root
Install Kali NetHunter on any stock, unrooted Android device without voiding the warranty.
Prerequisite:
Android Device (Stock unmodified device, no root or custom recovery required)
Installation:
- Install the NetHunter-Store app from store.nethunter.com
- From the NetHunter Store, install Termux, NetHunter-KeX client, and Hacker’s keyboardNote:The button “install” may not change to “installed” in the store client after installation — just ignore it.Starting termux for the first time may seem stuck while displaying “installing” on some devices — just hit enter.
- Open Termux and type:
[email protected]:~$ termux-setup-storage [email protected]:~$ pkg install wget [email protected]:~$ wget -O install-nethunter-termux https://offs.ec/2MceZWr [email protected]:~$ chmod +x install-nethunter-termux [email protected]:~$ ./install-nethunter-termux Usage:
Open Termux and type one of the following:
| Command | To |
|---|---|
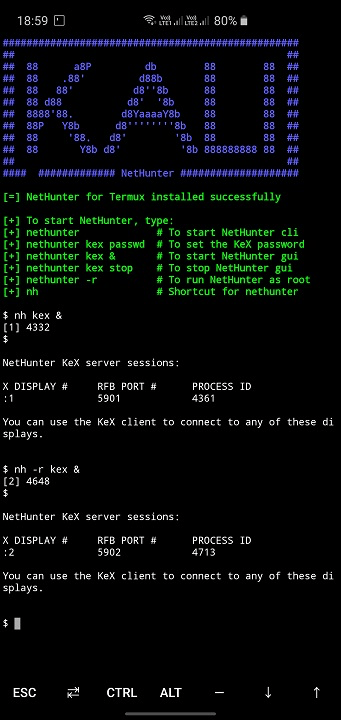
| nethunter | start Kali NetHunter command line interface |
| nethunter kex passwd | configure the KeX password (only needed before 1st use) |
| nethunter kex & | start Kali NetHunter Desktop Experience user sessions |
| nethunter kex stop | stop Kali NetHunter Desktop Experience |
| nethunter | run in NetHunter environment |
| nethunter -r | start Kali NetHunter cli as root |
| nethunter -r kex passwd | configure the KeX password for root |
| nethunter -r kex & | start Kali NetHunter Desktop Experience as root |
| nethunter -r kex stop | stop Kali NetHunter Desktop Experience root sessions |
| nethunter -r kex kill | Kill all KeX sessions |
| nethunter -r | run in NetHunter environment as root |
Note: The command nethunter can be abbreviated to nh . Tip: If you run kex in the background ( & ) without having set a password, bring it back to the foreground first when prompted to enter the password, i.e. via fg — you can later send it to the background again via Ctrl + z and bg
To use KeX, start the KeX client, enter your password and click connect Tip: For a better viewing experience, enter a custom resolution under “Advanced Settings” in the KeX Client
NetHunter Editions:
Please refer to this table for a comparison of the different NetHunter editions.
Tips:
- Run sudo apt update && sudo apt full-upgrade -y first thing after installation to update Kali. If you have plenty of storage space available you might want to run sudo apt install -y kali-linux-default as well.
- All of the penetration testing tools should work but some might have restrictions, e.g. metasploit works but doesn’t have database support. If you discover any tools that don’t work, please post it in our forums.
- Some utilities like “top” won’t run on unrooted phones.
- Non-root users still have root access in the chroot. That’s a proot thing. Just be aware of that.
- Galaxy phone’s may prevent non-root users from using sudo. Just use “su -c” instead.
- Perform regular backups of your rootfs by stopping all nethunter sessions and typing the following in a termux session: tar -cJf kali-arm64.tar.xz kali-arm64 && mv kali-arm64.tar.xz storage/downloads That will put the backup in your Android download folder. Note: on older devices, change “arm64” to “armhf”
- Please join us in our forums to exchange tips and ideas and be part of a community that strives to make NetHunter even better.
Updated on: 2023-Mar-06
Author: re4son