- How to reset a Windows password
- How to burn LIVE Kali Linux image
- How to boot from a flash drive
- Password Reset Program for Windows
- How to reset Windows 10 user password
- How to activate admin user in Windows 10
- Conclusion
- Related articles:
- Reset Windows 10 Local Password with Kali Linux Live USB
- Make a Kali Bootable USB Drive
- Boot with Kali Linux USB
- Reset Windows 10 Local Password
- Ready to try or buy?
- Related Articles
How to reset a Windows password
In this article, you will learn how to reset a forgotten Windows password.
Forgotten Windows password brings a lot of trouble, first of all, you cannot log in Windows. In addition, if the files on the disks are encrypted with a Windows password, then it is impossible to access (extract or copy) them even if you boot from the LIVE system – in this case there is only one way out – to reset the Windows password.
In this tutorial you will learn:
- how to reset Windows user password
- how to unlock a locked (disabled) Windows user account
- how to escalate user privileges, how to make any Windows user an administrator
- how to add users to group
- how to remove users from group
- how to edit registry of switched off Windows
The algorithm of actions is as follows:
- burn LIVE distribution Kali Linux on a USB flash drive
- disable Secure boot and Fast boot in BIOS
- boot from LIVE system
- reset a forgotten Windows password. Alternative: Activate an Administrator Account
- (if the Administrator was activated) boot as Administrator and change the user password
Each step is described as detailed as possible – you will definitely succeed. We need a USB flash drive with 3 or more Gigabytes, or an external (USB) drive.
The instruction may seem quite voluminous, but it is a 100% working way to log into Windows if you forget the password.
How to burn LIVE Kali Linux image
Go to the official Kali Linux page: https://www.kali.org/downloads/
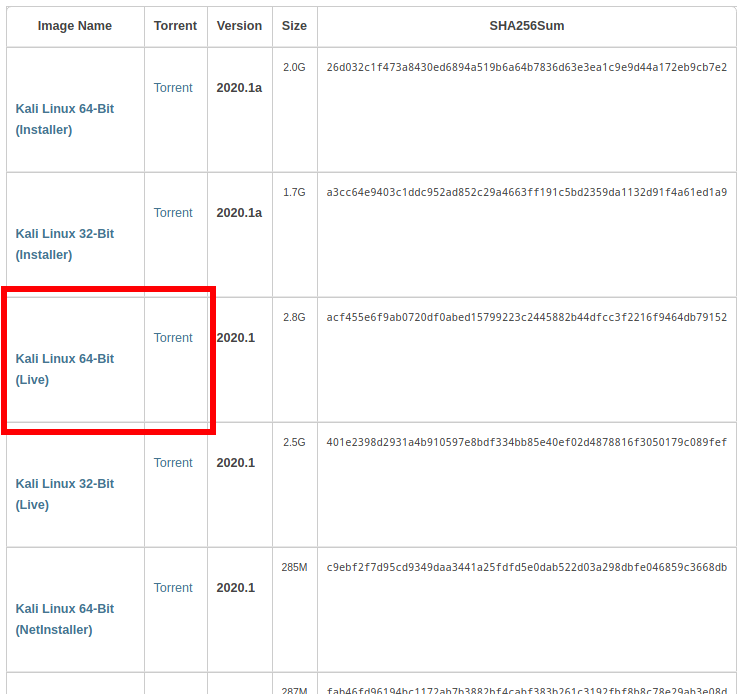
Find Kali Linux 64-Bit (Live) there and download the torrent.
Now go to the Etcher program website https://www.balena.io/etcher/ and download it:

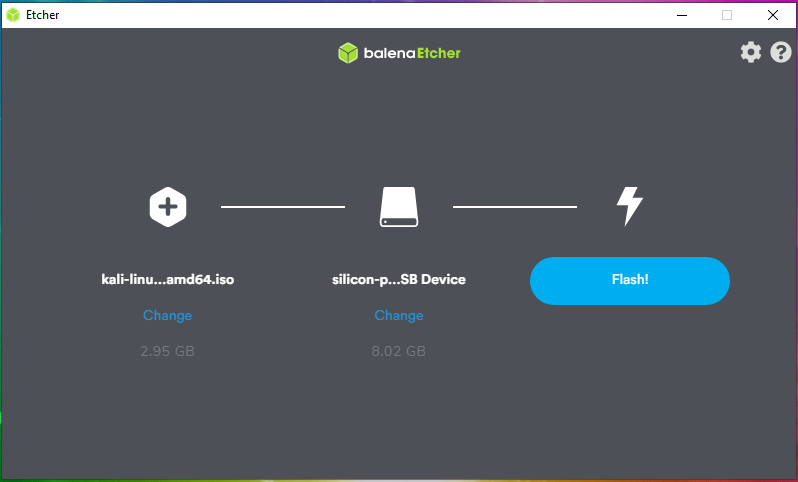
Plug in your USB flash drive, launch Etcher, select the downloaded Kali Linux LIVE ISO image, then just click the Flash! button and wait for the completion.
How to boot from a flash drive
Now we need the following:
1) disable Secure boot and Fast boot in EFI (BIOS)
2) select a USB flash drive with Kali Linux as the boot disk
Secure boot and Fast boot are only present in EFI – this is such a new BIOS. If you have an ancient computer, then these settings may be missing and you do not need to disable them.
Go into the BIOS – on different laptops and motherboards this can be done in different ways, as a rule, for this at the very beginning of the boot process you need to press the ESC button, or the Delete button, or one of the F* function keys many times. If all else fails, then google to find out how to enter BIOS for your laptop/motherboard model.

Disabling Secure boot and Fast boot is only necessary to boot from a USB flash drive, that is, after resetting the Windows password, these settings can be returned to their original state.
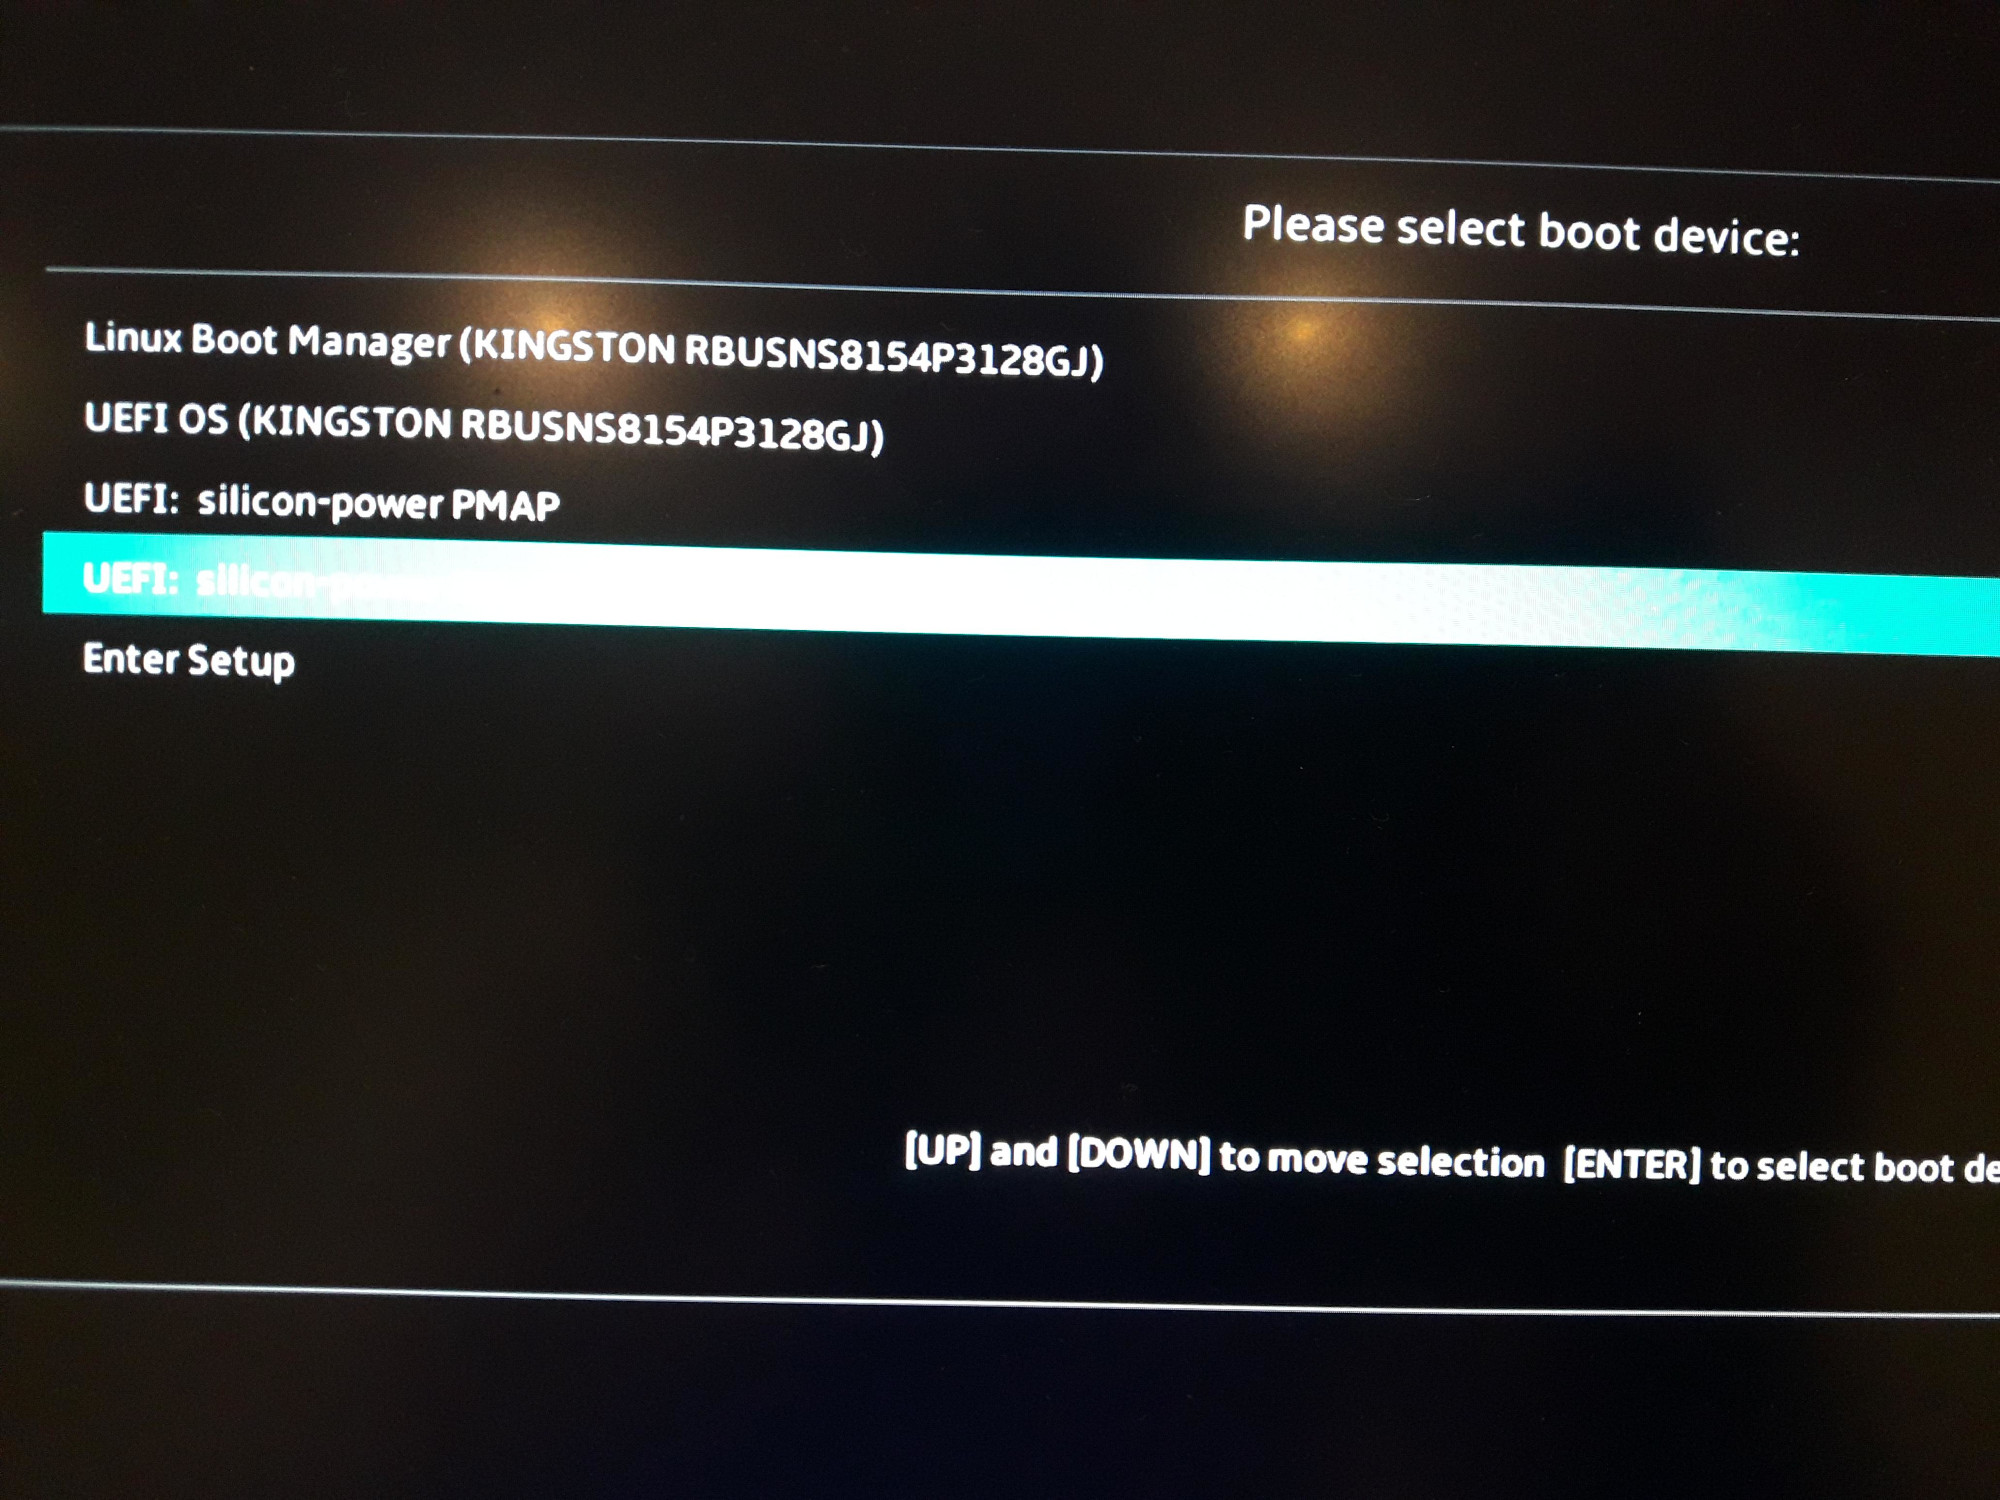
Then, when loading, or in the same place, in BIOS, select the USB flash drive or external drive as the boot disk:
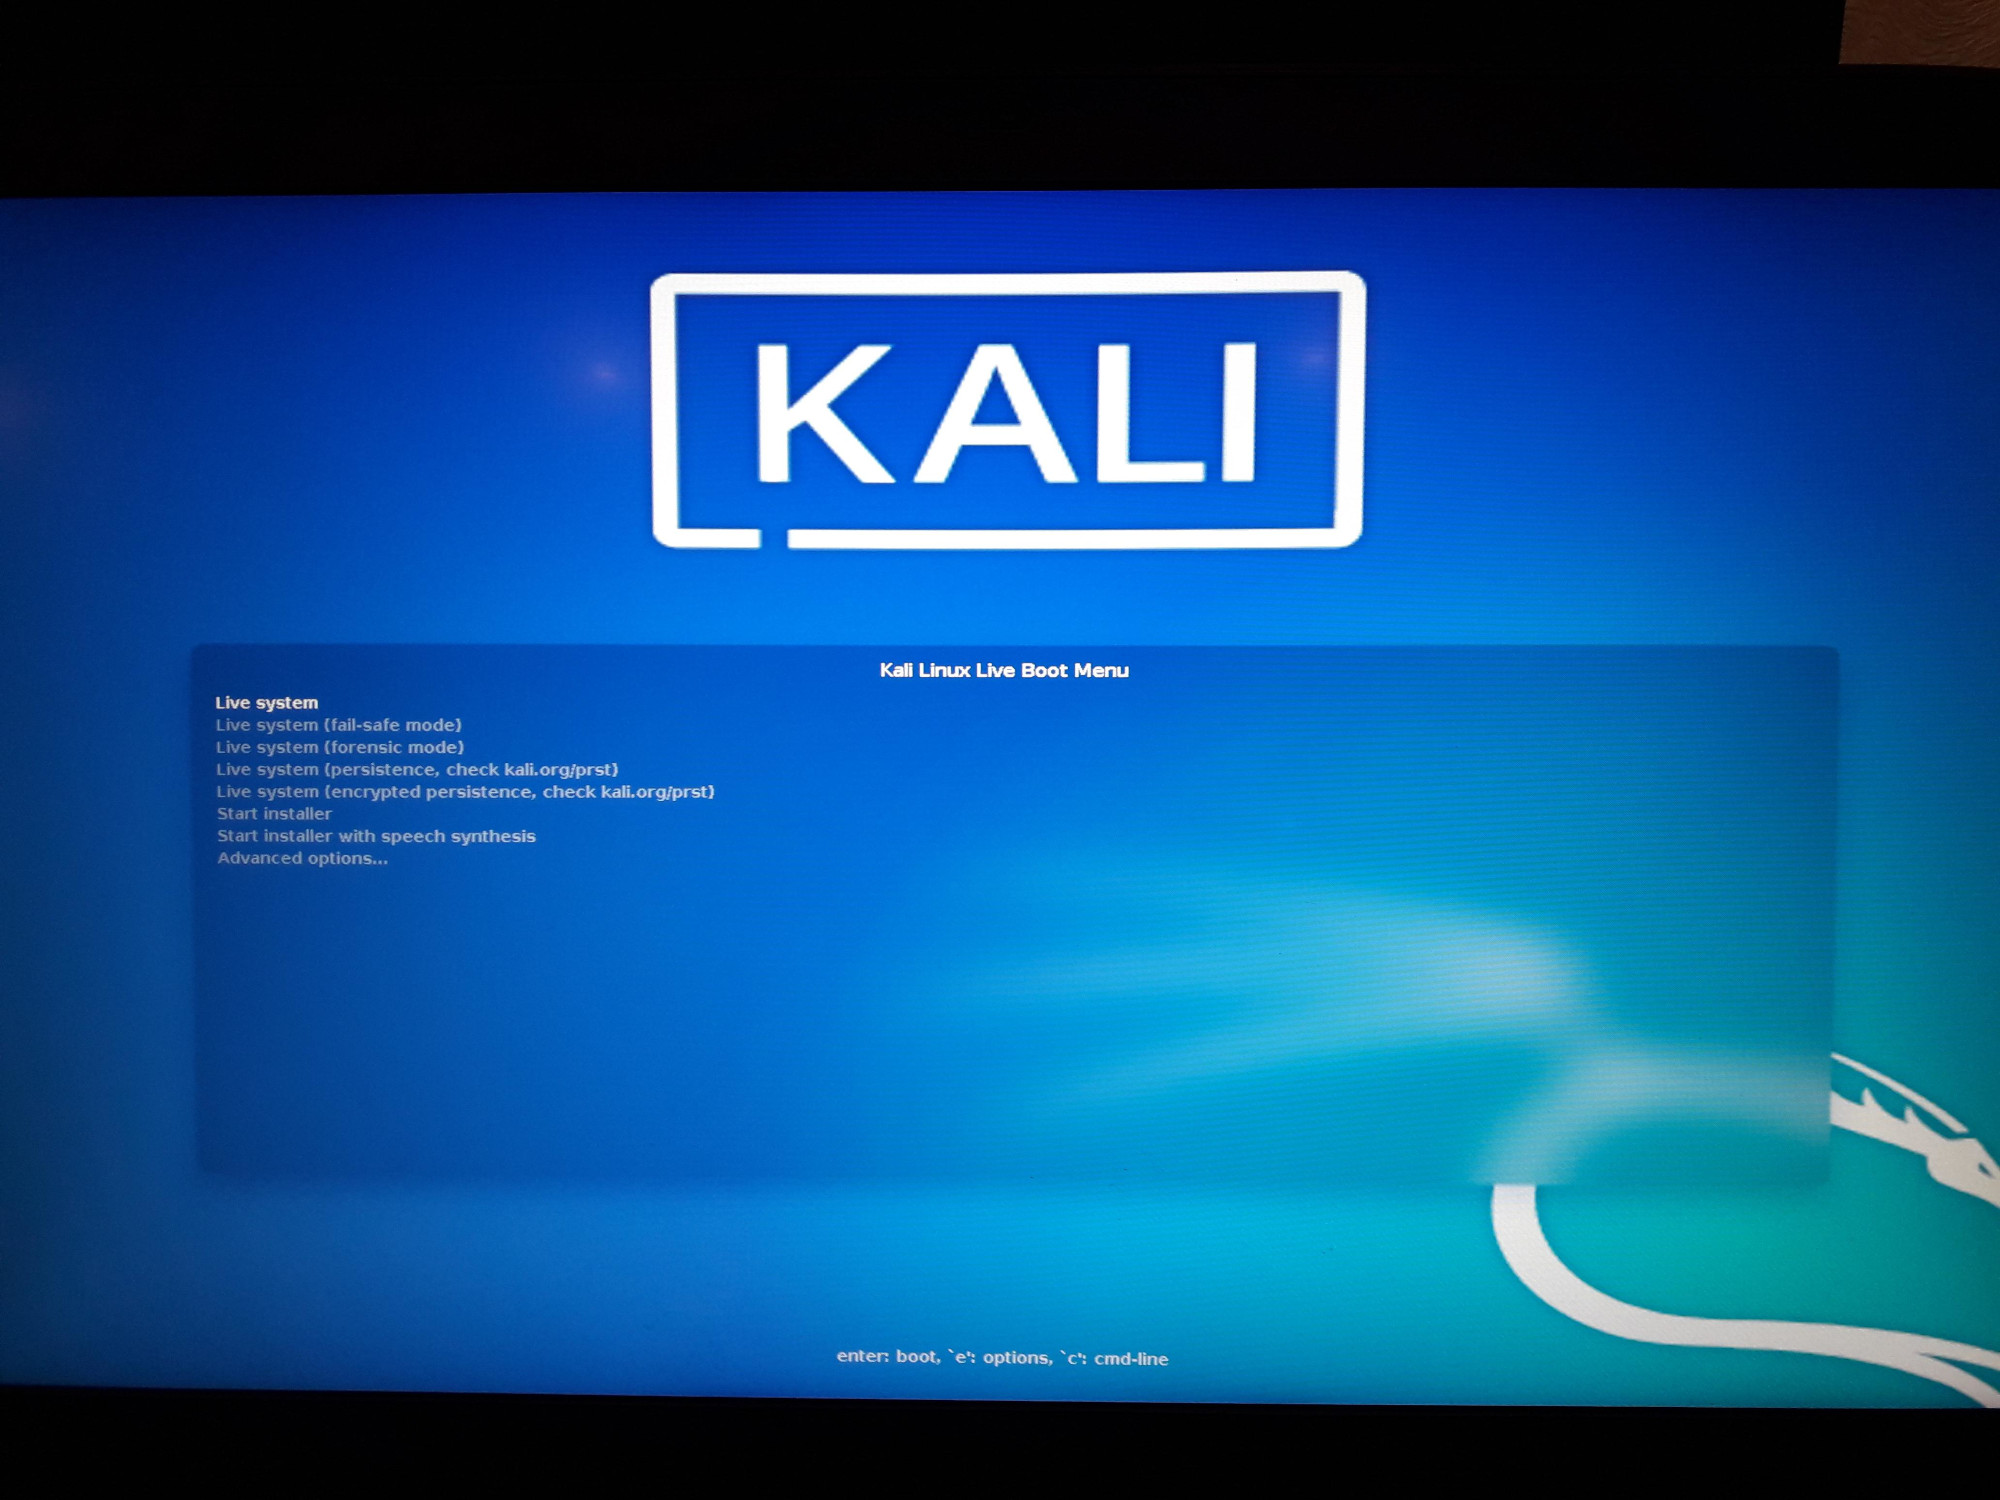
If you see the Kali Linux boot menu, then you have succeeded:
Password Reset Program for Windows
The program we need is called chntpw, it allows ones to change the Windows password, as well as unlock users. This is an open source program, that is, there is no need to fear that it will infect a computer with viruses or something like that. In addition, this Windows password reset program is free.
Modern Linux distributions automatically mount (that is, connect to the system) all disks. But in some cases, the drive is mounted read-only, and the mount points for different drives are different. Therefore, we will do the following:
- we will find a disk with Windows
- unmount (disconnect) it from the system
- run the command to fix possible file system problems
- re-mount it
The advantage of this approach is that:
- the drive will definitely be mounted with write permissions and there will be no other problems
- since we ourselves will choose the mount point, the commands for changing the Windows password can simply be copied – you do not need to change anything in them and substitute your path to the disk.
All disks that are plugged to the computer will be displayed:

Information about disks and their partitions is divided into blocks. Each block begins with the word “Disk:”, in each block the Disk model and the size of the disk are indicated – based on these data, find the disk on which the Windows operating system is installed.
Also, if it is Windows 10, then the “Windows recovery environment”, “EFI System”, “Microsoft reserved”, “Microsoft basic data ” partitions are present.
The arrow on the screenshot points to my Windows drive. We needed to find out the name of the drive and the name of the section “Microsoft basic data”, in my case it is /dev/sdb4. This is the largest partition. Older versions of Windows may have fewer partitions.
Now you need to run a command of the form in which PARTITION replace with your value:
My partition is /dev/sdb4 then the command is as follows:
Now you need to run a command of the form:
sudo ntfsfix /dev/PARTITION
My partition is /dev/sdb4 then the command is as follows:
There is no need to change anything in this command:
In the following command, again use your PARTITION value:
sudo mount /dev/PARTITION /mnt/windows
sudo mount /dev/sdb4 /mnt/windows
Now the most important phase in this tutorial is to make a backup copy of the SAM file in case something goes wrong.
sudo cp /mnt/windows/Windows/System32/config/SAM /mnt/windows/Windows/System32/config/SAM.bak sudo cp /mnt/windows/Windows/System32/config/SAM /mnt/windows/SAM.bak
Two backup copies of this file will be located in C:/Windows/System32/config/SAM.bak and C:/SAM.bak.
/usr/sbin/chntpw /mnt/windows/Windows/System32/config/SAM -l
The command is long, so use auto-completion, press the TAB key.
This command displayed a list of users:
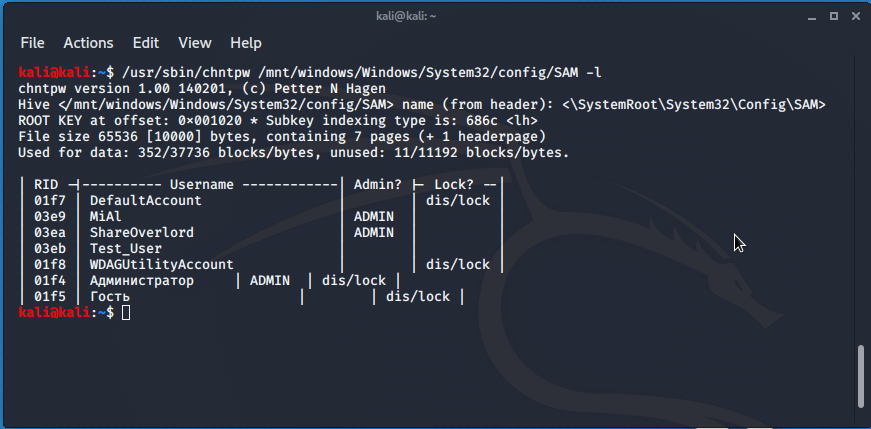
We will slightly correct the skewed table:
| RID -|---------- Username ------------| Admin? |- Lock? --| | 01f7 | DefaultAccount | | dis/lock | | 03e9 | MiAl | ADMIN | | | 03ea | ShareOverlord | ADMIN | | | 03eb | Test_User | | | | 01f8 | WDAGUtilityAccount | | dis/lock | | 01f4 | Администратор | ADMIN | dis/lock | | 01f5 | Гость | | dis/lock |
I want to recover the password of a Windows user named ShareOverlord. Also note that in the system there is an Administrator user, but he is disabled/locked (dis/lock).
The main thing we need to know about the Administrator user:
- he can reset the password of any user
- no password is set for it by default!
- we can activate this user.
So, we have two options: 1) reset the password for any user. Unfortunately, this option does not always work at present – sometimes it turns out to reset the password, and sometimes not. If you do as written here using ntfsfix to prepare the disk, you usually get to reset the password on Windows 10. From Windows to version 8.1 there should not be any problems at all. 2) Activate the Administrator and delete the password of any user through Administrator account.
How to reset Windows 10 user password
To reset the user password, run a command of the form:
sudo /usr/sbin/chntpw /mnt/windows/Windows/System32/config/SAM -u USER_NAME
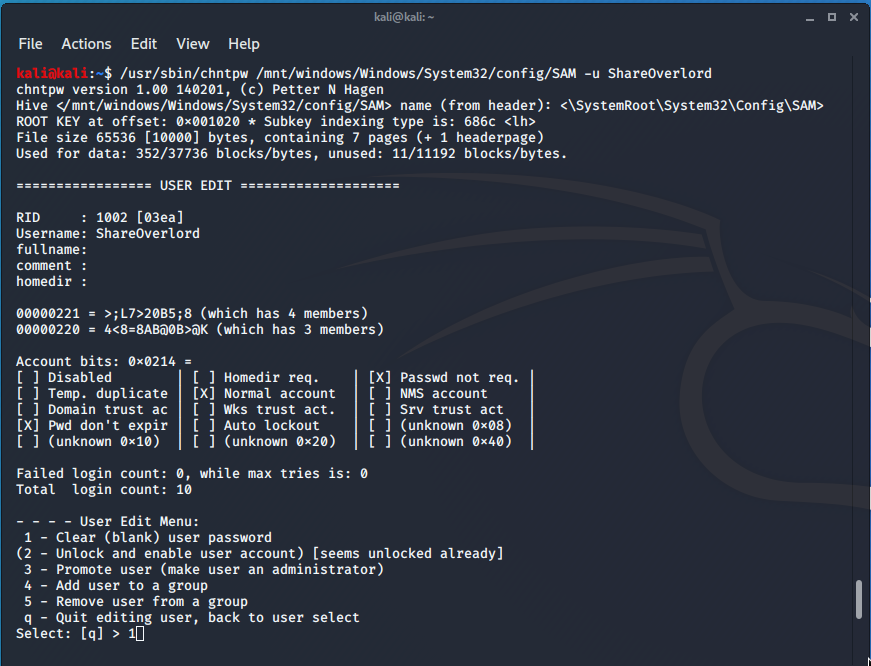
For example, I want to reset the password for the user ShareOverlord:
sudo /usr/sbin/chntpw /mnt/windows/Windows/System32/config/SAM -u ShareOverlord
We received the following information about this user:
The following menu is available for selection:
1 — Clear (blank) user password
(2 — Unlock and enable user account) [seems unlocked already]
3 — Promote user (make user an administrator)
5 — Remove user from a group
q — Quit editing user, back to user select
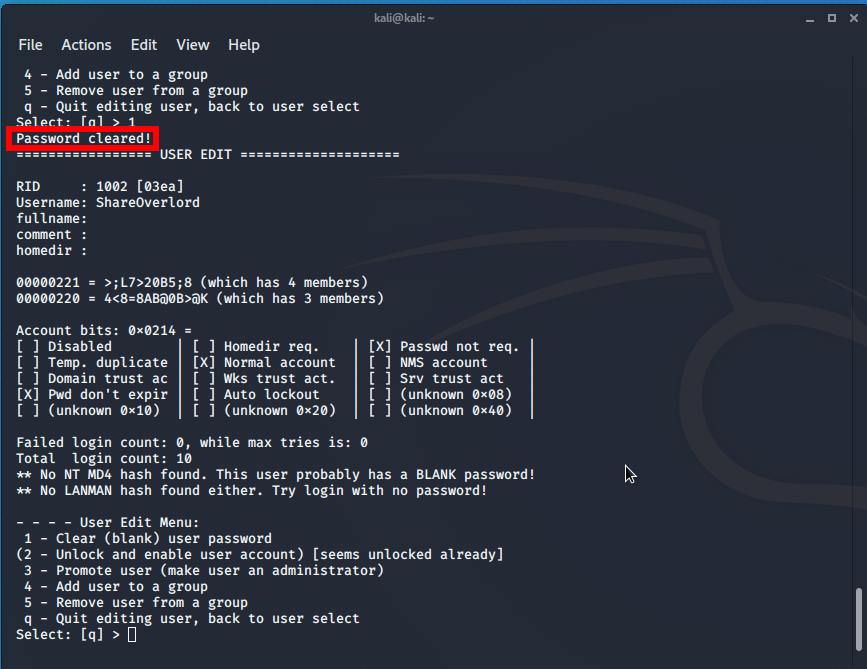
If everything went fine, then the inscription “Password cleared!” Should appear.
Now to save the changes, type
and then press to confirm:

Everything is ready – you can reboot into Windows and try to log in without a password.
If this method fails (Windows user password is still required), then activate the Administrator user account. This can be done immediately, before rebooting. If you do not need this account, you can turn it off again.
How to activate admin user in Windows 10
To unlock the Administrator, run the following command:
sudo /usr/sbin/chntpw /mnt/windows/Windows/System32/config/SAM -u Administrator
Please note that the username may not necessarily be “Administrator”, in different OS languages, the username is different.
Now we select menu item 2:
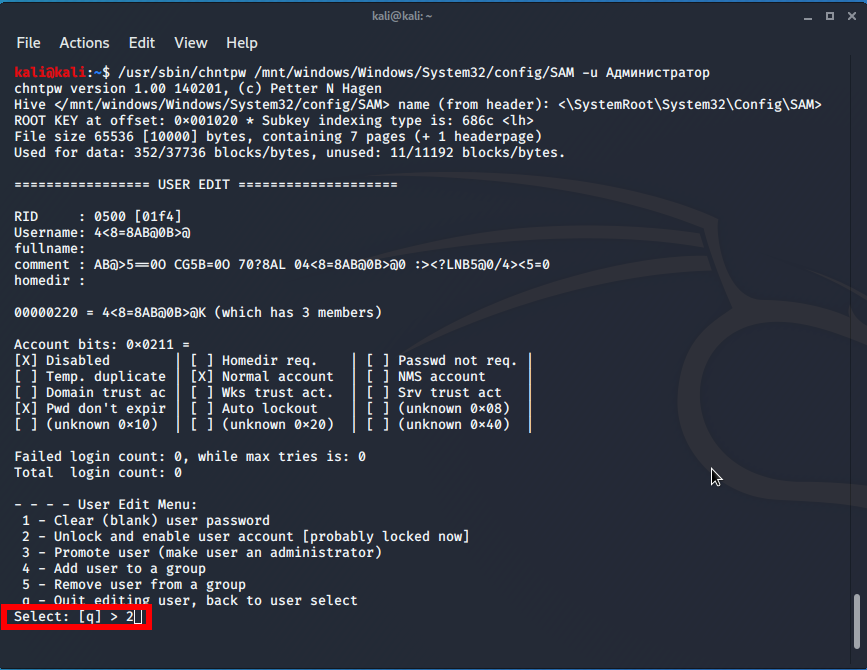
If everything went well, the message “Unlocked!” will appear.

In addition the second menu item is changed to:
(2 - Unlock and enable user account) [seems unlocked already]
To exit, do not forget to confirm the saving of the changes made:
Let’s check user information again:
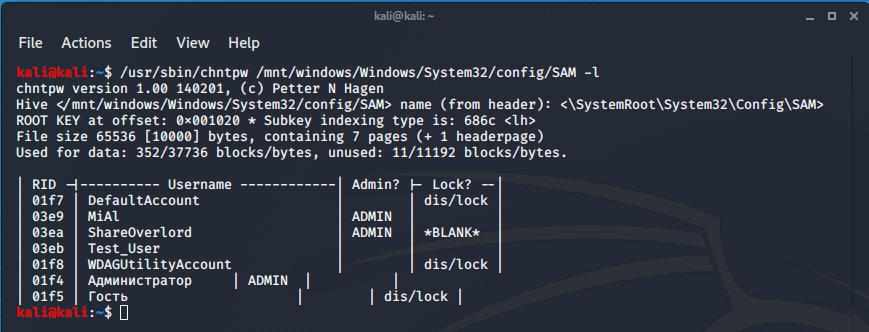
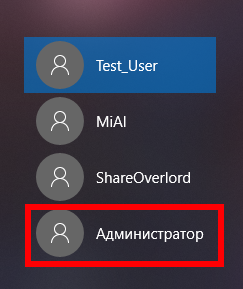
Now the Administrator user is unlocked:
| RID -|---------- Username ------------| Admin? |- Lock? --| | 01f7 | DefaultAccount | | dis/lock | | 03e9 | MiAl | ADMIN | | | 03ea | ShareOverlord | ADMIN | *BLANK* | | 03eb | Test_User | | | | 01f8 | WDAGUtilityAccount | | dis/lock | | 01f4 | Администратор | ADMIN | | | 01f5 | Гость | | dis/lock |
I managed to remove the user password:
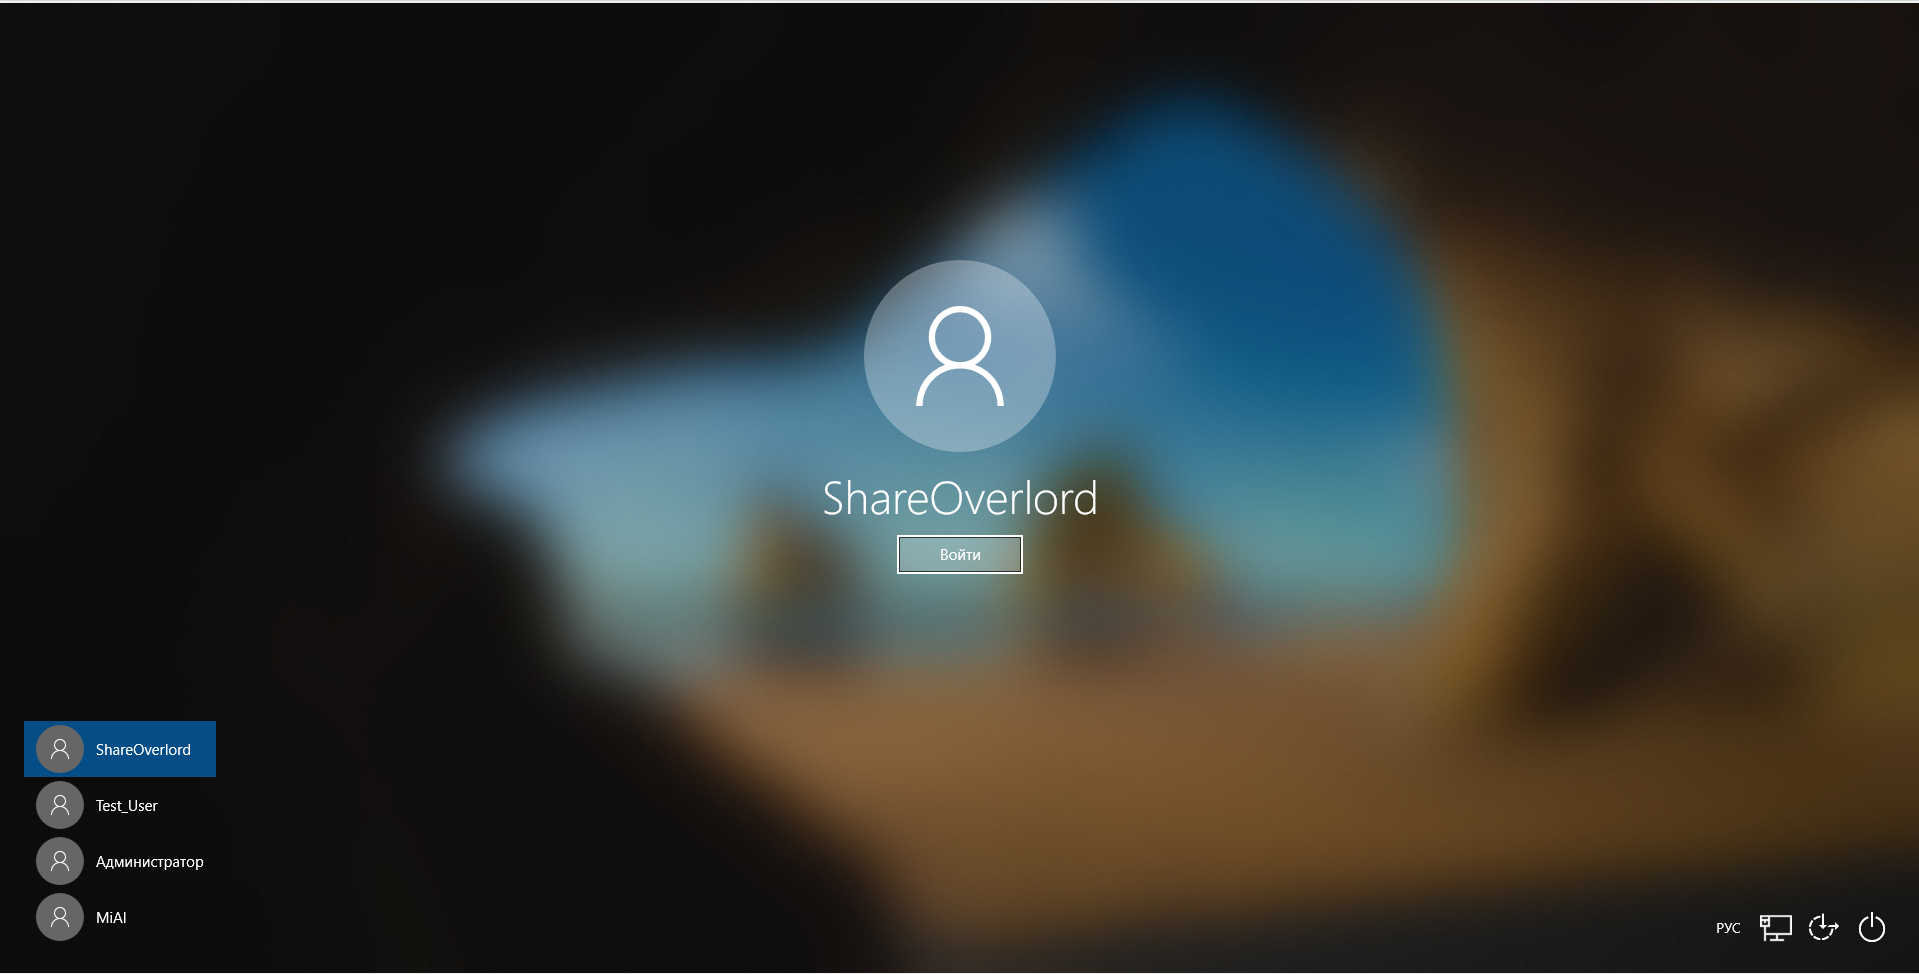
Even if something went wrong, now the Administrator is in the list of users, we use this account to log in:
Since this account is logged in for the first time, we are waiting a bit:

This is normal for the first launch of any user:

After you have logged in as Administrator, use the next command to list all user accounts:
Enter the following command to change the user account password. Replace “MiAl” with the name of Windows account, and “123” with the new password:
Conclusion
The working methods of password reset for Windows 10 are considered. All programs are free.
In the next part, we will analyze the advanced abilities of chntpw and get acquainted with the SAM (Security Account Manager) file, which stores the registry branch of Windows with information about User accounts, Passwords, Groups, and so on.
Related articles:
Reset Windows 10 Local Password with Kali Linux Live USB
Can’t access your computer because of forgetting Windows 10 password? Compared to offline local account, Microsoft online account makes it super easy to reset your password to regain access to your computer. If you lost a local administrator password, you have to use third-party bootable media. In this tutorial we’ll show you how to reset lost Windows 10 local password with Kali Linux.
Make a Kali Bootable USB Drive
When you’re locked out of Windows 10, you need to use another PC to make a Kali bootable USB drive. Please follow the steps listed below.
- Download the ISO image of Kali Linux (formerly known as BackTrack). It’s free.
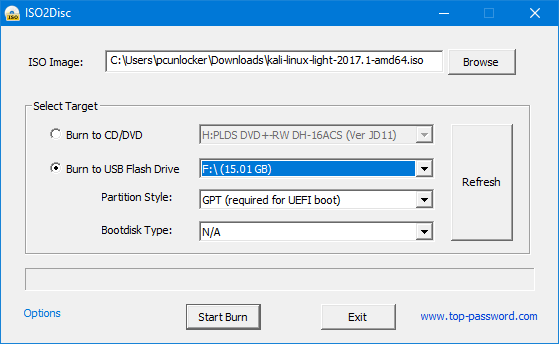
- Next, you’ll need a program to install Kali on your USB drive and make it bootable. Here we’ll use the freeware ISO2Disc. Just download and install it on your local PC.
- Start the ISO2Disc utility. Click Browse to locate your Kali Linux image.
- Choose the Burn to USB Flash Drive option and select the drive letter for your USB drive. Click Start Burn to create a Kali Live USB drive.
Boot with Kali Linux USB
Once you have a Kali Live USB, plug it into the USB port of your Windows 10 computer and boot from the USB. You may have to press a special key (e.g., Esc, F2, F12, Del, etc.) during bootup to get the computer to boot from the USB instead of its internal hard drive.
Reset Windows 10 Local Password
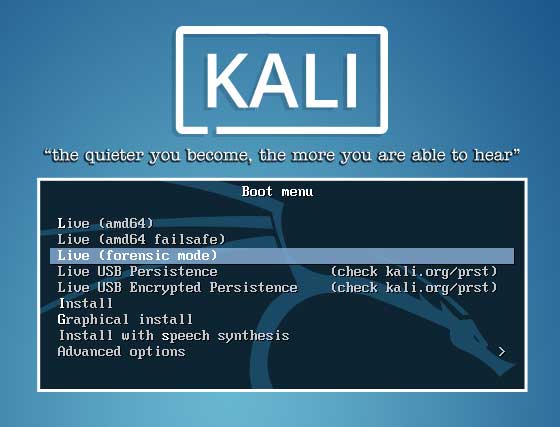
- After booting from USB, you will see Kali Linux Boot Menu. Choose the 3rd option which is Live (forensic mode).
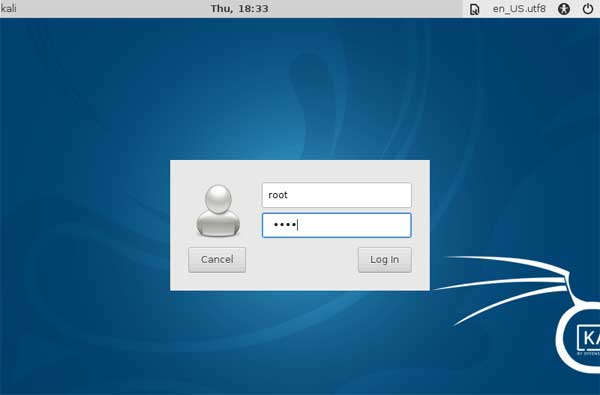
- Enter the default username as root and password as toor when prompted.
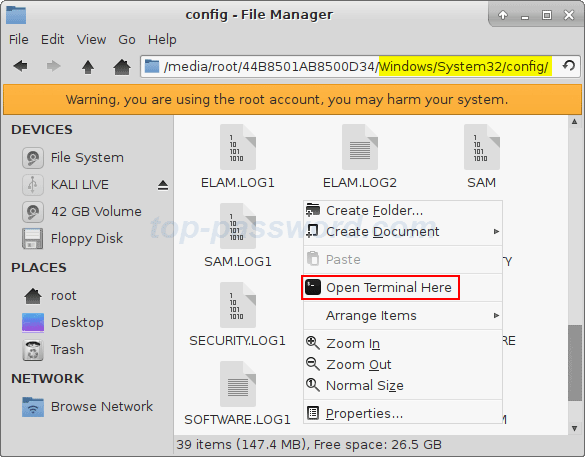
- Open File Manager and navigate to the directory where the SAM is saved. This file is usually located in /Windows/System32/Config. Right-click a blank space in File Manager, and select Open Terminal Here.
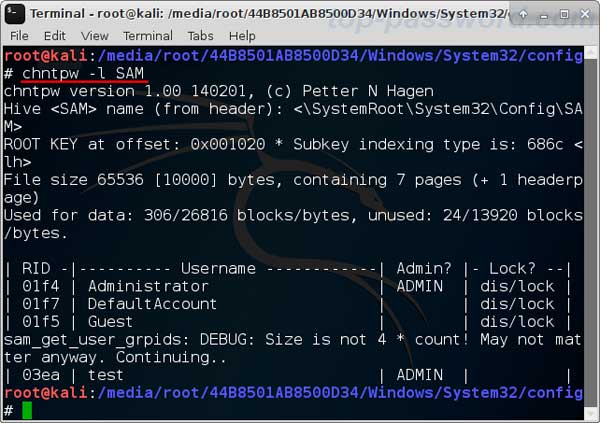
- Type the command: chntpw -l SAM. It shows the list of usernames found in the SAM on your Windows 10 OS.
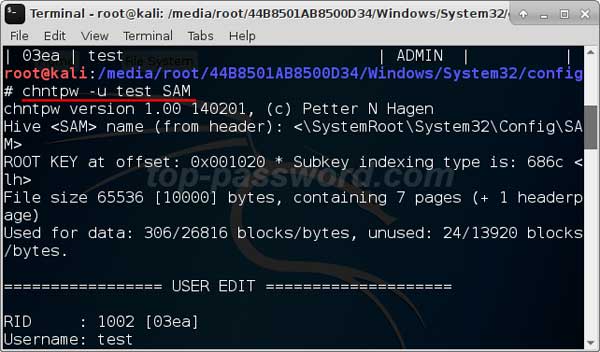
- Simply run the chntpw -u username SAM command to reset your lost password. Note: where username is the name of your actual Windows account. For example, my username is test, I should type chntpw -u test SAM after that hit Enter.
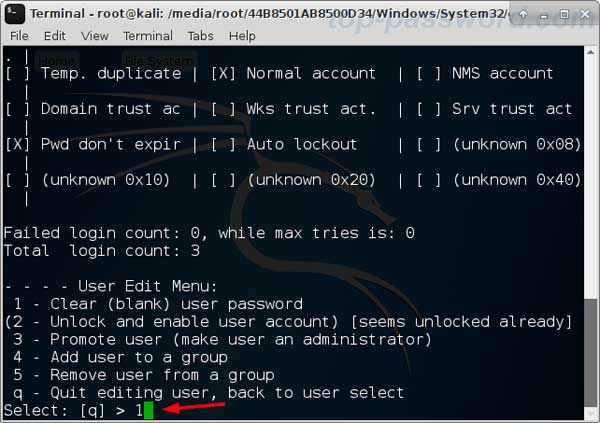
- Press 1 for clearing the previously set Windows password.
- Press y when asked if you want to save the changes to the SAM hive. Now, Reboot your computer and unplug the USB drive, you will see Window 10 automatically login without password.
Note that Kali Live USB can reset the password of local account only (not Microsoft account). If you need an easier and more powerful tool to reset forgotten Windows 10 password, you can try this dedicated password recovery utility — PCUnlocker.
