- Saved searches
- Use saved searches to filter your results more quickly
- luisco/sticky-fingers-kali-pi
- Name already in use
- Sign In Required
- Launching GitHub Desktop
- Launching GitHub Desktop
- Launching Xcode
- Launching Visual Studio Code
- Latest commit
- Git stats
- Files
- README.md
- Kali Linux on Raspberry Pi 1/2/3(+)/4/Zero(W) with touch optimized interface in a ready-to-go image (Refreshed 03-June-2019 with full RasPi 4 support)
- Installation
- TIP: How to mount the img file in linux
- Categories
- Recent Posts
Saved searches
Use saved searches to filter your results more quickly
You signed in with another tab or window. Reload to refresh your session. You signed out in another tab or window. Reload to refresh your session. You switched accounts on another tab or window. Reload to refresh your session.
luisco/sticky-fingers-kali-pi
This commit does not belong to any branch on this repository, and may belong to a fork outside of the repository.
Name already in use
A tag already exists with the provided branch name. Many Git commands accept both tag and branch names, so creating this branch may cause unexpected behavior. Are you sure you want to create this branch?
Sign In Required
Please sign in to use Codespaces.
Launching GitHub Desktop
If nothing happens, download GitHub Desktop and try again.
Launching GitHub Desktop
If nothing happens, download GitHub Desktop and try again.
Launching Xcode
If nothing happens, download Xcode and try again.
Launching Visual Studio Code
Your codespace will open once ready.
There was a problem preparing your codespace, please try again.
Latest commit
Git stats
Files
Failed to load latest commit information.
README.md
xz -d StickyFingers-Kali-Pi-armhf-180923.img.xz
dd if=StickyFingers-Kali-Pi-armhf-180923.img of=/dev/mmcblk0 bs=512k
Expanding partition to fill SDCard
Kali Linux on Raspberry Pi 1/2/3(+)/4/Zero(W) with touch optimized interface in a ready-to-go image
(Refreshed 03-June-2019 with full RasPi 4 support)
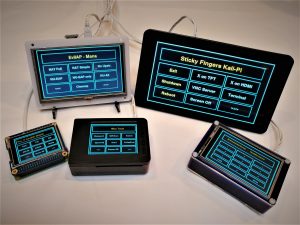
Sticky Finger’s Kali-Pi image comes with the following features out of the box:
- 2GB image ready to go with all common touch screens.
- Kali Linux Rolling edition with MSF meta package and all other essential tools
- Re4son Kali-Pi Kernel 4.14 with bluetooth, touch screen support and wifi injection patch
- “re4son-pi-tft-setup” tool to set up all common touch screens, enable auto-logon, etc.
- “kalipi-config” tool to set up the raspberry pi (improved raspi-config for kali)
- Apache, Pure-FTP, SDR-Scanner, Screenshot Tool, ntop, darkstats, mana-toolkit,
Kismet classic, Kismet development, Remote Access AP, Sticky Finger’s Kali-Pi Launcher - Boots into vanilla kali gui but comes with user “pi” pre-configured to launch
the “Sticky Finger’s Kali-Pi Launcher” (touch screen interface) after login - Just run “re4son-pi-tft-setup” tool for your particular screen and you are up and running.
- Out of the box support for on-board Bluetooth & wifi with nexmon patches
Installation
- Download the Sticky Finger’s Kali-Pi image here:
Architecture Link armhf (Pi 2/3/4 B/B+) https://whitedome.com.au/re4son/download/sticky-fingers-kali-pi/
SHA256: 41fa0a79f51d6d7c774f1cfb30c0ac3a3aee32569ee7f08ce887786a54de2c6farmel (Pi 1/Zero/Zero W) https://whitedome.com.au/re4son/download/sticky-fingers-kali-pi-0/
SHA256: 270044dd0d8decba4e5710182a3b9974e951c5da012ac3925b18319b91270615 - write it to your microSD card (Windows=Win32 Disk Imager, Linux=dd):
Minimum recommended card sizes:
kalipi-config # Configure wifi # Configure boot into command line interface for user pi # Change passwords for users "pi" and "root" # Set location settings, etc.
## Adjust these: export KPSCREENSIZE=2.8 ## Screensize in inch, Options= 5.0, 3.5, 2.8 export KPLAYOUT=9 ## Number of buttons - Currently only 9 is supported export KPPIN=0 ## Set to "1" to enforce PIN authentication, run ./set-pin to change PIN from "1337" #export KPTIMEOUT=2 ## Minutes before screensaver kicks in, comment out for screensaver off export KISMETVER=1 ## Set to "2" to launch kismet github version, "1" to use classic stable version export TFT=1 ## Set to "0": no TFT screen, ## "1": TFT touchscreen, ## "2": TFT screen with external mouse, ## "3": resistive HDMI touchscreen, or ## "4": Raspberry Pi 7" Touchscreen ## End adjustments
To pair Bluetooth devices, just start the bluetooth services:
systemctl enable bluetooth service bluetooth start systemctl enable hciuart systemctl start hciuart.service
You are now ready to pair your devices, just like this:
[bluetooth]# agent on
Agent registered
[bluetooth]# default-agent
Default agent request successful
[bluetooth]# scan on
Discovery started
[bluetooth]# pair 00:1F:xx:xx:xx:xx
Attempting to pair with 00:1F:xx:xx:xx:xx
…snip…
Pairing successful
[bluetooth]# trust 00:1F:xx:xx:xx:xx
[CHG] Device 00:1F:xx:xx:xx:xx Trusted: yes
[bluetooth]# connect 00:1F:xx:xx:xx:xx
Attempting to connect to 00:1F:xx:xx:xx:xx
Connection successful
Voila – there it is, Bluetooth device connected.
TIP: How to mount the img file in linux
If you are curious to see what’s in the image file before you write it to the SD card, here is how you can mount it in linux:
- Check the file system table with fdisk:
fdisk -l StickyFingers-Kali-Pi-Small-160827.img
mount StickyFingers-Kali-Pi-Small-160827.img -o loop,offset=$(( 512 * 1)) img1/ mount StickyFingers-Kali-Pi-Small-160827.img -o loop,offset=$(( 512 * 125001)) img2/
For questions or comments please join the discussion in our forum:
https://whitedome.com.au/forums