- non color Kali Linux Terminal in root user
- 5 Answers 5
- How to Change Kali Terminal Prompt Color
- Displaying the Value of PS1
- Command
- Output
- Changing the Prompt
- The Default Shell Prompt
- Understanding the Cryptic PS1
- How to Change Kali Linux Terminal Background and Font?
- Change Kali Linux Terminal Background
- How to Change Kali Linux Terminal Font?
- Conclusion
non color Kali Linux Terminal in root user
I recently install Kali Linux 2020. as you know it’s a non root user by default in this version! and also as you know the terminal it’s colorful for Dir or executable files and etc but when I change my user to root the Terminal is turned to black & white for all thing! do any body have a solution for this?
5 Answers 5
There’s a good link here that explains what all of that is doing with the PS1 line. It also lists all the colours so you can tailor it to exactly what you’d like
Below is what worked for me, and what produced a colour scheme that I find easy to work with.
As mentioned by others, open up this file from a terminal with
and under the existing ‘# PS1 =’ line (you can delete this line if you wish or leave it commented), add
That gives a decent colour difference to the root and the following directories.
The section responsible for the formatting for this is e[0;31m] the ‘e’ begins a format, the ‘m’ ends it. The ‘0’ here is for normal font, change to 1 for bold, or 4 for underlined. The font colour is the ’31’ (red in this case) — a full list of available colour codes can be found on the above link. All other letters in here are explained in the link also if you’re interested
Then remove the comments (#) from the middle section (under ‘# You may uncomment the following lines if you want ‘ls’ to be colorized’) to show colours on lists
to update the changes which you should now see in the terminal.
I had the same problem, luckily it comes with an easy solution.
If you just want ls to display color, uncommenting some lines in the ~/.bashrc file of the root user will be enough. You’ll find what to do in it; you can access it with vim .bashrc right after logging into root.
If you want to see that characteristic red root@kali:~$ at the beginning of the line too it takes some more steps but it’s also pretty straightforward.
First, launch the terminal as non root and open ~/.bashrc again (this is the non-root user file, the one with the color enabled) and locate the comment that says:
# set a fancy prompt (non-color, unless we know we "want" color) Now copy all the code below until you reach:
# enable color support of ls and also add handy aliases We don’t need whats below this last line, it is already in root’s .bashrc (the lines we uncommented before).
Now log into root, do vim .bashrc once more and paste the same code somwhere in the file. Relaunch the terminal and it’s done. At least it worked for me.
If you already have a user that has a terminal with colors, you can just copy that users ~/.bashrc to the root home directory and then
while logged in as root, and it should give you the same colors as the user had.
Copy the following code in a text editor in Kali or anywhere and save as .bashrc . Then open the file browser in Kali. In the options, toggle on «hidden files» and then paste the .bashrc file and click on replace and you are done.
Just restart your system once. (I didn’t have to restart, it might work for you, too.) Let me know if it works for you.
# ~/.bashrc: executed by bash(1) for non-login shells. # see /usr/share/doc/bash/examples/startup-files (in the package bash-doc) # for examples # If not running interactively, don't do anything case $- in *i*) ;; *) return;; esac # don't put duplicate lines or lines starting with space in the history. # See bash(1) for more options HISTCONTROL=ignoreboth # append to the history file, don't overwrite it shopt -s histappend # for setting history length see HISTSIZE and HISTFILESIZE in bash(1) HISTSIZE=1000 HISTFILESIZE=2000 # check the window size after each command and, if necessary, # update the values of LINES and COLUMNS. shopt -s checkwinsize # If set, the pattern "**" used in a pathname expansion context will # match all files and zero or more directories and subdirectories. #shopt -s globstar # make less more friendly for non-text input files, see lesspipe(1) #[ -x /usr/bin/lesspipe ] && eval "$(SHELL=/bin/sh lesspipe)" # set variable identifying the chroot you work in (used in the prompt below) if [ -z "$" ] && [ -r /etc/debian_chroot ]; then debian_chroot=$(cat /etc/debian_chroot) fi # set a fancy prompt (non-color, unless we know we "want" color) case "$TERM" in xterm-color) color_prompt=yes;; esac # uncomment for a colored prompt, if the terminal has the capability; turned # off by default to not distract the user: the focus in a terminal window # should be on the output of commands, not on the prompt force_color_prompt=yes if [ -n "$force_color_prompt" ]; then if [ -x /usr/bin/tput ] && tput setaf 1 >&/dev/null; then # We have color support; assume it's compliant with Ecma-48 # (ISO/IEC-6429). (Lack of such support is extremely rare, and such # a case would tend to support setf rather than setaf.) color_prompt=yes else color_prompt= fi fi if [ "$color_prompt" = yes ]; then PS1='$\[\033[01;31m\]\u@\h\[\033[00m \]:\[\033[01;34m\]\w\[\033[00m\]\$ ' else PS1='$\u@\h:\w\$ ' fi unset color_prompt force_color_prompt # If this is an xterm set the title to user@host:dir case "$TERM" in xterm*|rxvt*) PS1="\[\e]0;$\u@\h: \w\a\]$PS1" ;; *) ;; esac # enable color support of ls and also add handy aliases if [ -x /usr/bin/dircolors ]; then test -r ~/.dircolors && eval "$(dircolors -b ~/.dircolors)" || eval "$(dircolors -b)" alias ls='ls --color=auto' #alias dir='dir --color=auto' #alias vdir='vdir --color=auto' #alias grep='grep --color=auto' #alias fgrep='fgrep --color=auto' #alias egrep='egrep --color=auto' fi # some more ls aliases #alias ll='ls -l' #alias la='ls -A' #alias l='ls -CF' # Alias definitions. # You may want to put all your additions into a separate file like # ~/.bash_aliases, instead of adding them here directly. # See /usr/share/doc/bash-doc/examples in the bash-doc package. if [ -f ~/.bash_aliases ]; then . ~/.bash_aliases fi # enable programmable completion features (you don't need to enable # this, if it's already enabled in /etc/bash.bashrc and /etc/profile # sources /etc/bash.bashrc). if ! shopt -oq posix; then if [ -f /usr/share/bash-completion/bash_completion ]; then . /usr/share/bash-completion/bash_completion elif [ -f /etc/bash_completion ]; then . /etc/bash_completion fi fi How to Change Kali Terminal Prompt Color

The environment variable PS1 (Prompt String One) holds the string that is being displayed as a command or shell prompt in the terminal emulator program Terminal. The prompt string is embedded (interspersed) with color tags in the form of
where x is a display attribute (normal, dim, bold, italics, etc) and y is the color code.
Changing the value or content of PS1 during a terminal session quickly changes the displayed prompt, however, the changes are lost once the terminal session is closed. To make the changes permanent, the hidden file named .bashrc located in the user’s home directory must be edited to reflect the changes in the prompt string.
Displaying the Value of PS1
Command
Output
\ [ \ e ] 0 ; \ u @ \ h : \ w \ a \ ] $ < debian_chroot : + ( $ debian_chroot ) >\ [ \ 033 [ 01 ; 33m \ ] \ u @ \ h \ [ \ 033 [ 00m \ ] : \ [ \ 033 [ 01 ; 34m \ ] \ w \ [ \ 033 [ 00m \ ] \ $
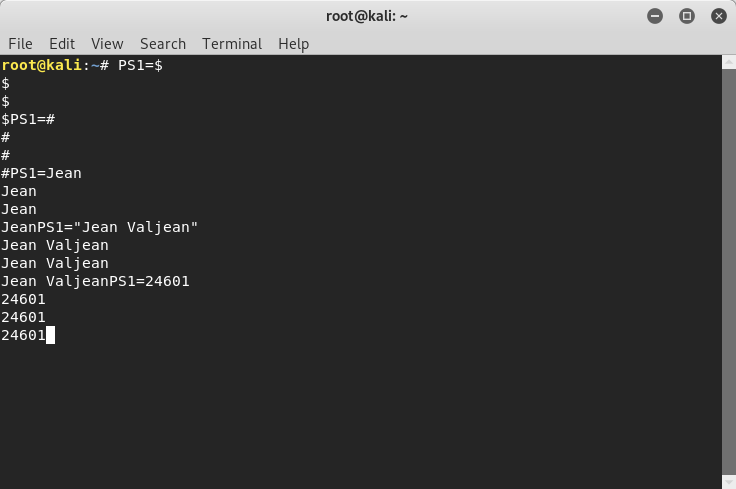
Changing the Prompt
The prompt string can be made as simple as a single character like a dollar sign ($) or a hashtag sign (#). Or it can be any text string you may want. To change the prompt string, assign a new value to PS1.
To enter a string with spaces or non-printable characters, enclose the string with single (‘) or double (“) quotes.
The Default Shell Prompt
The default shell prompt, besides being a cue for entering a shell command in a terminal session, is also used to convey a lot of information about the system. Take for an example the default Kali Linux shell prompt,

The default shell prompt is in red, a warning sign. It indicates that the terminal user has administrative privileges or root privileges. It means that the user may, and can, mess up the system with improper commands like deleting files necessary for Kali’s normal operations.
It also shows the current user root, the host name kali, the current working directory, the home directory represented by the tilde sign (~), and finally, the hashtag sign (#) indicating a priveleged user as opposed to an ordinary user which is usually handed a prompt with a dollar sign ($).
Understanding the Cryptic PS1
To incorporate meaningful information on the shell prompt, bash, the shell interpreter, uses a special set of characters called escape characters , to encode information in the prompt string. See the table (Bash Prompt Escape Characters) below for the complete list of escape characters that are recognized by bash.
| Escape Character Code | Meaning |
| \u | Username |
| \h | Hostname |
| \w | Working directory |
| \$ | Display a hashtag if uid=0 (user is root) or else display a dollar sign ($) |
How to Change Kali Linux Terminal Background and Font?

As Kali Linux user knows that when they open up the Terminal that is similar to Command Prompt (CMD) in the Windows operating system. They may not like the default background colour. If you want to change Kali Linux Terminal background, we are here to guide you. I really don’t like the Terminal background colour because nothing looks clearly. When we want to type something, we would not be able to recognise what we have written. So that’s why we are going to help you to change your Kali Linux Terminal background and font.
Change Kali Linux Terminal Background
For the demonstration, we are going to do our task on Kali Linux version 2. Right now this is the latest version of Kali Linux that its user works on it. Before we get started, I’m going to tell one thing else. We have the same terminal on the Mac operating system. When you want to change the Linux Terminal background, it means that you know how to change Mac OS Terminal as well. Because these two operating systems are somehow alike to each other.
To change Kali Linux Background, follow the instructions below. This article will help you to learn how to change Kali Linux Terminal background and as well as Mac OS X El Capitan.
For the first time what you are going to do is open up the Terminal. If you don’t know how to open Terminal, tap on the small black square icon at the left-hand side. If you don’t find it, go to the Applications tab and find the terminal there.
Step #1. When you open up the Terminal, click on the Edit tab then choose Profile Preferences.

Step #2. Go to “Colors Tab” now then do the following activity.
- Uncheck “Use colours from the system theme “
- Text Color
- Background Color
- Use Transparent Background
Uncheck the theme colour and choose a custom theme. Change the text colour to black or any colour that you want and as well change the background colour to white or custom colour that you want. Finally, uncheck the Transparent background and drag the small button to the right. Once you are satisfied with this setting, click “Close” at the bottom right-hand side.

Change Terminal Background Color
How to Change Kali Linux Terminal Font?
You might see that someone use a very unusual font on Kali Linux Terminal which attracts you. Don’t worry about this. You as well can do it. Just go to the Terminal Edit tab then choose the General tab. See the bottom left-hand side of the window and select “Custom Font”. Now, select the font which you like the most. Once you are agreed with this font, click on the “Close” button to end up this process.

Conclusion
This was all about how to change Kali Linux Terminal background and font. I hope that you have enjoyed this article and good luck. If you have got any question regarding this article, feel free to ask us right below this post via the comment. We will try to answer it as soon as possible. Thanks for being with us.