- How to make a bootable windows USB in Kali Linux
- 5 Answers 5
- How to Create Bootable USB for Kali Linux on Windows
- Kali Linux 2020
- What You’ll Need
- How to Create Bootable USB for Kali Linux on Windows
- Create Kali Bootable Installer USB Drive in Windows 10 (Kali Bootable Non-Persistence USB Drive)
- Advantages of using Kali Live USB Drive – Non-Persistence
- Disadvantages of using Kali Live USB Drive – Non-Persistence
- Requirements
- Creating a Bootable Kali USB Drive on Windows 10 – Non-Persistence
- Downloading Kali Linux ISO image
- Win32 Disk Imager utility
- Fixing Win32 Disk Imager error in Windows 10
- Plug in USB drive and select ISO in Win32 Disk Imager
How to make a bootable windows USB in Kali Linux
When I tried to boot my PC into Windows 10 I got a screen with a sad face saying unmountable_boot_volume. After searching it said I needed a Windows 10 USB or CD which I do not have. I still have access to Kali Linux on my PC by booting up with my SSD. How can I make a bootable Windows USB with a ISO in Kali Linux OS?
5 Answers 5
You can create a bootable usb using the command dd :
sudo dd if=/path/to/windows.iso of=/dev/sdx bs=4M sync example: the output of fdisk -l is /dev/sdb1 :
sudo dd if=/home/user/Downloads/windows.iso of=/dev/sdb sync There is an easier way coming built in with kali linux.
- Just Browse to the windows iso location
- Right click on iso
- Open with other appalication
- select Disk image writer
- select your usb device from the drop dows menu
- click restore
- click restore again
- wait until finished
- boot with usb
- install Windows
I had major problems with the above solutions as DD made the drive UDF format, I managed to compile woeusb by following instructions Here, Make sure software-common-properties is up to date. I also had to edit the changelog in /woeusb/debian and add a version number (I used 1.0.1.1) and edit the
to avoid the signature check.
Obviously running this command whilst in that directory.
How to Create Bootable USB for Kali Linux on Windows

Kali Linux is a distribution of Linux family and which is mostly used by students, system administrators, network administrators, new and professional users. Linux is a family of open-source Unix operating systems that support newly developed operating systems. Kali Linux in use of professional users especially hackers but ordinary users can also make use of and learn quite many things. The Kali Linux has two interfaces for different users, that is graphical interface and command-line interface. Here’s how to Create Bootable USB for Kali Linux on Windows.
Just like its name, the graphical interface is more of graphical control like it’s similar to a typical desktop like Windows. Instead, the command line interface is only of commands where you can do everything via command which is perfect for professional users. These are only possible via Kali Linux installed. While there are various ways to install Kali Linux, we did install Kali Linux on VMware and VirtualBox. But for most, it doesn’t satisfy them and they want more of the actual experience than working on portable realistic Kali Linux on a virtual machine. In this case, the only way to adapt and use Kali Linux will be install Kali Linux on PC or Dual Boot Kali Linux with Windows 10.
While you can install as many operating systems in a single computer as your computer’s resources are limited to, there’s no reason why you shouldn’t install another useful operating system as Kali Linux. Windows is amazing and has it’s own super useful features but that doesn’t mean Kali Linux doesn’t have. Like you can do most basic and also advanced things on Windows but when it comes to security and operation testing, Kali Linux is the hero.
Comes to why not have both when you can. Having both of these operating systems in a single computer is a dream of any user. You can definitely do it without placing your Windows out or making a change to your Windows. However, installing Kali Linux on PC will make you pretty happy when it will perform way better than installed on VMware or VirtualBox. But there might be a little hurdle as well but don’t worry we’re here to help. In this post, I’ll show how to Create Bootable USB for Kali Linux on Windows.
Kali Linux 2020
If you are wondering of how Kali Linux is, how it will work, will I lose something or what’s required, Is it really helpful for you or not. All of these questions are answered within this post. Let’s head to how to Create Bootable USB for Kali Linux on Windows.
Kali Linux is an operating system like Windows macOS, Ubuntu, Linux Kernal, or any other operating system. Kali Linux is a widely-known operating system. With the help of Kali Linux, you can do many things in terms of security such as secure network or computer or server, discover and fix vulnerabilities, and more.
If you are thinking that someone might hack your system, network, or elsewhere, you can secure them with Kali Linux. The Kali Linux can be used for inappropriate purposes like hacking. In Kali Linux, you have various tools. And with them, you can do many things but if you want to hack something, it is illegal which we don’t recommend. This article is entirely for educational purposes and doesn’t support or promote illegal activities at all.
There are many types of hackers, who use different tools for different purposes. The first group of hackers is known as White Hat hackers. This group of hackers hacks or works for useful and legal things. They use their expertise and tools for a useful purpose and they use Kali Linux but for beneficial things. Another group of hackers is known as Gray Hat hackers and Black Hat hackers. These two groups perform illegal jobs and use software like Kali Linux. In this post, I’ll show how to Create Bootable USB for Kali Linux on Windows.
What You’ll Need
For the first and most essential part of the installation processes, you need a working bootable USB for Kali Linux. Without Kali Linux bootable USB, you can’t install Kali Linux with any chance. Here are what you’ll need for creating a successfully bootable USB.
- An ISO File of Kali Linux – Goto the Kali Linus download window and select which version of Kali Linux you want to download and click on it.
- A USB Pendrive with a minimum of 8GB storage.
- Power ISO
Once that’s done, install the Power ISO and make sure it’s ready. If you are having any difficulty with making a bootable USB, another great tool is Rufus. Next, is how to Create a Bootable USB for Kali Linux on Windows.
How to Create Bootable USB for Kali Linux on Windows
Before we start, make sure you have the Kali Linux ISO with you. The ISO file for Kali Linux and Power ISO is the most important file of this process. We’ll move to how to Create Bootable USB for Kali Linux on Windows.
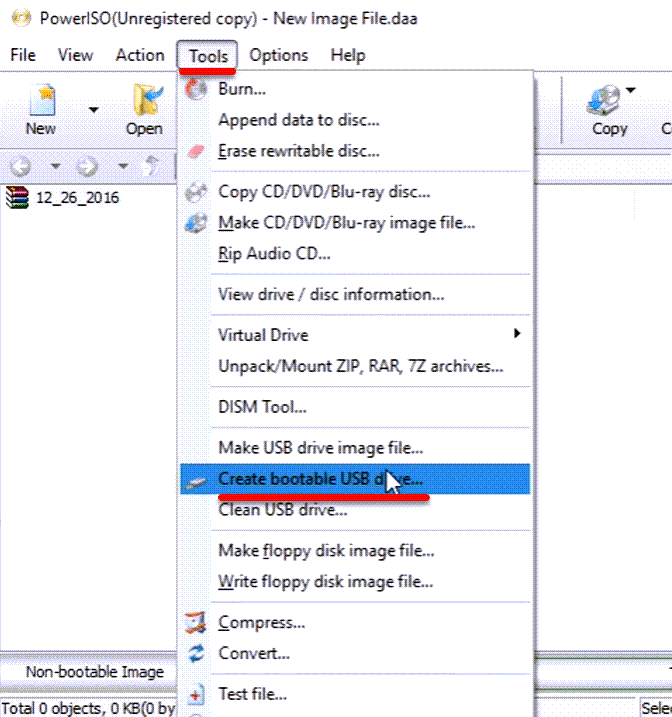
Once it’s there, open up the Power ISO. From there click on Tools then Create bootable USB Drive.
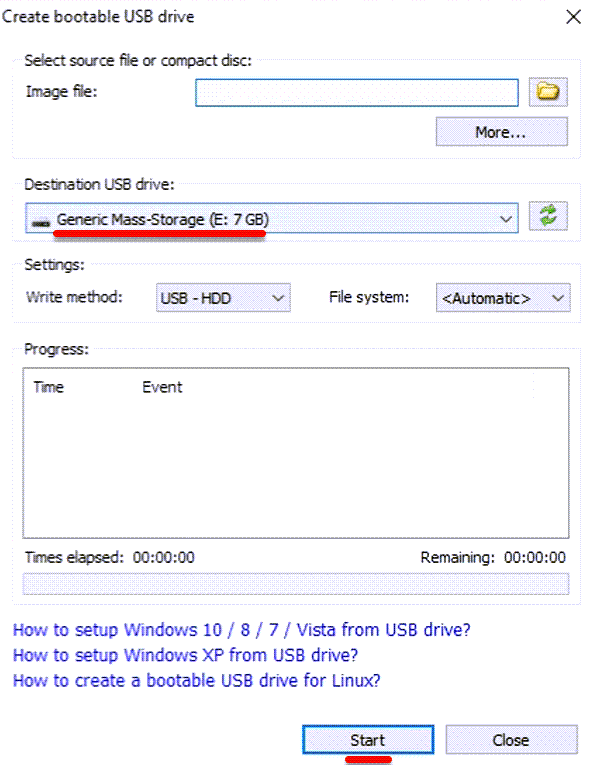
Insert your USB drive and select the USB under the USB drive option and click on the folder icon in front of Image file.
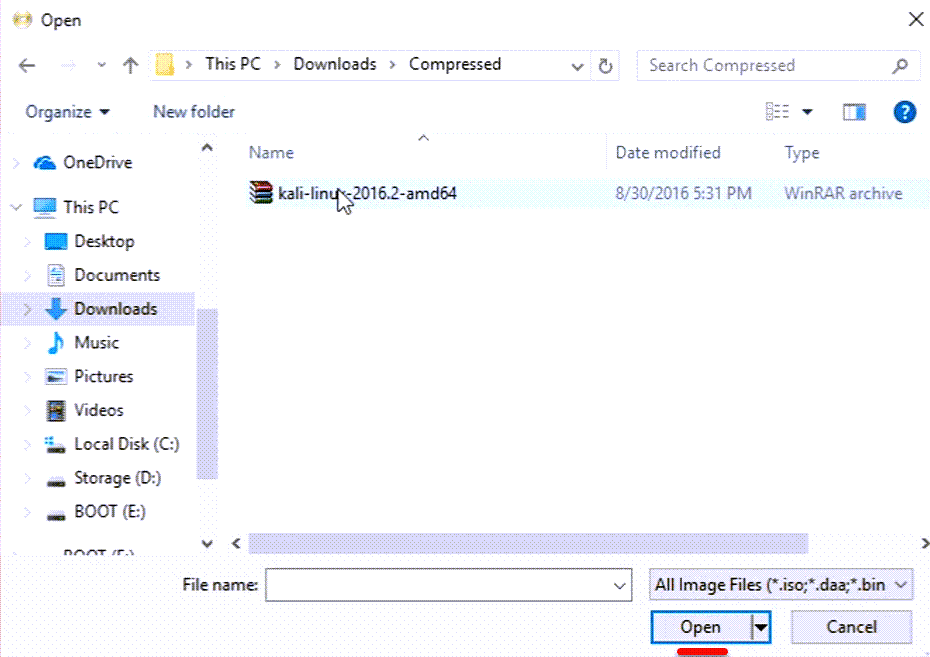
Choose the Kali Linux ISO and click on Open.
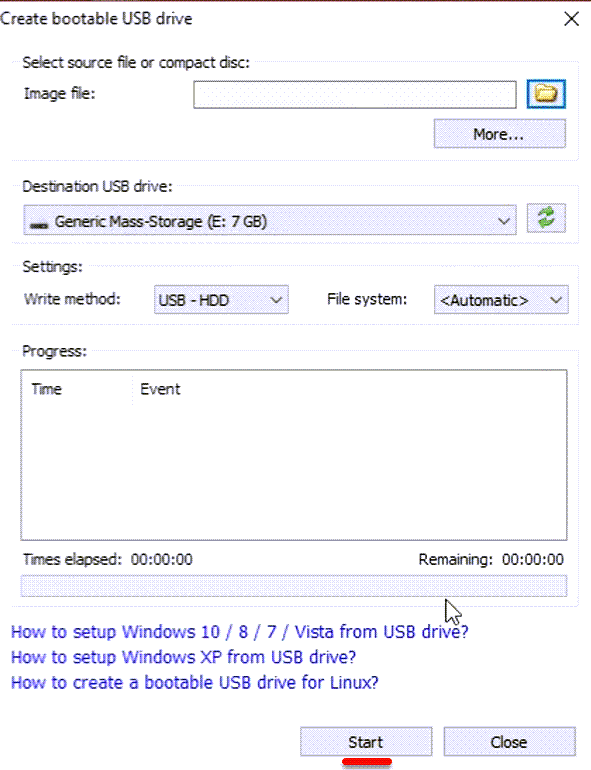
When you’re done, at the end click on Start.
Once the process is finished, the bootable USB drive has been created and is ready to use. We hope you enjoyed and learned something from this post. That was how to Create Bootable USB for Kali Linux on Windows. If you have any suggestions, questions related to the article you can let us know in the comments section.
Create Kali Bootable Installer USB Drive in Windows 10 (Kali Bootable Non-Persistence USB Drive)

This post will show how to create Kali Bootable Installer USB Drive in Windows 10 (Kali Bootable Non-Persistence USB Drive). This is the fastest method, for getting up and running with Kali Linux is to run it “live” from a USB drive.
Advantages of using Kali Live USB Drive – Non-Persistence
- It’s non-destructive — it makes no changes to the host system’s hard drive or installed OS, and to go back to normal operations, you simply remove the “Kali Live” USB drive and restart the system.
- It’s portable — you can carry Kali Linux in your pocket and have it running in minutes on an available system.
- It’s secured – you can destroy the disk and there is no way to link anything back to that USB as the physical medium is destroyed.
- Best of all – You can boot any supported computers using it thus bypass OS security.
Disadvantages of using Kali Live USB Drive – Non-Persistence
Requirements
- A verified copy of the appropriate ISO image of the latest Kali build image for the system you’ll be running it on. i.e. note i386 or x64 or armel or armhf versions.
- A copy of Win32 Disk Imager utility.
- A USB thumb drive, 4GB or larger.
Creating a Bootable Kali USB Drive on Windows 10 – Non-Persistence
Downloading Kali Linux ISO image
You need to download an Official Kali Linux ISO image from here: https://www.kali.org/downloads/
Note that you need to ensure you know which system you will be running that image on. For example, if you want to use 32 bit Kali Linux you download Kali Linux 32 bit image. For 64-bit machines, download Kali Linux 64 bit image. This is very basic and you should already know it.
Win32 Disk Imager utility
Simple again, just download Win32 Disk Imager utility from SourceForge: http://sourceforge.net/projects/win32diskimager/files/latest/download and install it. However, I found an interesting issue with Windows 10 when running Win32 Disk Imager utility for the first time. It gave me an error and just b0mbed out on me. Easy fix though, you just need to run Compatibility troubleshooter and it will fix it almost instantly.
Click on the title below to expand the troubleshooting steps. Otherwise, just keep going through rest of the steps.
Fixing Win32 Disk Imager error in Windows 10
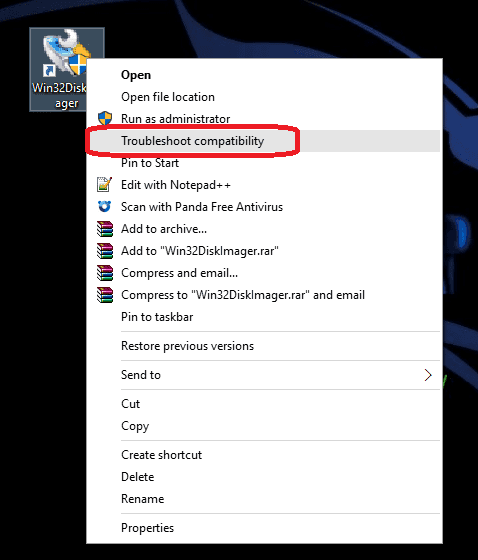
Right-click on Win32 Disk Imager shortcut icon and select “Troubleshoot compatibility”.
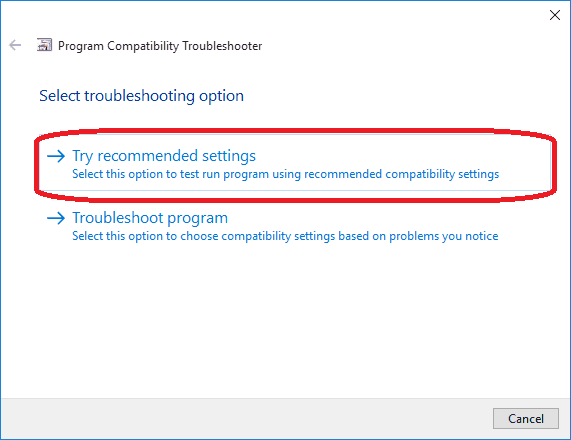
This will launch the wizard which will create few troubleshooting options for you. Click on “Try recommended settings”.
Next up, click on “Test the program” button.
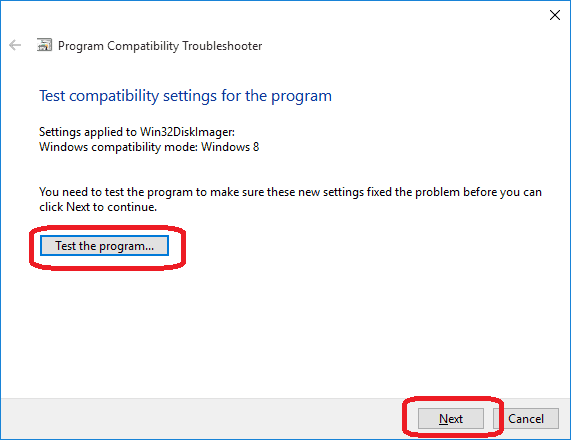
Win32 Disk Imager should run at this point without any issues.
If that worked for you, you can save these settings by clicking on “Yes, save these settings for this program” option.

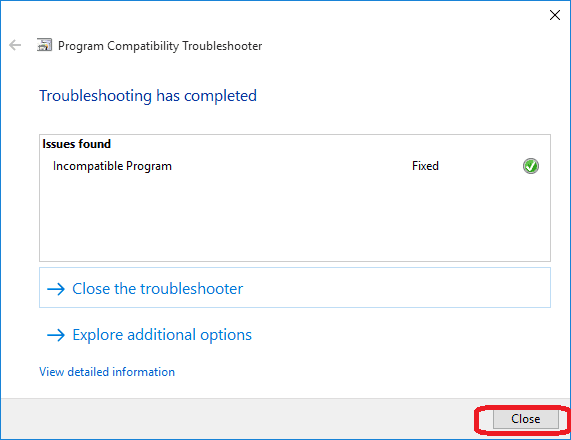
And finally close the Wizard by clicking on “Close” button.
Plug in USB drive and select ISO in Win32 Disk Imager
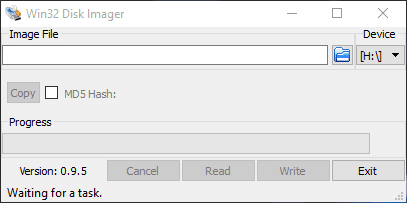
Now that Win32 Disk Imager is up and running, plug your USB drive into an available USB port on your Windows PC. Take a note of the Drive Letter (e.g. “H:\”) it uses once it mounts.
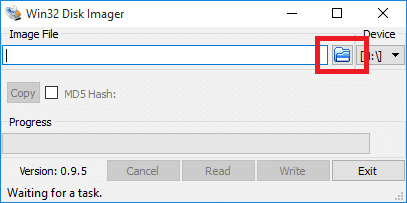
Click on the little “Folder” icon on Win32 Disk Imager to select your downloaded ISO file.
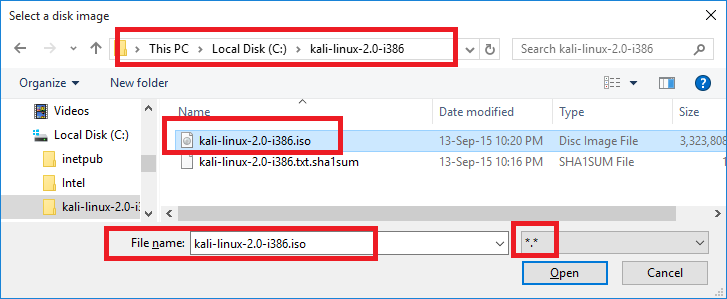
Browse and select the ISO file you downloaded. At first you won’t see the ISO file. Change the drop-down option to *.* (Next to “File name” box) to see the ISO file.
In my case, I am building this for a very old laptop which doesn’t support 64-bit, so I am using 32-bit Kali Linux ISO i.e. (kali-linux-2.0-i386.iso).
Highlight the file and select “Open” button.
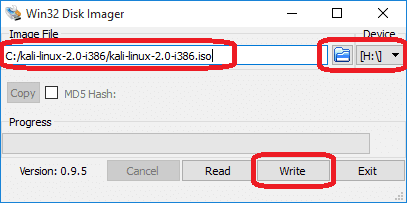
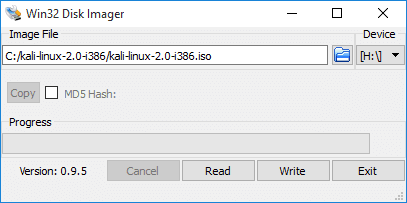
You should see something like “C:/kali-linux-2.0-i386/kali-linux-2.0-i386.iso” in the Image File location as shown below and the USB Drive letter (e.g. H:). Ensure you have the correct USB Drive selected in there. **** THIS IS A VERY IMPORTANT STEP ****
When ready and confirmed, click on the “Write” button.
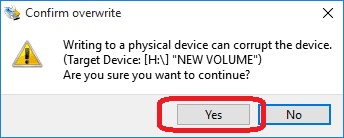
Immediately, you will have the following Pop-Up coming up to confirm your selection. Just make sure you selected the USB drive and press “Yes” button.
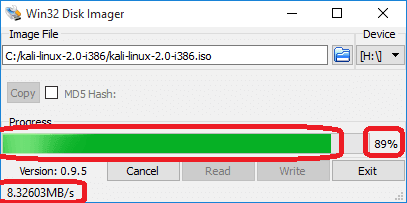
You will see a progress bar incrementing slowly. Just wait and relax.
When all done, You will have the “Write Successful” popup coming up. Press “OK” to close it.

And finally press “Exit” to close Win32 Disk Imager.
Safely eject the USB drive from the Windows machine. Now you can use this USB device to boot into Kali Linux on any supported machine.
You need to select/change BIOS setup to select USB as the first boot device. When you have this following prompt,
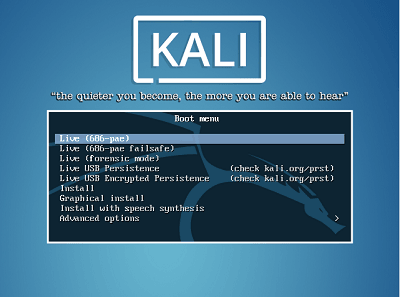
Select Live (686-pae) or Live (amd64) or similar based on the ISO you’ve selected and off you go.