- Анонимность в Kali Linux с помощью Tor и Proxychains
- Анонимность Kali Linux
- Анонимность с помощью Tor и Proxychains в Kali Linux
- Настройка ProxyChains в Kali Linux
- Использование Tor с Proxychains
- Anonymize Linux Traffic With ProxyChains and Tor
- What are ProxyChains?
- Installing Tor & Proxychains in Linux
- Configuring ProxyChains
- Usage of ProxyChains
- Conclusion 👨💻
Анонимность в Kali Linux с помощью Tor и Proxychains
В сегодняшней статье мы вернемся к вопросу анонимности в сети при использовании Kali Linux. Первое, что приходит на ум при фразе «Анонимность в Kali Linux» — это Tor или VPN. И одно и другое не может гарантировать 100% анонимности. Далее я покажу, как добиться идеальной анонимности работая в Kali Linux.
Я согласен, словосочетание «Идеальная анонимность», может вызвать сомнение, но метод о котором я расскажу можно с уверенностью назвать лучшим и почти идеальным.
Анонимность Kali Linux
Tor — хороший способ быть анонимным в сети, но многие крупные сайты и сервисы умеют определять использование и блокировать Tor. Хороший пример — Google.
Что касается VPN, то они могут хранить логи активности в своей базе данных. Многие из них, разумеется, доказывают обратное, но можем ли мы им доверять? Как показывает практика, не всегда и не всем.
Анонимность с помощью Tor и Proxychains в Kali Linux
Итак, в этой статье мы поговорим о простом, быстром и эффективном способе оставаться анонимным в Интернете. Используя данный способ, будет очень сложно деанонимизировать вас. И еще один большой ништяк — это более или менее белый IP, который не будут блокировать сайты (писали о блокировке Tor в другой статье).
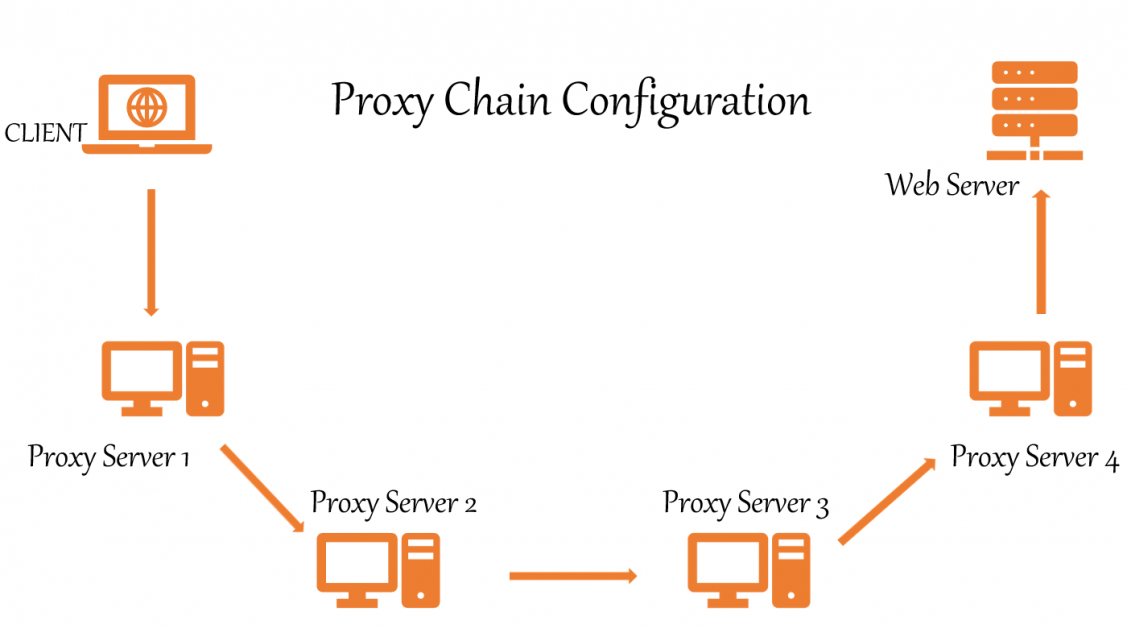
Идея проста, но действенна. Мы собираемся использовать Tor и Proxychains (прокси цепочка) вместе. Сначала мы запускаем Tor, затем запускаем цепочку прокси Proxychains. При работе тандема Tor и ProxyChains сервисы не будут видеть IP-адрес Tor.
Настройка ProxyChains в Kali Linux
Proxychains установлен по умолчанию в Kali Linux, но если по какой-то причине его в вашем дистрибутиве нет, можно установить его с помощью команды:

После этого нужно настроить. Откроем файл конфигурации:
Приведенная выше команда откроет файл конфигурации proxychains, как мы видим на скрине:

Если мы прокрутим вниз до конца файла, то увидим список прокси.

Можно добавить сюда наши прокси-серверы. Сначала тип прокси, затем IP-адрес, затем порт. Мы также можем добавить имя пользователя и пароль прокси-сервера (при необходимости).

Здесь можно не только добавлять прокси, но и менять другие настройки, на пример, установить для них тай-маут.

Можно настроить различные типы прокси-цепочек, такие, как динамическая цепочка, случайная цепочка, строгая цепочка. Есть описание всех этих настроек.

Но простым языком мы можем объяснить их следующим образом. Предположим, у нас есть список прокси в файле конфигурации.
- Динамическая цепочка прокси — В этой цепочке список прокси-серверов будет поддерживать установленный нами порядок, но если один или несколько прокси-серверов не работают, он будет пропущен, а соединение будет восстановлено следующим в списка сервером.
- Строгая цепочка прокси — В этом типе цепочки будет соблюдаться порядок подключения. Здесь важно чтобы каждый прокси-сервер стабильно работал, иначе соединение будет потеряно.
- Случайная прокси-цепочка — Этот тип соединения использует случайные прокси из списка добавленных прокси-серверов.
Где взять бесплатные прокси? На специальных сайтах, которые предоставляют бесплатные или платные прокси. К примеру: HidemyName, Genode, Proxy-List и т. д. Даже бесплатный прокси от Google может сгодиться для нашей цели.

Можно выбрать прокси по стране, скорости, типу и анонимности. Чтобы добавить прокси в proxychains.conf, нужны данные о типе, IP и порт. Я добавил два прокси в файл конфигурации.

Я собираюсь использовать динамические цепочки прокси. Поэтому удаляем ‘#’ перед динамической цепочкой и помещаем ‘#’ перед строгой цепочкой, чтобы отключить ее:

Теперь мы можем сохранить и закрыть файл конфигурации прокси-цепочек, нажав «CTRL + X», затем «Y», затем «Enter».
Использование Tor с Proxychains
Далее устанавливаем службу Tor в Kali Linux:
Anonymize Linux Traffic With ProxyChains and Tor

Invicti Web Application Security Scanner – the only solution that delivers automatic verification of vulnerabilities with Proof-Based Scanning™.
Using a Linux-based operating system to hide your identity on the internet is quite simple, and you can do it all without paying for a VPN service like those available today.
Kali Linux distributions are used to test the security of WiFi networks, websites, and servers, among other things. Operating systems like Debian and Ubuntu are also commonly utilized for these purposes.
ProxyChains and Tor can be used to chain many proxies and provide anonymity, making it more challenging to track down your actual IP address. As a result, ProxyChains hides your genuine IP address by using many proxy servers. Remember that the more proxies you use, the slower your Internet connection will become.
What are ProxyChains?
Proxychains is a UNIX program that allows us to mask our IP address by redirecting network traffic. It routes our TCP traffic through a variety of proxies, including TOR, SOCKS, and HTTP.
- TCP reconnaissance tools such as Nmap are compatible.
- Allows any TCP connection to be forwarded to the internet via a series of configurable proxies.
- The Tor network is used by default.
- Within a list, it’s possible to mix and match different proxy kinds.
- Proxychains can also be used in evading firewalls, IDS, and IPS detecting.
Proxy chaining is simple and may be accomplished by anyone, as demonstrated in this article.
This guide will show you how to set up Tor and Proxychains in Linux for anonymity.
Installing Tor & Proxychains in Linux
First, update the Linux system with the patches and the latest applications. For this we open a terminal and type:
$ sudo apt update && sudo apt upgrade Then check whether Tor and Proxychains are pre-installed or not by simply typing these commands separately :
If they were not installed, type the following command in the terminal:
$ sudo apt install proxychains tor -yPlease note that we’re not installing the Tor browser. We’re installing the tor service which is a service that runs locally on your virtual machine or on your operating system and is actually bound to a particular port on local-host. In our case, it’s going to be 9050 and that’s the default with the tor service.
To check the status of Tor :
┌──(root💀kali)-[/home/writer] └─# service tor status ● tor.service - Anonymizing overlay network for TCP (multi-instance-master) Loaded: loaded (/lib/systemd/system/tor.service; disabled; vendor preset: disabled) Active: inactive (dead)Configuring ProxyChains
First, locate the directory of ProxyChains by using this command :
┌──(root💀kali)-[~] └─# locate proxychains /etc/proxychains4.conf /etc/alternatives/proxychains /etc/alternatives/proxychains.1.gz /usr/bin/proxychains /usr/bin/proxychains4 /usr/lib/x86_64-linux-gnu/libproxychains.so.4 /usr/share/applications/kali-proxychains.desktop /usr/share/doc/libproxychains4 /usr/share/doc/proxychains4This is our configuration file.
Based on the above result, we can notice that the ProxyChain config file is located in /etc/.
We need to make some adjustments to ProxyChains configuration files. Open the config file in your favorite text editor like leafpad, vim, or nano.
Here I am using nano editor.

The config file is opened. Now you need to comment and comment out some lines to set up the proxy chains.
You’ll notice “#” in the configuration, which stands for bash language comments. You may scroll down and make the adjustments using the arrow keys.
#1. Dynamic chain should be removed from the remark comment. All you have to do is to remove a # in front of dynamic_chain.
dynamic_chain # # Dynamic - Each connection will be done via chained proxies # all proxies chained in the order as they appear in the list # at least one proxy must be online to play in chain # (dead proxies are skipped) # otherwise EINTR is returned to the app #2 . Put the comment in front of random_chain and strict_chain. Just add # in front of these.
#random_chain # # Random - Each connection will be done via random proxy # (or proxy chain, see chain_len) from the list. # this option is good to test your IDS :)#3. Max times it includes the proxy-DNS uncomment, double-check that it is uncommented. You will avoid any DNS leaks that may reveal your true IP address in this manner.
# Proxy DNS requests - no leak for DNS data proxy_dns #4. Add socks5 127.0.0.1 9050 in the proxy list the last line.
[ProxyList] # add proxy here . # meanwile # defaults set to "tor" socks4 127.0.0.1 9050 socks5 127.0.0.1 9050 Here socks4 proxy will be already given. You need to add the socks5 proxy as shown above. And finally, save the config file and exit the terminal.
Usage of ProxyChains
At first, you have to start the Tor service in order to use ProxyChains.
┌──(root💀kali)-[/home/writer] └─# service tor start After the tor service is started, you can use ProxyChains for browsing and for anonymous scanning and enumeration. You can also use Nmap or sqlmap tool with ProxyChain for scanning and searching exploits anonymously. It’s great, right?
To utilize ProxyChains, simply type the ProxyChains command in a terminal, followed by the name of the app you want to use. The format is as follows:
┌──(writer㉿kali)-[~] └─$ proxychains firefox www.flippa.com$ proxychains nmap -targetaddress$ proxychains python sqlmap -u targetYou can also test for exploits anonymously like
$ proxychains python sqlmap -u http://www.targetaddress/products.php?product=3Literally, Every TCP reconnaissance tool can be used with ProxyChains.
For the final confirmation of ProxyChains is working properly or not, just go to dnsleaktest.com and check your IP address and DNS leaks.
After running ProxyChains, you will notice that Firefox has been loaded with a different language. Now, let’s perform a DNS leak test by using a command :
$ proxychains firefox dnsleaktest.com
As you can see, my location has shifted from INDIA to PAKISTAN, and the good news is that ProxyChains continuously changing my IP address in a dynamic manner, ensuring that my anonymity is maintained.
If you wish to see a new result, simply close Firefox, clean the terminal, restart the Tor service and launch ProxyChains again. In the DNS leak test, you’ll see a variety of outcomes, as illustrated below.

Again you can see that my location has shifted from Pakistan to Russia. This is how dynamic chain proxies work. It increases the chances for more anonymity while hacking.
Conclusion 👨💻
We learned how to remain anonymous on the internet and protect our online privacy while pentesting. ProxyChains can also be used in conjunction with security tools such as Nmap and Burpsuite, and they are frequently used in evading IDS, IPS, and firewall detection.
Alternatively, if you are looking for a quick and easy setup solution then you may consider using a VPN that anonymizes traffic out of the box.