- How to install usb modem in kali linux? (2023)
- How do you connect a modem to a laptop?
- Как подключить wi-fi модем к виртуальной Кали Линукс?
- Что используется?
- Подключаем wi-fi модем к виртуальной Кали Линукс: процесс
- Gnome PPP Alternate Connect USB Modem on Kali Linux
- 1. How to install Gnome PPP on Kali Linux
- 2. How to setup Gnome PPP on Kali Linux
- Kali linux usb modem
- USB Gadget support
- Exit, save, and build
How to install usb modem in kali linux? (2023)
Connect the USB Modem: Plug the USB modem into the USB port on your wireless router. Login to the router: Connect your PC, laptop, or mobile device to the router’s wireless network and login to the admin section of your router using the password you selected during setup.
Make sure the USB dongle is connected to a free USB port. Scan all access points in the area using the dongle’s software. Connect to the router and see if that works. A security key will be required.
ModemManager is a service which controls mobile broadband
Whether built-in devices, USB dongles, bluetooth-paired telephones or professional RS232/USB devices with external power supplies, ModemManager is able to prepare and configure the modems and setup connections with them.
Connect the modem power cord into an electrical outlet, then connect the other end to the modem. Connect one end of one Ethernet cable into the back of the modem, then connect the other end into the Wide Area Network (WAN) port on the router.
- Unplug the USB modem from your computer. .
- Restart the computer. .
- Click on the wired or wireless access link on the status bar located on the right of your screen to see if your modem is detected (icon looks like a Wi-Fi signal or a plug in front of a monitor).
Try dialing your own telephone number by typing «ATDT555-1212» (replacing 555-1212 with your phone number). If you hear the modem dial, followed by a busy signal, your modem is connected and working properly. If you do not hear a dial tone, test your telephone line by connecting a working telephone.
Just plugin the Airtel 4G LTE dongle and click on the network manager icon in the panel at top right. You should see the modem detected and an option to connect to new mobile broadband network under the Mobile Broadband section. Click on it and follow through the prompts.
DESCRIPTION. ModemManager is a DBus-powered Linux daemon which provides a unified high level API for communicating with (mobile broadband) modems. It acts as a standard RIL (Radio Interface Layer) and may be used by different connection managers, like NetworkManager.
ModemManager provides a unified high level API for communicating with mobile broadband modems, regardless of the protocol used to communicate with the actual device (Generic AT, vendor-specific AT, QCDM, QMI, MBIM. ). Using. ModemManager is a system daemon and is not meant to be used directly from the command line.
ModemManager is a daemon that to control specific modem functions. It can be disabled or removed. To disable, just add the line manual to a corresponding override file.
How do you connect a modem to a laptop?
- Locate the Ethernet and USB ports on the back of the modem. .
- Locate the Ethernet port on your laptop. .
- Attach the Ethernet cable between the laptop port and the modem port.
- Restart the modem by pulling the power plug out of the back and then reattaching it.
(Video) How To Setup Internet & Networks in Kali Linux — Kali Linux Tutorials (Essentials For Beginners)
Plug one end of an Ethernet cable into your modem. Plug the other end of the Ethernet cable into the Internet, Uplink, WAN or WLAN port on your router. Plug in your router and allow at least 2 to 3 minutes for it to light up. Turn off your computer and connect an Ethernet cable to your computer.

What is modem vs router?
Your modem is a box that connects your home network to the wider Internet. A router is a box that lets all of your wired and wireless devices use that Internet connection at once and also allows them to talk to one another without having to do so over the Internet.
A lot of internet issues can be remedied quickly by simply restarting your modem and router. It’s an easy fix that’s always worth a shot. To restart your modem and router, unplug the power cable for 10 seconds and plug it back in. The equipment will take a few minutes to reboot.
Properly restart the modem and router. Power cycling the router and modem can fix internet connectivity issues and resolve problems with wireless connections. It is important to reboot both the modem and the wireless router. Check your network settings.
Disconnect the power cord—if you have both a modem and a router, disconnect both—then reconnect the modem after a minute or two. Make sure that the power switch is in the On position, if there is one. Once its lights are on, plug in your router (if applicable) and wait for it to boot up as well.
- Click the Windows Start button.
- Hover over My Computer and right-click.
- Select Properties.
- Click the Hardware tab.
- Click Device Manager.
- Click the + next to Modem and ports.
- If 3G Modem and 3G PC UI Interface is shown, the dongle is successfully connected.
Как подключить wi-fi модем к виртуальной Кали Линукс?

Как подключить wi-fi модем к виртуальной Кали Линукс? В статье рассмотрим подключение wi-fi модема к виртуальной Кали Линукс на хозяйской Windows 11. В качестве подопытной участвует старый-добрый TL-WN722 V1. Аппарат меня не подводил, жив и продолжает исправно работать. Таким образом, сейчас этот модем будет подключён к виртуальной Кали Линукс.
Что используется?
- Хозяйская ОС Windows 11 Домашняя
- Виртуальная Кали Линукс в качестве гостевой (здесь показано как её установить )
- Virtual Box + Oracle VM VirtualBox Extension Pack подходящей версии.
Что касается программного обеспечения виртуализации. Если сумели установить Кали на виртуальную основу, думаю, что и пакет VirtualBox Extension Pack уже к VirtualBox прикреплён. Всё нужное для скачивания, а также процессы установки найдёте по ссылкам вверху. Здесь описываю процесс работы с указанным модемом. Перед началом работы модем предпочтительнее всего правильно установить в самой хозяйской ОС-и. Я воспользовался офсайтом с драйверами к моей версии. С установкой в Windows 11 проблем не возникло даже со старыми драйверами, и модем успешно определился системой:


Модем TL-WN722 в USB порту, проверяю правильность подключения в сетевых настройках. Вызываем строку Выполнить с помощью WIN + R ->

Подключаем wi-fi модем к виртуальной Кали Линукс: процесс
Запускаю виртуальную Кали и перехожу в панель инструментов. Попробую подключить модем вживую. Ждём появления рабочего стола Кали. В панели виртуальной Кали Линукс прохожу по Устройства — USB — Настроить USB… Установлю персональный фильтр для модема:


Проверим подключение уже в самой Кали. Запускаем терминал и проверим сетевые подключения:
Если ничего нет, повторно залезаем в панель инструментов и указываем на нашу «альфа-карту»:

Переподключение между интерфейсами часто сопровождается в Windows характерным звуком. Если всё настроено верно, Кали всякий раз автоматически будет подключать модем, если тот вставлен в USB порт. Повторно проверим список интерфейсов:
Сразу проверим работоспособность модема в гостевой машине. Самый простой способ — попробовать запустить его в режиме мониторинга (если нужно, введите пароль для Кали):
sudo airmon-ng start wlan0
Вот и он — wlan0:

и сразу повторно проверим интерфейсы:
Интерфейс, как и положено, переименовался в wlan0mon:

Следующей командой запускаем сниффер:
Модем начинает нюхать близлежащие беспроводные сети. В общем, кто в курсе, знает, что на нижеследующем фото происходит:

У меня указанный модем вполне успешно подключён к виртуальной Кали Линукс и готов к работе.
Gnome PPP Alternate Connect USB Modem on Kali Linux
How to connect USB modem using Gnome PPP — There’s some method to connect internet using USB modem on Kali likes wvdial, sakis3g, Gnome PPP and many others. This post will guide you how to install and setup Gnome PPP on Kali Linux.
If you using wvdial, you must configure it via CLI ( Command Line Interface ), but not when you using Gnome PPP. Yes, this application is running in GUI ( Graphic User Interface ). So you’ll be easy to configure it.
Gnome PPP is a modem dial-up tool designed to integrate nicely into Gnome 2 Desktop Environment. GNOME PPP is very similar to GPPP dial-up utility for Gnome 1 and KDE equivalent, KPPP. KPPP.
Since it is a graphical fronted for excellent wvdial, very little knowledge is needed to setup dial-up connection using this application. It features ease of use, auto detection of your modem and connection monitoring.
1. How to install Gnome PPP on Kali Linux
To install gnome ppp on Kali Linux, we’ll use terminal. So, open Kali Linux terminal then type and run this command :
The installing process will start and displays on your terminal. Just wait until it clear and finish.
2. How to setup Gnome PPP on Kali Linux
After finished the installation, next configure / setup the connection. Here’s step by step to guide you :
- Open gnome PPP from Application >Internet >Gnome PPP
- Fill required username and password and dialup number
- You can give checklist to remember password
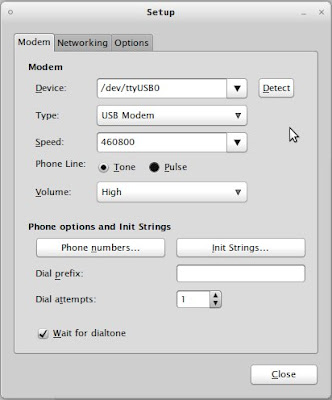
- Now click at Setup button
- Hit Detect to make Gnome PPP start detecting your USB modem
- For another setting, do yourself please
- Now you can Close or leave them
- Hit Connect to test and start connecting
- If you already connected, Gnome PPP will tell «Connected» with Running Time, Details and Disconnect button.
That’s all I can write about How to install, setup and configure Gnome PPP as alternate connect USB modem on Kali Linux. Hope you’ve enjoyed reading this tutorial as much I’ve enjoyed writing it. Thanks for visiting us.
Kali linux usb modem
CDC ACM support is required for Proxmark and similar devices
Navigate to Device Drivers -> USB support and select the following option:
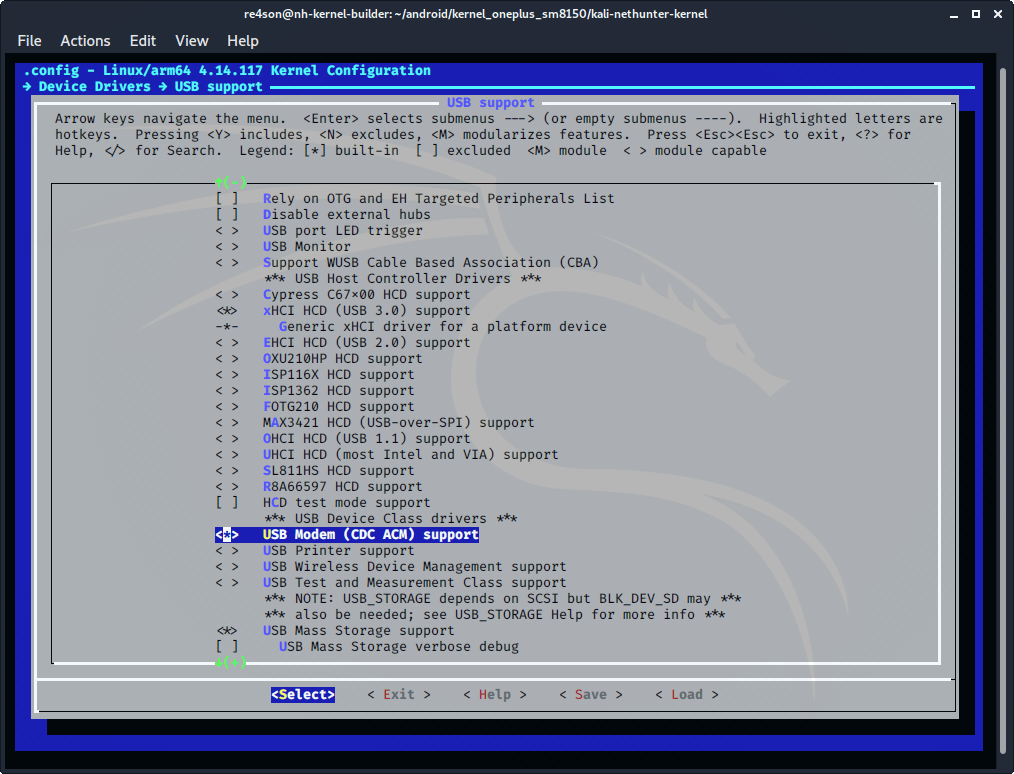
USB Gadget support
Please note that kernels above 4.x version (most of the times) don’t need any patches, we can simply enable in kernel config as seen below.
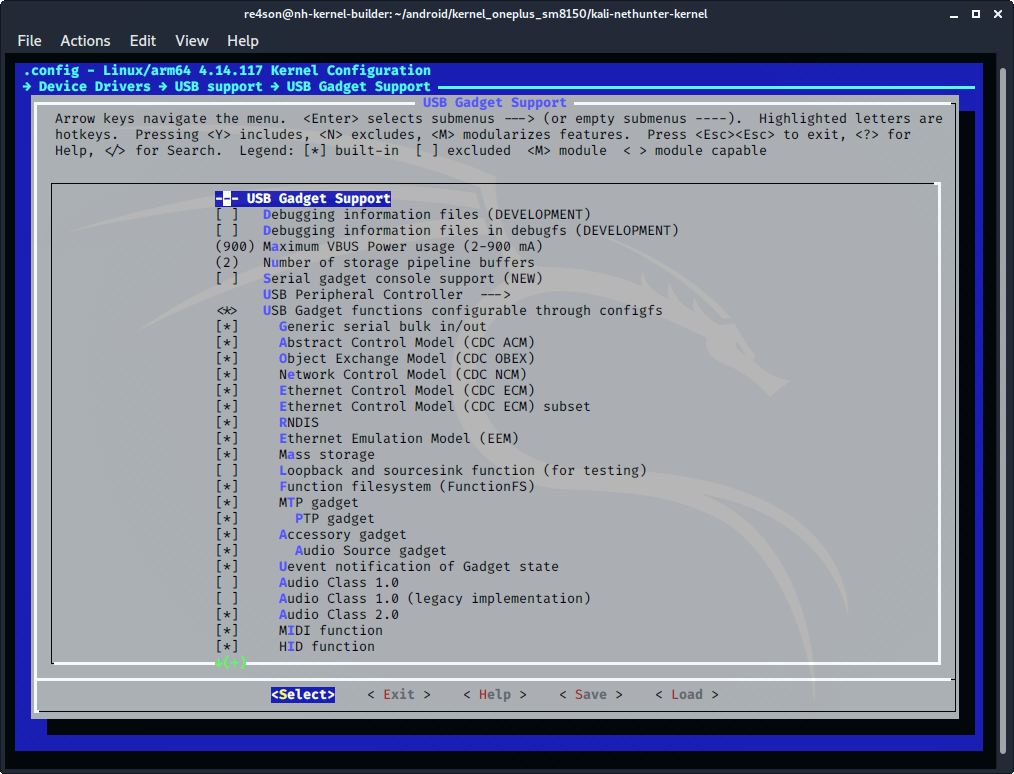
Generic serial, CDC ACM, CDC ECM, and HID are required for various USB based attacks.
Navigate to Device Drivers -> USB support -> USB Gadget Support and choose:
- select “Generic serial bulk in/out” (CONFIG_USB_CONFIGFS_SERIAL=y)
- select “Abstract Control Model (CDC ACM)” (CONFIG_USB_CONFIGFS_ACM=y)
- select “Object Exchange Model (CDC OBEX)” (CONFIG_USB_CONFIGFS_OBEX=y)
- select “Network Control Model (CDC NCM)” (CONFIG_USB_CONFIGFS_NCM=y)
- select “Ethernet Control Model (CDC ECM)” (CONFIG_USB_CONFIGFS_ECM=y)
- select “Ethernet Control Model (CDC ECM) subset” (CONFIG_USB_CONFIGFS_ECM_SUBSET=y)
- select “RNDIS” (CONFIG_USB_CONFIGFS_RNDIS=y)
- select “Ethernet Emulation Model (EEM)” (CONFIG_USB_CONFIGFS_EEM=y)
- select “Mass Storage” (CONFIG_USB_CONFIGFS_MASS_STORAGE=y)
Exit, save, and build
Updated on: 2023-Mar-06
Author: re4son