- Create Kali Linux Live USB on macOS
- Incredible Benefits of Creating a Kali Linux Live USB
- A Comprehensive Guide to Create Kali Linux Live USB
- Step 1: Download the Kali Linux ISO image
- Step 2: Insert the USB drive
- Step 3: Open the Terminal
- Step 4: Identify the USB drive
- Step 5: Unmount the USB drive
- Step 6: Convert the Kali Linux ISO to an IMG file
- Step 7: Write the IMG file to the USB drive
- Step 8: Eject the USB drive
- Kali linux usb on mac
- What You’ll Need
- Kali Linux Live USB Install Procedure
- Creating a Bootable Kali USB Drive on macOS/OS X (DD)
- Creating a Bootable Kali USB Drive on macOS/OS X (Etcher)
- Kali Linux загрузка на MacBook (EFI) c USB
- UNetbootin
- Заказать создание и поддержку безопасной IT-инфраструктуры любой сложности
Create Kali Linux Live USB on macOS
Creating a Kali Linux Live USB inside macOS can be a valuable tool for anyone interested in cybersecurity and ethical hacking. You are here to create Kali Linux Live USB inside macOS and that is what we are going to do.
Incredible Benefits of Creating a Kali Linux Live USB
There are numerous benefits of Live USB of Kali Linux and here are some of them:
Experimentation: Creating a Live USB allows you to experiment with Kali Linux without installing it on your Mac. This way, you can test different features and tools without the risk of affecting your existing operating system.
Portability: A Kali Linux Live USB is a portable operating system that can be used on any computer that supports booting from USB. This means you can use Kali Linux on different devices without having to install it on each one.
Security Testing: Kali Linux is a popular tool among ethical hackers and cybersecurity professionals for testing the security of computer systems and networks. By creating a Kali Linux Live USB, you can perform security tests on different systems without leaving any traces on the host system.
Learning Opportunity: Kali Linux is a powerful tool for learning about cybersecurity and ethical hacking. By creating a Kali Linux Live USB, you can explore different features and tools in a safe and controlled environment, and learn about how they can be used to protect against cyber threats.
A Comprehensive Guide to Create Kali Linux Live USB

Sure, here’s a step-by-step guide on how to create a Kali Linux Live USB on macOS:
Step 1: Download the Kali Linux ISO image
Before you can create a Kali Linux Live USB, you will need to download the Kali Linux ISO Image. You can choose between 32-bit or 64-bit versions depending on your computer’s architecture. Select and download the ISO file of Kali Linux from the server. You are recommended to use third-party applications like IDM (Internet Download Manager) for faster downloading.
Step 2: Insert the USB drive
The second step is to prepare your trusty USB drive. Make sure it’s at least 8GB and ready to be transformed into a powerful tool for hacking and cybersecurity. Keep in mind that any data currently on the drive will be sacrificed for the greater good, so be sure to give it a proper farewell and back up any crucial files.
Step 3: Open the Terminal

Open the Terminal application on your Mac. You can find the Terminal app in the Utilities folder, which is located in the Applications folder.
- Click on the Finder icon in your Dock, which is typically located at the bottom of your screen.
- From the Finder menu bar at the top of your screen, click on Go and then select Utilities.
- In the Utilities folder, find and double-click on Terminal to launch it.
Step 4: Identify the USB drive
In the Terminal, type the command “diskutil list” and press Enter. This will display a list of all the drives connected to your Mac. Identify the USB drive by its name or capacity. Note the disk identifier of the USB drive, which will be in the format “diskX“, where X is a number.
Step 5: Unmount the USB drive
In the Terminal, type the command “diskutil unmountDisk /dev/diskX” and press Enter. Replace “diskX” with the disk identifier of the USB drive you identified in step 4. This will unmount the USB drive so that it can be written to.
Step 6: Convert the Kali Linux ISO to an IMG file
In the Terminal, type the command:
hdiutil convert -format UDRW -o /path/to/kali-linux-2023.1-amd64.iso /path/to/kali-linux-2023.1-amd64.imgAnd press Enter. Don’t forget to replace “/path/to/kali-linux-2023.1-amd64.iso” with the actual path to the Kali Linux ISO image that you downloaded in step 1, and “/path/to/kali-linux-2023.1-amd64.img” with the desired path and filename for the resulting IMG file. This will convert the Kali Linux ISO image to an IMG file that can be written to the USB drive.
Step 7: Write the IMG file to the USB drive
In the Terminal, type the command below and press Enter.
sudo dd if=/path/to/kali-linux-2023.1-amd64.img of=/dev/rdiskX bs=1mReplace “/path/to/kali-linux-2023.1-amd64.img” with the actual path and filename of the IMG file you created in step 6, and “/dev/rdiskX” with the device name of the USB drive (note the “r” in “rdiskX”). This will write the IMG file to the USB drive. This process may take several minutes, depending on the speed of your computer and USB drive.
Step 8: Eject the USB drive
In the Terminal, type the command “diskutil eject /dev/diskX” and press Enter.
Replace “diskX” with the disk identifier of the USB drive you identified in step 4. This will eject the USB drive so that it can be safely removed from your Mac.
That’s it! You have successfully created a Kali Linux Live USB on macOS and can use it to experiment with Kali Linux wherever you go.
Kali linux usb on mac
Our favourite way, and the fastest method, for getting up and running with Kali Linux is to run it “live” from a USB drive. This method has several advantages:
- It’s non-destructive — it makes no changes to the host system’s hard drive or installed OS, and to go back to normal operations, you simply remove the “Kali Live” USB drive and restart the system.
- It’s portable — you can carry Kali Linux in your pocket and have it running in minutes on an available system
- It’s customizable — you can roll your own custom Kali Linux ISO image and put it onto a USB drive using the same procedures
- It’s potentially persistent — with a bit of extra effort, you can configure your Kali Linux “live” USB drive to have persistent storage, so the data you collect is saved across reboots
In order to do this, we first need to create a bootable USB drive which has been set up from an ISO image of Kali Linux.
What You’ll Need
- A verified copy of the appropriate ISO image of the latest Kali build image for the system you’ll be running it on: see the details on downloading official Kali Linux images.
- If you’re running under macOS/OS X, you can use the dd command, which is pre-installed on those platforms, or use Etcher.
- A USB thumb drive, 4GB or larger. (Systems with a direct SD card slot can use an SD card with similar capacity. The procedure is identical.)
Kali Linux Live USB Install Procedure
The specifics of this procedure will vary depending on whether you’re doing it on a Windows, Linux, or macOS/OS X system.
Creating a Bootable Kali USB Drive on macOS/OS X (DD)
macOS/OS X is based on UNIX, so creating a bootable Kali Linux USB drive in an macOS/OS X environment is similar to doing it on Linux. Once you’ve downloaded and verified your chosen Kali ISO file, you use dd to copy it over to your USB drive. If you would prefer to use Etcher, then follow the same directions as a Windows user. Note that the USB drive will have a path similar to /dev/disk2.
WARNING: Although the process of imaging Kali on a USB drive is very easy, you can just as easily overwrite a disk drive you didn’t intend to with dd if you do not understand what you are doing, or if you specify an incorrect output path. Double-check what you’re doing before you do it, it’ll be too late afterwards.
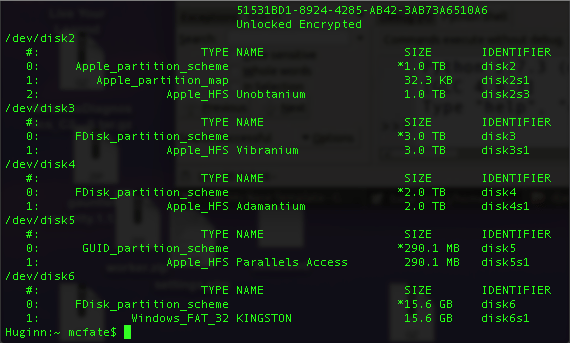
- Without the USB drive plugged into the system, open a Terminal window, and type the command diskutil list at the command prompt.
- You will get a list of the device paths (looking like /dev/disk0, /dev/disk1, etc.) of the disks mounted on your system, along with information on the partitions on each of the disks.

3. Plug in your USB device to your Apple computer’s USB port and run the command diskutil list a second time. Your USB drive’s path will most likely be the last one. In any case, it will be one which wasn’t present before. In this example, you can see that there is now a /dev/disk6 which wasn’t previously present.
4. Unmount the drive (assuming, for this example, the USB drive is /dev/disk6 — do not simply copy this, verify the correct path on your own system!):
- Proceed to (carefully!) image the Kali ISO file on the USB device. The following command assumes that your USB drive is on the path /dev/disk6, and you’re in the same directory with your Kali Linux ISO, which is named “kali-linux-2023.2-live-amd64.iso”. We will replace /dev/disk6 with /dev/rdisk6 to improve the write speeds:
There is a chance you may receive an error when running the above command, that you will receive the following error:
If this is the case, please change the 4M to be 4m . Additionally, increasing the blocksize (bs) will speed up the write progress, but will also increase the chances of creating a bad USB drive. Using the given value on macOS/OS X has produced reliable images consistently.
Another potential error will be that status=progress does not work on your version of macOS. If this is the case, remove this section and instead use CTRL+T to measure status.
Imaging the USB drive can take a good amount of time, over half an hour is not unusual, as the sample output below shows. Be patient!
The dd command provides no feedback until it’s completed, but if your drive has an access indicator, you’ll probably see it flickering from time to time. The time to dd the image across will depend on the speed of the system used, USB drive itself, and USB port it’s inserted into. Once dd has finished imaging the drive, it will output something that looks like this:
Creating a Bootable Kali USB Drive on macOS/OS X (Etcher)
Alternatively, Etcher can be used.
- Download and run Etcher.
- Choose the Kali Linux ISO file to be imaged with “select image” and verify that the USB drive to be overwritten is the correct one. Click the “Flash!” button once ready.
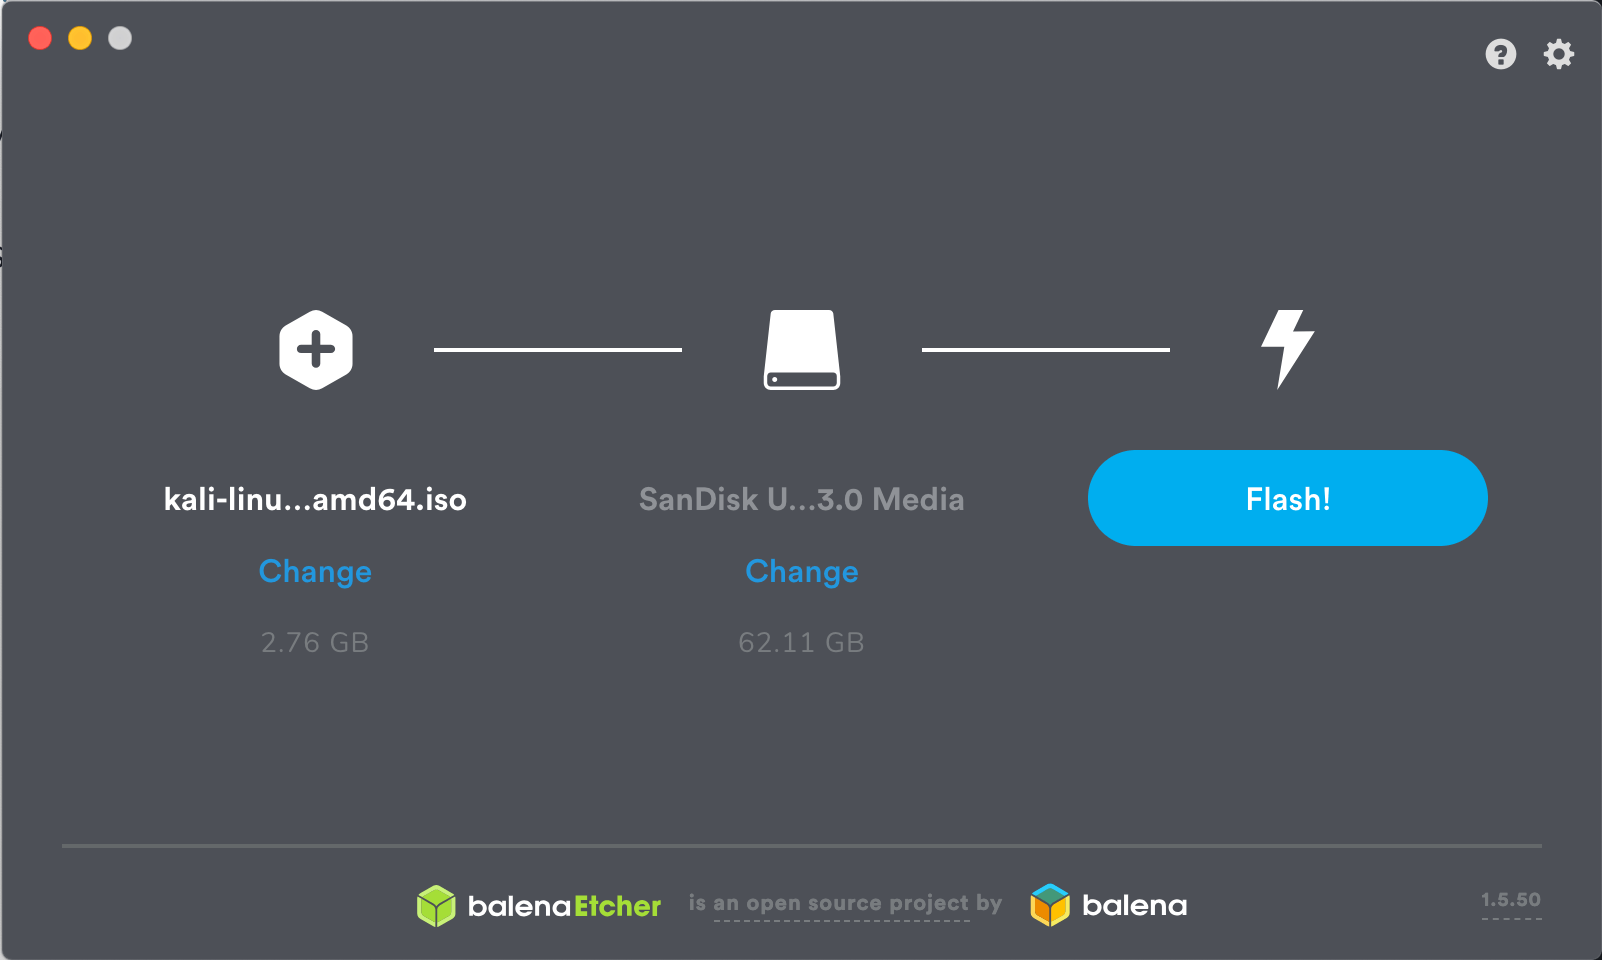
3. Once Etcher alerts you that the image has been flashed, you can safely remove the USB drive.
You can now boot into a Kali Live / Installer environment using the USB device.
To boot from an alternate drive on an macOS/OS X system, bring up the boot menu by pressing the Option key immediately after powering on the device and select the drive you want to use.
Updated on: 2023-May-30
Author: g0tmi1k
Kali Linux загрузка на MacBook (EFI) c USB
Сегодня мы запустим Kali Linux с USB носителя на MacBook Air. Стандартные методы тут не помогут. Если развернуть дистрибьютив с помощью Unetbootin или скопировать его с помощью утилиты dd на USB носитель, то Mac просто не увидит загрузчика на этом носителе. Нужно создать специальный загрузчик, чтобы EFI увидел и запустил GRUB.
Для начала скачаем UNetbootin и развернем с помощью него образ Kali Linux на USB носитель.
UNetbootin

Запустив UNetbootin мы увидим вполне понятный интерфейс. Т.к. Kali Linux все еще не появился в списке систем, которые можно скачать, то мы выберем Diskimage (образ диска) Тип образа: ISO и укажем путь к образу Kali Linux. Далее выберем тип носителя, на который будем разворачивать образ (Type: USB Drive) и выберем само устройство (Drive: Название) (тут стоит быть аккуратным, потому что можно убить нужный раздел). И нажмем OK.
После того, как развертывание образа будет завершено, создадим в корне на носителе папку efi и в ней папку boot
Скопируем в папку boot образ GRUB (нам потребуются фалы и папки BOOTX64.efi, MokManager.efi, fonts, grubx64.efi), который возьмем у Linux Fedora (скачать его можно с официального источника или с нашего сервера)
и так же создадим конфиг для GRUB (в папке efi/boot создадим файл grub.cfg)
И в него запишем пункты меню для запуска. Далее привожу целиком конфиг (возможно (hd1,1) придется поменять, если у вас более 1 HDD).
function load_video insmod efi_gop
insmod efi_uga
insmod video_bochs
insmod video_cirrus
insmod all_video
>
load_video
set gfxpayload=keep
menuentry «Kali — Boot Non Persistent Mode» set root=(hd1,1)
linuxefi /live/vmlinuz boot=live noconfig=sudo username=root hostname=kali
initrdefi /live/initrd.img
>
menuentry «Kali — Boot Persistent» set root=(hd1,1)
linuxefi /live/vmlinuz boot=live noconfig=sudo username=root hostname=kali persistence
initrdefi /live/initrd.img
>
menuentry «Kali Failsafe» set root=(hd1,1)
linuxefi /live/vmlinuz boot=live config memtest noapic noapm nodma nomce nolapic nomodeset nosmp nosplash vga=normal
initrdefi /live/initrd.img
>
menuentry «Kali Forensics — No Drive or Swap Mount» set root=(hd1,1)
linuxefi /live/vmlinuz boot=live noconfig=sudo username=root hostname=kali noswap noautomount
initrdefi /live/initrd.img
>
menuentry «Kali Graphical Install» set root=(hd1,1)
linuxefi /install/gtk/vmlinuz video=vesa:ywrap,mtrr vga=788
initrdefi /install/gtk/initrd.gz
>
menuentry «Kali Text Install» set root=(hd1,1)
linuxefi /install/vmlinuz video=vesa:ywrap,mtrr vga=788
initrdefi /install/initrd.gz
>
Заказать создание и поддержку безопасной IT-инфраструктуры любой сложности
Быть уверенным в своей IT-инфраструктуре – это быть уверенным в завтрашнем дне.