Kali linux usb сохранение
In this workshop, we will examine the various features available to us when booting Kali Linux from USB devices. We will explore features such as persistence, creating LUKS encrypted persistence stores, and even dabble in “LUKS Nuking” our USB drive. The default Kali Linux ISOs (from 1.0.7 onwards) support USB encrypted persistence.
0x01 — Start by imaging the Kali ISO onto your USB drive (ours was /dev/sdb). Once done, you can inspect the USB partition structure using parted /dev/sdb print:
For ease of use, please use a root account. This can be done with “sudo su”.
[email protected]:~$ dd if=kali-linux-2023.2-live-amd64.iso of=/dev/sdb conv=fsync bs=4M 0x02 — Create and format an additional partition on the USB drive. In our example, we create a persistent partition in the empty space above the Kali Live partitions:
When fdisk completes, the new partition should have been created at /dev/sdb3 ; this can be verified with the command lsblk .
0x03 — Encrypt the partition with LUKS:
[email protected]:~$ cryptsetup --verbose --verify-passphrase luksFormat /dev/sdb3 0x04 — Open the encrypted partition:
[email protected]:~$ cryptsetup luksOpen /dev/sdb3 my_usb 0x05 — Create an ext4 filesystem and label it:
[email protected]:~$ mkfs.ext4 -L persistence /dev/mapper/my_usb [email protected]:~$ e2label /dev/mapper/my_usb persistence 0x06 — Mount the partition and create your persistence.conf so changes persist across reboots:
[email protected]:~$ mkdir -p /mnt/my_usb [email protected]:~$ mount /dev/mapper/my_usb /mnt/my_usb [email protected]:~$ echo "/ union" | sudo tee /mnt/my_usb/persistence.conf [email protected]:~$ umount /dev/mapper/my_usb 0x07 — Close the encrypted partition:
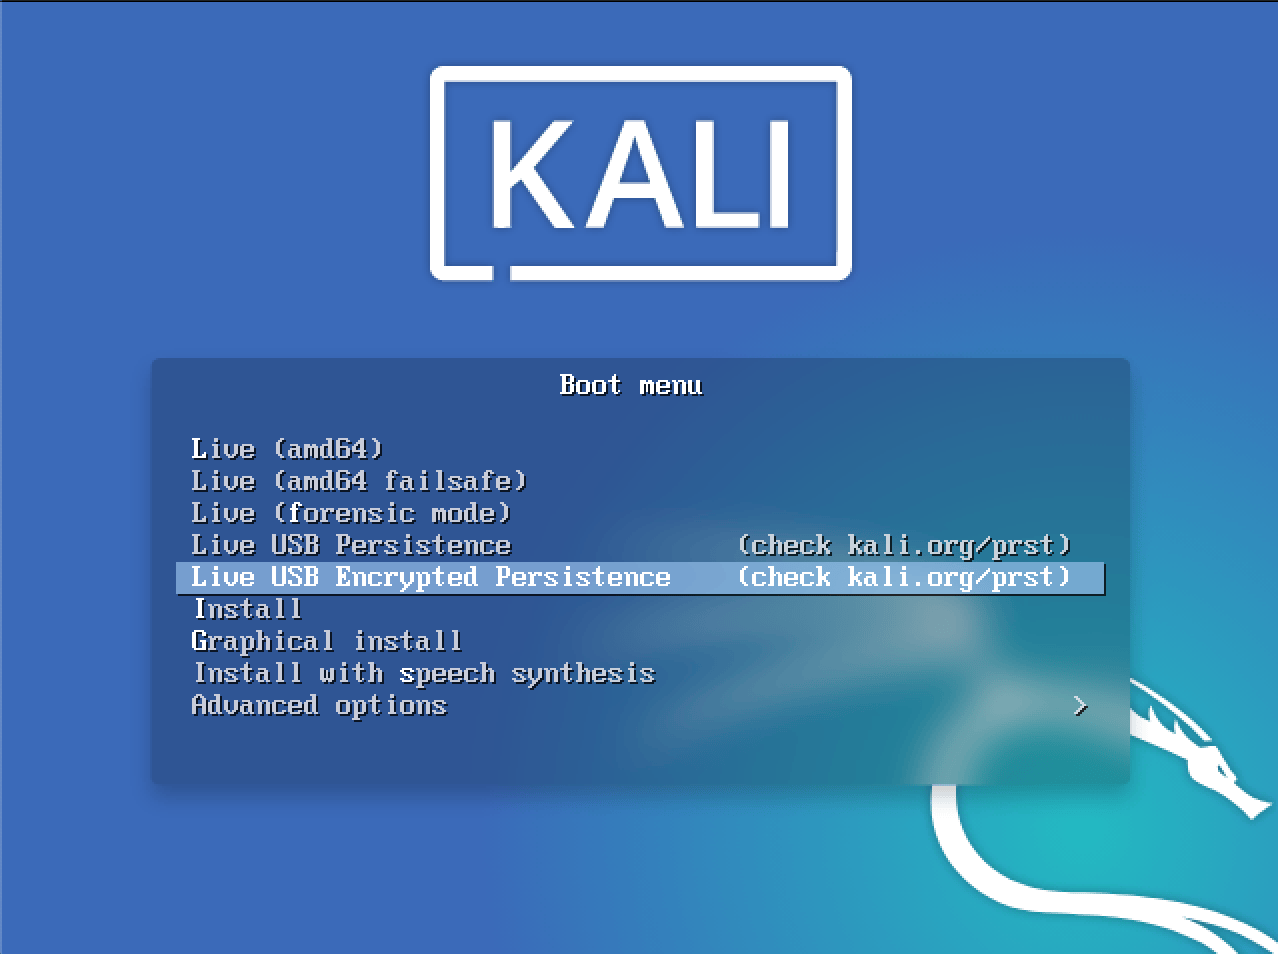
[email protected]:~$ cryptsetup luksClose /dev/mapper/my_usb Now your USB drive is ready to plug in and reboot into Live USB Encrypted Persistence mode.
Multiple Persistence Stores
At this point we should have the following partition structure:
We can add additional persistence stores to the USB drive, both encrypted or not… and choose which persistence store we want to load, at boot time. Let’s create one more additional non-encrypted store. We’ll label and call it “work”.
0x01 — Create an additional, 4th partition which will hold the “work” data. We’ll give it another 5GB of space:
[email protected]:~$ parted /dev/sdb GNU Parted 2.3 Using /dev/sdb Welcome to GNU Parted! Type 'help' to view a list of commands. (parted) print Model: SanDisk SanDisk Ultra (scsi) Disk /dev/sdb: 31.6GB Sector size (logical/physical): 512B/512B Partition Table: msdos Number Start End Size Type File system Flags 1 32.8kB 2988MB 2988MB primary boot, hidden 2 2988MB 3050MB 64.9MB primary fat16 3 3050MB 10.0GB 6947MB primary (parted) mkpart primary 10000 15000 (parted) quit Information: You may need to update /etc/fstab. 0x02 — Format the fourth partition, label it “work”:
[email protected]:~$ mkfs.ext4 /dev/sdb4 [email protected]:~$ e2label /dev/sdb4 work 0x03 — Mount this new partition and create a persistence.conf in it:
[email protected]:~$ mkdir -p /mnt/usb [email protected]:~$ mount /dev/sdb4 /mnt/usb [email protected]:~$ echo "/ union" > /mnt/usb/persistence.conf [email protected]:~$ umount /mnt/usb Boot the computer, and set it to boot from USB. When the boot menu appears, edit the persistence-label parameter to point to your preferred persistence store!
Emergency Self Destruction of Data in Kali
As penetration testers, we often need to travel with sensitive data stored on our laptops. Of course, we use full disk encryption wherever possible, including our Kali Linux machines, which tend to contain the most sensitive materials. Let’s configure a nuke password as a safety measure:
[email protected]:~$ sudo apt install -y cryptsetup-nuke-password [email protected]:~$ dpkg-reconfigure cryptsetup-nuke-password The configured nuke password will be stored in the initrd and will be usable with all encrypted partitions that you can unlock at boot time.
Backup you LUKS keyslots and encrypt them:
[email protected]:~$ cryptsetup luksHeaderBackup --header-backup-file luksheader.back /dev/sdb3 [email protected]:~$ openssl enc -e -aes-256-cbc -in luksheader.back -out luksheader.back.enc Now boot into your encrypted store, and give the Nuke password, rather than the real decryption password. This will render any info on the encrypted store useless. Once this is done, verify that the data is indeed inacessible.
Lets restore the data now. We’ll decrypt our backup of the LUKS keyslots, and restore them to the encrypted partition:
[email protected]:~$ openssl enc -d -aes-256-cbc -in luksheader.back.enc -out luksheader.back [email protected]:~$ cryptsetup luksHeaderRestore --header-backup-file luksheader.back /dev/sdb3 Our slots are now restored. All we have to do is simply reboot and provide our normal LUKS password and the system is back to its original state.
Updated on: 2023-May-30
Author: g0tmi1k
Kali linux usb сохранение
Kali Linux “Live” has two options in the default boot menu which enable persistence — the preservation of data on the “Kali Live” USB drive — across reboots of “Kali Live”. This can be an extremely useful enhancement, and enables you to retain documents, collected testing results, configurations, etc., when running Kali Linux “Live” from the USB drive, even across different systems. The persistent data is stored in its own partition on the USB drive, which can also be optionally LUKS-encrypted.
To make use of the USB persistence options at boot time, you’ll need to do some additional setup on your “Kali Linux Live” USB drive; this article will show you how.
This guide assumes that you have already created a Kali Linux “Live” USB drive as described in the doc page for that subject. For the purposes of this article, we’ll assume you’re working on a Linux-based system.
You’ll need to have root privileges to do this procedure, or the ability to escalate your privileges with sudo .
In this example, we assume:
- your USB drive is /dev/sdb (last letter will probably be different). Check the connected usb drives with the command lsblk and modify the device name in the usb variable before running the commands)
- your USB drive has a capacity of at least 8GB — the Kali Linux image takes over 3GB, and for this guide, we’ll be creating a new partition of about 4GB to store our persistent data in
In this example, we’ll create a new partition to store our persistent data into, starting right above the second Kali Live partition, put an ext4 file system onto it, and create a persistence.conf file on the new partition.
- First, begin by imaging the latest Kali Linux ISO (currently 2023.2) to your USB drive as described in this article. We’re going to assume that the two partitions created by the imaging are /dev/sdb1 and /dev/sdb2 . This can be verified with the command lsblk .
- Create and format an additional partition on the USB drive. First, let’s create the new partition in the empty space above our Kali Live partitions. We have to do this from the command line as gparted will read the imaged ISO as a large block:
[email protected]:~$ usb=/dev/sdb [email protected]:~$ [email protected]:~$ sudo fdisk $usb When fdisk completes, the new partition should have been created at /dev/sdb3 ; again, this can be verified with the command lsblk .
[email protected]:~$ usb=/dev/sdb [email protected]:~$ [email protected]:~$ sudo mkfs.ext4 -L persistence $3
- Create a mount point, mount the new partition there, and then create the configuration file to enable persistence. Finally, unmount the partition:
[email protected]:~$ usb=/dev/sdb [email protected]:~$ [email protected]:~$ sudo mkdir -p /mnt/my_usb [email protected]:~$ sudo mount $3 /mnt/my_usb [email protected]:~$ echo "/ union" | sudo tee /mnt/my_usb/persistence.conf [email protected]:~$ sudo umount $3
We can now reboot into “Live USB Persistance.” Keep in mind we will need to select this boot option every time we wish to have our work stored.
Статья Как сделать Kali Live USB с сохранением обновлений, файлов и программ
Kali Live USB persistence (Потенциально стойкий) — сохранение данных на USB флешке. Это может быть чрезвычайно полезным дополнением, и позволяет сохранить документы, собранные результаты тестирования, конфигурации и т.д.
Rufus для создания образа на USB флешки
Запускаем Rufus и выбираем файл Kali Linux

Далее выбираем мод DD Image

Жмем Start и OK. После того как образ был записан на флешке просто закрываем программу.
Теперь у нас есть образ Kali Linux на флешке.
Далее открываем программу MiniTool Partition Wizard.
Щелкните правой кнопкой мыши на нераспределенное место на флешке и кликните Create, жмите OK.

Выбираем параметры как в картинке жмем OK потом Apply. Ждем…

После того, как менеджер разделов закончит работу, перезагрузите компьютер и загрузите с вашего USB. Выберите опцию «Live USB persistence».
После того как Kali загрузился вы должны увидеть на рабочем столе папку с флешки persistence.

Далее определите раздел вашей флешки

Теперь открываем терминал и пишем
mkdir -p /mnt/USB mount /dev/sda3 /mnt/USB echo "/ union" >> /mnt/USB/persistence.conf umount /dev/sda3 reboot


После рестарта если папка флешки persistence исчезла с рабочего стола то это значит что у вас всё получилось.
Вот и всё. Теперь при загрузке Kali если вы выберите Kali Live USB persistence то вы сможете сохранить все что угодно вам на флешке и после рестарта ничего не исчезнет.
Sergei webware
Sergei webware
Well-known member
- RED_RABBIT 07.11.2015 в 03:54
когда перезапускаю винду и выбираю флэшку вот что пишет
ISOLINUX 6.03 20150107 EHDD Copyright (c) 1994-2014 H. Peter Anvin et al
Failed to load ldlinux.c32
Boot failed: press a key to retry
Помогите что делать ??7 - PSYHOCODE 15.11.2015 в 05:34
Форматируйте флешку форматом FAT16
- PSYHOCODE 23.11.2015 в 04:13
значит что у вас всё получилось
- АНОНИМ 24.11.2015 в 16:58
что делать? - АНОНИМ 24.11.2015 в 17:53
ответ не требуется, оказалось что у меня флэшка просто старая была, попробовал по новее, все пошло нормально спасибо - АНОНИМ 24.11.2015 в 18:07
хотя остался вопрос 1 вот я на старую флешку сделал кали, и теперь показывает что у меня там 3 гб всего, а на самом деле 8 гб… как её теперь восстановить, удалить кали? (форматирование не помогает!) - АНОНИМ 24.11.2015 в 18:09
блин, извините пожалуйста я и удалил кали полностью с помощью этого же руфуса спасибо всем!
- PSYHOCODE 03.03.2016 в 20:54
исполизуйте раздел ext4
- SUPERVINNI 20.05.2016 в 21:12
Там не «1» а буква «L» , только маленькая.
- TUTU 30.09.2016 в 00:59
У меня такаяже ситуация.
1. Было два каталога Kali Linux и persistence, после прописания автомонтирования persistence ушла, а Kali Linux осталась, но в принципе проблем с ней нет. После перезагрузки все сохраняется.
2. Какие горячие клавиши на переключение раскладке языка. - TUTU 30.09.2016 в 01:01
3. нет звука
ОСТРИКОВ СЕРГЕЙ 17.10.2016 в 16:44
Я нашёл ошибку:
Неправильно:
[ Partition Label: persistance ]
Правильно:
[ Partition Label: persistence ]
После перезагрузки папка исчезла, я изменил настройки языка, чтобы всё отображалось на русском и перезагрузил чтобы принять настройки, в итоге не запускается система в общем.
Вот фото экрана на моменте когда она виснет и ничего более не происходит:
- ОСТРИКОВ СЕРГЕЙ 19.10.2016 в 01:56
Я разобрался в чём дело, всё работает отлично, это был косяк из за моей уверенности и отсутствия знаний, прошу прощения.
WEBWARE TEAM 24.08.2017 в 23:49
Не все имеют аккаунт в вк. Для удобства пользователей залейте картинку на общедоступный фотохостинг. ASTERICS 25.08.2017 в 11:58
