- Установка Kali Linux с графическим интерфейсом в подсистеме Windows 10.
- Привет, друзья! У меня есть отличная новость для любителей «поэкспериментировать» и не только..)
- Выглядеть это будет вот так:
- Что нужно сделать?
- Обновление ядра WSL2.
- Скачиваем Kali Linux в магазине Windows.
- Kali linux windows installer
- What You’ll Need
- Creating a Bootable Kali USB Drive on Windows (Etcher)
- Creating a Bootable Kali USB Drive on Windows (Rufus)
- Booting A USB Drive In Windows
- Kali on the Windows Subsystem for Linux
- Kali on … Windows? Really?
- Setting up the Environment
Установка Kali Linux с графическим интерфейсом в подсистеме Windows 10.
Привет, друзья! У меня есть отличная новость для любителей «поэкспериментировать» и не только..)
Как мы знаем (а, может, и нет) что после обновления Redstone (в далёком 2016г.) Майкрософт добавили возможность установки Linux в подсистеме Windows 10 . Установить популярные дистрибутивы можно непосредственно через магазин Windows Store . Но суть в том, что после установки Вы не увидите «привычный» Linux.. Взаимодействие с системой возможно только с помощью терминала. Т.е. в принципе, рядовому пользователю это нафиг не нужно.
Конечно, были и сейчас есть способы, придуманные энтузиастами, позволяющие «прицепить» к установленному дистрибутиву графическую оболочку.. Но, как показал личный опыт- это ещё те костыли..)
Так вот.. С обновлением 2004 появилась официальная возможность запустить Linux в подсистеме Windows 10 с графической оболочкой!
Выглядеть это будет вот так:
Что нужно сделать?
Первым делом нам нужно активировать подсистему Windows для Linux, потому- что по умолчанию она не включена. Для этого заходим в «Панель управления» 👉 «Программы и компоненты» 👉 «Включение или отключение компонентов Windows»:
Ищем в списке «Hyper-V» , ставим галочку:
И, здесь же находим компонент » Подсистема Windows для Linux «, ставим на нём галочку, жмём » ОК «, после чего обязательно перезагружаем компьютер :
Вторым шагом нам необходимо открыть » Windows PowerShell (Администратор) » который можно найти в списке, если кликнуть правой кнопкой мыши по пуску:
Копируем туда вот эту команду и жмём » Enter «:
. выходим из PowerShell.
Обновление ядра WSL2.
Далее, нам нужно скачать с официального сайта Майкрософт ядро Linux WSL2. Переходим по 👉 ЭТОЙ ссылке, и выбираем следующее:
Скачается *.msi установщик. Советую переместить скачанный установщик в корень любого диска на вашем компьютере. (Чтобы небыло кириллицы в пути). И уже оттуда просто запускаем его и устанавливаем:
После перезагрузки опять заходим в « Windows PowerShell (Администратор) « и выполняем следующую команду:
Скачиваем Kali Linux в магазине Windows.
После того, как Kali Linux установился, жмём «Запустить» и наблюдаем следующую картину:
В данном окне нам нужно задать имя пользователя, затем пароль и ещё раз пароль. При вводе пароля символы отображаться не будут ! Так и должно быть. Логин вводим в нижнем регистре:
Закрываем данное окошко и вновь возвращаемся в Windows PowerShell. Вводим данную команду:
и видим, что у нас установлен пакет kali-linux с wsl версией=2:
Отлично. Значит всё правильно. Если вдруг у Вас версия wsl=1, вводим следующую команду:
..после чего ждём, когда закончится конвертация wsl1 в wsl2.
После завершения всех манипуляций с командной строкой PowerShell нам необходимо запустить Kali Linux. (Ищем его в меню «Пуск»).
ПО ОЧЕРЕДИ выполняем следующие команды. И при запросе пароля вводим заданный ранее пароль. И, советую сначала ниже прочесть все примечания , а потом приступить к выполнению команд:
Примечание №1. Сочетание клавиш «Ctrl+V» для вставки в терминал НЕ РАБОТАЕТ. Чтобы вставить скопированную команду просто жмём на правую кнопку мышки.)
Примечание №3 . Как узнать, что команда полностью выполнилась? — Очень просто, ждём когда высветится зелёная строчка с именем пользователя. После этого можно приступать к следующей операции.
Примечание №4 . При запросе в терминале « Do you want to continue? [Y/n] «, пишем Y и жмём ENTER . ВАЖНО! Y — обязательно большая, иначе получим «Abort» .
Да да да, после выполнения последней команды (собственно, загрузка оболочки для нашей kali) высветилось вот такое окошко:
Kali linux windows installer
One of the fastest method, for getting up and running with Kali Linux is to run it “live” from a USB drive. This method has several advantages:
- It’s non-destructive — it makes no changes to the host system’s hard drive or installed OS, and to go back to normal operations, you simply remove the Kali Live USB drive and restart the system
- It’s portable — you can carry Kali Linux in your pocket and have it running in minutes on an available system
- It’s customizable — you can roll your own custom Kali Linux ISO image and put it onto a USB drive using the same procedures
- It’s potentially persistent — with a bit of extra effort, you can configure your Kali Linux “live” USB drive to have persistent storage, so the data you collect is saved across reboots
In order to do this, we first need to create a bootable USB drive which has been set up from an ISO image of Kali Linux.
The specifics of this procedure will vary depending on whether you’re doing it on a Linux, macOS/OS X, or Windows system.
What You’ll Need
- A verified copy of the appropriate ISO image of the latest Kali build image for the system you’ll be running it on.
- If you’re running under Windows, there is not one tool that is considered the overall best for imaging. We recommend Etcher(installer or portable) as it is simpler to use, however Rufus is another popular option with its advance options. If one does not work for you, consider the other.
- A USB drive, 8GB or larger (Systems with a direct SD card slot can use an SD card with similar capacity. The procedure is identical.)
During this procedure, you might see some warnings telling you that Kali Linux contains malware, trojan, virus or whatever. This message usually comes from Windows Defender or USB Defender, or a third-party antivirus. Those warnings are expected: Kali Linux is packed with pentesting tools that are likely to be flagged as malware. Just ignore the warnings.
Creating a Bootable Kali USB Drive on Windows (Etcher)
- Plug your USB drive into an available USB port on your Windows PC, note which drive designator (e.g. “ G:\ ”) it uses once it mounts, and launch Etcher.
- Click Flash from file, and locate the Kali Linux ISO file to be imaged with.
- Click Select target and choose the USB drive you want to make bootable.
- Click the Flash! button once ready.
Note: You may get a UAC prompt asking for administrator privileges that you will need to accept.

5. Once Etcher alerts you that the image has been flashed, you can safely remove the USB drive and proceed to boot into Kali with it.
At the time of writing, Etcher will use MBR. This is to allow for the most hardware compatibility.
Creating a Bootable Kali USB Drive on Windows (Rufus)
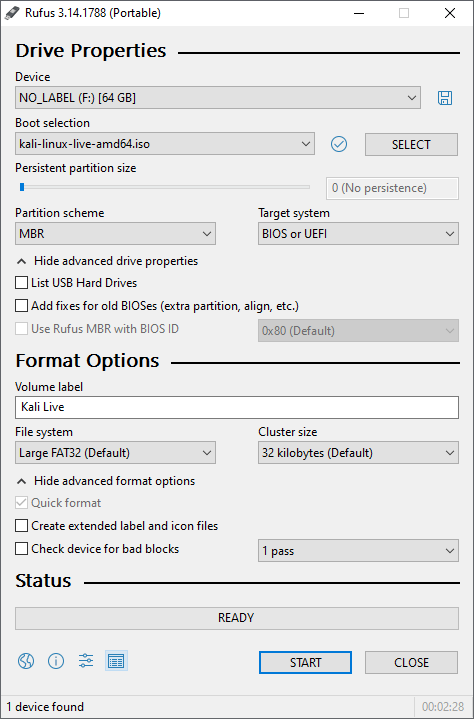
- Plug your USB drive into an available USB port on your Windows PC, note which drive designator (e.g. “ G:\ ”) it uses once it mounts, and launch Rufus.
- With Device, check the dropdown list of options for the USB drive (e.g. “ G:\ ” and size).
- Boot selection needs to point to point to the Kali Linux ISO file, which can be done by clicking the SELECT button
- Depending on your configuration, you can set the Partition scheme, as well as Target system. If you are not sure, leave it as the default values.
While you can easily create a persistent live usb with the integrated options in Rufus by increasing the persistence slider, this is not the officially supported method (check Adding Persistence to a Kali Linux Live USB Drive), as it doesn’t work for all images, like the Kali Everything Live ISO introduced in release 2022.1.
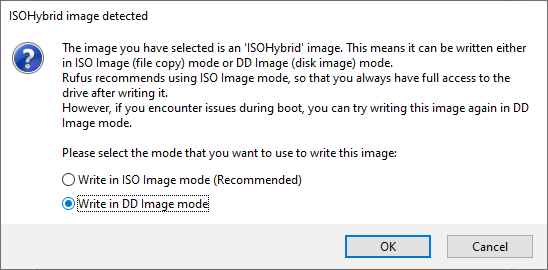
6. You may get a prompt saying about ISOHybird image. Selecting ISO image, will allow you to edit the files from the Kali Linux ISO, but at the potential lose of hardware compatibility. As a result, we recommend selecting DD Image.
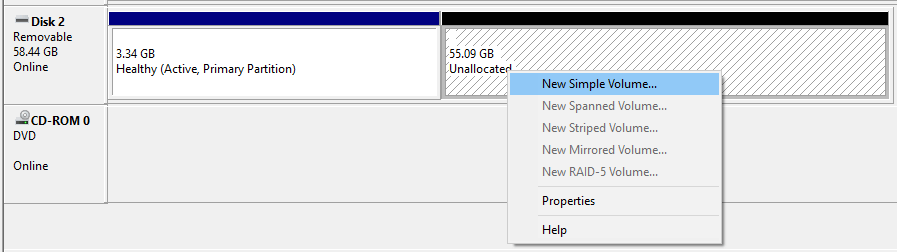
Note: If you select “DD Image” option, you can create another partition on the USB drive, allowing you to use the rest of the space. Start -> Run (Windows + R) -> diskmgmt.msc -> Locate the USB drive -> Right-click in “Unallocated” -> New Simple Volume -> Follow the rest of the wizard with next, next, next…
Booting A USB Drive In Windows
Depending on the system (such as BIOS or UEFI), as well as the version of Windows, and how they are each configured, you may need to re-image the USB drive.
- Master Boot Record (MBR) is often used on legacy systems that use BIOS as well as UEFI which has Compatibility Support Module (CSM) enabled
- GUID Partition Table (GPT) is required where UEFI has CSM disabled, forcing to use the modern standard
After writing the image to the USB drive, reboot Windows with the USB inserted. Depending on the motherboard manufacture, will also depend on the next stage. Some motherboard’s support a “temporary” boot menu, allowing for a one off selection. Others you need to enter BIOS/UEFI to configure it to try and boot from USB first. Entering either location, also depends on the motherboard. You can look up on the manufactures website and read the manual, try and read the screen when booting (however the text may be shown too quick or full logos used), or try common key combinations (such as ESC , F1 , F2 , F3 , F4 , F8 , F10 , F11 , F12 or DEL ).
Updated on: 2023-May-18
Author: g0tmi1k
Kali on the Windows Subsystem for Linux
Update : This post is outdated. For a better way of getting Kali Linux on Windows 10, install Kali Linux from the App store.
We’re always on the prowl for novel environments to run Kali on, and with the introduction of the Windows Subsystem for Linux (WSL) in Windows 10, new and exciting possibilities have surfaced. After all, if the WSL can support Ubuntu, it shouldn’t be too hard to incorporate another Debian-like distribution, right? This is especially true with the Windows Subsystem for Linux Distribution Switcher utility.
Kali on … Windows? Really?
While this setup of Kali on Windows is not optimal due to various environmental restrictions (such as the lack of raw sockets and lack of customised Kali kernel), there are still many situations where having Kali Linux alongside your Windows 10 machine can be beneficial. One example that comes to mind is consolidation of workspaces, especially if Windows is your main working environment. Other useful situations that crossed our minds were standardizing tools and scripts to run across multiple environments, quick porting of Linux penetration testing command line tools to Windows, etc. For example, below is a screenshot of running the Metasploit Framework from Kali Linux, over WSL.

Setting up the Environment
While the setup is described well over at the WSL Distribution Switcher README file, we’ve made a quick 4-minute video to walk you through the setup and installation process. For an easier copy / paste operation, these are the basic steps taken:
1. Update your Windows 10 machine. Open an administrative PowerShell window and install the Windows Subsystem with this one-liner. A reboot will be required once finished:
2. Once rebooted, open a command line shell and run the following commands to install the default Ubuntu environment. This will lay down the foundations for our Kali install:
3. Setup and install the WSL Switcher, download a Kali base, and extract it to disk:
4. Now that Kali is set up on your Windows 10 machine, you can interact with it by running the “bash” command:
5. At this point, you’re inside Kali and you can use it as you normally do–install packages, use tools, etc. We strongly recommend first running an update and upgrade:
Without further ado, here’s the video demonstration of the setup described above: