- Logitech Capture
- ALL-IN-ONE CONTENT CREATION
- RECORD FROM MULTIPLE SOURCES
- CREATE VERTICAL VIDEO FOR MOBILE VIEWING
- BROADCAST YOURSELF
- LIVE TEXT OVERLAYS
- STUDIO-STYLE CONTROLS
- CAMERA CUSTOMIZATION
- Камера logitech драйвера linux
- Logitech C920 Linux Driver Problem
- Install v4l-utils
- Change Settings using v4l-utils
- List controls for the Logitech C920
- There are two values we need to change to get the best performance from our webcam.
- Video Walkthrough
- Using a Logitech StreamCam on Linux
- Getting it to work in Linux
- List your devices (Optional)
- Guvcview
- Configuration
- Recording video
- Update: A note on guvcview and audio recording issues
- Install RPM Fusion that automatically stays up-to-date alongside future Fedora Silverblue releases
- Hardware-accelerated video playback in Fedora Silverblue 38
- Delayed starting of Docker service until expected mounts are available
Logitech Capture
Logitech Capture makes creating content with your webcam easy, fast, and intuitive.
ALL-IN-ONE CONTENT CREATION
Connect, record, and share. Start recording high-quality video content the second you connect your new webcam. Logitech Capture makes it easy to share your passion with the world.
RECORD FROM MULTIPLE SOURCES
Record from two webcams or a desktop or application window, and easily switch between six different scenes like picture-in-picture or side-by-side.
CREATE VERTICAL VIDEO FOR MOBILE VIEWING
Record in 9:16 vertical video for an optimized viewing experience on mobile phones and social media posts.
BROADCAST YOURSELF
Add Logitech Capture as a camera source to your favorite streaming platforms like YouTube, Facebook Live, or Twitch via Open Broadcaster Software (OBS) or XSplit.Windows only
LIVE TEXT OVERLAYS
Personalize your video content with live text overlays. Choose from a variety of font styles, colors, and backgrounds to easily customize your screen name and messages to your fans.
STUDIO-STYLE CONTROLS
Quickly apply filters, transitions, and borders to personalize your content, and use powerful controls like Chroma Key to remove your background for even more polish. Choose to work in Light or Dark mode to match the lighting in your creative space.
CAMERA CUSTOMIZATION
Select your field of view, aspect ratio, and recording resolution. Additional options allow you to adjust white-balance, auto-focus, and frames-per-second settings.
Create a Logitech ID to save all of your Logitech Capture settings in a profile. Save up to six profiles to conveniently switch between sessions.
Камера logitech драйвера linux
With my webcam, I was having major issues and tried looking for a Logitech C920 Linux Driver, as I have a Logitech C920 Webcam that is very laggy in Linux, but in Windows, I don’t have any issues. I found out that the autofocus and exposure were causing a ton of issues. After following this guide, you will be able to fix this issue.
Logitech C920 Linux Driver Problem
So there isn’t a Logitech program to control and optimize your Logitech camera in Linux, like the Windows counterpart. However, there is a command line program that will allow you to change ANY setting on the Logitech camera. This is, in my opinion, way better than the Windows clunky Logitech Application. So let’s get our program to do just that and fix these horrible default settings.
Install v4l-utils
Ubuntu/Debian:
sudo apt-get install v4l-utils
Fedora/Centos:
sudo yum install v4l-utils
Change Settings using v4l-utils
Find your C920 Webcam or other webcams you need to switch the default settings on.

List controls for the Logitech C920
v4l2-ctl -d /dev/video6 —list-ctrls
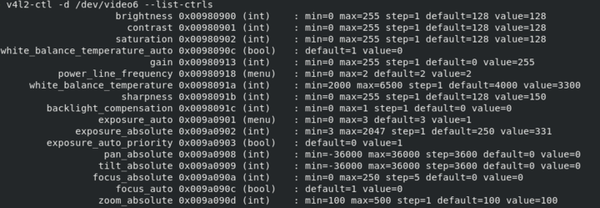
There are two values we need to change to get the best performance from our webcam.
Here is the command syntax:
v4l2-ctl -d /dev/video6 —set-ctrl=exposure_auto=1
v4l2-ctl -d /dev/video6 —set-ctrl=focus_auto=0
Video Walkthrough

Now that you know about the Logitech C920 Linux Driver support and how it functions, you can fix it. I hope this helps you as it took me quite a while to hunt down this information.
Using a Logitech StreamCam on Linux

Last week I finally purchased a webcam for online meetings, something I had been holding off on for quite some time. I was using a 12″ MacBook for these up until now, but I wanted to get a webcam for my main computer as I sometimes need to look over or go through a project while in a meeting, and that’s easier to do on my main macine. For a quick family call this certainly makes it easier, too.
One model that is highly recommended is the Logitech C922 – the successor to the still wildly popular C920. Coming from a Mac webcam, even a potato would be considered an upgrade in terms of image quality, but when looking at reviews and comparisons on YouTube, I couldn’t help but notice the picture quality was decidedly fuzzy.
Since webcams are not necessarily cheap, I had a hard time convincing myself to get it. This is actually the primary reason it took me so long to purchase one in the first place. But, I have to find a solution for this sooner or later, so let’s just get it over with now, I thought.
The Logitech StreamCam is, as the name implies, targeted somewhat more towards the YouTube and Twitch gamers. For what reason I am not entirely sure, as it does not necessarily seem like a great choice for that market. It actually looks like a better all-round choice, or perhaps just for anyone who prefers to have a slightly sharper and higher framerate capture (bandwidth permiting, of course) and spends some time in front of a webcam throughout the year, whatever their purpose may be.
And so, I chose to get the Logitech StreamCam. Not because I’m planning on doing any streaming, but simply because it offers a sharper looking image in most lighting conditions, and supports 1080p at 60 frames per second, if so desired. Perhaps this is overkill now, but as I am not someone who enjoys upgrading hardware often, I like to think that this camera is future proof.
There are two colors available: white and «graphite,» the latter of which is basically the black-equivalent version. Included with the StreamCam are two mounts; one is your typical camera mount designed to be placed on top of your LCD display, and the other has a standard tripod screw mount, which is super handy and the one I ended up using alongside an off-brand GoPro bar mount, attached to my monitor arm.
The camera is hard-wired with an 1.5 meter long USB-C 3.1 cable, which depending on your setup might be a bit short. Fortunately it seems to work fine with a 1 meter USB-C extension cable I purchased separately. No USB-C to USB-A adapter is included in the box by default, although this is something the store I purchased it from did include.

Getting it to work in Linux
Fortunately Logitech webcam support is pretty good under Linux, with video4linux (or v4l2) providing support. What follows is a quick step-by-step guide on how to get the StreamCam to work at full 1080p, 60fps quality, although you can use this same guide for other Logitech cameras too, as the steps should be identical.
List your devices (Optional)
To see if your computer recognizes the webcam you can use the v4l2-ctl tool, which is provided by the v4l-utils package. It is not necessary to install this package, you only need it if you want to use some of the helper tools it provides.
Ubuntu / Debian
❯ sudo apt install v4l-utilsManjaro / Arch
After this you can run the following command to get a list of recognized devices. Your result should look something like this – along with any other recognized device you may have plugged in:
❯ v4l2-ctl --list-devices Logitech StreamCam (usb-0000:09:00.1-2): /dev/video0 /dev/video1 /dev/media0Guvcview
The main utility we’ll be using here is called Guvcview, and is available directly from the Ubuntu universe and Manjaro community repositories. This utility will allow us to preview the webcam, alter many of its settings, and even do things like make photos or record video – though the latter comes with a few caveats. More on that in a bit.
Ubuntu / Debian
❯ sudo apt install guvcviewManjaro / Arch
Configuration
When you first launch guvcview you should be greeted with your camera’s view, it’s working! However, things probably don’t look quite right. You’ll probably get an abysmal framerate, too. Let’s fix that. Whenever you make a change, you should immediately see the difference in the camera view. The window title of the camera view will tell you what the current framerate is, so keep an eye on that too.

The main window of Guvcview is made up of three tabs, let’s walk through them in order:

Image Controls
- Disable Exposure, Auto Priority, if it’s not already.
- Disable Auto Focus (continuous), if it’s not already.
Video Controls
- Change Frame Rate to 60/1 fps (or 30/1 fps if you prefer).
- Change Resolution to 1920×1080 (or 1280×720 if you prefer 720p)
If these changes did not immediately fix the framerate, try doing the following under Image Controls:
Sometimes the camera seems to need a nudge in the right direction, and this might help it. After this your framerate should jump up to whatever option you chose, and you should be able to change Exposure, Auto back to Aperture Priority Mode. Alternatively you can leave it at whatever specific setting you want, of course.

These are just the default settings needed to get the StreamCam to show up at its full resolution and framerate. From here you can tweak its white balance, exposure, etc. if you like, although I must admit I have done none of those things. I did use the mirror filter to match what I see on-camera with what I expect to see, which is a bit more convenient for me.
Take a look at all the available settings and see what you like. Fortunately Guvcview supports saving and loading of profiles, so once you have made your basic configuration, simply use the Save profile option under Settings, and store this somewhere convenient. That way you can always go back to your defaults, or even switch between different settings depending on specific situations, for example.
Recording video
Guvcview allows you to snap a photo and record a video directly, too, which can be handy in certain situations. What you may find though is that by default as soon as you hit Cap. Video, the framerate tanks.
This seems to be a limitation with this application, but a solution I found was to change the Video codec from the Video menu to MJPG — compressed. Raw camera input works fine, too. This seems to avoid the issue, although the resulting video file will become quite large, quite fast, so keep that in mind. If you’re planning on recording videos more frequently, it would probably make sense to use something like OBS instead, just make sure you check the aperture-related settings if your framerate seems low.
Most settings you specify in Guvcview should be preserved by other applications that use the camera, unless they apply their own settings or defaults. So once you have configured things the way you like in Guvcview, your next Zoom/Skype/Google Hangouts call should look quite alright.

Update: A note on guvcview and audio recording issues
It appears that guvcview has trouble recording audio these days, likely related to pipewire, which is the new default used on several more up-to-date systems. Guvcview still correctly shows microphone activity while recording, but no audio is actually being recorded.
If you have run into this issue, know that this is not an issue with the StreamCam. I’ve unfortunately so far not found any way to fix this, other than to use a different tool. The webcam tool called «Cheese» would be a nice alternative if it wasn’t for its very poor picture quality defaults that seemingly can’t be changed. I’ve been using OBS to record videos, which feels like overkill, but at least it works.
I wasn’t able to find much information about the StreamCam under Linux, so if you are in a similar boat as I was and found this article whilst doing your research, rest assured that the StreamCam works just fine under Linux, including full [email protected].
Install RPM Fusion that automatically stays up-to-date alongside future Fedora Silverblue releases
I’d like to show a slightly Inception looking way you can install RPM Fusion in a way that you don’t have to worry about needing to remove-and-reinstall it with every Fedora update. The issue lies with the «normal» method of installing RPM Fusion being specific to the currently installed version

Hardware-accelerated video playback in Fedora Silverblue 38
More recently, Fedora removed support for hardware-accelerated playback of H.264 and H.265 content. This was done due to the need to avoid licensing complications (and costs) that surround these codecs. While understandable, this is less desirable to those using Fedora and wanting smooth video playback, especially on more

Delayed starting of Docker service until expected mounts are available
(Or for any other systemctl controlled service, for that matter) If you’ve ever run into the situation where you reboot your computer (or virtual machine) and the Docker service kicked in a bit too fast, even before some of your fstab defined mounts are fully available, you might’ve noticed that